價格低廉的433MHz傳輸和接收模組
阿新 • • 發佈:2019-01-11
我所知道的無線通訊裝置分為這麼幾種型別:
1.藍芽傳送資料
2.wifi傳送資料
3.nRF24L01模組傳送資料
4.433MHZ模組(單向通訊)
今天我介紹一下433MHZ模組在兩塊arduino uno開發板上實現通訊
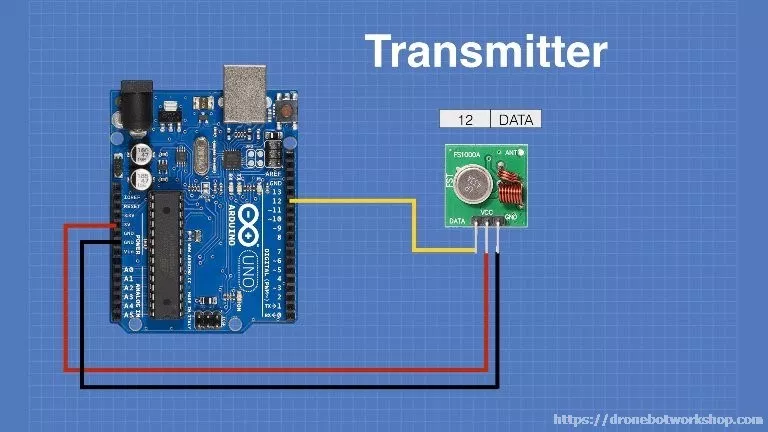
發射器:連線示意圖如下

模組有三個連線:
VCC:可以是3-12V的直流電壓(電壓要和接送器匹配,5V-5V或者其他anyway)
GND:連線板子上的GND
DATA OUT:連線板子的PIN 12
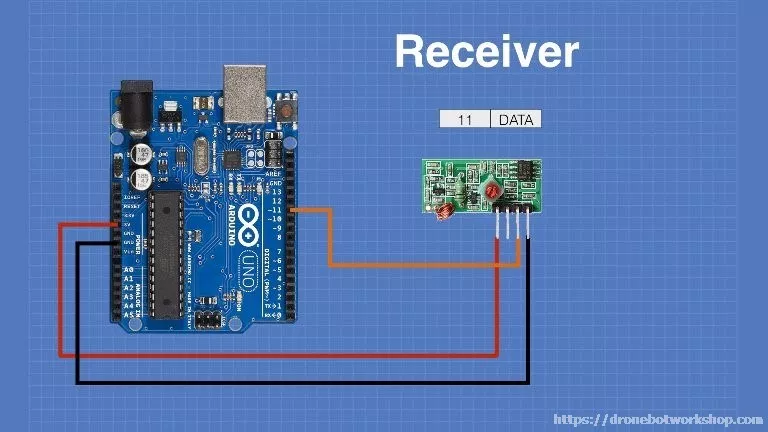
接收器:示意連線如下圖

模組有三個連線:
VCC:可以是3-12V的直流電壓(電壓要和接送器匹配,5V-5V或者其他anyway)
GND:連線板子上的GND
DATA OUT:連線板子的PIN 11
下面是程式碼區域:
發射器程式碼
/* 433 MHz RF Module Transmitter Demonstration 1 RF-Xmit-Demo-1.ino Demonstrates 433 MHz RF Transmitter Module Use with Receiver Demonstration 1 DroneBot Workshop 2018 https://dronebotworkshop.com */ // Include RadioHead Amplitude Shift Keying Library#include <RH_ASK.h> // Include dependant SPI Library #include <SPI.h> // Create Amplitude Shift Keying Object RH_ASK rf_driver; void setup() { // Initialize ASK Object rf_driver.init(); } void loop() { const char *msg = "Welcome to the Workshop!"; rf_driver.send((uint8_t*)msg, strlen(msg)); rf_driver.waitPacketSent(); delay(1000); }
接收器程式碼
/*
  433 MHz RF Module Receiver Demonstration 1
  RF-Rcv-Demo-1.ino
  Demonstrates 433 MHz RF Receiver Module
  Use with Transmitter Demonstration 1

  DroneBot Workshop 2018
  https://dronebotworkshop.com
*/

// Include RadioHead Amplitude Shift Keying Library
#include <RH_ASK.h>
// Include dependant SPI Library
#include <SPI.h>

// Create Amplitude Shift Keying Object
RH_ASK rf_driver;

void setup()
{
    // Initialize ASK Object
    rf_driver.init();
    // Setup Serial Monitor
    Serial.begin(9600);
}

void loop()
{
    // Set buffer to size of expected message
    uint8_t buf[24];
    uint8_t buflen = sizeof(buf);
    // Check if received packet is correct size
    if (rf_driver.recv(buf, &buflen))
    {

      // Message received with valid checksum
      Serial.print("Message Received: ");
      Serial.println((char*)buf);
    }
}
arduino庫如下:
連結:https://pan.baidu.com/s/1_jWYNHKuXuSTUG3Br0XaBQ
提取碼:7hm6
庫檔案匯入步驟:
現在開啟你的Arduino IDE。轉到專案下拉選單,然後開啟載入庫子選單。選擇新增ZIP庫
將開啟一個對話方塊,允許您導航到放置RadioHead ZIP檔案的位置。找到該檔案並選擇它。
該庫將安裝到您的Arduino IDE中。執行此操作後,您可能需要重新啟動IDE。
現在,RadioHead已成為Arduino IDE的一部分,您已準備好進行編碼。
