
Android APP 更新模組
應用更新有兩種:
1、 檢測到更新,App實現下載功能,下載安裝。
2、檢查到更新,跳轉應用市場下載。兩種方法優缺點:
第一種:- 優點:是,下載同意,便於版本同意升級,只要使用者點選更新,可以保證其實官方最新的包。
- 缺點:實現起來稍微優點麻煩,如果寫不好,下載的包可能無法解析,有些機型導致下載了無法安裝的問題。
第二種:
- 優點:實現簡單,幾乎不用寫幾行程式碼。
- 缺點:每個手機安裝的應用市場不同,不同應用市場的稽核速度不一樣,導致使用者用的版本參差不齊,提示更新後,使用者去應用市場下載安裝,發現還提示更新,是因為應用市場上不是最新包。
下面先給出第二種實習方法,再給第一種方法(實踐後結論下載穩定)
//檢查到需要更新,呼叫
 ToolUtil.gotoMarket(mActivity, mActivity.getPackageName());
/**
* 開啟市場
*/
public static void gotoMarket(Context context, String pck) {
if (!isHaveMarket(context)) {
Toast.makeText(context, "您手機中沒有安裝應用市場!", Toast.LENGTH_SHORT).show();
return /**
* 是否安裝市場
*/ 第二種到此就完了。可以驗證下,前題是,你的app要在應用商場上線。沒有上線的話,是找不到對應的APP的。
那麼下來重點說下第一種:
先看效果圖:
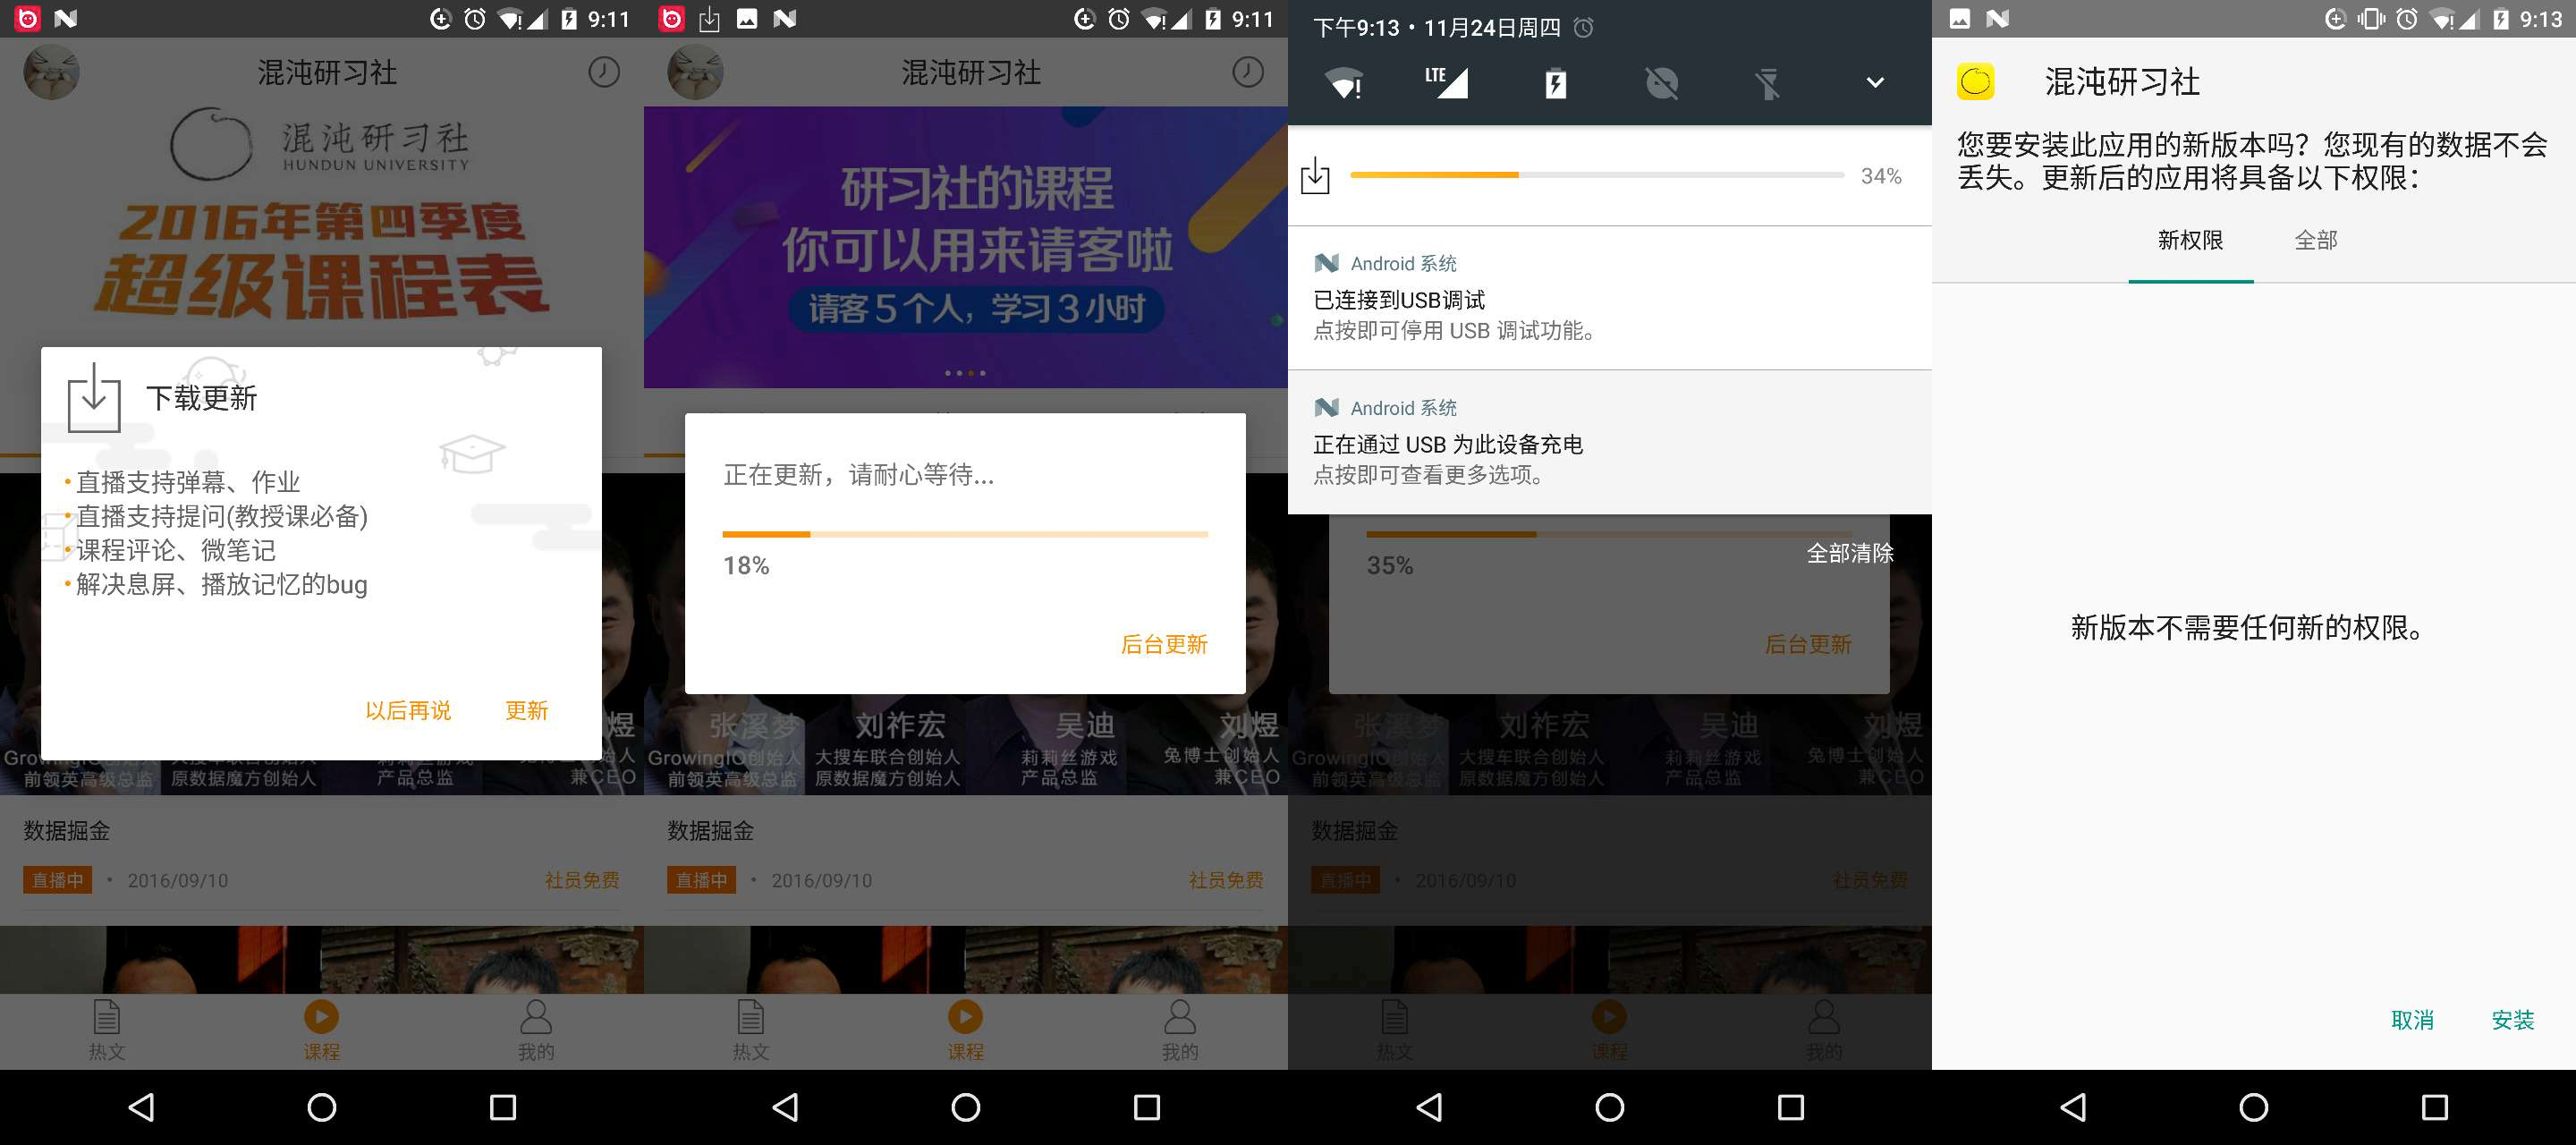
這裡先說,途中的dialog,用的是github上 material-dialogs 。(這了忽略對話方塊的程式碼)
從左到右,檢查更新–>是否需要下載–>點選下載–>狀態列和對話方塊同時走下載進度條–>最後下載成功。
- 提出下載的主要程式碼。
// 啟動Service 開始下載
AppUpdateService.startUpdate(mContext, url, fileName, new AppUpdateService.OnProgressListener() {
            @Override
            public void onProgress(int progress) {
                //更新對話方塊進度條
                mDialog.setProgress(progress);
            }

            @Override
            public void onSuccess(boolean isSuccess) {
                mDialog.dismiss();
                //失敗提示
                if (!isSuccess) {
                    ToastTools.toastLong("更新不成功");
                }
            }
        });
這裡用到的InternetService類,IntentService是Service的子類,
IntentService實現了work非阻塞執行緒,適合做耗時操作,可以自行Google or 百度 他們的區別和用法。
package com.hundun.yanxishe.service;

import android.app.IntentService;
import android.app.Notification;
import android.app.NotificationManager;
import android.app.PendingIntent;
import android.content.Context;
import android.content.Intent;
import android.net.Uri;
import android.widget.RemoteViews;

import com.hundun.yanxishe.R;
import com.hundun.yanxishe.tools.LogTool;

import java.io.File;
import java.io.FileOutputStream;
import java.io.InputStream;
import java.net.HttpURLConnection;
import java.net.URL;

/**
 * An {@link IntentService} subclass for handling asynchronous task requests in
 * a service on a separate handler thread.
 * <p>
 * helper methods.
 */
public class AppUpdateService extends IntentService {
    private static final String ACTION_UPDATE = "com.hundun.yanxishe.service.action.update";
    private static final String EXTRA_URL = "com.hundun.yanxishe.service.extra.url";
    private static final String EXTRA_FILE_NAME = "com.hundun.yanxishe.service.extra.file.name";
    private boolean isRunning = false;
    private NotificationManager updateNotificationManager;
    private Notification updateNotification;
    private PendingIntent updatePendingIntent;
    private static OnProgressListener mProgressListener;

    public interface OnProgressListener {
        void onProgress(int progress);

        void onSuccess(boolean isSuccess);
    }

    public AppUpdateService() {
        super("AppUpdateService");
    }


    @Override
    protected void onHandleIntent(Intent intent) {
        if (intent != null) {
            final String action = intent.getAction();
            if (ACTION_UPDATE.equals(action)) {
                final String param1 = intent.getStringExtra(EXTRA_URL);
                final String param2 = intent.getStringExtra(EXTRA_FILE_NAME);
                startDownloade(param1, param2);
            }
        }
    }

    @Override
    public void onDestroy() {
        mProgressListener = null;
        super.onDestroy();
    }

    /**
     * Starts this service to perform action Baz with the given parameters. If
     * the service is already performing a task this action will be queued.
     *
     * @see IntentService
     */
    public static void startUpdate(Context context, String param1, String param2, OnProgressListener pregressListener) {
        mProgressListener = pregressListener;
        Intent intent = new Intent(context, AppUpdateService.class);
        intent.setAction(ACTION_UPDATE);
        intent.putExtra(EXTRA_URL, param1);
        intent.putExtra(EXTRA_FILE_NAME, param2);
        context.startService(intent);
    }

    private void startDownloade(String url, String fileName) {
        LogTool.debug("開始升級----" + url + "---" + fileName);
        if (isRunning) {
            return;
        }
        isRunning = true;
        initRemoteView();

        try {
            boolean isSuccess = downloadUpdateFile(url, fileName);
            if (mProgressListener != null) {
                mProgressListener.onSuccess(isSuccess);
            }
            if (isSuccess) {
                Uri uri = Uri.fromFile(new File(fileName));
                Intent installIntent = new Intent(Intent.ACTION_VIEW);
                installIntent.addFlags(Intent.FLAG_ACTIVITY_NEW_TASK);
                installIntent.setDataAndType(uri, "application/vnd.android.package-archive");
                startActivity(installIntent);
                try {
                    updateNotificationManager.cancel(0);
                } catch (Exception ex) {
                    LogTool.error(ex.getMessage(), ex);
                }
            } else {
                Notification notification = new Notification.Builder(AppUpdateService.this)
                        .setContentTitle(getString(R.string.app_name))
                        .setContentText("下載失敗")
                        .setSmallIcon(R.drawable.download)
                        .build();
                updateNotificationManager.notify(0, notification);
            }


        } catch (Exception e) {
            e.printStackTrace();
        }

    }

    /**
     * 初始化狀態列進度條
     */
    private void initRemoteView() {
        try {
            updateNotificationManager = (NotificationManager) getSystemService(Context.NOTIFICATION_SERVICE);
            //狀態列提醒內容
            updateNotification = new Notification.Builder(this)
                    .setTicker("版本更新下載")
                    .setWhen(System.currentTimeMillis())
                    .setSmallIcon(R.drawable.download).build();
            updatePendingIntent = PendingIntent.getActivity(this, 0, new Intent(this, RemoteViews.class), 0);
            updateNotification.contentIntent = updatePendingIntent;
            //狀態列提醒內容
            updateNotification.contentView = new RemoteViews(getApplication().getPackageName(), R.layout.progress);
            updateNotification.contentView.setProgressBar(R.id.progressBar1, 100, 0, false);
            updateNotification.contentView.setTextViewText(R.id.textView1, "0%");
            // 發出通知
            updateNotificationManager.notify(0, updateNotification);
        } catch (Exception e) {
            e.printStackTrace();
        }
    }

    /**
     * 下載檔案
     *
     * @param downloadUrl
     * @param filepath
     * @return
     * @throws Exception
     */
    private boolean downloadUpdateFile(String downloadUrl, String filepath) {
        try {
            int downloadCount = 0;
            int currentSize = 0;
            long totalSize = 0;
            int updateTotalSize = 0;
            boolean result = false;
            HttpURLConnection httpConnection = null;
            InputStream is = null;
            FileOutputStream fos = null;
            File temp = new File(filepath + ".tmp");
            if (temp.getParentFile().isDirectory()) {
                temp.getParentFile().mkdirs();
            }
            try {
                URL url = new URL(downloadUrl);
                httpConnection = (HttpURLConnection) url.openConnection();
                httpConnection.setRequestProperty("User-Agent", "PacificHttpClient");
                if (currentSize > 0) {
                    httpConnection.setRequestProperty("RANGE", "bytes=" + currentSize + "-");
                }
                httpConnection.setConnectTimeout(20000);
                httpConnection.setReadTimeout(120000);
                updateTotalSize = httpConnection.getContentLength();
                if (httpConnection.getResponseCode() == 404) {
                    throw new Exception("fail!");
                }
                is = httpConnection.getInputStream();
                fos = new FileOutputStream(temp, false);
                byte buffer[] = new byte[4096];
                int readsize = 0;
                while ((readsize = is.read(buffer)) > 0) {
                    fos.write(buffer, 0, readsize);
                    totalSize += readsize; // 為了防止頻繁的通知導致應用吃緊,百分比增加10才通知一次
                    if ((downloadCount == 0) || (int) (totalSize * 100 / updateTotalSize) - 1 > downloadCount) {
                        downloadCount += 1;
                        try {
                            updateNotification.contentView.setProgressBar(R.id.progressBar1, 100, (int) totalSize * 100 / updateTotalSize,
                                    false);
                            updateNotification.contentView.setTextViewText(R.id.textView1, (int) totalSize * 100 / updateTotalSize + "%");
                            updateNotification.contentIntent = updatePendingIntent;
                            updateNotificationManager.notify(0, updateNotification);
                            if (mProgressListener != null) {
                                mProgressListener.onProgress((int) totalSize * 100 / updateTotalSize);
                                System.out.println("AppUpdateService.downloadUpdateFile"+(int) totalSize * 100 / updateTotalSize);
                            }
                        } catch (Exception ex) {
                            LogTool.error(ex.getMessage(), ex);
                        }
                    }
                }
                temp.renameTo(new File(filepath));
                temp.delete();
            } finally {
                if (httpConnection != null) {
                    httpConnection.disconnect();
                }
                if (is != null) {
                    is.close();
                }
                if (fos != null) {
                    fos.close();
                }
                result = updateTotalSize > 0 && updateTotalSize == totalSize;
                if (!result) { //下載失敗或者為下載完成
                    new File(filepath).delete();
                }
            }
            return result;
        } catch (Exception e) {
            e.printStackTrace();
            return false;
        }
    }
}
貼出狀態列的佈局檔案:
<?xml version="1.0" encoding="utf-8"?>
<LinearLayout xmlns:android="http://schemas.android.com/apk/res/android"
              android:layout_width="fill_parent"
              android:layout_height="fill_parent"
              android:gravity="center_vertical"
              android:orientation="horizontal"
    >

    <ImageView
        android:id="@+id/imageView1"
        android:layout_width="30dp"
        android:layout_height="30dp"
        android:paddingLeft="5dp"
        android:scaleType="centerInside"
        android:src="@drawable/download"
        />


    <ProgressBar
        android:id="@+id/progressBar1"
        style="?android:attr/progressBarStyleHorizontal"
        android:layout_width="0dp"
        android:layout_height="4dp"
        android:layout_marginLeft="10dp"
        android:layout_marginRight="5dp"
        android:layout_weight="1"
        android:progressDrawable="@drawable/progressbar_style"
        />


    <TextView
        android:id="@+id/textView1"
        android:layout_width="40dp"
        android:layout_height="wrap_content"
        android:layout_marginLeft="5dp"
        android:layout_marginRight="5dp"
        android:text="100%"
        android:textColor="#888888"
        android:textSize="14sp"/>

</LinearLayout>
這裡貼程式碼比較多,沒什麼講解,但是如果你對照著每行程式碼寫下來,應該不需要我講解就會明白了。
核心程式碼已經全部給出,如有疑問,可以“簡書”找 “小追兵”留言。
注意:
狀態列的圖片setSmallIcon(R.drawable.download),這裡的圖片不要太大(我的64*64 px),還有注意放在drawable資料夾下,否則可能會包異常。改了,如果還報異常,clean專案應該就好了。
檔案從網路下載,寫流的部分,不是我寫,搬磚搬來的。
相關推薦
Android APP 更新模組
應用更新有兩種: 1、 檢測到更新,App實現下載功能,下載安裝。 2、檢查到更新,跳轉應用市場下載。 兩種方法優缺點: 第一種: 優點:是,下載同意,便於版本同意升級,只要使用者點選更新,可以保證其實官方最新的包。 缺點:實現起來稍微優點麻煩,如果寫
android app 更新下載安裝 適配android 7.0
public class UpdataService extends Service { public UpdataService() { } /** * 安卓系統下載類 **/ private DownloadManager manager; /
android App更新7.0許可權
public void InstallApk(){ String filePath = getExternalFilesDir("Download").getAbsolutePath() + File.separator+"軟體名稱"+mVersion+".apk"; Intent inst
Android應用-更新模組的實現
一個完整的app應用都會包含一個更新的功能模組,通過網上查詢相關資料,今天我來簡單說明一下更新模組的實現步驟 一、版本的確認 app要更新一般都是有新版本才要更新,所以首先要確認伺服器端的版本是否比當前客戶端的版本高,如果高就進行後續操作,否則就沒有必要
Android app更新功能
最近公司客戶端做了升級功能,感覺學到了不少東西,因此做下記錄,以備後續檢視。 檢查版本更新可以放在splash頁面,也可以放在主頁面。 上圖是更新app的思維導圖,畫的不是很好,大家能看懂就好哈。 我在網上找了一個更加清楚的流程圖,大家可以看下這個,說的更詳細。 檢查更新的步驟大體分
Android APP更新下載工具類——簡單封裝DownloadManager
幾乎所有APP都包含了檢查更新功能,更新下載功能的實現方式常用的有兩種:1、使用App網路框架的檔案下載請求;2、使用自帶的DownloadManager類;本文介紹第二種,簡單封裝一下DownloadManager進行下載更新。重要宣告:本文嚴格意義上來說並非原創,參考了
Android APP更新下載,實現Notification通知欄進度通知,下載完成後點選安裝
簡單做一個APP檢測更新的小工具,有點粗糙。不能斷點續傳,只用為個人覺得沒有必要,自己可根據大家的想法新增更多的功能,這裡只是為了想我一樣的初學者和比較簡約的人所提供。 效果如下: 基本思路先理一理,以我的實際開發為例:首先當然要一個網路去請求我們的
Android App內檢測更新新版本APK
調用 led com nta contex context smis 手動 方法 Rayland主板雖然作為一塊基於Android的工控板,但是很多設備廠商並不想讓用戶看到Android系統信息。所以APK默認設置為開機啟動項、img去除了Android頭部和底部菜單。但是
安卓自定義漂亮的對話方塊及其更新APP功能模組
首先我們來看一下整個專案執行的效果圖 上圖是整個更新模組,當然做了很多處理,這裡沒有一一展示,有流量提醒,是否存在安裝包避免重複下載等 今天我先分享一下自定義對話方塊,其他功能處理等下次更新 看下今天分享的效果圖 就是這個一個自定義對話方塊,用安卓原生的對話方塊,著實簡單不美
Android Studio更新導致Program type already present:的問題以及如下描述。R檔案丟失問題 Error:Execution failed for task ':app:processDebugManifest'
All com.android.support libraries must use the exact same version specification (mixing versions can lead to runtime crashes). Found versions 27.1.1,
android app版本更新
1.首先整理一下思路 →在tomcat的目錄中存放一個apk檔案 →android客戶端傳送請求驗證版本是否為最新版本 →如果不是最新版本(看業務需求是直接強制更新,還是提示使用者自助更新) →啟動google官方提供的DownloadManager給與引數啟動下載並安裝(封裝了工具
Android app 線上更新那點事兒(適配Android6.0、7.0、8.0)
一、前言 app線上更新是一個比較常見需求,新版本釋出時,使用者進入我們的app,就會彈出更新提示框,第一時間更新新版本app。線上更新分為以下幾個步驟: 1, 通過介面獲取線上版本號,versionCode 2, 比較線上的versionCode 和本地的versi
Android(3)—Mono For Android App版本自動更新(2)
0.前言 這篇博文是上一篇的延續,主要是修改上一個版中的BUG和優化一些待完善的項,也算是結貼,當然還有需要完善的,等日後專案中用到的時候再單獨寫出來吧,本篇主要寫升級改進的部分; 改進1.修復【BUG-從通知欄進入更新介面後,然後按返回鍵-接著再從通知欄進入更新介面,更新介面的資料就完全
Android(2)—Mono For Android App版本自動更新
0.前言 公司Android查詢的專案已經開始,整體採用Java後臺+App前臺來實現,由於專案小,App這塊就我一個人開發,首先需要研究的是:Android版本的更新升級問題;本人經過近一週的學習整理, 終於有了個Demo,開發環境:VS2012+Mono4.8.00013破解版 測試手機:三
Android App熱更新中的外掛化(ClassLoader、DexLoader)(1)
PathClassLoader在熱更新的作用? Android ClassLoader流程解讀並簡單方式實現熱更新- https://www.jianshu.com/p/2f4939320eb1 > Android 動態升級 1.Android 外掛化 —— 指將
Android App內部自動更新Library的使用
AutoUpdateProject 最新版本已經到1.1.4 1.0版本 版本更新library,提供兩種模式的版本更新,一種是對話方塊顯示下載進度,一種是通知欄顯示後臺默默下載形式。 特點概述 一、:可從後臺主動控制本地app強制更新,主要適
Android App 版本更新實現
今天終於進行了一次在我來看真正的面試,終於能和工程師進行一次交流了,雖然聊了沒幾分鐘,但讓我足夠讓我知道自己是多無知的了。 嘚嘚嘚說正事吧:這兩天注意到了App更新的步驟,然後就打算做一下。 一般版本更新都是通過一個遠端的通知進行通知使用者進行版本更新,然後就順著這裡開頭
Android App的版本升級(迭代/更新)
為了修復bug和拓展功能,app是需要不斷升級和維護的。推薦一個我寫的app更新庫——VersionUpdater,該庫將版本升級的通用程式碼封裝起來,並將其和版本更新時的UI提示剝離開來,使用者只需處理自己的UI提示即可。郭大俠粉絲之眾,令在下敬仰。其中不乏學生黨。因此,先
android app應用內更新
1.表現形式:下載完成後會自動彈出安裝介面。已適配7.0. 2.github 地址 https://github.com/hunanqi/HNQApkInstall 3.使用方式: (1)在專案的的gradle檔案中加上: maven { url 'https:
Android-App增量更新的使用姿勢
簡述 增量更新,根據字面理解,就是下載增加的那部分來達到更新的目的,實際就是這個意思。 原理 用一箇舊的Apk安裝與一個新的Apk安裝包使用 bsdiff工具 ,執行命令生成一個差異檔案,此差異檔案就是我們修改需要更新下載的那部分。