Activiti 流程啟動及節點流轉原始碼分析
本文主要是以activiti-study中的xiaomage.xml流程圖為例進行跟蹤分析
具體的流程圖如下:
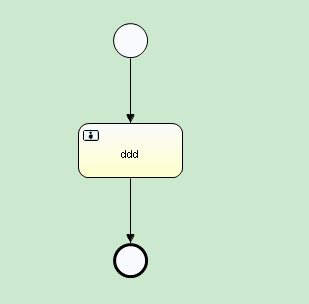
流程圖對應的XML檔案如下:
<?xml version="1.0" encoding="UTF-8"?>
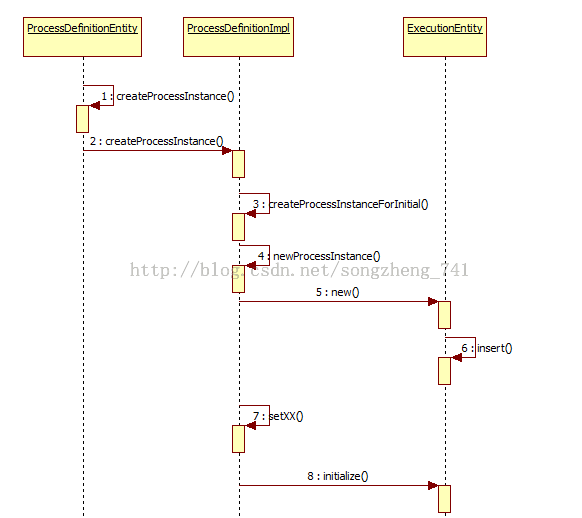
<definitions xmlns="http://www.omg.org/spec/BPMN/20100524/MODEL" xmlns:xsi="http://www.w3.org/2001/XMLSchema-instance" xmlns:activiti="http://activiti.org/bpmn" xmlns:bpmndi="http://www.omg.org/spec/BPMN/20100524/DI" 流程例項建立過程如下(下圖轉載自:activiti 原始碼筆記之startProcess):
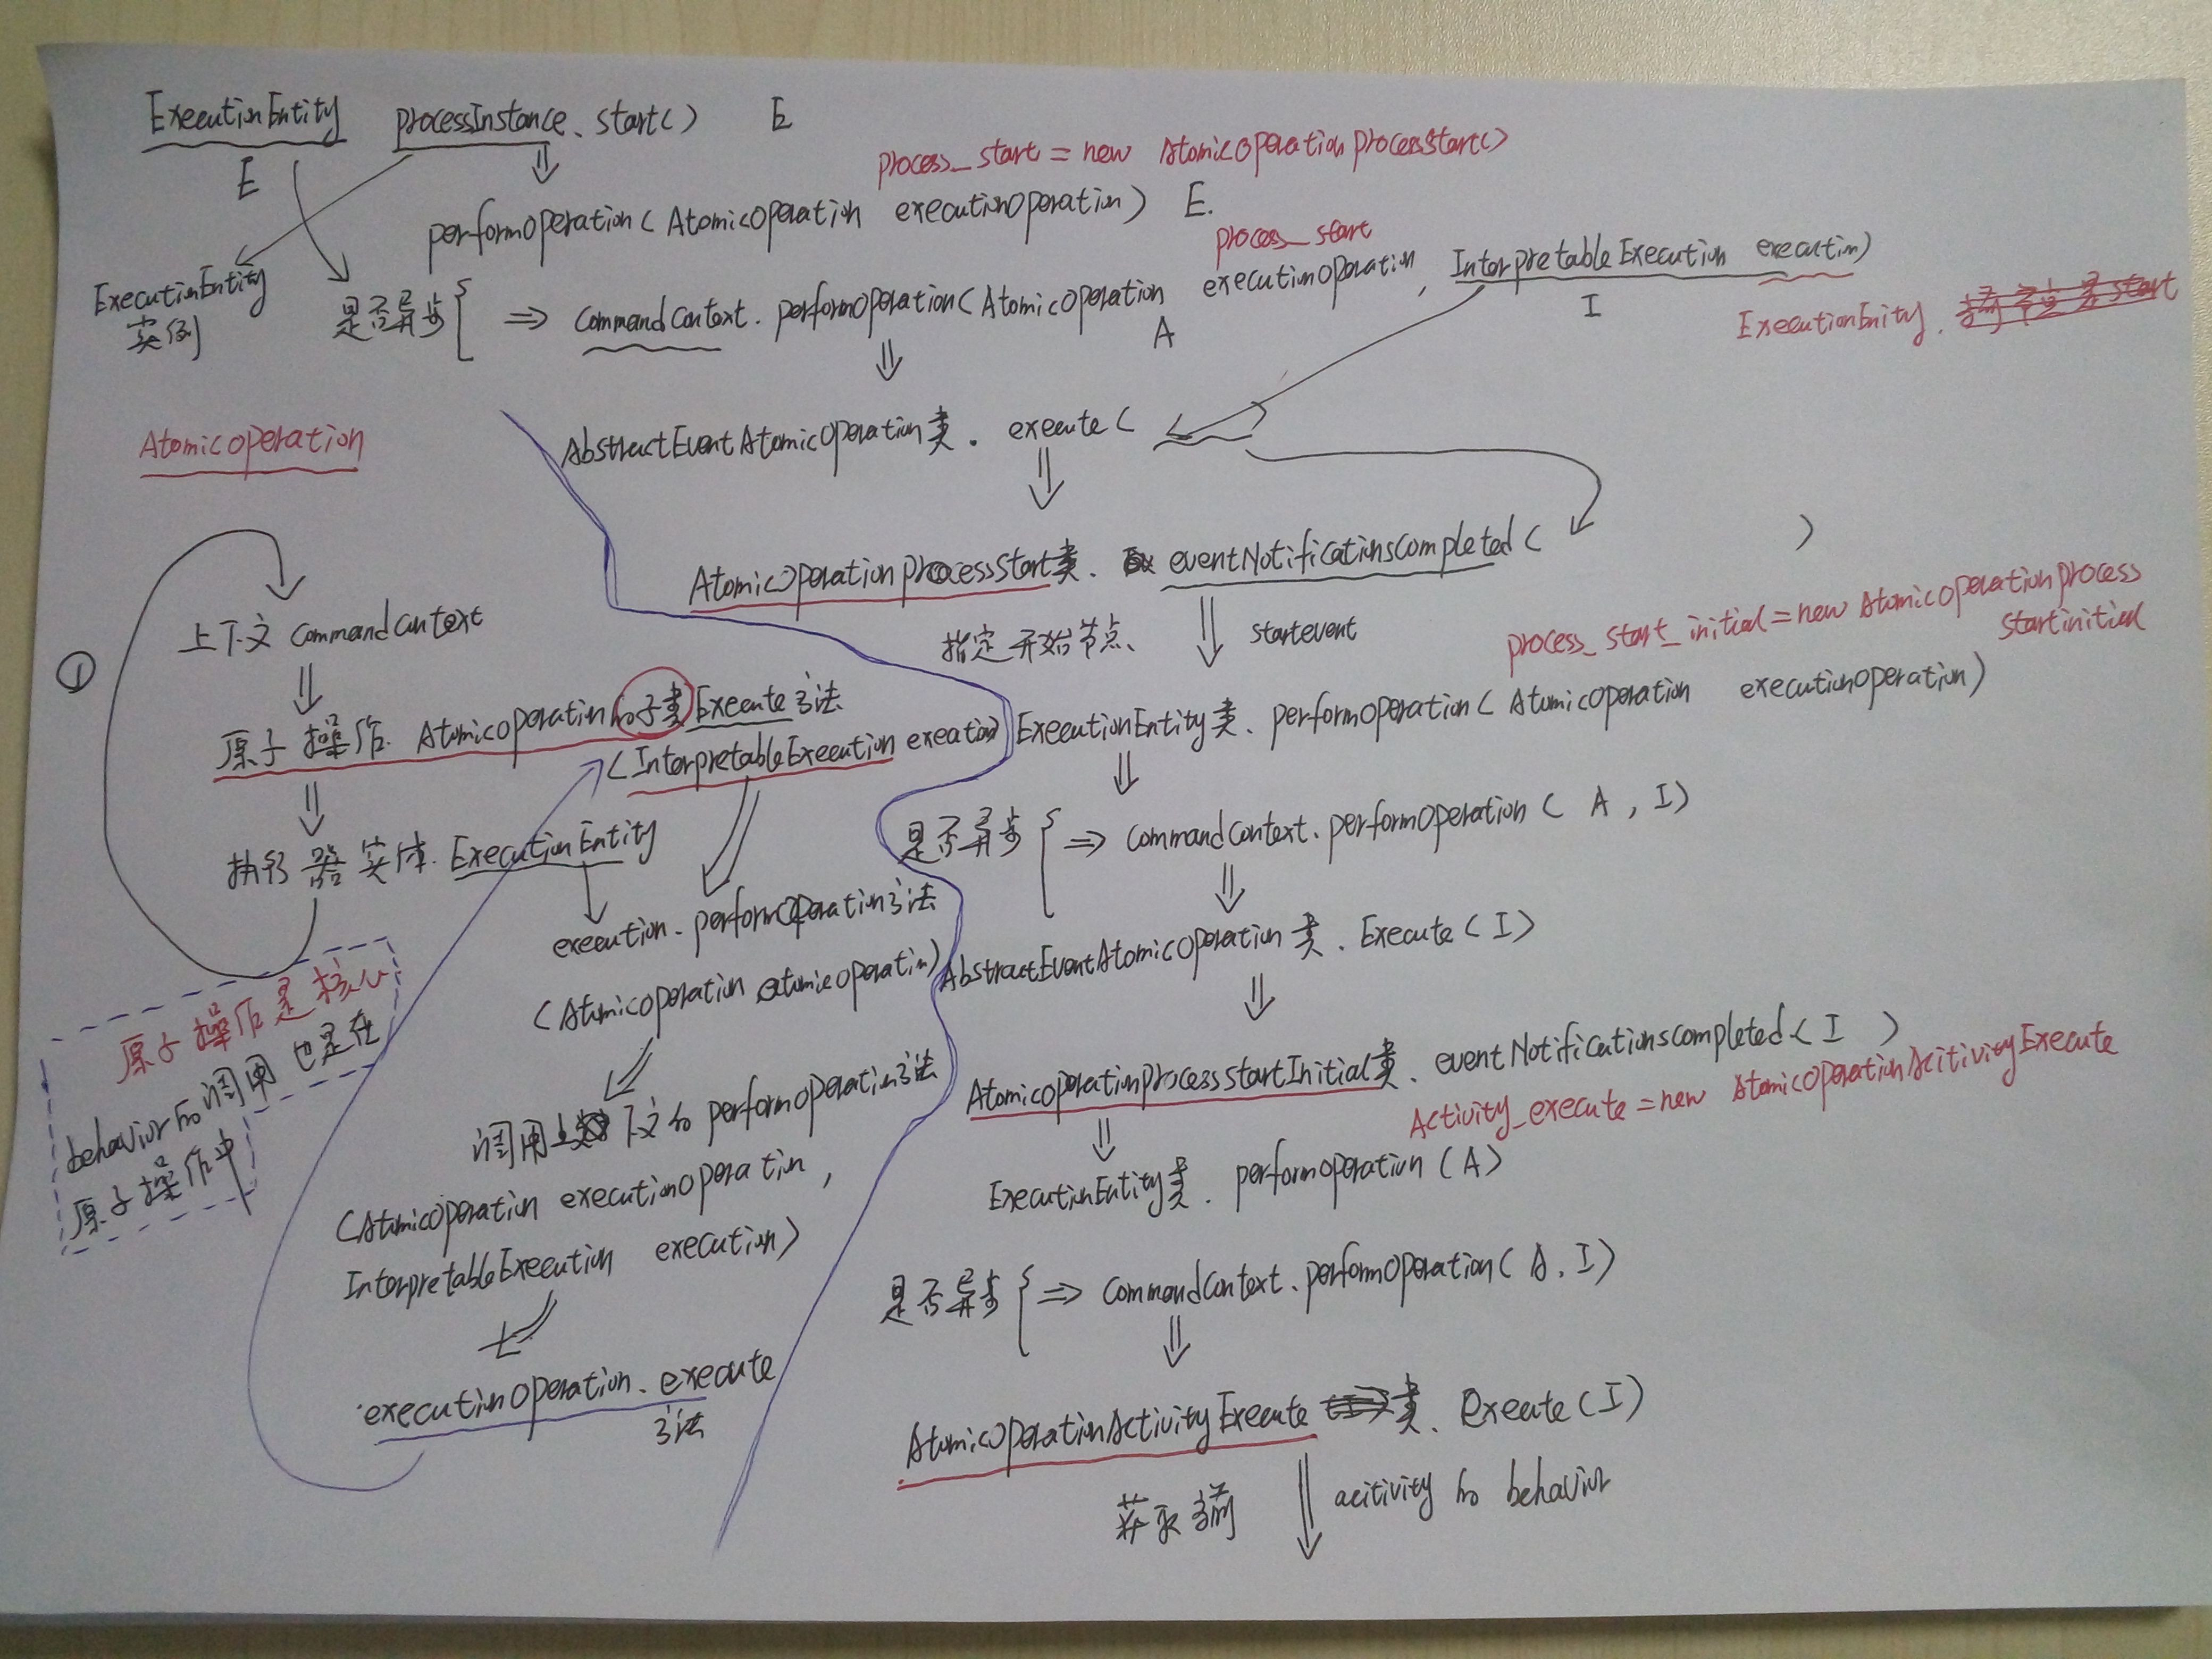
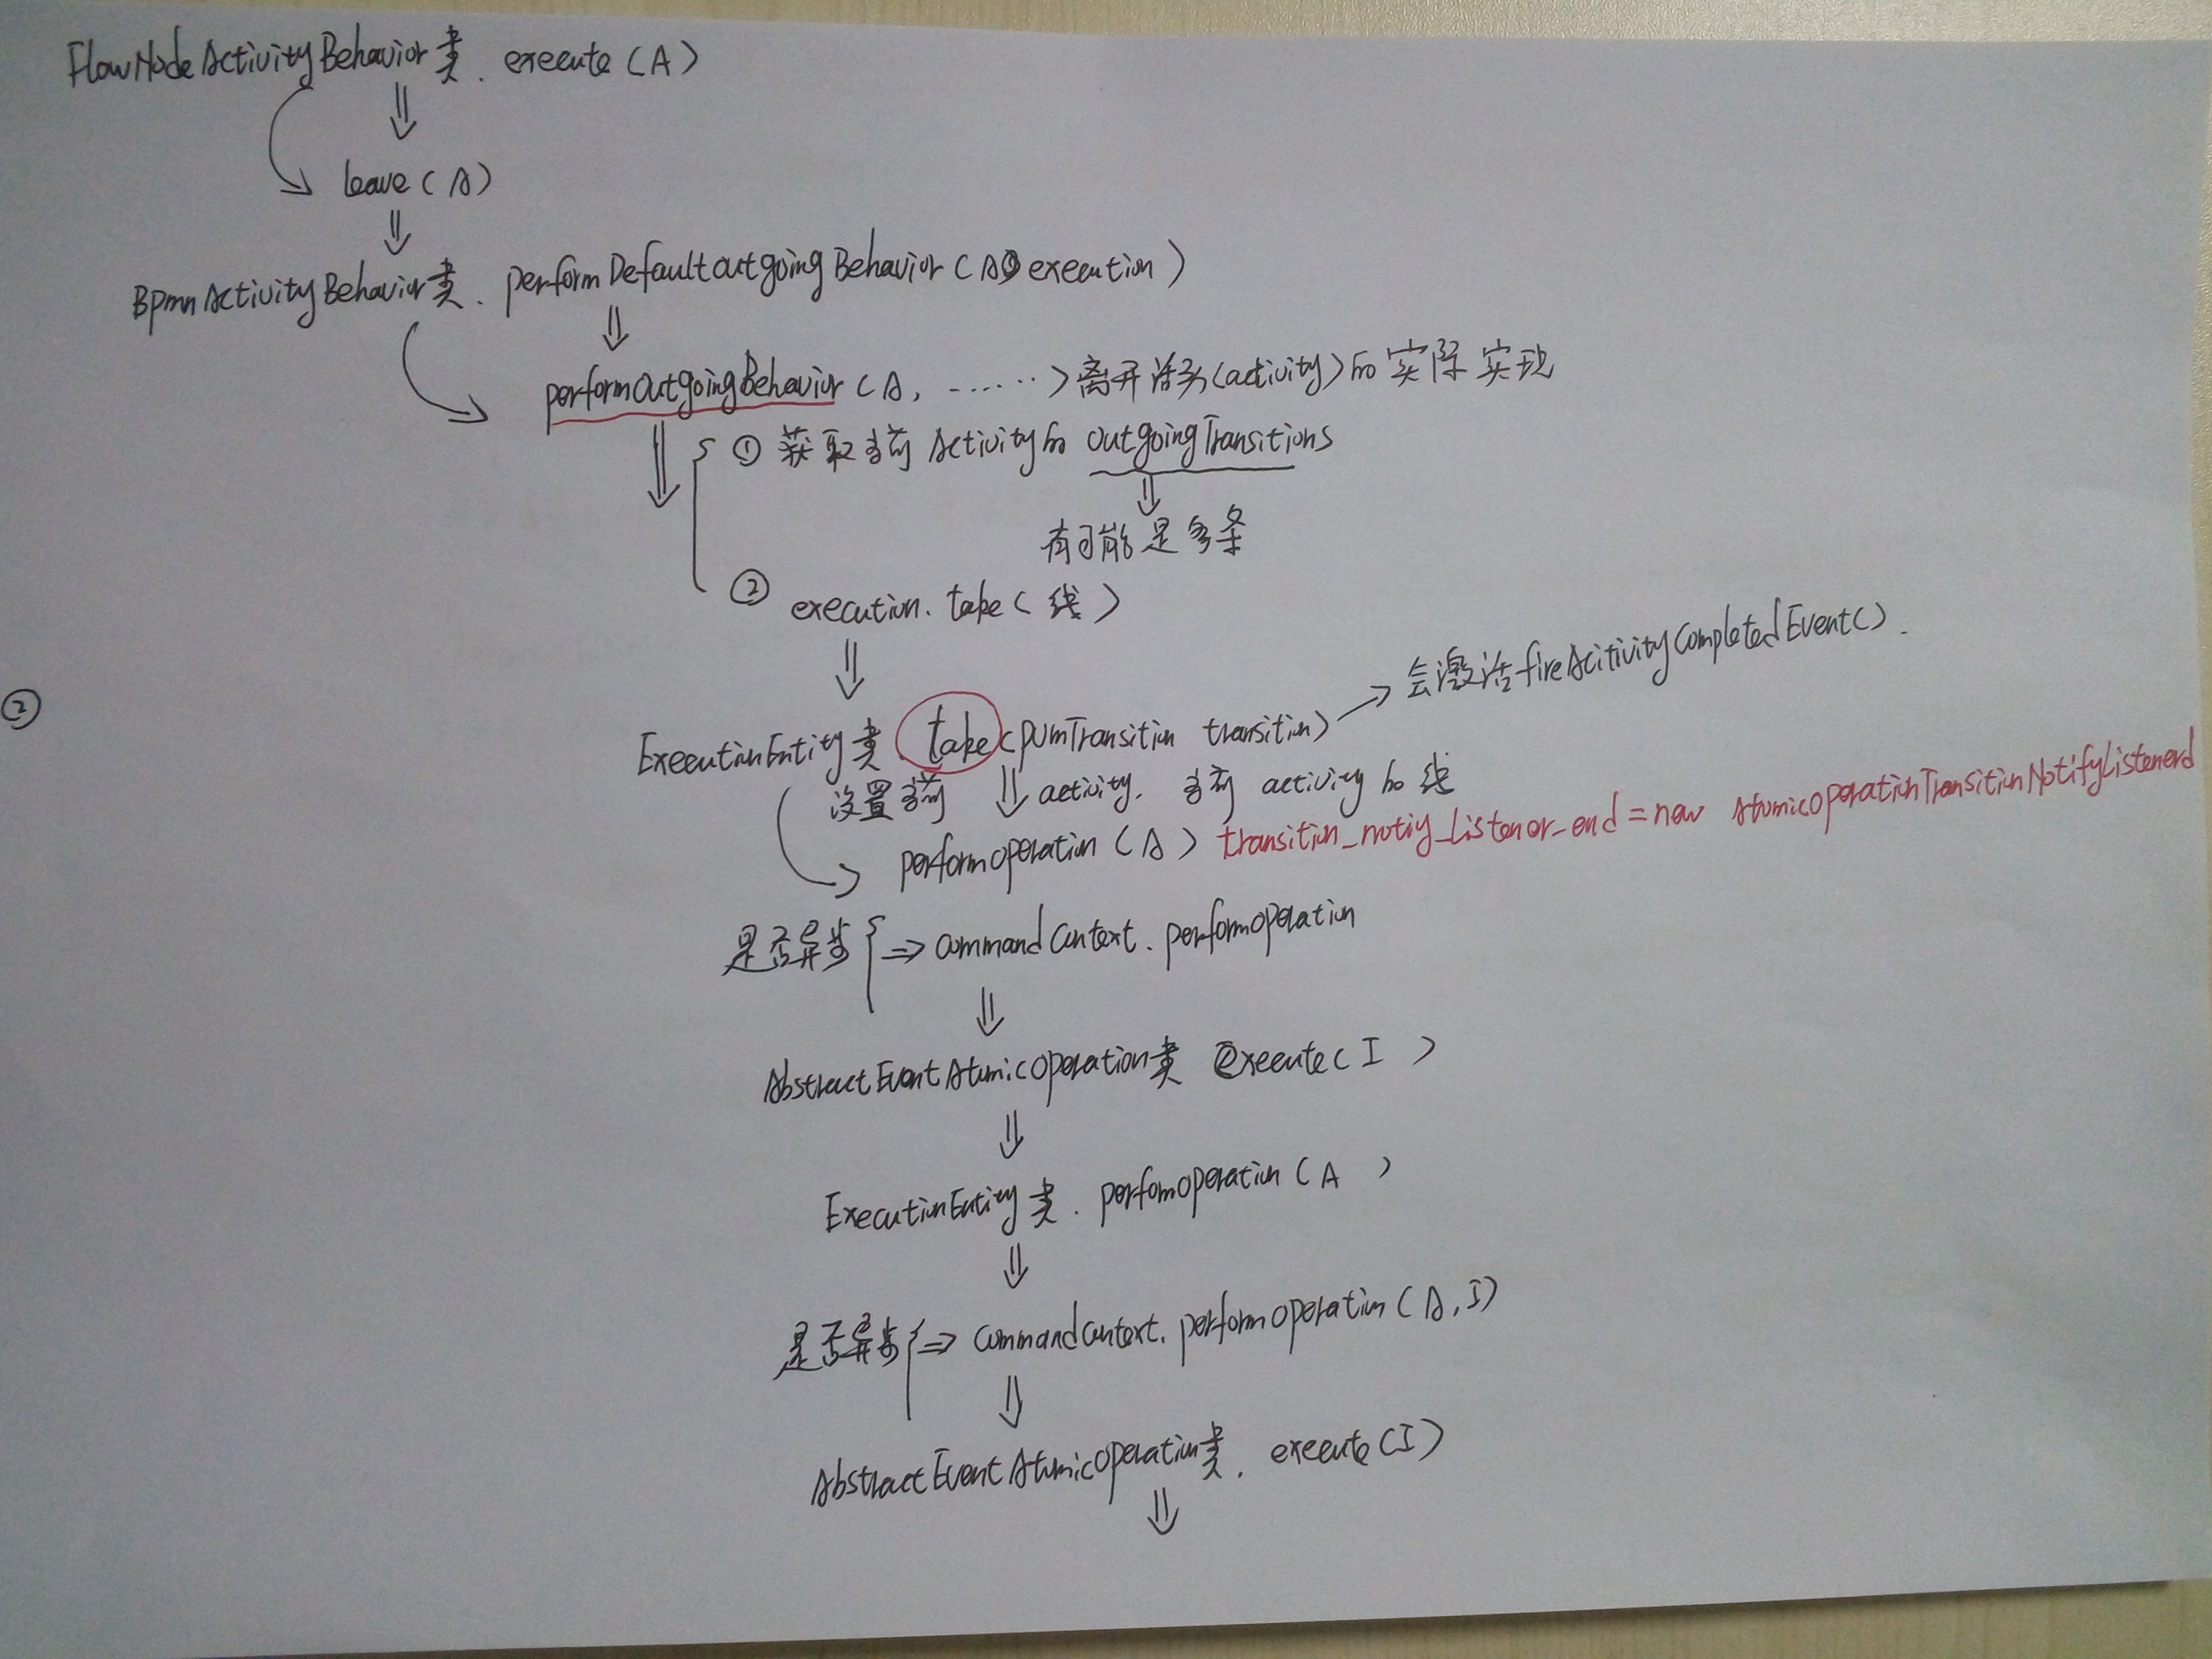
流程啟動跟蹤分析:
圖一:
圖二:
圖三:
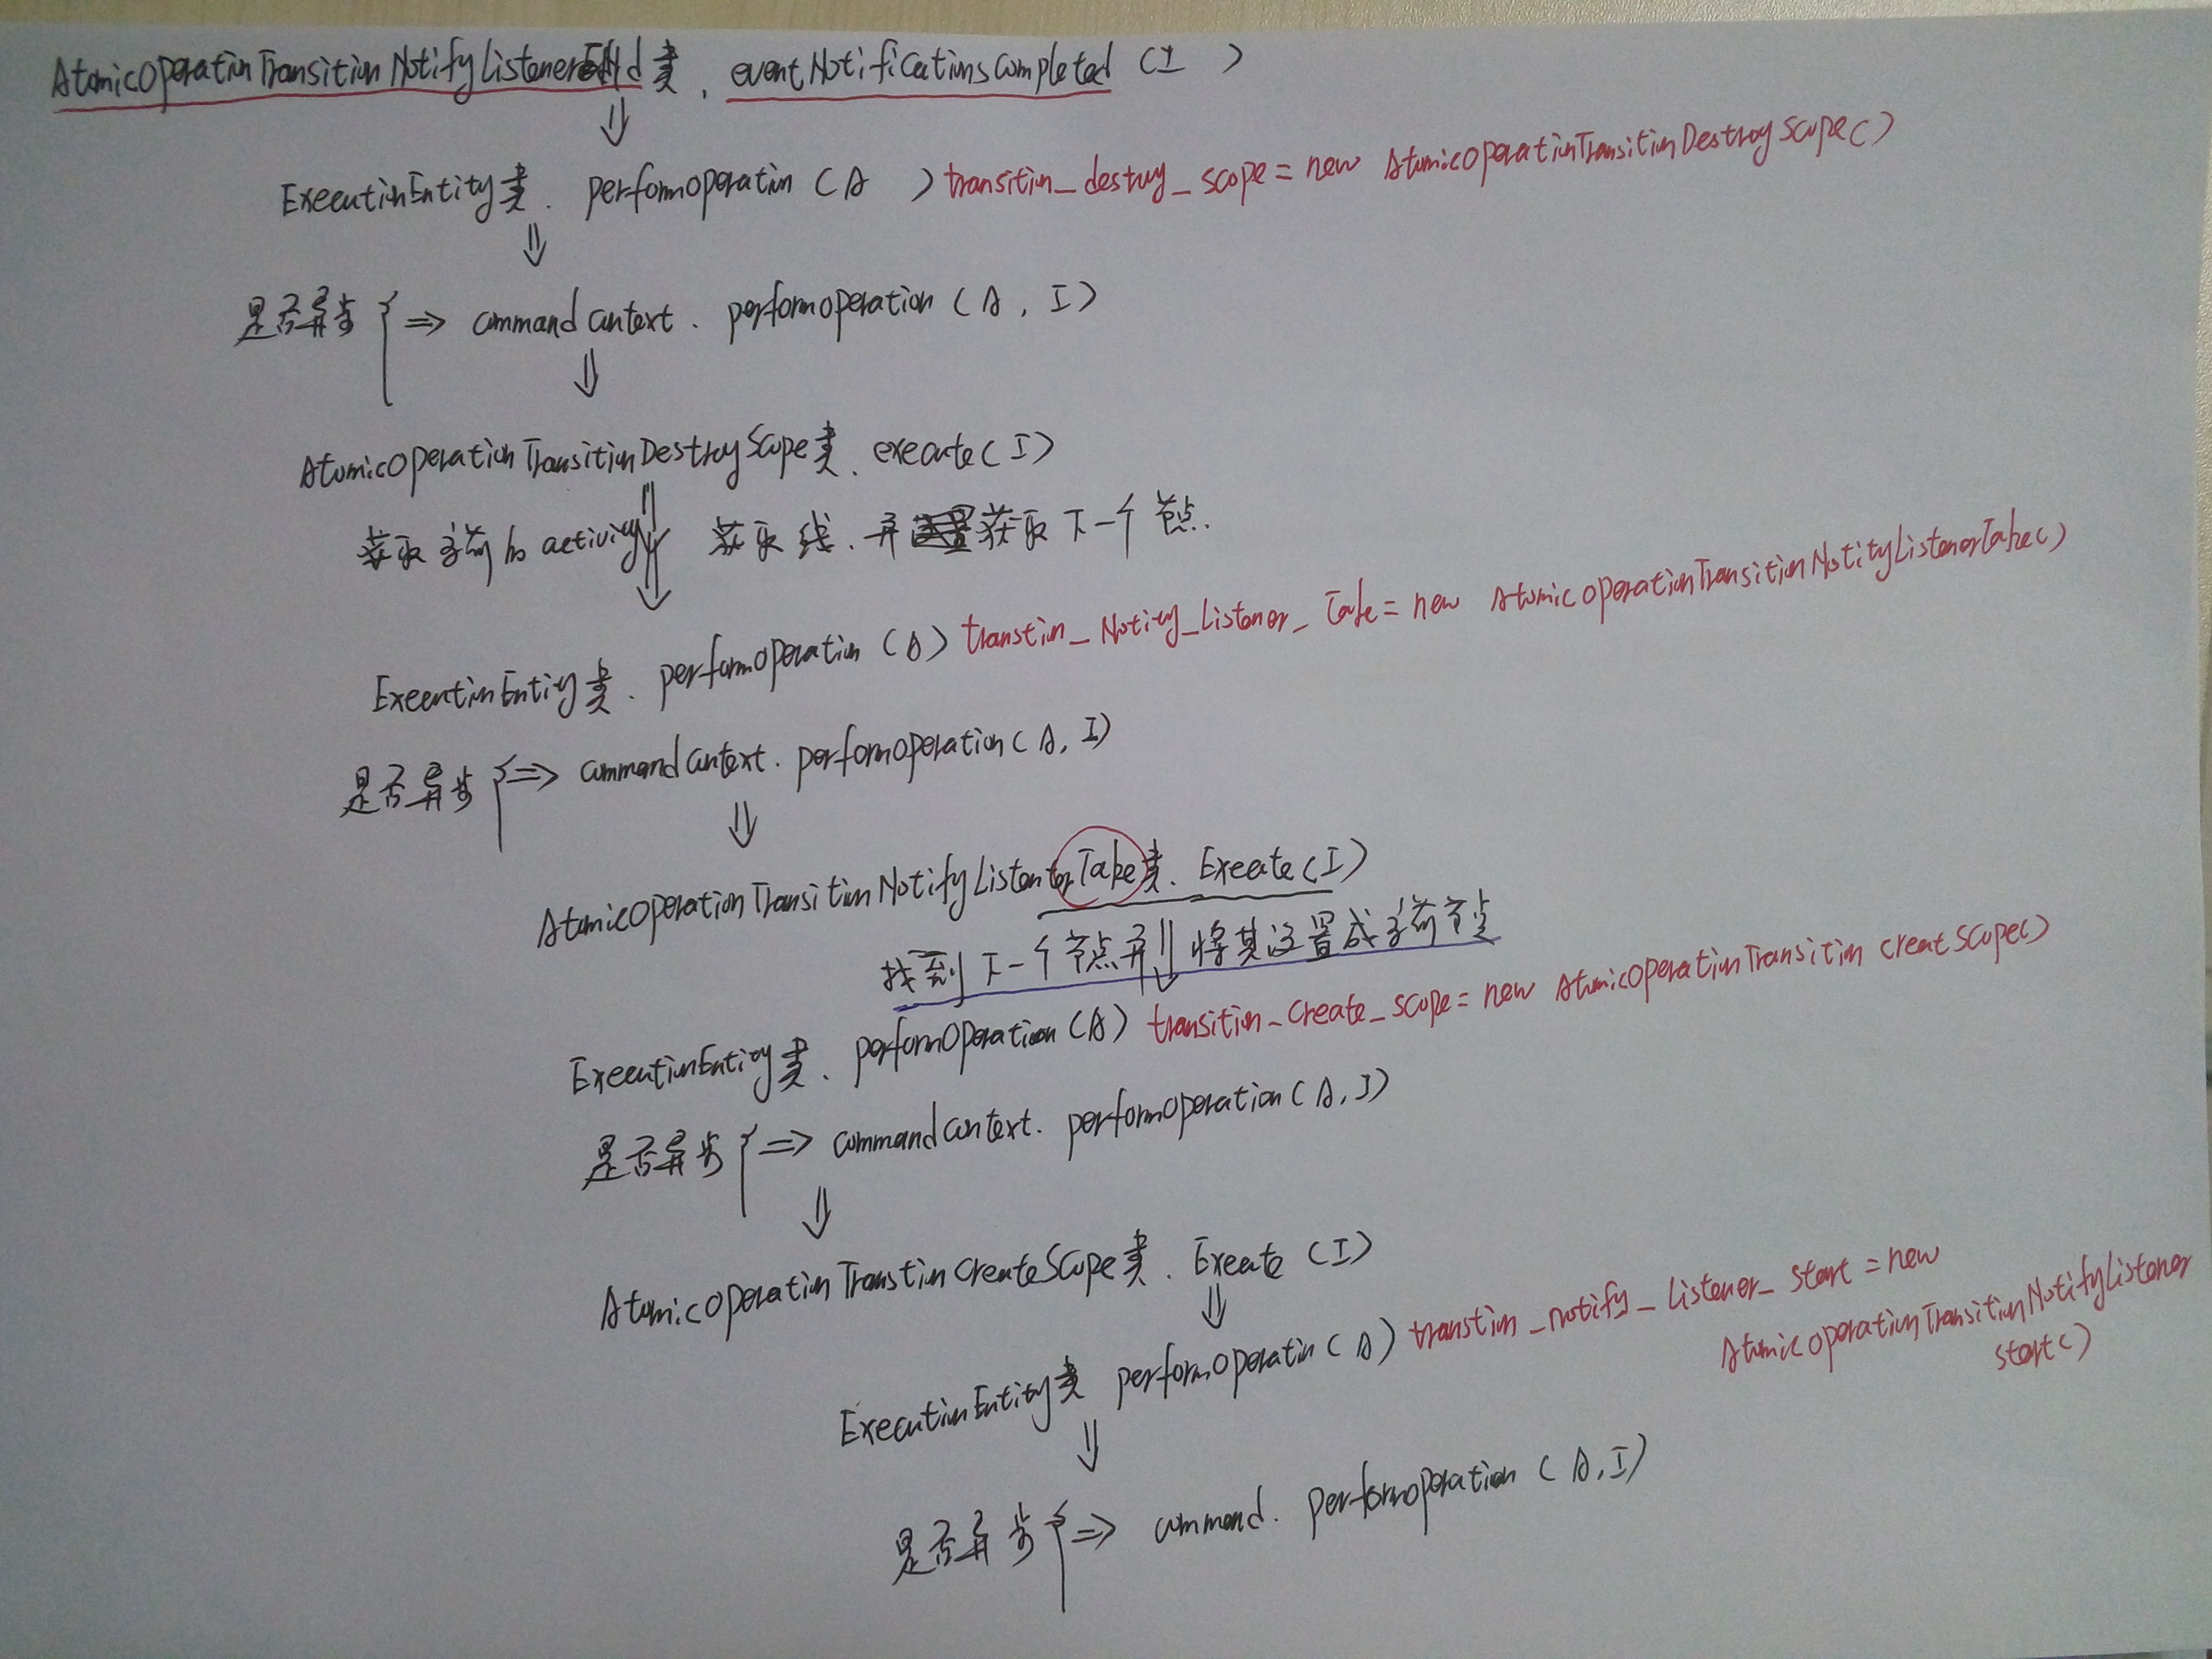
圖四:
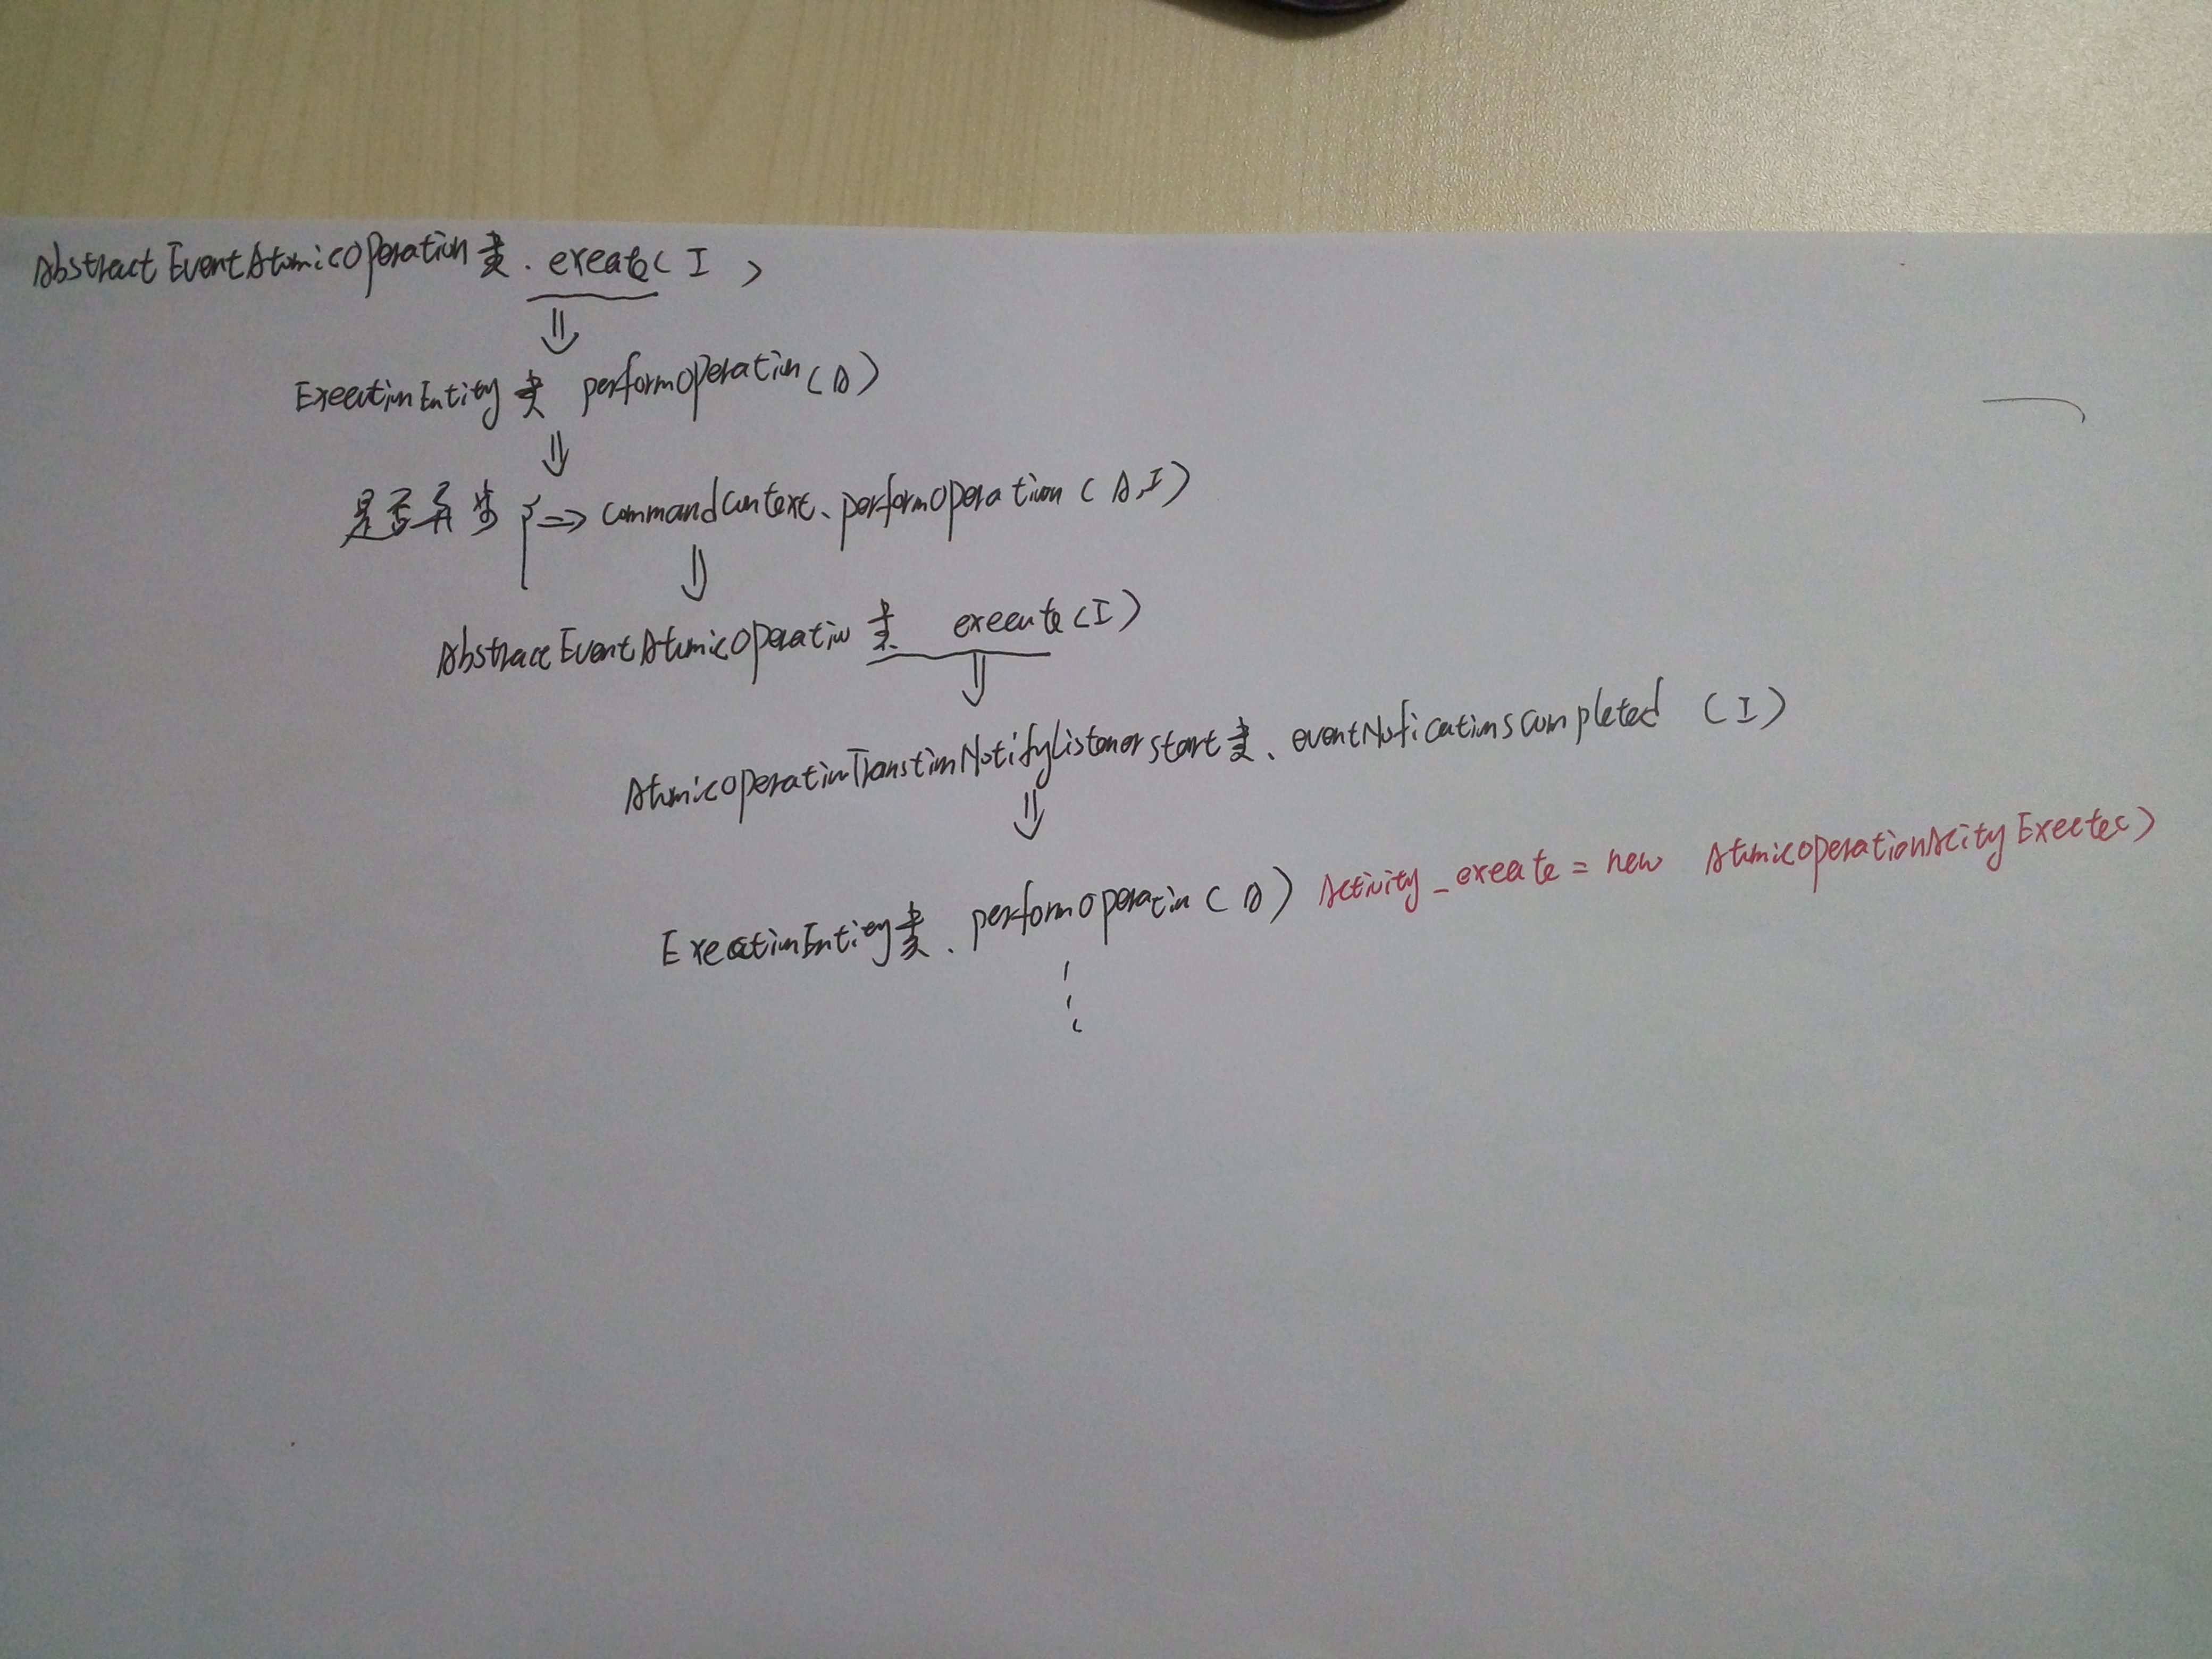
以上主要是跟蹤分析了,三個節點之間的流轉情況。
在流轉的時候需要注意以下兩個介面:
原子操作(AtomicOperation)介面:
public interface AtomicOperation {

  AtomicOperation PROCESS_START = new AtomicOperationProcessStart();
  AtomicOperation PROCESS_START_INITIAL = new AtomicOperationProcessStartInitial();
  AtomicOperation PROCESS_END = new AtomicOperationProcessEnd();
  AtomicOperation ACTIVITY_START = new AtomicOperationActivityStart();
  AtomicOperation ACTIVITY_EXECUTE = new AtomicOperationActivityExecute();
  AtomicOperation ACTIVITY_END = new AtomicOperationActivityEnd();
  AtomicOperation TRANSITION_NOTIFY_LISTENER_END = new AtomicOperationTransitionNotifyListenerEnd();
  AtomicOperation TRANSITION_DESTROY_SCOPE = new AtomicOperationTransitionDestroyScope();
  AtomicOperation TRANSITION_NOTIFY_LISTENER_TAKE = new AtomicOperationTransitionNotifyListenerTake();
  AtomicOperation TRANSITION_CREATE_SCOPE = new AtomicOperationTransitionCreateScope();
  AtomicOperation TRANSITION_NOTIFY_LISTENER_START = new AtomicOperationTransitionNotifyListenerStart();

  AtomicOperation DELETE_CASCADE = new AtomicOperationDeleteCascade();
  AtomicOperation DELETE_CASCADE_FIRE_ACTIVITY_END = new AtomicOperationDeleteCascadeFireActivityEnd();

  void execute(InterpretableExecution execution);

  boolean isAsync(InterpretableExecution execution);
}
注意:
void execute(InterpretableExecution execution);InterpretableExecution介面:
public interface InterpretableExecution extends ActivityExecution, ExecutionListenerExecution, PvmProcessInstance {

  void take(PvmTransition transition);

  void take(PvmTransition transition, boolean fireActivityCompletedEvent);

  void setEventName(String eventName);

  void setEventSource(PvmProcessElement element);

  Integer getExecutionListenerIndex();
  void setExecutionListenerIndex(Integer executionListenerIndex);

  ProcessDefinitionImpl getProcessDefinition();

  void setActivity(ActivityImpl activity);

  void performOperation(AtomicOperation etomicOperation);

  boolean isScope();

  void destroy();

  void remove();

  InterpretableExecution getReplacedBy();
  void setReplacedBy(InterpretableExecution replacedBy);

  InterpretableExecution getSubProcessInstance();
  void setSubProcessInstance(InterpretableExecution subProcessInstance);

  InterpretableExecution getSuperExecution();

  void deleteCascade(String deleteReason);

  boolean isDeleteRoot();

  TransitionImpl getTransition();
  void setTransition(TransitionImpl object);

  void initialize();

  void setParent(InterpretableExecution parent);

  void setProcessDefinition(ProcessDefinitionImpl processDefinitionImpl);

  void setProcessInstance(InterpretableExecution processInstance);

  boolean isEventScope();

  void setEventScope(boolean isEventScope);

  StartingExecution getStartingExecution();

  void disposeStartingExecution();
}
注意:
void performOperation(AtomicOperation etomicOperation);單獨摘出來的兩個方法是圖一中:
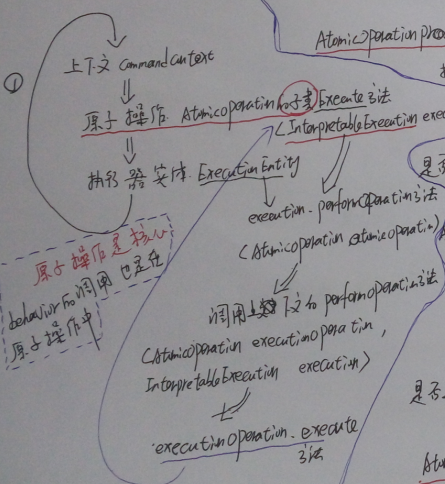
上下文、原子操作、執行器實體三者相互呼叫的關鍵。
上圖的具體呼叫情況如下:
ExecutionEntity類中的:
public void performOperation(AtomicOperation executionOperation) {
    if (executionOperation.isAsync(this)) {
        scheduleAtomicOperationAsync(executionOperation);
    } else {
        performOperationSync(executionOperation);
    }
}

protected void performOperationSync(AtomicOperation executionOperation) {
    Context
    .getCommandContext()
    .performOperation(executionOperation, this);
}
performOperation函式中呼叫上下文CommandContext類中的:
public void performOperation(AtomicOperation executionOperation, InterpretableExecution execution) {
    nextOperations.add(executionOperation);
    if (nextOperations.size()==1) {
        try {
            Context.setExecutionContext(execution);
            while (!nextOperations.isEmpty()) {
                AtomicOperation currentOperation = nextOperations.removeFirst();
                if (log.isTraceEnabled()) {
                    log.trace("AtomicOperation: {} on {}", currentOperation, this);
                }
                if (execution.getReplacedBy() == null) {
                    currentOperation.execute(execution);
                } else {
                    currentOperation.execute(execution.getReplacedBy());
                }
            }
        } finally {
            Context.removeExecutionContext();
        }
    }
}
performOperation函式呼叫原子操作(AtomicOperation)介面中的void execute(InterpretableExecution execution)來處理。
該處的處理分為兩種情況:
1、根據AtomicOperation介面標識來繼續進行流轉
(再次呼叫ExecutionEntity類中的performOperation(AtomicOperation executionOperation)方法)
比如:
PROCESS_START=》PROCESS_START_INITIAL=》ACTIVITY_EXECUTE。。。。。。
具體可以參考本文圖一到圖四的程式碼跟蹤中的標識。
2、根據節點上的ActivityBehavior類進行不同的處理
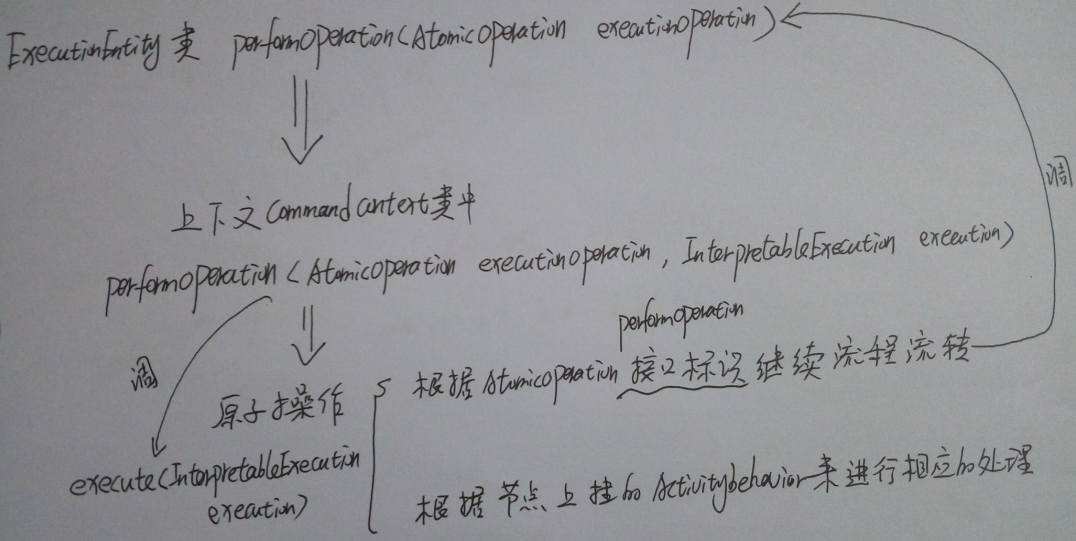
Activiti節點(開始、結束、任務、閘道器等等)都是Activity型別的,只是其掛的ActivityBehavior不同,通過不同的ActivityBehavior來實現相應的操作。
相關推薦
Activiti 流程啟動及節點流轉原始碼分析
本文主要是以activiti-study中的xiaomage.xml流程圖為例進行跟蹤分析 具體的流程圖如下: 流程圖對應的XML檔案如下: <?xml version="1.0
UCOSII啟動流程詳解(結合原始碼分析)
μC/OS-Ⅱ初始化 在呼叫μC/OS-Ⅱ的任何其它服務之前,μC/OS-Ⅱ要求使用者首先呼叫系統初始化函式 OSIint()。OSIint()初始化μC/OS-Ⅱ所有的變數和資料結構(見 OS_CORE.C)。OSInit()建立空閒任務 idle task,這個任務總是
rest-framework的APIview原始碼分析,Serializer及解析器原始碼分析
rest-framework 1.安裝 方式一:pip3 install djangorestframework 方式二:pycharm圖形化介面安裝 方式三:pycharm命令列下安裝(裝在當前工程所用的直譯器下) 2.djangorestframework的APIVi
Android Framework學習——Launcher啟動應用程式過程原始碼分析
ActivityInfo aInfo = r.activityInfo; if (r.packageInfo == null) { r.packageInfo = getPackageInfo(aInfo.applicationInfo,
Android如何在應用層進行截圖及截圖原始碼分析(下)
首先,那麼如果朋友你只是來找截圖介面使用在你的專案中的,那麼你就不用繼續往下看了。。。 基於上班時間較忙,另外個人覺得還是將這個截圖流程分析和使用分開總結比較好,於是決定分兩篇文章來講解。好了,那麼上一篇文章主要是從原始碼角度分析講解了Android系統截圖流
View的繪製流程之一:setContentView()方法原始碼分析
一、知識儲備 由 Activity 的啟動流程,我們知道 Activity 的啟動順序如下: --> 棧頂的Activity的onPause() --> Instrumentation的newActivity() /*建立Activit
Android如何在應用層進行截圖及截圖原始碼分析(上)
最近在看framework層程式碼時發現其中有一個是測試截圖操作的專門的包,於是潛意識的驅使下就研究了這方面的知識,今天作個總結吧!以及我們在寫上層應用時如何做截圖操作的,那麼我們先來看看截圖的原始碼分析,其實截圖操作就java這部分是放在了系統SystemUI
面試高頻SpringMVC執行流程最優解(原始碼分析)
文章已託管到GitHub,大家可以去GitHub檢視閱讀,歡迎老闆們前來Star! 搜尋關注微信公眾號 碼出Offer 領取各種學習資料! SpringMVC執行流程 SpringMVC概述 Spring MVC屬於SpringFrameWork的後續產品,已經融合在Spring Web Flow裡面。
10.深入k8s:排程的優先順序及搶佔機制原始碼分析
> 轉載請宣告出處哦~,本篇文章釋出於luozhiyun的部落格:https://www.luozhiyun.com > > 原始碼版本是[1.19](https://github.com/kubernetes/kubernetes/tree/release-1.19) ——nsqd的初始化及啟動流程
nsq原始碼地址:https://github.com/nsqio/nsq 版本1.1.0 NSQ原始碼分析系列是我通過閱讀nsq的原始碼及結合網上的相關文章整理而成,由於在網上沒有找到很詳細和完整的文章,故自己親自整理了一份。如果有錯誤的地方,還請指正,希望這系列的文章給您帶來
Spark2.2.2原始碼解析: 3.啟動worker節點啟動流程分析
本文啟動worker節點啟動流程分析 啟動命令: ${SPARK_HOME}/sbin/start-slave.sh spark://sysadmindeMacBook-Pro.local:7077 檢視start-slave.sh
Spark2.2.2原始碼解析: 2.啟動master節點流程分析
本文主要說明在啟動master節點的時候,程式碼的流程走向。 授予檔案執行許可權 chmod755 兩個目錄裡的檔案: /workspace/spark-2.2.2/bin --所有檔案 /workspace/spark-2.2.2/sb
Flink on Yarn模式啟動流程原始碼分析
此文已由作者嶽猛授權網易雲社群釋出。 歡迎訪問網易雲社群,瞭解更多網易技術產品運營經驗。 Flink on yarn的啟動流程可以參見前面的文章 Flink on Yarn啟動流程,下面主要是從原始碼角度看下這個實現,可能有的地方理解有誤,請給予指正,多謝。 --> 1.命令列啟動yarn sessi
【Android】原始碼分析 - Activity啟動流程
啟動Activity的方式 Activity有2種啟動的方式,一種是在Launcher介面點選應用的圖示、另一種是在應用中通過Intent進行跳轉。我們主要介紹與後者相關的啟動流程。 Intent intent = new Intent(this, TestActivity
AM335x啟動流程(BootRom->MLO->Uboot)超詳細原始碼分析
寫的非常好,收藏學習 參考檔案: 1,AM335x ARM Cortex-A8 Microprocessors (MPUs) Technical Reference Manual.pdf; 2,am3359.pdf; 1,am335x的cpu上電後,會跳到哪個地址去
DispatcherServlet執行流程及相關原始碼分析
DispatcherServlet執行流程及相關原始碼分析 在前一篇文章SpringMVC 啟動流程及相關原始碼分析中,詳細探討了Spring MVC在Web容器中部署後的啟動過程,以及相關原始碼分析,同時也討論了DispatcherServlet類的初始化建立過程,相關內容在此不再贅述,如有需
Netty原始碼分析:1.4伺服器啟動流程
第一章節是主要是伺服器啟動的程式碼分析。章節目錄有: |———1.1初始化NioEventLoopGroup |———1.2初始化NioEventLoop |———1.3初始化NioServerSocketChannel |———1.4伺服器啟動流程 為什麼先從初始化開
hog訓練流程及原始碼分析
一、網上一些參考資料 在部落格目標檢測學習_1(用opencv自帶hog實現行人檢測) 中已經使用了opencv自帶的函式detectMultiScale()實
struts2流程及原始碼分析
struts 架構圖 分析這個架構圖,我們可以從4個部分,也就struts訪問的4個階段的流程來分析 這4個階段包括:Action對映、Action轉發、Action執行、結果返回 首先是Action對映階段 當請求到來的時候,首先是struts的核心過濾器接收到請求,然後通過ActionMapp
Spark叢集啟動流程-Worker啟動-原始碼分析
Spark叢集啟動流程-Worker啟動-原始碼分析 上篇文章介紹了Master啟動(Master啟動點選:https://blog.csdn.net/weixin_43637653/article/details/84073849 ),接下來,我們在原始碼裡繼續分析Worker的啟動
