
Spring Boot + thymeleaf + UEditor整合
因為公司專案需求,需要使用富文字編輯器,貨比三家選擇了百度的UEditor。然而做這個時,我這個小萌新連Spring Boot都不太清楚,所以給自己挖了很多坑,然後一直在填坑.....
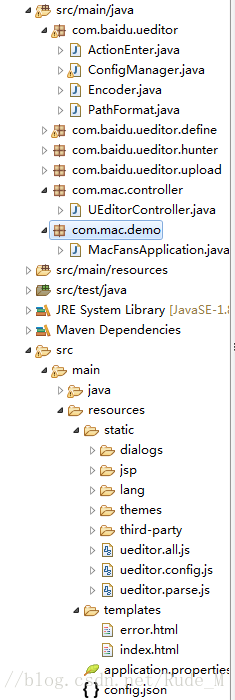
首先到官網下載原始碼以及jsp版本,然後將解壓後的原始碼分別放到專案下。如圖所示,這裡需要注意的是config.json需要放到resource根目錄下。還有就是index.html放到templates下。
接著就是pom的依賴了。
<dependencies>
		<dependency>
			<groupId>org.springframework.boot</groupId>
			<artifactId>spring-boot-starter-web</artifactId>
		</dependency>

		<dependency>
			<groupId>org.springframework.boot</groupId>
			<artifactId>spring-boot-starter-test</artifactId>
			<scope>test</scope>
		</dependency>
		<dependency>
    		<groupId>org.springframework.boot</groupId>
    		<artifactId>spring-boot-starter-thymeleaf</artifactId>
		</dependency>
		<dependency>
            <groupId>org.json</groupId>
            <artifactId>json</artifactId>
            <version>20180130</version>
        </dependency>

        <dependency>
            <groupId>commons-fileupload</groupId>
            <artifactId>commons-fileupload</artifactId>
            <version>1.3.2</version>
        </dependency>
        <dependency>
            <groupId>commons-codec</groupId>
            <artifactId>commons-codec</artifactId>
        </dependency>
	</dependencies>
這裡我要提起的是自己犯了一個令自己哭笑不得的錯誤,大佬可以自行略過...
就是啟動類的註解,如果啟動類是放在根目錄的話,只寫@SpringBootApplication就ok了,反之則要寫三個註解:@SpringBootApplication、@EnableAutoConfiguration、@ComponentScan
接著就可以新建一個控制器UEditorController進行測試一下
@RequestMapping("/")
	public String showPage() {
		return "index";
	}
發現上傳圖片功能不能正常使用,提示說沒有獲取到配置。這裡它是通過jsp目錄下的controller.jsp進行操作的,然而我使用的是thymeleaf模板的話,我是在控制器寫了一個介面,替代了這個jsp。
@RequestMapping(value="/config")
    public void config(HttpServletRequest request, HttpServletResponse response) {
        response.setContentType("application/json");
        String rootPath = request.getSession().getServletContext().getRealPath("/");
        try {
            String exec = new ActionEnter(request, rootPath).exec();
            PrintWriter writer = response.getWriter();
            writer.write(exec);
            writer.flush();
            writer.close();
        } catch (IOException e) {
            e.printStackTrace();
        }

    }
ConfigManager的getConfigpath方法:
private String getConfigPath () {
		//return this.parentPath + File.separator + ConfigManager.configFileName;
		try {
			//獲取classpath下的config.json路徑
			return this.getClass().getClassLoader().getResource("config.json").toURI().getPath();
		} catch (URISyntaxException e) {
			return null;
		}
	}
BinaryUploader:
public class BinaryUploader {

    public static final State save(HttpServletRequest request,
            Map<String, Object> conf) {
        // FileItemStream fileStream = null;
        // boolean isAjaxUpload = request.getHeader( "X_Requested_With" ) != null;

        if (!ServletFileUpload.isMultipartContent(request)) {
            return new BaseState(false, AppInfo.NOT_MULTIPART_CONTENT);
        }

        // ServletFileUpload upload = new ServletFileUpload(
            //  new DiskFileItemFactory());
        //
        // if ( isAjaxUpload ) {
        //     upload.setHeaderEncoding( "UTF-8" );
        // }

        try {
            // FileItemIterator iterator = upload.getItemIterator(request);
            //
            // while (iterator.hasNext()) {
            //  fileStream = iterator.next();
            //
            //  if (!fileStream.isFormField())
            //      break;
            //  fileStream = null;
            // }
            //
            // if (fileStream == null) {
            //  return new BaseState(false, AppInfo.NOTFOUND_UPLOAD_DATA);
            // }
            MultipartHttpServletRequest multipartRequest = (MultipartHttpServletRequest) request;
            MultipartFile multipartFile = multipartRequest.getFile(conf.get("fieldName").toString());
            if(multipartFile==null){
                return new BaseState(false, AppInfo.NOTFOUND_UPLOAD_DATA);
            }

            String savePath = (String) conf.get("savePath");
            //String originFileName = fileStream.getName();
            String originFileName = multipartFile.getOriginalFilename();
            String suffix = FileType.getSuffixByFilename(originFileName);

            originFileName = originFileName.substring(0,
                    originFileName.length() - suffix.length());
            savePath = savePath + suffix;

            long maxSize = ((Long) conf.get("maxSize")).longValue();

            if (!validType(suffix, (String[]) conf.get("allowFiles"))) {
                return new BaseState(false, AppInfo.NOT_ALLOW_FILE_TYPE);
            }

            savePath = PathFormat.parse(savePath, originFileName);

            String basePath=(String) conf.get("basePath");
            String physicalPath = basePath + savePath;

            //InputStream is = fileStream.openStream();
            InputStream is = multipartFile.getInputStream();
            State storageState = StorageManager.saveFileByInputStream(is,
                    physicalPath, maxSize);
            is.close();

            if (storageState.isSuccess()) {
                storageState.putInfo("url", PathFormat.format(savePath));
                storageState.putInfo("type", suffix);
                storageState.putInfo("original", originFileName + suffix);
            }

            return storageState;
        // } catch (FileUploadException e) {
        //  return new BaseState(false, AppInfo.PARSE_REQUEST_ERROR);
        } catch (IOException e) {
        }
        return new BaseState(false, AppInfo.IO_ERROR);
    }

    private static boolean validType(String type, String[] allowTypes) {
        List<String> list = Arrays.asList(allowTypes);

        return list.contains(type);
    }
}
config.json增加如下的程式碼,這裡的地址是可以自己修改的。
“basePath”:“E:/image/”,ConfigManager的getConfig方法裡增加一條,下面的兩條只是給個位置:
conf.put( "basePath", this.jsonConfig.getString("basePath") );

//這下面的兩行程式碼只是提供一個位置
conf.put( "savePath", savePath );
conf.put( "rootPath", this.rootPath );
然後我的application.properties檔案配置:
server.port=8088
server.servlet.context-path=/
server.tomcat.uri-encoding=UTF-8

spring.mvc.view.prefix=/
spring.mvc.view.suffix=.html

spring.thymeleaf.prefix=classpath:templates/
spring.thymeleaf.suffix=.html
spring.thymeleaf.mode=HTML
spring.thymeleaf.encoding=UTF-8
spring.thymeleaf.servlet.content-type=text/html
spring.thymeleaf.cache=false

web.upload-path=E:/images/static/
spring.mvc.static-path-pattern=/static/**
spring.resources.static-locations=classpath:/META-INF/resources/,classpath:/resources/,classpath:/static/,classpath:/public/,file:${web.upload-path}
好啦,完成可以正常上傳以及顯示了.
相關推薦
Spring Boot + thymeleaf + UEditor整合
因為公司專案需求,需要使用富文字編輯器,貨比三家選擇了百度的UEditor。然而做這個時,我這個小萌新連Spring Boot都不太清楚,所以給自己挖了很多坑,然後一直在填坑..... 首先到官網下載原始碼以及jsp版本,然後將解壓後的原始碼分別放到專案下。如圖所示,這裡需
Spring boot+Thymeleaf+easyui整合:js建立元件頁面報錯
開發工具:Ideal 使用場景:Demo 前提: 環境:Spring boot +Thymeleaf+easyui &nbs
Spring Boot 2.0 整合Thymeleaf 模板引擎
reporting 配置信息 name www. title 建模 type 引擎 suffix 本節將和大家一起實戰Spring Boot 2.0 和thymeleaf 模板引擎 1. 創建項目 2. 使用Spring Initlizr 快速創建Spring Boot
spring-boot-thymeleaf
高精度 put ive 引入 function rri chang 解決方案 osi https://github.com/kolorobot/spring-boot-thymeleaf http://docs.spring.io/spring-boot/do
spring boot Thymeleaf模板引擎 最簡單輸出例子
test leaf att map 控制器 輸出 span blog hello spring boot Thymeleaf模板引擎 最簡單輸出例子 控制器代碼如下: @GetMapping(value = "/test")public String test(Mo
spring boot + thymeleaf 報錯 org.thymeleaf.exceptions.TemplateInputException
serve pac result http 返回 render lba div ble org.thymeleaf.exceptions.TemplateInputException: Error resolving template "admin/verifyPas
spring boot(十五)spring boot+thymeleaf+jpa增刪改查示例
ali 遍歷 config link examples 技術分享 返回 stat 業務 快速上手 配置文件 pom包配置 pom包裏面添加jpa和thymeleaf的相關包引用 <dependency> <groupId>org.sprin
spring boot: thymeleaf模板引擎使用
sage homepage 順序 object tomcat fig component art format spring boot: thymeleaf模板引擎使用 在pom.xml加入thymeleaf模板依賴 <!-- 添加thymeleaf的依賴 --
Spring Boot之Swagger2整合
一、Swagger2簡單介紹 Swagger2,它可以輕鬆的整合到Spring Boot中,並與Spring MVC程式配合組織出強大RESTful API文件。它既可以減少我們建立文件的工作量,同時說明內容又整合入實現程式碼中,讓維護文件和修改程式碼整合為一體,可以讓我們在修改程式碼邏輯的同時方便的修
spring boot MongoDB的整合和使用
前言 上一章節,簡單講解了如何整合Spring-data-jpa。本章節,我們來看看如何整合NoSQL的Mongodb。mongodb是最早熱門非關係資料庫的之一,使用也比較普遍。最適合來儲存一些非結構資料了,適合對大量或者無固定格式的資料進行儲存,比如:日誌、快取等。 一點知識
從零實現 Spring Boot 2.0 整合 weixin-java-mp(weixin-java-tools) 獲取 openId,用於微信授權
步驟: 一、內網穿透申請二級域名(有伺服器和域名者可略過) 二、申請微信公眾平臺測試號(有已認證的微信服務號者可略過) 三、搭建 Spring Boot 2.0 專案實現獲取openId 一、內網穿透: 因為要直接用內網本機開發除錯,微信網頁授權在回撥時要訪問本機,所以直接
使用spring boot + Thymeleaf實現web小頁面
本文章只是介紹下如何使用spring boot + Thymeleaf,實現簡單的web頁面步驟和流程 幾點說明: Spring boot開發web專案,通常打成jar包,使用內建的web伺服器 Tomcat、Jetty、undertow 來執行。 靜態資源(css、js、圖片等)預
Spring Boot起步以及整合themaleaf
1、建立專案 2、選擇Maven專案 Maven配置檔案 開啟專案 檢視專案結構 新增依賴pom.xml <project xmlns="http://maven.apache.org/POM/4.0.0" xmlns:xs
Spring Boot的shiro整合(中)
一 配置 1 MyShiroRealm類 package com.wzq.shiro.config; import javax.annotation.Resource; import org.apache.shiro.authc.AuthenticationExc
Spring Boot的shiro整合(上)
一 新建pom <dependencies> <dependency> <groupId>org.springframework.boot</groupId> <artifactId>
spring-boot 2.0 整合 dubbo
spring-boot 2.0 整合 dubbo 新增如下依賴,需要執行 zookeeper <dependencies> <!-- Spring Boot Dubbo 依賴 --> <dependency> &
Spring Boot的shiro整合(下)
一 執行程式,MySQL生成5張資料表 1 sys_permission CREATE TABLE `sys_permission` ( `id` int(11) NOT NULL AUTO_INCREMENT, `available` bit(1) DEFA
Spring Boot中MyBatis整合Druid
Spring Boot中MyBatis整合Druid MyBatis整合Druid 1. 引入依賴 2. 配置application.properties 3. DruidConfiguration 4. DruidStatFil
Spring Boot -- Thymeleaf
Spring Boot -- Thymeleaf Thymeleaf簡介 1. pom.xml 2. application.properties Thymeleaf的預設配置 常用配置 3.建立Thymeleaf
Spring Boot中級篇-整合Swagger2分組文件
Swagger配置檔案 這裡配置兩個分組admin【後臺管理介面】、wechat【微信管理介面】 @Configuration @EnableSwagger2 public class Swagger2 { public static final String SWAGGE