
SpringBoot ActiveMQ 整合使用
安裝 ActiveMQ(見上一篇)
整合
IDEA 建立 SpringBoot 專案,
1.開啟IDEA,建立新專案,選擇Spring Initializr
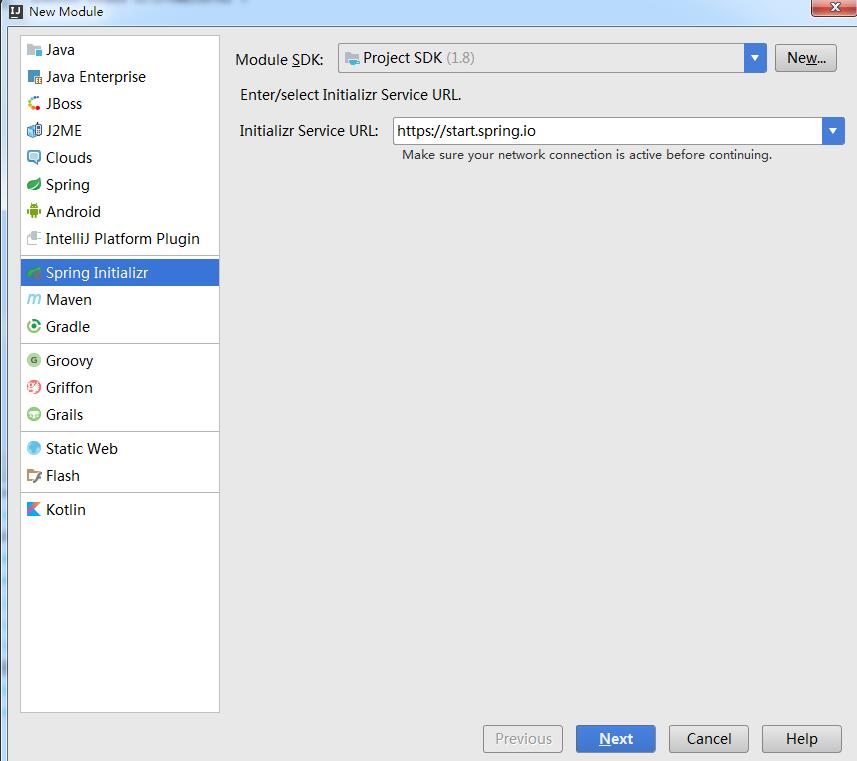
2.輸入Artifact

3.勾選Web

4.點選finish完成
5.進入專案,可以將以下內容刪除
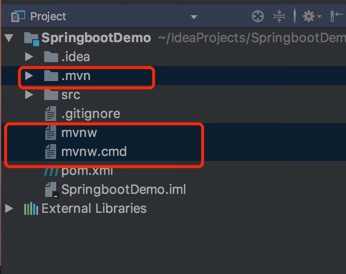
因為 SpringBoot 已經內建了對 ActiveMQ 的支援,所以直接引入依賴 spring-boot-starter-activemq 就行。整體專案結構如下:

1、pom.xml 檔案
2、配置檔案 application.properties<?xml version="1.0" encoding="UTF-8"?> <project xmlns="http://maven.apache.org/POM/4.0.0" xmlns:xsi="http://www.w3.org/2001/XMLSchema-instance" xsi:schemaLocation="http://maven.apache.org/POM/4.0.0 http://maven.apache.org/xsd/maven-4.0.0.xsd"> <modelVersion>4.0.0</modelVersion> <groupId>com.yuezhong</groupId> <artifactId>activemq</artifactId> <version>0.0.1-SNAPSHOT</version> <packaging>jar</packaging> <name>activemq</name> <description>Demo project for Spring Boot ActiveMQ</description> <parent> <groupId>org.springframework.boot</groupId> <artifactId>spring-boot-starter-parent</artifactId> <version>2.0.1.RELEASE</version> <relativePath/> </parent> <properties> <project.build.sourceEncoding>UTF-8</project.build.sourceEncoding> <project.reporting.outputEncoding>UTF-8</project.reporting.outputEncoding> <java.version>1.8</java.version> </properties> <dependencies> <dependency> <groupId>org.springframework.boot</groupId> <artifactId>spring-boot-starter-web</artifactId> </dependency> <dependency> <groupId>org.springframework.boot</groupId> <artifactId>spring-boot-starter-test</artifactId> <scope>test</scope> </dependency> <dependency> <groupId>org.springframework.boot</groupId> <artifactId>spring-boot-starter-activemq</artifactId> </dependency> </dependencies> <build> <plugins> <plugin> <groupId>org.springframework.boot</groupId> <artifactId>spring-boot-maven-plugin</artifactId> </plugin> </plugins> </build> </project>
3、傳送訊息類spring.activemq.broker-url=tcp://127.0.0.1:61616 # 在考慮結束之前等待的時間 #spring.activemq.close-timeout=15s # 預設代理URL是否應該在記憶體中。如果指定了顯式代理,則忽略此值。 spring.activemq.in-memory=true # 是否在回滾回滾訊息之前停止訊息傳遞。這意味著當啟用此命令時,訊息順序不會被保留。 spring.activemq.non-blocking-redelivery=false # 密碼 spring.activemq.password=admin # 等待訊息傳送響應的時間。設定為0等待永遠。 spring.activemq.send-timeout=0 spring.activemq.user=admin # 是否信任所有包 #spring.activemq.packages.trust-all= # 要信任的特定包的逗號分隔列表(當不信任所有包時) #spring.activemq.packages.trusted= # 當連線請求和池滿時是否阻塞。設定false會拋“JMSException異常”。 #spring.activemq.pool.block-if-full=true # 如果池仍然滿,則在丟擲異常前阻塞時間。 #spring.activemq.pool.block-if-full-timeout=-1ms # 是否在啟動時建立連線。可以在啟動時用於加熱池。 #spring.activemq.pool.create-connection-on-startup=true # 是否用Pooledconnectionfactory代替普通的ConnectionFactory。 #spring.activemq.pool.enabled=false # 連線過期超時。 #spring.activemq.pool.expiry-timeout=0ms # 連線空閒超時 #spring.activemq.pool.idle-timeout=30s # 連線池最大連線數 #spring.activemq.pool.max-connections=1 # 每個連線的有效會話的最大數目。 #spring.activemq.pool.maximum-active-session-per-connection=500 # 當有"JMSException"時嘗試重新連線 #spring.activemq.pool.reconnect-on-exception=true # 在空閒連線清除執行緒之間執行的時間。當為負數時,沒有空閒連線驅逐執行緒執行。 #spring.activemq.pool.time-between-expiration-check=-1ms # 是否只使用一個MessageProducer #spring.activemq.pool.use-anonymous-producers=true
package com.yuezhong.activemq.client;

import org.springframework.jms.annotation.JmsListener;
import org.springframework.stereotype.Component;
import org.springframework.util.StringUtils;

/**
 * Created by yz.shi on 2018/4/9.
 */
@Component
public class ActiveMQClient {

    // 使用JmsListener配置消費者監聽的佇列,其中text是接收到的訊息
    @JmsListener(destination = "mytest.queue")
    public void receiveQueue(String text) {
        if(!StringUtils.isEmpty(text)){
            System.out.println("ActiveMQServer收到的報文為:"+text);
            System.out.println("");
        }
    }
}
4、訊息接收類
package com.yuezhong.activemq.server;

import org.apache.activemq.command.ActiveMQQueue;
import org.springframework.beans.factory.annotation.Autowired;
import org.springframework.jms.core.JmsTemplate;
import org.springframework.scheduling.annotation.EnableScheduling;
import org.springframework.scheduling.annotation.Scheduled;
import org.springframework.stereotype.Component;
import javax.jms.Destination;

/**
 * Created by yz.shi on 2018/4/9.
 */
@Component
@EnableScheduling
public class ActiveMQServer {

    @Autowired
    private JmsTemplate jmsTemplate;

    static int index = 0;

    Destination destination = new ActiveMQQueue("mytest.queue");

    @Scheduled(fixedDelay = 5000) // 5s執行一次   只有無參的方法才能用該註解
    public void sendMessage() {
        index++;
        String message = "shiyuezhong" + index;
        this.jmsTemplate.convertAndSend(destination, message);
    }

}
5、ActivemqApplication
package com.yuezhong;

import com.yuezhong.queue.producer.Producer;
import org.apache.activemq.command.ActiveMQQueue;
import org.springframework.beans.factory.annotation.Autowired;
import org.springframework.boot.SpringApplication;
import org.springframework.boot.autoconfigure.SpringBootApplication;
import javax.annotation.PostConstruct;
import javax.jms.Destination;

@SpringBootApplication
public class ActivemqApplication {

    public static void main(String[] args) {
        SpringApplication.run(ActivemqApplication.class, args);
    }

}
另: Producer
package com.yuezhong.queue.producer;

import org.apache.activemq.command.ActiveMQQueue;
import org.springframework.jms.core.JmsTemplate;
import org.springframework.scheduling.annotation.Scheduled;
import org.springframework.stereotype.Service;
import javax.jms.Destination;
import javax.annotation.Resource;

/**
 * Created by yz.shi on 2018/4/9.
 */
@Service("producer")
public class Producer {
    @Resource
    private JmsTemplate jmsTemplate;

    /**
     * 傳送訊息(主方法設定佇列)
     *
     * @param destination 傳送到的佇列
     * @param message     待發送的訊息
     */
    public void convertAndSend(Destination destination, final String message) {
        jmsTemplate.convertAndSend(destination, message);
    }

    /**
     * 傳送訊息(定時傳送佇列)
     */
    static int i = 100;
    Destination destination = new ActiveMQQueue("yzshi_queue");

    @Scheduled(fixedDelay = 5000) // 5s執行一次   只有無參的方法才能用該註解
    public void convertAndSend() {
        i++;
        String message = "這是定時任務queueProducer傳送的第" + i + "個訊息!";
        jmsTemplate.convertAndSend(destination, message);
    }

}
package com.yuezhong.queue.consumer;

import org.springframework.jms.annotation.JmsListener;
import org.springframework.messaging.handler.annotation.SendTo;
import org.springframework.stereotype.Component;

/**
 * Created by yz.shi on 2018/4/9.
 */
@Component
public class ConsumerB {
    /**
     * 使用JmsListener配置消費者監聽的佇列
     *
     * @param text 接收到的訊息
     */
    @JmsListener(destination = "yzshi_queue")
    @SendTo("out.queue")
    public String receiveQueue(String text) {
        System.out.println("----------------Consumer-B : 收到的報文為:" + text);
        return text;
    }

    @JmsListener(destination = "yzshi_queue")
    public void printReceiveQueue(String text) {
        System.out.println("+++++++++++++++++Consumer-B : 收到的報文為:" + text);
    }
}
ConsumerC
package com.yuezhong.queue.consumer;

import org.springframework.jms.annotation.JmsListener;
import org.springframework.stereotype.Component;

/**
 * Created by yz.shi on 2018/4/9.
 */
@Component
public class ConsumerC {
    /**
     * 使用JmsListener配置消費者監聽的佇列
     *
     * @param text 接收到的訊息
     */
    @JmsListener(destination = "out.queue")
    public void consumerMessage(String text) {
        System.out.println("Consumer-C : 從out.queue佇列收到的回覆報文為:" + text);
    }
}
package com.yuezhong;

import com.yuezhong.queue.producer.Producer;
import org.apache.activemq.command.ActiveMQQueue;
import org.springframework.beans.factory.annotation.Autowired;
import org.springframework.boot.SpringApplication;
import org.springframework.boot.autoconfigure.SpringBootApplication;
import javax.annotation.PostConstruct;
import javax.jms.Destination;

@SpringBootApplication
public class ActivemqApplication {

    @Autowired
    private Producer producer;

    @PostConstruct
    public void init() {
        int num = 10;
        try {
            Destination destinationQueue = new ActiveMQQueue("yzshi_queue");
            for (int i = 1; i <= num; i++) {
                producer.convertAndSend(destinationQueue, "這是主queueProducer傳送的第" + i + "個訊息!");
            }
            System.out.println("activeMQ生產成功!");
        } catch (Exception e) {
            System.out.println("activeMQ生產失敗!");
       }
    }

    public static void main(String[] args) {
        SpringApplication.run(ActivemqApplication.class, args);
    }

}
相關推薦
SpringBoot ActiveMQ 整合使用
安裝 ActiveMQ(見上一篇)整合IDEA 建立 SpringBoot 專案,1.開啟IDEA,建立新專案,選擇Spring Initializr2.輸入Artifact3.勾選Web4.點選finish完成5.進入專案,可以將以下內容刪除因為 SpringBoot 已經
springboot與ActiveMQ整合
nds 消息 ring str and info 開啟 int ng- 前言 很多項目, 都不是一個系統就做完了. 而是好多個系統, 相互協作來完成功能. 那, 系統與系統之間, 不可能完全獨立吧? 如: 在學校所用的管理系統中, 有學生系統, 資產系統, 宿舍系
springboot+rabbitmq整合示例程
param resource pom del actor .cn pri 完全 pan 關於什麽是rabbitmq,請看另一篇文: http://www.cnblogs.com/boshen-hzb/p/6840064.html 一、新建maven工程:springboot
深入淺出JMS(四)--Spring和ActiveMQ整合的完整實例
訂閱 實例 schema -i 同步和異步 生產 技術分享 .com factor 第一篇博文深入淺出JMS(一)–JMS基本概念,我們介紹了JMS的兩種消息模型:點對點和發布訂閱模型,以及消息被消費的兩個方式:同步和異步,JMS編程模型的對象,最後說了JMS的優點。 第二
Spring mvc4 + ActiveMQ 整合
ted toolbar :active 文件 nat ava logs const urn 轉載:http://www.cnblogs.com/leiOOlei/p/5075402.html 一、配置部分 二、代碼部分 三、頁面部分 四、Controller控制器 五、效果
Spring和ActiveMQ整合的完整實例
beans util caching consumer str blank prop ner 消息發送 Spring和ActiveMQ整合的完整實例 前言 這篇博文,我們基於Spring+JMS+ActiveMQ+Tomcat,做一個Spring4.1.0和Acti
Springboot redis 整合
不優雅 settime 朋友 最大 阻塞 操作 create rom unit 年末將至,是時候該把所學的總結下了。最近正好從eclipes轉到idea,發現idea對模組的支持很棒。這一片先總結下springboot和redis的整合 首先添加redis服務器 直接用do
springboot+activemq中引入重發機制
簡介 一個 value nec ring cto 為我 body over 一、簡介 在使用activemq消息中間件進行消息隊列傳輸時,總會由於各種原因導致消息失敗。 一個經典的場景是一個生成者向Queue中發消息,裏面包含了一組郵件地址和郵件內容。而消費者從Queue中
ActiveMQ 整合 spring
emp println nts name gpo ref imp 接收 取消 一、添加 jar 包 <dependency> <groupId>org.apache.activemq</groupId> <arti
Springboot activemq 對象傳遞
odi blog specified hub AS url static itl rust 86. Spring Boot集成ActiveMQ【從零開始學Spring Boot】 博客分類: 從零開始學Spring Boot 【視頻&交流平
springboot/Mybatis整合
lookup can selectall odi 容易 runt 位置 list keys 正題 本項目使用的環境: 開發工具:Intellij IDEA 2017.1.3 springboot: 1.5.6 jdk:1.8.0_161 maven:3.3.9 額外功能
springboot mybatis 整合
char override ssp figure private on() new doctype xml文件 新建項目在上一篇. 第二步:創建表和相應的實體類 實體類:user.java package com.qtt.im.entity; import java.
springboot+shiro整合教程
sco actor attr run max 修改 authz prope ava 本教程整合環境: java8 maven 開發工具: idea 版本: springboot 1.5.15.RELEASE 註: 1.本教程數據操作是模擬數據庫操作,並沒有真正進行持
Websocket教程SpringBoot+Maven整合(目錄)
cat 單播 sim 系統 方案 acc stomp sock class 1、大話websocket及課程介紹 簡介: websocket介紹、使用場景分享、學習課程需要什麽基礎 2、課程技術選型和瀏覽器兼容講解 簡介: 簡
SpringBoot Kafka 整合 例項 原始碼
1、使用IDEA新建工程引導方式,建立訊息生產工程 springboot-kafka-producer。 工程POM檔案程式碼如下: 1 <?xml version="1.0" encoding="UTF-8"?> 2 <project xmlns="htt
SpringBoot Kafka 整合實例教程
內容 string n) spring pic win tst app ken 1、使用IDEA新建工程引導方式,創建消息生產工程 springboot-kafka-producer。 工程POM文件代碼如下: 1 <?xml version="1.0" e
springboot kafka整合(包括java程式碼不能傳送和消費kafka訊息的採坑記錄)
kafka採坑記錄: 1、kafka服務端server.properties中的broker.id叢集內需要唯一。 2、kafka config檔案中listeners和advertised.listeners需要配置本機ip:9092
springboot(3)——整合freemarker模板、AOP統一處理、全域性異常處理
《三》、整合freemarker模板、AOP統一處理、全域性異常處理 一、整合freemarker模板引擎 1、引入freemarker依賴 <dependency> <groupId>org.springframe
springboot+swagger2整合
新增pom依賴 <!--swagger2 start--> <dependency> <groupId>io.springfox</groupId> <artifactId>springfox-swagger2</
springBoot+ActiveMQ訊息佇列安裝測試
1.ActiveMQ下載安裝(我使用的是5.14.0版本): 下載連結地址: http://activemq.apache.org/activemq-5140-release.html 2.1 Windows平臺MQ啟動(根據自己不同的計算機配置選擇32位或64位): &