Oracle 11g 快速搭建指令碼
阿新 • • 發佈:2019-01-12
一、root使用者
1、安裝前準備
mv /home/vsftpd/linux.x64_11gR2_database_*  /tmp && cd /tmp
unzip linux.x64_11gR2_database_1of2.zip &&  unzip linux.x64_11gR2_database_2of2.zip
echo "centos" > /etc/hostanme
echo "192.168.10.13 centos"  >> /etc/hosts
yum install yum install gcc make binutils gcc-c++ compat-libstdc++-33 elfutils-libelf-devel elfutils-libelf-devel-static ksh libaio libaio-devel numactl-devel sysstat unixODBC unixODBC-devel pcre-devel –y
groupadd oinstall
groupadd dba
useradd -g oinstall -G dba oracle
passwd oracle
id oracle
2、編輯etc/sysctl.conf
在/etc/sysctl.conf末尾新增,並執行sysctl -p生效
fs.aio-max-nr = 1048576
fs.file-max = 6815744
kernel.shmall = 2097152
kernel.shmmax = 1073741824
kernel.shmmni = 4096
kernel.sem = 250 32000 100 128
net.ipv4.ip_local_port_range = 9000 65500
net.core.rmem_default = 262144
net.core.rmem_max = 4194304
net.core.wmem_default = 262144
net.core.wmem_max = 1048576
3、編輯/etc/security/limits.conf
在 /etc/security/limits.conf末尾新增
oracle           soft    nproc           2047
oracle           hard    nproc           16384
oracle           soft    nofile          1024
oracle           hard    nofile          65536
oracle           soft    stack           10240
4、在/etc/pam.d/login末尾新增
session  required   /lib64/security/pam_limits.so
session  required   pam_limits.so
5、在/etc/profile中新增
if [ $USER = "oracle" ]; then
  if [ $SHELL = "/bin/ksh" ]; then
   ulimit -p 16384
   ulimit -n 65536
  else
   ulimit -u 16384 -n 65536
  fi
fi
6、建立安裝目錄
mkdir -p /ibmp_data/oracle/product/11.2.0
mkdir /ibmp_data/oracle/oradata
mkdir /ibmp_data/oracle/inventory
mkdir /ibmp_data/oracle/fast_recovery_area
chown -R oracle:oinstall /ibmp_data/oracle
chmod -R 775 /ibmp_data/oracle
二、 oracle使用者安裝
su - oracle
vim .bash_profile
新增以下內容,並執行source .bash_profile生效
ORACLE_BASE=/ibmp_data/oracle
ORACLE_HOME=$ORACLE_BASE/product/11.2.0
ORACLE_SID=orcl
PATH=$PATH:$ORACLE_HOME/bin
export ORACLE_BASE ORACLE_HOME ORACLE_SID PATH
1、配置安裝引數
cp -R /tmp/database/response/ .
sed -i "s%oracle.install.option=%oracle.install.option=INSTALL_DB_SWONLY%g" /home/oracle/response/db_install.rsp
sed -i "s%ORACLE_HOSTNAME=%ORACLE_HOSTNAME=centos%g"  /home/oracle/response/db_install.rsp
sed -i "s%UNIX_GROUP_NAME=%UNIX_GROUP_NAME=oinstall%g" /home/oracle/response/db_install.rsp
sed -i "s%INVENTORY_LOCATION=%INVENTORY_LOCATION=/ibmp_data/oracle/inventory%g" /home/oracle/response/db_install.rsp
sed -i "s%SELECTED_LANGUAGES=%SELECTED_LANGUAGES=en,zh_CN%g"  /home/oracle/response/db_install.rsp
sed -i "s%ORACLE_HOME=%ORACLE_HOME=/ibmp_data/oracle/product/11.2.0%g"   /home/oracle/response/db_install.rsp
sed -i "s%ORACLE_BASE=%ORACLE_BASE=/ibmp_data/oracle%g"  /home/oracle/response/db_install.rsp
sed -i "s%oracle.install.db.InstallEdition=%oracle.install.db.InstallEdition=EE%g"  /home/oracle/response/db_install.rsp
sed -i "s%oracle.install.db.isCustomInstall=false%oracle.install.db.isCustomInstall=true%g"  /home/oracle/response/db_install.rsp
sed -i "s%oracle.install.db.DBA_GROUP=%oracle.install.db.DBA_GROUP=dba%g"  /home/oracle/response/db_install.rsp
sed -i "s%oracle.install.db.OPER_GROUP=%oracle.install.db.OPER_GROUP=dba%g"  /home/oracle/response/db_install.rsp
sed -i "s%DECLINE_SECURITY_UPDATES=%DECLINE_SECURITY_UPDATES=true%g"  /home/oracle/response/db_install.rsp
2、靜默安裝
cd /tmp/database/ && ./runInstaller -silent -responseFile /home/oracle/response/db_install.rsp -ignorePrereq
3、安裝結束在root下執行
[[email protected] ~]# sh /ibmp_data/oracle/inventory/orainstRoot.sh
[[email protected] ~]# sh /ibmp_data/oracle/product/11.2.0/root.sh
4、oracle使用者下配置監聽
netca /silent /responsefile /home/oracle/response/netca.rsp三、靜默模式建庫
vim /home/oracle/response/dbca.rsp修改如下內容
GDBNAME = "orcl"            //資料庫名
SID = "orcl"                //sid
SYSPASSWORD = "ibmp"
SYSTEMPASSWORD = "ibmp"
SYSMANPASSWORD = "ibmp"
DBSNMPPASSWORD = "ibmp"
DATAFILEDESTINATION =/ibmp_data/oracle/oradata
RECOVERYAREADESTINATION= /ibmp_data/oracle/fast_recovery_area
CHARACTERSET = "AL32UTF8"
TOTALMEMORY = "1638"   //實體記憶體的80%
dbca -silent -responseFile /home/oracle/response/dbca.rsp四、開機自啟動
1)第一步:寫啟動關閉資料庫指令碼
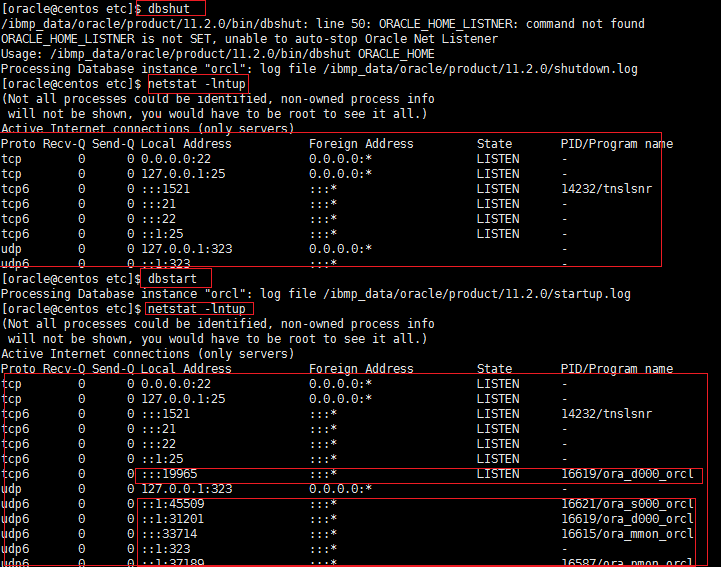
- 修改 /ibmp_data/oracle/product/11.2.0/bin/dbstart、vim /ibmp_data/oracle/product/11.2.0/bin/dbshut:
將ORACLE_HOME_LISTNER=\(1修改為ORACLE_HOME_LISTNER=\)ORACLE_HOME - 修改/etc/oratab
將orcl:/ibmp_data/oracle/product/11.2.0:N中最後的N改為Y
測試指令碼

2)新增開機啟動指令碼
1在root使用者下新增開機啟動指令碼 /etc/rc.d/init.d/oracle
#!/bin/bash
# oracle: Start/Stop Oracle Database 11g R2
# chkconfig: 345 90 10
# description: The Oracle Database is an Object-Relational Database Management System.
#
. /etc/rc.d/init.d/functions
LOCKFILE=/var/lock/subsys/oracle
ORACLE_HOME=/ibmp_data/oracle/product/11.2.0
ORACLE_USER=oracle
case "$1" in
'start')
if [ -f $LOCKFILE ]; then
      echo $0 already running.
      exit 1
    fi
    echo -n $"Starting Oracle Database:"
    su - $ORACLE_USER -c "$ORACLE_HOME/bin/lsnrctl start"
    su - $ORACLE_USER -c "$ORACLE_HOME/bin/dbstart $ORACLE_HOME"
    su - $ORACLE_USER -c "$ORACLE_HOME/bin/emctl start dbconsole"
    touch $LOCKFILE
    ;;
'stop')
    if [ ! -f $LOCKFILE ]; then
      echo $0 already stopping.
      exit 1
    fi
    echo -n $"Stopping Oracle Database:"
    su - $ORACLE_USER -c "$ORACLE_HOME/bin/lsnrctl stop"
    su - $ORACLE_USER -c "$ORACLE_HOME/bin/dbshut"
    su - $ORACLE_USER -c "$ORACLE_HOME/bin/emctl stop dbconsole"
    rm -f $LOCKFILE
    ;;
'restart')
    $0 stop
    $0 start
    ;;
'status')
    if [ -f $LOCKFILE ]; then
      echo $0 started.
      else
      echo $0 stopped.
    fi
    ;;
*)
    echo "Usage: $0 [start|stop|status]"
    exit 1
esac
exit 0
3)授權指令碼
chmod 755 /etc/init.d/oracle
chkconfig oracle on
service oracle start/stop/restart         //可用於日常關閉和啟動資料庫