
Redis: sentinel叢集的搭建和測試
Sentinel叢集的搭建和測試
1.1 測試環境
master: 127.0.0.16379
slave1: 127.0.0.1 6380
slave2: 127.0.0.1 6381
master-sentinel: 127.0.0.1 26379
slave1-sentinel: 127.0.0.1 26380
slave2-sentinel: 127.0.0.1 26381
1.2 叢集配置
1) Master
redis.conf:
daemonize yes
port 6379
requirepass pw
masterauth  pw
appendonly no
save ""
slave-read-only yes
6379-sentinal.conf
port 26379
sentinel monitor mymaster 192.168.0.105 6379 2
sentinel auth-pass mymaster foobared
sentinel down-after-milliseconds mymaster 30000
sentinel parallel-syncs mymaster 1
sentinel failover-timeout mymaster 900000
2) Salve1
Redis.conf
daemonize yes
port 6380
requirepass pw
masterauth  pw
appendonly no
save ""
slave-read-only yes
slaveof 192.168.0.105 6379
6380-sentinal.conf
port 26380
sentinel monitormymaster 192.168.0.105 6379 2
sentinel auth-passmymaster pw
sentineldown-after-milliseconds mymaster 30000
sentinel parallel-syncsmymaster 1
sentinel failover-timeout mymaster 900000
3) Salve2
Redis.conf
daemonize yes
port 6381
requirepass pw
masterauth  pw
appendonly no
save ""
slave-read-only yes
slaveof 192.168.0.105 6379
6381-sentinal.conf
port 26381
sentinel monitormymaster 192.168.0.105 6379 2
sentinel auth-passmymaster pw
sentineldown-after-milliseconds mymaster 30000
sentinel parallel-syncsmymaster 1
sentinel failover-timeout mymaster 900000
1.3 啟動叢集
寫一個批量啟動叢集的shell指令碼:
St-batch-start.sh
./bin/redis-server./st_cluster_1/master-6379/redis.conf&
./bin/redis-sentinel./st_cluster_1/master-6379/6379-sentinal.conf&
./bin/redis-server./st_cluster_1/salve-6380/redis.conf&
./bin/redis-sentinel ./st_cluster_1/salve-6380/6380-sentinal.conf&
./bin/redis-server./st_cluster_1/salve-6381/redis.conf&
./bin/redis-sentinel./st_cluster_1/salve-6381/6381-sentinal.conf&
#sh st-batch-start.sh
寫一個批量關閉叢集的shell指令碼:
St-batch-stop.sh
kill -9 `ps -ef | grep redis | awk '{print $2}'`#sh st-batch-stop.sh
1.1 啟動後的結果

起一個會話檢視master的情況:
redis-cli -h 192.168.0.105 -p 6379
auth pw
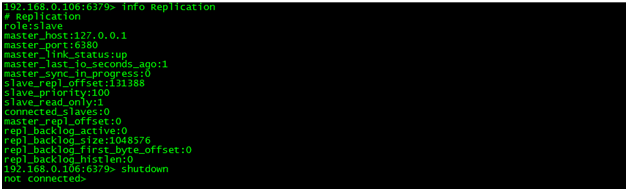
info Replication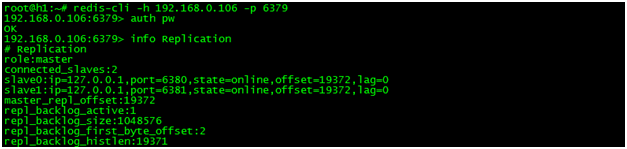
起一個會話查詢salve1的情況:
redis-cli -h192.168.0.105 -p 6380
起一個會話查詢salve2的情況:
redis-cli -h192.168.0.105 -p 6381
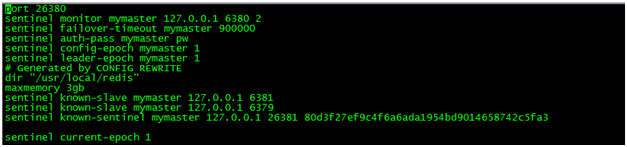
此時檢視sentinal各個主機的配置檔案:
埠為26379的sentinel的配置檔案沒有改變:

埠為26380的sentinel的配置檔案有改變:
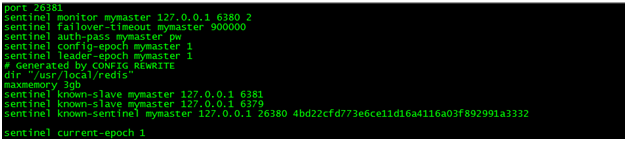
埠為26381的檔案被重寫了,因為它們發現了master的salve 6381,和另一個sentinel 26381。
1.4 場景測試
----場景1:master宕機
master-sentinel作為master 1的leader,會選取一個master 1的slave作為新的master。slave的選取是根據一個判斷DNS情況的優先順序來得到,優先順序相同通過runid的排序得到,但目前優先順序設定還沒實現,所以直接獲取runid排序得到slave 1。然後傳送命令slaveofno one來取消slave 1的slave狀態來轉換為master。當其他sentinel觀察到該slave成為master後,就知道錯誤處理例程啟動了。sentinel A然後傳送給其他slave slaveof new-slave-ip-port 命令,當所有slave都配置完後,sentinelA從監測的masters列表中刪除故障master,然後通知其他sentinels。
關閉master:
現在6379是master,6380和6381是salve。

Sentinel底下觀察選舉新的master的過程:
顯示了failover的過程:

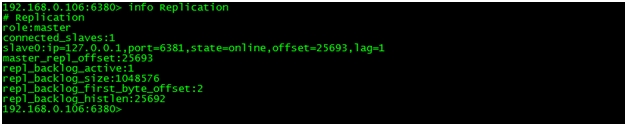
選擇6380為master:
----場景2:master恢復
重新啟動原來的master:
./bin/redis-server./st_cluster_1/master-6379/redis.conf&
檢視sentinel狀態:

原來的master自動切換成slave,不會自動恢復成master。
----場景3:salve1宕機
接著上面的繼續實驗。
關閉slave1:6379:
檢視master的Replication資訊:

此時只存在一個slave。
----場景4:salve1重啟
./bin/redis-server./st_cluster_1/master-6379/redis.conf&檢視sentinel狀態:
sentinel能快速的發現slave加入到叢集中:

檢視master的Replication資訊:

1.5 Java客戶端測試
修改Jedis 2.8的test case進行測試。package redis.clients.jedis.tests;
import java.util.HashSet;
import java.util.Set;
import org.apache.commons.pool2.impl.GenericObjectPoolConfig;
import org.junit.Before;
import org.junit.Test;
import redis.clients.jedis.HostAndPort;
import redis.clients.jedis.Jedis;
import redis.clients.jedis.JedisSentinelPool;
import redis.clients.jedis.Transaction;
import redis.clients.jedis.exceptions.JedisConnectionException;
import redis.clients.jedis.exceptions.JedisException;
import redis.clients.jedis.tests.utils.JedisSentinelTestUtil;
public class JedisSentinelPoolTest extends JedisTestBase {
private static final String MASTER_NAME = "mymaster";
private static final String localHost = "192.168.0.106";
protected static HostAndPort master = new HostAndPort(localHost, 6379);
protected static HostAndPort slave1 = new HostAndPort(localHost, 6380);
protected static HostAndPort slave2 = new HostAndPort(localHost, 6381);
protected static HostAndPort sentinel1 = new HostAndPort(localHost, 26379);
protected static HostAndPort sentinel2 = new HostAndPort(localHost, 26380);
protected static HostAndPort sentinel3 = new HostAndPort(localHost, 26381);
protected static Jedis sentinelJedis1;
protected static Jedis sentinelJedis2;
protected static Jedis sentinelJedis3;
protected Set<String> sentinels = new HashSet<String>();
@Before
public void setUp() throws Exception {
sentinels.add(sentinel1.toString());
sentinels.add(sentinel2.toString());
sentinels.add(sentinel3.toString());
sentinelJedis1 = new Jedis(sentinel1.getHost(), sentinel1.getPort());
sentinelJedis2 = new Jedis(sentinel2.getHost(), sentinel2.getPort());
sentinelJedis3 = new Jedis(sentinel3.getHost(), sentinel3.getPort());
}
@Test(expected = JedisConnectionException.class)
public void initializeWithNotAvailableSentinelsShouldThrowException() {
Set<String> wrongSentinels = new HashSet<String>();
wrongSentinels.add(new HostAndPort(localHost, 65432).toString());
wrongSentinels.add(new HostAndPort(localHost, 65431).toString());
JedisSentinelPool pool = new JedisSentinelPool(MASTER_NAME, wrongSentinels);
pool.destroy();
}
@Test(expected = JedisException.class)
public void initializeWithNotMonitoredMasterNameShouldThrowException() {
final String wrongMasterName = "wrongMasterName";
JedisSentinelPool pool = new JedisSentinelPool(wrongMasterName, sentinels);
pool.destroy();
}
@Test
public void checkCloseableConnections() throws Exception {
GenericObjectPoolConfig config = new GenericObjectPoolConfig();
JedisSentinelPool pool = new JedisSentinelPool(MASTER_NAME, sentinels, config, 10000,
"pw", 3);
Jedis jedis = pool.getResource();
jedis.auth("pw");
jedis.set("foo", "bar");
String ss = jedis.get("test");
assertEquals("bar", jedis.get("foo"));
jedis.close();
pool.close();
assertTrue(pool.isClosed());
}
@Test
public void ensureSafeTwiceFailover() throws InterruptedException {
JedisSentinelPool pool = new JedisSentinelPool(MASTER_NAME, sentinels,
new GenericObjectPoolConfig(), 9000, "pw", 3);
forceFailover(pool);
// after failover sentinel needs a bit of time to stabilize before a new
// failover
Thread.sleep(100);
forceFailover(pool);
// you can test failover as much as possible
}
@Test
public void returnResourceShouldResetState() {
GenericObjectPoolConfig config = new GenericObjectPoolConfig();
config.setMaxTotal(1);
config.setBlockWhenExhausted(false);
JedisSentinelPool pool = new JedisSentinelPool(MASTER_NAME, sentinels, config, 1000,
"pw", 3);
Jedis jedis = pool.getResource();
Jedis jedis2 = null;
try {
jedis.set("hello", "jedis");
Transaction t = jedis.multi();
t.set("hello", "world");
jedis.close();
jedis2 = pool.getResource();
assertTrue(jedis == jedis2);
assertEquals("jedis", jedis2.get("hello"));
} catch (JedisConnectionException e) {
if (jedis2 != null) {
jedis2 = null;
}
} finally {
jedis2.close();
pool.destroy();
}
}
@Test
public void checkResourceIsCloseable() {
GenericObjectPoolConfig config = new GenericObjectPoolConfig();
config.setMaxTotal(1);
config.setBlockWhenExhausted(false);
JedisSentinelPool pool = new JedisSentinelPool(MASTER_NAME, sentinels, config, 1000,
"pw", 3);
Jedis jedis = pool.getResource();
try {
jedis.set("hello", "jedis");
} finally {
jedis.close();
}
Jedis jedis2 = pool.getResource();
try {
assertEquals(jedis, jedis2);
} finally {
jedis2.close();
}
}
private void forceFailover(JedisSentinelPool pool) throws InterruptedException {
HostAndPort oldMaster = pool.getCurrentHostMaster();
// jedis connection should be master
Jedis beforeFailoverJedis = pool.getResource();
assertEquals("PONG", beforeFailoverJedis.ping());
waitForFailover(pool, oldMaster);
Jedis afterFailoverJedis = pool.getResource();
assertEquals("PONG", afterFailoverJedis.ping());
assertEquals("pw", afterFailoverJedis.configGet("requirepass").get(1));
assertEquals(3, afterFailoverJedis.getDB());
// returning both connections to the pool should not throw
beforeFailoverJedis.close();
afterFailoverJedis.close();
}
private void waitForFailover(JedisSentinelPool pool, HostAndPort oldMaster)
throws InterruptedException {
HostAndPort newMaster = JedisSentinelTestUtil.waitForNewPromotedMaster(MASTER_NAME,
sentinelJedis1, sentinelJedis2);
waitForJedisSentinelPoolRecognizeNewMaster(pool, newMaster);
}
private void waitForJedisSentinelPoolRecognizeNewMaster(JedisSentinelPool pool,
HostAndPort newMaster) throws InterruptedException {
while (true) {
HostAndPort currentHostMaster = pool.getCurrentHostMaster();
if (newMaster.equals(currentHostMaster)) break;
System.out.println("JedisSentinelPool's master is not yet changed, sleep...");
Thread.sleep(100);
}
}
}相關推薦
Redis 叢集搭建和測試教程
請注意,本教程使用於Redis3.0(包括3.0)以上版本 Redis叢集介紹 Redis 叢集是一個提供在多個Redis間節點間共享資料的程式集。 Redis叢集並不支援處理多個keys的命令,因為這需要在不同的節點間移動資料,從而達不到像Redis那樣的效能,在高
hadoop學習第二天~Hadoop2.6.5完全分散式叢集搭建和測試
環境配置: 系統 centos7 節點 192.168.1.111 namenode 192.168.1.115 datanode2 192.168.1.116 datanode3 java 環境 :
Redis: sentinel叢集的搭建和測試
Sentinel叢集的搭建和測試 1.1 測試環境 master: 127.0.0.16379 slave1: 127.0.0.1 6380 slave2: 127.0.0.1 6381 master-sentine
Redis 復制、Sentinel的搭建和原理說明(轉)
單個 高可用 模式 ogre 出現 password 並不會 shc generated Redis 復制、Sentinel的搭建和原理說明 轉自:http://www.cnblogs.com/zhoujinyi/p/5570024.html. 背景: R
Redis哨兵Sentinel的搭建和原理說明
原文地址:http://www.cnblogs.com/zhoujinyi/p/5570024.html 背景: Redis-Sentinel是Redis官方推薦的高可用性(HA)解決方案,當用Redis做Master-slave的高可用方
redis之二 主從複製、sentinel叢集搭建
redis中文官網: replication sentinel 一、主從複製 通過redis的持久化功能,redis可以保證伺服器重啟也不會損失(或少量損失)資料。但資料儲存在單臺redis伺服器上,如果這臺伺服器出現硬碟故障,則會導致資料丟失。 為了避免單點故障,可以將資
redis詳解——redis叢集搭建和使用(二)
上一章我寫到redis簡單的介紹和如何單機的使用,當我們redis相當重要的時候那麼接下來就需要搭建一個叢集了。 1 Redis叢集的介紹 1.1 redis-cluster(叢集)架構圖 架構細節: (1)所有的redis節點彼此互聯(PING-PONG機制),
Redis高可用叢集-哨兵模式(Redis-Sentinel)搭建配置教程【Windows環境】
No cross,no crown . 不經歷風雨,怎麼見彩虹。 Redis哨兵模式,用現在流行的話可以說就是一個“哨兵機器人”,給“哨兵機器人”進行相應的配置之後,這個”機器人”可以7*24小時工作,它能能夠自動幫助你做一些事情,如監控,提醒,自動處
Linux下Redis叢集搭建與測試
叢集搭建 準備條件 一臺已經配置好Redis服務的虛擬機器,地址為: 192.168.2.100:6379 克隆6臺,使用命令nmtui修改地址分別為: 192.168.2.101 192.168.2.102 192.168.2.103 1
redis高可用sentinel叢集搭建
哨兵機制,它基於 Redis 主從複製,主要作用便是解決主節點故障恢復的自動化問題,進一步提高系統的高可用性。 哨兵的架構 它由兩部分組成,哨兵節點和資料節點: 哨兵節點:哨兵系統由一個或多個哨兵節點組成,哨兵節點是特殊的 Redis 節點,不儲存資料。 資料節點:主節點和
Redis 叢集搭建和簡單使用教程
##一臺機器<br>ps -ef | grep redis root 61020 1 0 02:14 ? 00:00:01 redis-server 127.0.0.1:7000 [cluster] root 61024 1 0 02:14 ? 00:00:01 redis-ser
SMM框架的搭建和測試(Spring MVC+MyBatis)
meta true model spa const -i ssp pan div Spring MVC:MVC框架,通過Model-View-Controller模式很好的將數據,業務與展現進行分離。 MyBatis:數據持久層框架 我這裏使用的是MyEclipse 2
SSH框架的搭建和測試(Spring + Struts2 + Hibernate)
conf work fault 項目 -i extends struts2 scrip map SSH框架實現了視圖、控制器、和模型的徹底分離,同時還實現了業務邏輯層與持久層的分離。 Spring實現了MVC中的 Controller的功能,Struts實現Web視圖的功能
Windows平臺下的Redis-Sentinel叢集配置
一、環境介紹 Microsoft Windows 10 企業版 Redis-x64-3.2.100 jedis 2.9.0 Sentinel是一個管理多個redis例項的工具,它可以實現對redis的監控、通知、自動故障轉移。sentinel不斷的檢測red
VSCode + PYQT5 + QtDesigner 環境搭建和測試
目的:編寫Python桌面應用程式。 備註:也可以選擇VS2017+QtDesigner ,但更喜歡VSCode 第1步:安裝PyQt5和PyQt5-tools pip3 install -i https://mirrors.aliyun.com/pypi/simple/&n
使用docker redis-cluster叢集搭建
參考https://www.cnblogs.com/cxbhakim/p/9151720.html此文 主要搭建過程參考上文,此處講下主要過程和遇到的坑 首先是映象的基礎搭建,我不知道是否是作者編寫時和我現在的版本不同了,第一個坑點Dockerfile中FROM Centos:7,這去掉算
MySQL 5.7 延遲復制環境搭建和測試
uic glibc tin sed quic -s triggers def lee 安裝主從 MySQL 5.7 # 主 MySQL5.7 cd /usr/local tar -xvf mysql-5.7.23-linux-glibc2.12-x86_64.tar.gz
Redis Sentinel叢集雙機房容災實施步驟
概要目標防止雙機房情況下任一個機房完全無法提供服務時如何讓Redis繼續提供服務。架構設計A、B兩機房,其中A機房有一Master一Slave和兩個Sentinel,B機房只有2個Sentinel,如下圖。 初始規劃A機房192.168.71.213 S+哨兵192.168.71.214 M+哨兵B機房19
redis的叢集模式和哨兵模式
redis的叢集模式和哨兵模式 redis中叢集模式 redis叢集模式配置支援3.0及以上的版本。目的提高redis的可用性,但是隻能保證一定程度的高可用。 redis-cluster原理 Redis 叢集有16384個雜湊槽,每個key通過CRC16校驗後對16384取模來決定放置哪個槽.叢集的每個節點負
Zookeeper叢集搭建和Kafka叢集的搭建
Zookeeper!!! 一、Zookeeper叢集搭建步驟 0)叢集規劃 在hadoop01、hadoop02和hadoop03三個節點上部署Zookeeper。 1)解壓安裝 (1)解壓zookeeper安裝包到/home/hadoop/insatll/目錄下 [[email