
Running AWS Fargate with virtual-kubelet
AWS Fargate is a new compute engine that allows you to run containers without having to provision, manage, or scale servers.
Today, Fargate is natively integrated with Amazon Elastic Container Service (ECS). Since we announced Fargate at re:Invent 2017, many customers have told us that they were very interested in using Fargate to run Kubernetes. To help make this happen, we’ve started exploring using
Virtual-kubelet is an open source, community-driven project that allows Kubernetes worker nodes to be backed by any compute resource. We have written a new provider plugin that allows virtual-kubelet to create Fargate tasks, and have merged this plugin into the virtual-kubelet upstream project
This new plugin is an exploratory step towards extending AWS Fargate’s managed data plane to Kubernetes, and we have a lot to do before it works seamlessly for all use cases. For now, here are few simple steps to try it for yourself:
Step 1: Set up a single-master Kubernetes cluster using kops
We will set up a simple test environment to showcase Kubernetes workloads backed by AWS Fargate.
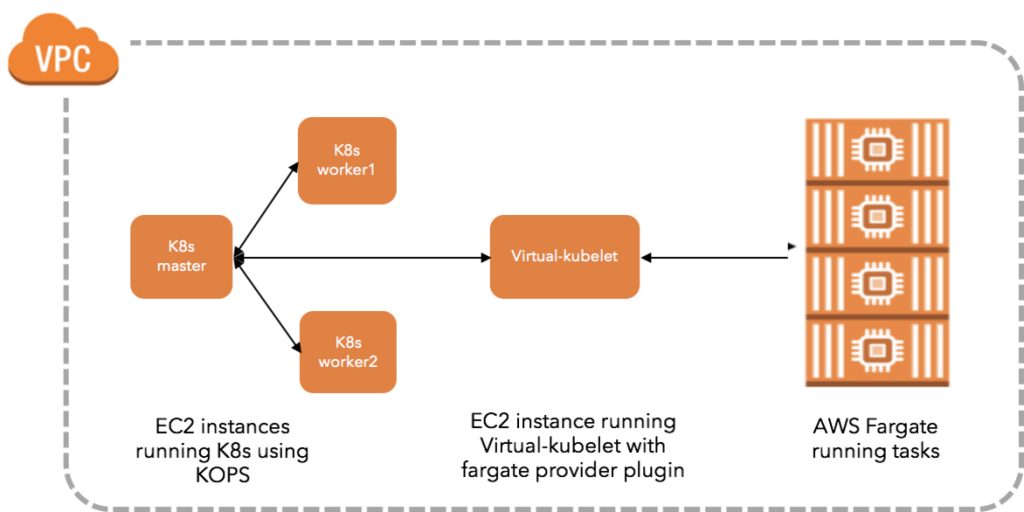
The first step is to set up a kops cluster. In our kops set-up we are using a hybrid environment with two EC2 worker nodes and one virtual-kubelet instance. Any Kubernetes workloads that are not supported on Virtual-Kubelet and Fargate, can easily be scheduled as usual on the two worker nodes. Follow the instructions below using this repository: github.com/kubernetes/kops/blob/master/docs/aws.md. Our blog post on managing Kubernetes clusters on AWS using kops may also be helpful.
$ export KUBERNETES_VERSION=https://storage.googleapis.com/kubernetes-release/release/v1.9.0/
$ export AWS_AVAILABILITY_ZONES=us-east-1
$ export CLUSTER_NAME=dnishi-kops1.k8s.local

$ kops create cluster —name $CLUSTER_NAME —zones $AWS_AVAILABILITY_ZONES —kubernetes-version $KUBERNETES_VERSION --yes

##Tested with Kubernetes v1.8.0+
##Kops 1.6.2+ can be easily created as a gossip-based cluster and the cluster name has to end with k8s.local
Once the kops install finishes, verify your nodes are running with kubectl:
$ kubectl get nodes
NAME                            STATUS    ROLES     AGE       VERSION
ip-172-20-42-7.ec2.internal     Ready     master    5h        v1.9.0
ip-172-20-44-230.ec2.internal   Ready     node      5h        v1.9.0
ip-172-20-58-31.ec2.internal    Ready     node      5h        v1.9.0
Copy the kubeconfig file for the kops cluster and save it. You will need this file on the EC2 instance where virtual-kubelet will run.
Step 2: Make a virtual-kubelet build from the upstream repository
Before you build, make sure you have installed Go. For a first time user set the variables as follows:
$ export GOPATH=$HOME/goWe’ll use github.com/virtual-kubelet as our base path.
$ mkdir -p $GOPATH/src/github.com/virtual-kubelet
$ cd $GOPATH/src/github.com/virtual-kubelet
If you are cloning this repo for the first time, use the commands below. If you have previously cloned virtual-kublet, replace `git clone` with `git pull` in the commands below.
$ git clone https://github.com/virtual-kubelet/virtual-kubelet
$ cd virtual-kubelet
$ make buildAll dependencies are vendored-in to the repository and will be built together with virtual-kubelet. The binary is placed in virtual-kubelet/bin directory.
Step 3: Create your Fargate task
If you haven’t used AWS Fargate before, the easiest way to get started is with Fargate’s first run experience. This will set up Fargate in your AWS account with the default settings. It will create a default Fargate cluster*, IAM roles, and a default VPC with an internet gateway and a default security group. After the first run, it’s easy to fine-tune individual settings. Once you have your first application on Fargate running, visit the AWS ECS console to take a closer look at your Fargate resources. Take a note of the sample-app’s subnets and security groups.
*because Fargate abstracts away servers, the cluster is used only as a logical construct to group running containers.
Step 4: Create an EC2 instance to run virtual-kubelet with the Fargate provider plugin
Create an IAM Role for the EC2 instance. Many AWS services require that you use roles to control what a service can access. When an IAM role serves a specialized purpose for a service, it is categorized as a service role for EC2 instances (for example), or a service-linked role. The EC2 instance running virtual-kubelet needs full access to the ECS APIs. Use the following steps to create the right IAM role:
Using AWS Console:
- Create role, select AWS service, Choose EC2 as the service that will use this role and click “Next: Permissions.”
- Search for “AmazonECS_FullAccess”, select it and click “Next: Review.”
- Name the role as “VK-ECSFullAccess” and complete. You will see the new role appear on the IAM Roles page.
Using aws-cli:
Create the role and attach the trust policy that enables EC2 to assume this role:
$ aws iam create-role --role-name VK-ECSFullAccess --assume-role-policy-document file://VK-Role-Trust-Policy.jsonHere is the VK-Role-Trust-Policy.json:
$ cat VK-Role-Trust-Policy.json
{
  "Version": "2012-10-17",
  "Statement": {
    "Effect": "Allow",
    "Principal": {"Service": "ec2.amazonaws.com"},
    "Action": "sts:AssumeRole"
  }
}
Call the attach-role-policy command to grant this IAM role permission to access resources in your account:
$ aws iam attach-role-policy --role-name VK-ECSFullAccess --policy-arn arn:aws:iam::aws:policy/AmazonECS_FullAccessCreate the instance profile required by EC2 to contain the role:
$ aws iam create-instance-profile --instance-profile-name EC2-AmazonECS_FullAccessFinally, add the role to the instance profile:
$ aws iam add-role-to-instance-profile --instance-profile-name EC2-AmazonECS_FullAccess --role-name VK-ECSFullAccessCreate the EC2 instance and attach the new role to it:
- Use the EC2 console to create an EC2 node in the same VPC and Subnet as the other kops worker nodes and add the VK-ECSFullAccess-Role to the EC2 node during creation.
- Alternately, use these aws-cli commands:
Create an ec2 Debian GNU/Linux 8 (Jessie) instance within the same subnet and security group as the kops worker nodes:
$ aws ec2 run-instances --image-id ami-b14ba7a7 --count 1 --instance-type t2.micro --key-name ${MyKeyPair-xxxxx} --security-group-ids ${sg-xxxxxxxx} --subnet-id ${subnet-xxxxxxxx} --associate-public-ip-addressCall the associate-iam-instance-profile command to attach the instance profile, YourNewRole-Instance-Profile, for the newly created IAM role, YourNewRole, to your EC2 instance, YourInstanceId:
$ aws ec2 associate-iam-instance-profile --instance-id ${i-xxxxxxxxxxxxx} --iam-instance-profile Name=EC2-AmazonECS_FullAccessVerify that the IAM role is now attached to the instance by calling the describe-iam-instance-profile-association command:
$ aws ec2 describe-iam-instance-profile-associationsCopy the following files to the new EC2 node:
- “virtual-kubelet” binary
- config file. Update the fargate.toml file with the subnet, security group values from STEP 3. Also, change AssignPublicIPv4Address = true, if you want to access images from outside.
- “kubeconfig” file from the kops cluster. Move this file to the path /root/.kube/config
$ scp -r -i ${path-to-MyKeyPair-xxxxx} ${path-to-virtual-kubelet/providers/aws/fargate.toml} ~/.kube/config [email protected]
$ ssh -i ${path-to-MyKeyPair-xxxxx} [email protected]
$ sudo -i
$ mv config /root/.kube/config
Run virtual-kubelet and keep the process running:
$ ./virtual-kubelet --provider aws --provider-config fargate.tomlStep 5: Confirm from your kubectl client that the cluster is ready
Once virtual-kubelet process is initiated, you will see it register as an agent onto the cluster.
$ kubectl get nodes
NAME                            STATUS    ROLES     AGE       VERSION
ip-172-20-42-7.ec2.internal     Ready     master    1d        v1.9.0
ip-172-20-44-230.ec2.internal   Ready     node      1d        v1.9.0
ip-172-20-58-31.ec2.internal    Ready     node      1d        v1.9.0
virtual-kubelet                 Ready     agent     14s       v1.8.3
Step 6: Create Kubernetes objects (pods, deployments, replica sets, services)
Deploy nginx with three replicas by using a text editor to create a YAML file with these contents and running it. To assign pods on Fargate (virtual-kubelet), we use constraint in the manifest, which is a field of PodSpec. It specifies a map of key-value pairs. You can also use Kubernetes taints to simulate this behavior.
apiVersion: apps/v1
kind: Deployment
metadata:
  name: nginx-deployment
  labels:
    app: nginx
spec:
  replicas: 3
  selector:
    matchLabels:
      app: nginx
  template:
    metadata:
      labels:
        app: nginx
    spec:
      containers:
      - name: nginx
        image: nginx:1.7.9
        ports:
        - containerPort: 80
        imagePullPolicy: IfNotPresent
        resources:
          requests:
            memory: "256Mi"
            cpu: "250m"
          limits:
            memory: "1000Mi"
            cpu: "500m"
      nodeSelector:
        type: virtual-kubelet
Now, deploy the YAML file you created:
$ kubectl create -f nginx-deployment.yaml
deployment.apps "nginx-deployment" created
$ kubectl get deployments -o wide
NAME              DESIRED  CURRENT  UP-TO-DATE  AVAILABLE  AGE  CONTAINERS  IMAGES       SELECTOR
nginx-deployment     3       3         3             0     12s  nginx       nginx:1.7.9 app=nginx

$ kubectl get pods -o wide
NAME                               READY      STATUS      RESTARTS     AGE     IP          NODE
nginx-deployment-6b488d64b-47hvk   1/1        Running     0            2m      10.0.1.23   virtual-kubelet
nginx-deployment-6b488d64b-dj45s   1/1        Running     0            2m      10.0.1.161  virtual-kubelet
nginx-deployment-6b488d64b-p6vsb   1/1        Running     0            2m      10.0.1.95   virtual-kubelet
Notice the nginx pod metadata in bold is reflected in the Fargate Dashboard below as a task definition.

Let’s update the nginx-deployments running on Fargate from v1.7.9 to v1.9.1:
$ kubectl set image deployment/nginx-deployment nginx=nginx:1.9.1

deployment.apps "nginx-deployment" image updated

$ kubectl rollout status deployment/nginx-deployment
Waiting for rollout to finish: 1 out of 3 new replicas have been updated...
Waiting for rollout to finish: 1 out of 3 new replicas have been updated...
Waiting for rollout to finish: 2 out of 3 new replicas have been updated...
Waiting for rollout to finish: 2 out of 3 new replicas have been updated...
Waiting for rollout to finish: 2 out of 3 new replicas have been updated...
Waiting for rollout to finish: 1 old replicas are pending termination...
Waiting for rollout to finish: 1 old replicas are pending termination...
deployment "nginx-deployment" successfully rolled out
Fargate tasks also get updated one task at a time. If you click on a task, you can see the image version update from v1.7.9 to v1.9.1. Within seconds, each task updates to v1.9.1 and this process repeats for each task one at a time.


Deploy 20 pods with a single command. Use the nginx-deployment-new.yaml. As reflected in the Fargate dashboard, the tasks are created in seconds:
$ kubectl create -f nginx-deployment-new.yaml
deployment.apps "nginx-deployment" created

$ kubectl get deployments -o wide
NAME              DESIRED  CURRENT  UP-TO-DATE  AVAILABLE  AGE  CONTAINERS  IMAGES      SELECTOR
nginx-deployment    20       20       20           0       14s    nginx  nginx:1.7.9   app=nginx


Closing Thoughts
Today, the virtual-kubelet provider plugin does not support every Kubernetes use case and application pattern. This is our first step to give Kubernetes users a new way to think about compute, and we are excited to engage with the community on how best to implement nodeless design concepts for Kubernetes. We hope you will join us on this journey, suggest ideas, contribute code, and help test this plugin for your applications.
Here’s how you can participate:
AWS will be at KubeCon EU in Copenhagen, Denmark on May 2nd to 4th 2018 , demonstrating this integration as well as our upcoming managed Kubernetes service, Amazon Elastic Container Service for Kubernetes (Amazon EKS).
NOTE: This post is written specifically for intermediate-level users. A grasp of Linux, Go, Docker, and K8s is expected. Also, virtual-kubelet is not yet a stable code base. Don’t be surprised if virtual-kubelet crashes. We need help to make it stable!
相關推薦
Running AWS Fargate with virtual-kubelet
AWS Fargate is a new compute engine that allows you to run containers without having to provision, manage, or scale servers. Toda
Building Real Time AI with AWS Fargate
This post is a contribution from AWS customer, Veritone. It was originally published on the company’s Website. Here at Veritone,
AWS終於支援Kubernetes,Serverless容器服務AWS Fargate同時釋出_Kubernetes中文社群
在之前文章 我們提到微軟、Google、IBM及甲骨文等主要雲服務廠商都支援Kubernetes,細心朋友會發現唯一少了AWS,幸運的是在本週(11/29)Amazon宣佈開始支援Kubernetes容器排程服務,推出 Amazon Elastic Container Service for
Casual dining chains counter sagging sales with virtual assistants, AI
Casual dining chains are leaving few technology stones unturned in the push to jumpstart their ailing businesses. Dine Brands Global, owner of U.S. restaur
Running a container with a non root user
Running a container with a non root userTL;DROne best practice when running a container is to launch the process with a non root user. This is usually done
AWS Storage Gateway: Virtual Tape Backup to the Cloud
The AWS Storage Gateway service can be configured to act as a Virtual Tape Library (VTL) that spans from your on-premises environment, where your
Pay AWS Bill with Multiple Payment Methods
Amazon Web Services is Hiring. Amazon Web Services (AWS) is a dynamic, growing business unit within Amazon.com. We are currently hiring So
Task Networking in AWS Fargate
AWS Fargate is a new compute engine for containers that allows you to focus on running your application without needing to provision, monitor, or
Migrating Your Amazon ECS Containers to AWS Fargate
AWS Fargate is a new compute engine that works with Amazon Elastic Container Service (ECS) to run containers without having to manage servers or c
Building SaaS Services for AWS Customers with PrivateLink
With the advent of AWS PrivateLink, you can provide services to AWS customers directly in their Virtual Private Networks by offering cross-account
Connect to the AWS Console with SAML
Amazon Web Services is Hiring. Amazon Web Services (AWS) is a dynamic, growing business unit within Amazon.com. We are currently hiring So
AWS Marketplace: SafeNet Virtual KeySecure 8.1, 32
30 Day Free Trial - Upon subscribing, you will automatically receive one instance of this product free for 30 days. Own your encryption keys--and
AWS Fargate – 無伺服器化容器解決方案
AWS Fargate 是可以與 Amazon ECS結合使用的技術,讓您在執行容器時不需要管理伺服器或叢集。使用 AWS Fargate,你不需要搭建控制平面,只需選擇合適的例項型別,或配置應用程式堆疊的所有其它部分,比如網路、擴充套件、服務發現、負載均衡,安全組、許可權或金鑰管理。你只需
AWS Fargate 簡介 – 執行容器無需管理基礎設施
容器是開發人員用來開發、封裝和部署其應用程式的一種強大方法。AWS 每週啟動超過十萬 ECS 群集和數億新容器。這相當於從 2016 年以來實現了超過 400% 的客戶增長。Amazon ECS 和 Kubernetes 這樣的容器編排解決方案讓部署、管理和擴充套件這些容器工作負載變得更簡單
AWS Fargate容器部署_無需管理伺服器與叢集的容器服務
AWS Fargate 是一種適用於 Amazon ECS 的計算引擎,讓您無需管理伺服器或群集即可執行容器。使用 AWS Fargate,您不必再預置、配置和擴充套件虛擬機器群集即可執行容器。這樣一來,您就無需再選擇伺服器型別、確定擴充套件群集的時間和優化群集打包。AWS Fargate
AWS Fargate 定價
例如,您的服務使用 10 個 ECS 任務,每個 ECS 任務使用 0.25 個 vCPU 和 1GB 記憶體,每天執行 1 個小時(3600 秒),持續執行一個月(30 天)。 月度 CPU 費用 vCPU 總費用 = 任務數 x vCP
AWS Fargate 常見問題
問:AWS Fargate 如何與 ECS 搭配使用? Amazon Elastic Container Service (ECS) 一項高度可擴充套件的高效能容器管理服務,支援 Docker 容器,並讓您能夠在託管的 Amazon EC2 例項叢集上輕鬆
AWS終於支援Kubernetes,Serverless容器服務AWS Fargate同時釋出
在之前文章 我們提到微軟、Google、IBM及甲骨文等主要雲服務廠商都支援Kubernetes,細心朋友會發現唯一少了AWS,幸運的是在本週(11/29)Amazon宣佈開始支援Kubernetes容器排程服務,推出 Amazon Elastic Container