
Ubuntu之Gitlab、Gerrit、Jenkins協調工作配置
前提
前提
- 建立郵箱 [email protected]
- 建立郵箱 [email protected]
Gitlab配置
Gitlab已經配置了root賬戶的郵箱為[email protected]
為Gitlab的root使用者新增ssh金鑰
系統上建立admin使用者
$ sudo adduser admin
可以得到系統的使用者名稱admin和使用者自己設定的密碼
系統上登入admin賬戶,生成SSH金鑰
$ su - admin
$ ssh-keygen -C [email protected] 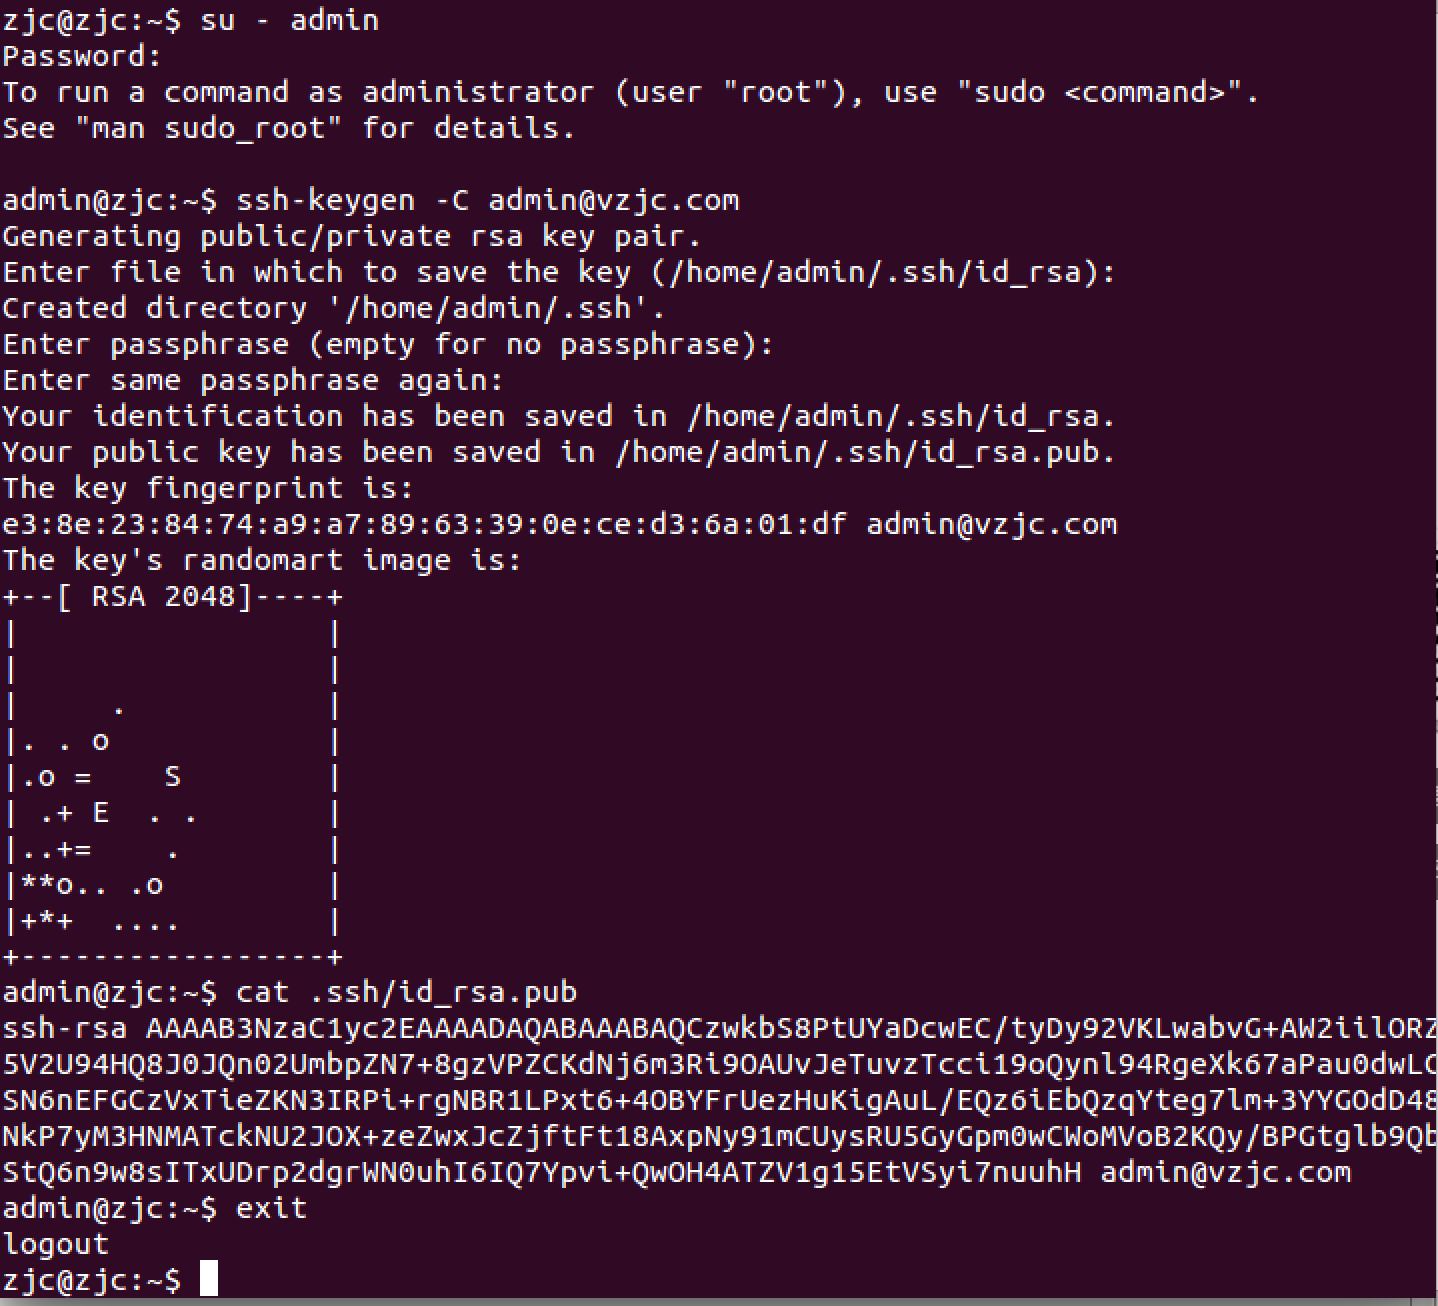
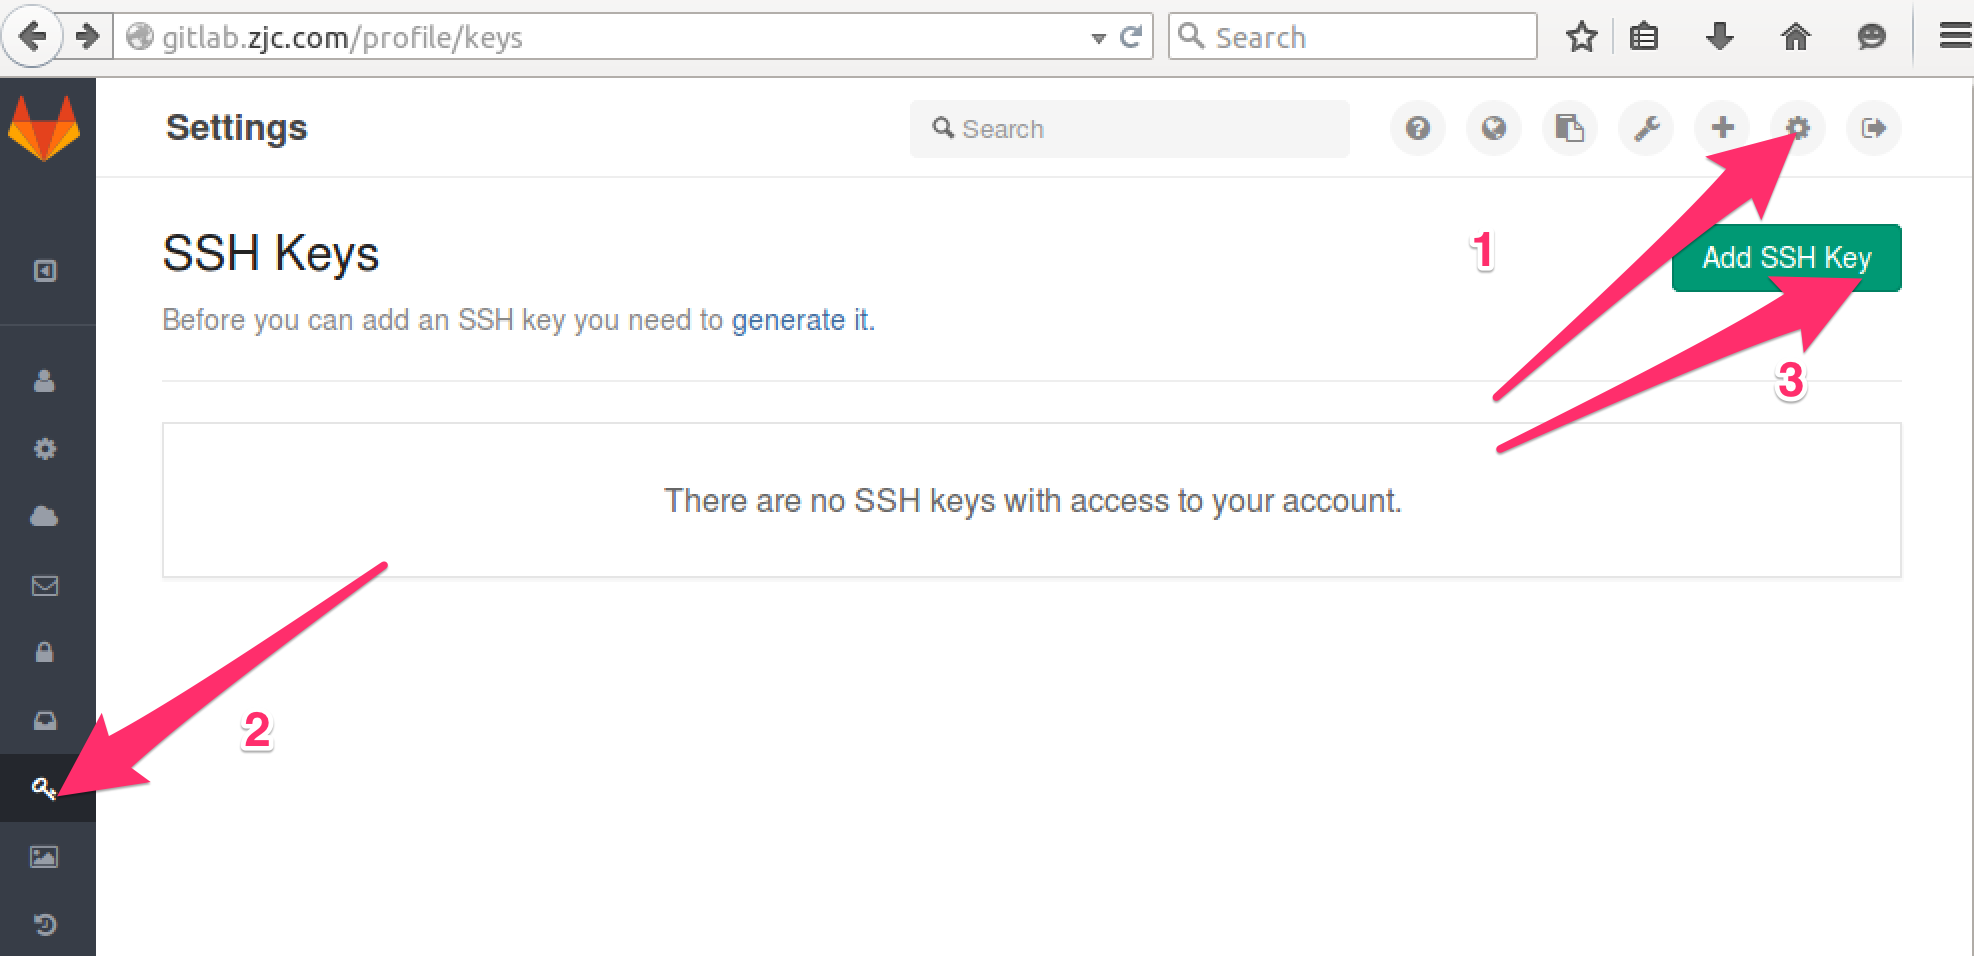
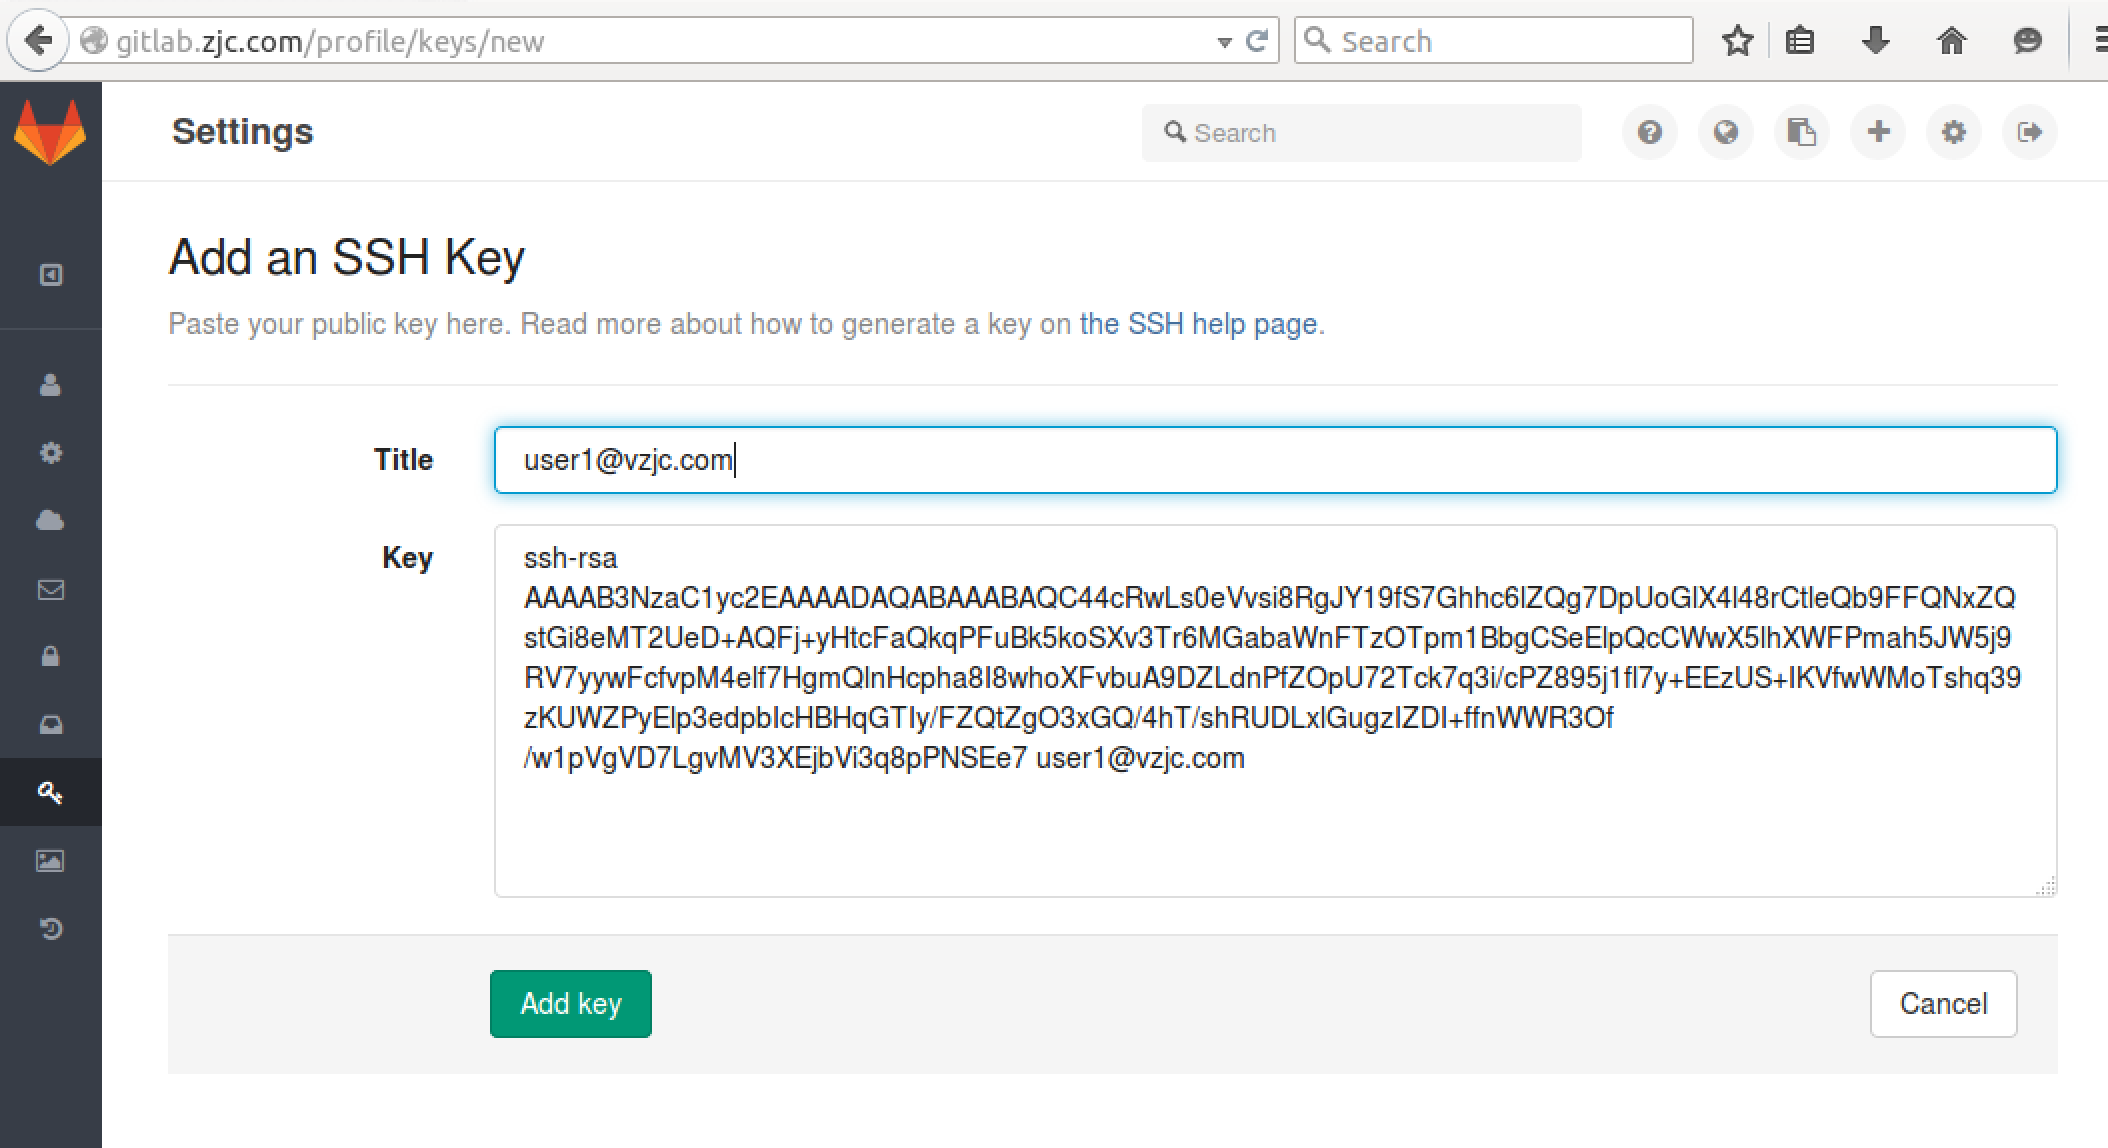
在Gitlab系統上更新SSH公鑰
- 用root賬號登入
http://gitlab.zjc.com - 點選頁面右上角的Profile Settings - 點選左側的SSH Keys小鑰匙圖示 - 點選
Add SSH Key。在Key對應的輸入框中輸入上段落$cat .ssh/id_rsa.pub顯示的公鑰全文,點選Title,應該會自動填充為[email protected]
用了圈點Skitch,感覺萌萌噠
建立使用者user1,作為一般使用者
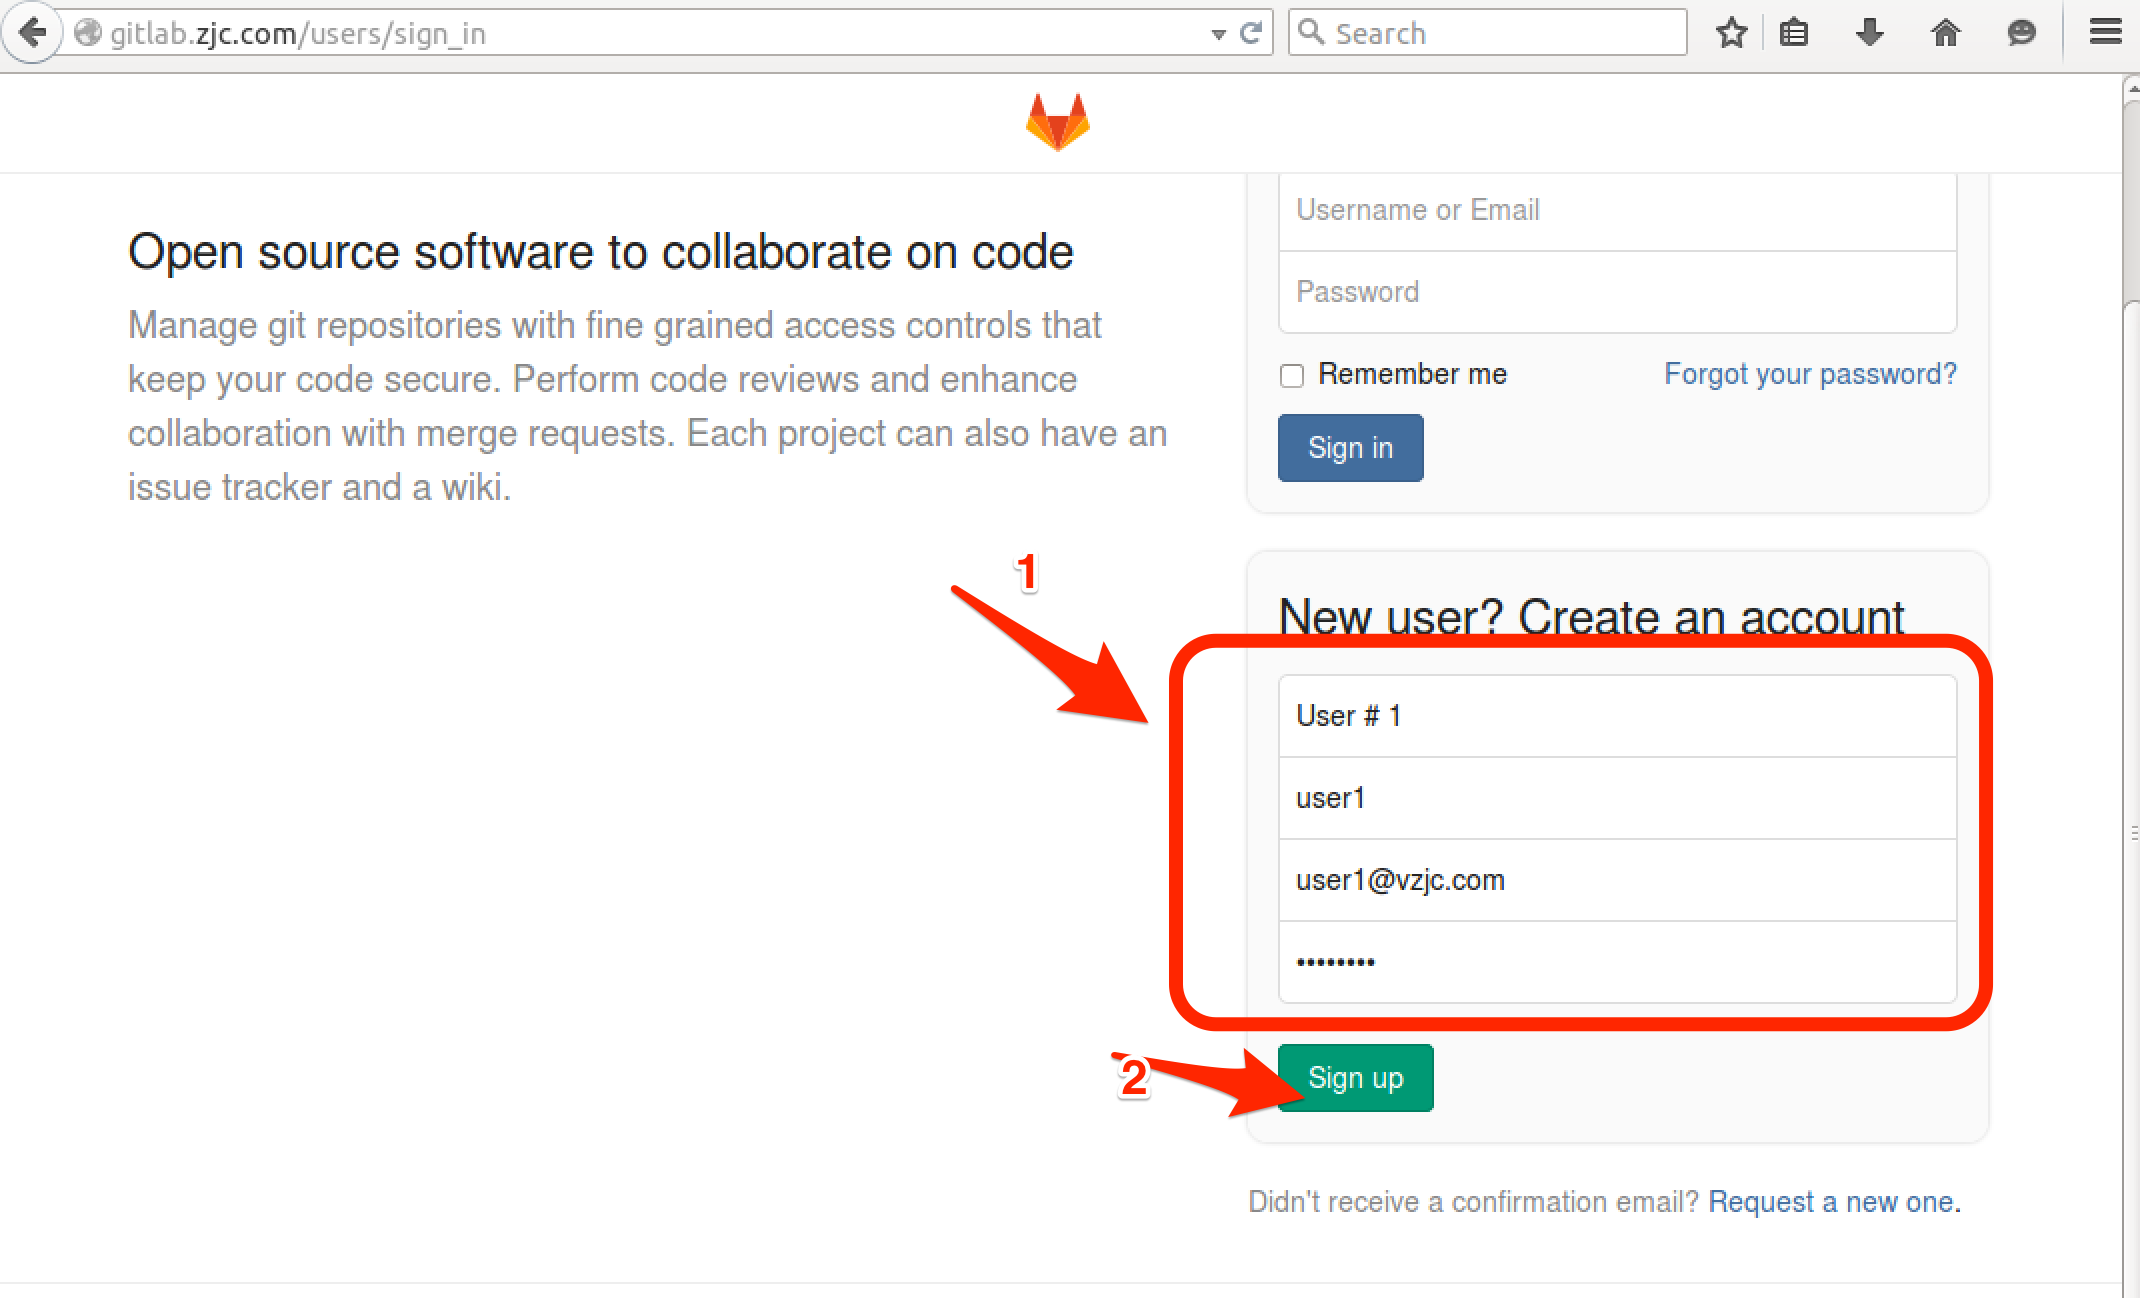
Gitlab上建立使用者user1
進入註冊頁面,輸入註冊資訊,點選Sign up
按鈕來註冊使用者user1。登入郵箱點選驗證連線,在Gitlab上成功建立user1賬號
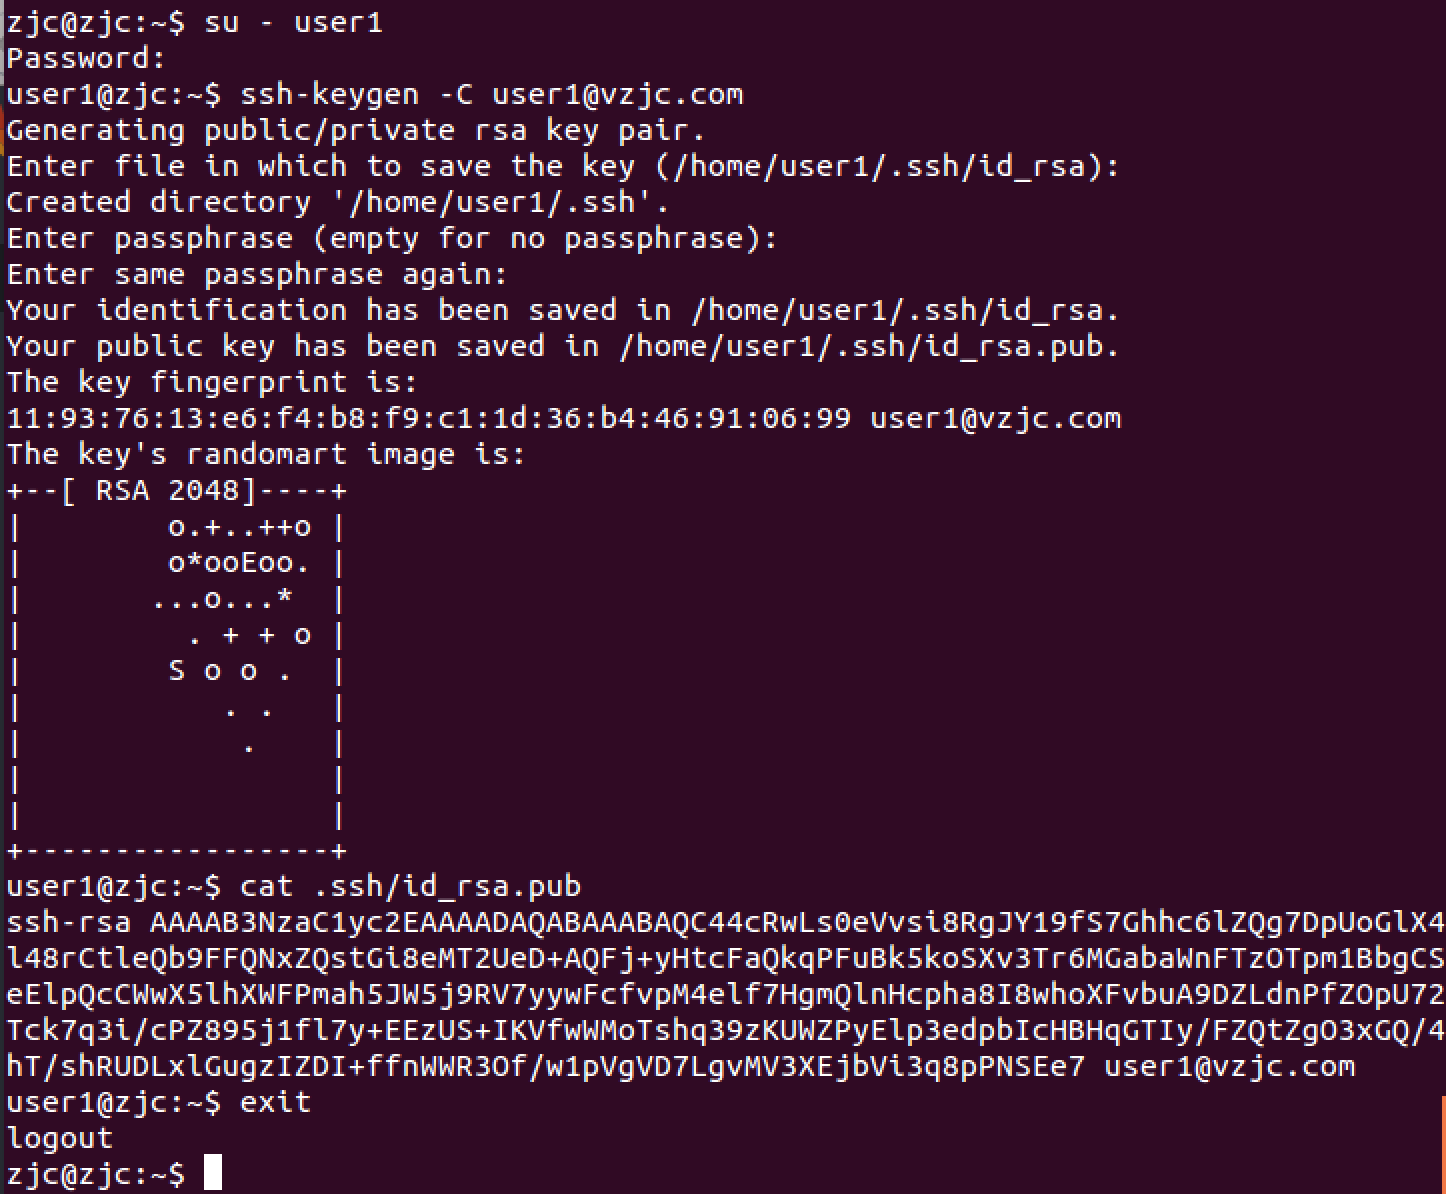
Ubuntu系統上建立user1賬號,生成SSH祕鑰
$ sudo adduser user1
$ su - user1
$ ssh-keygen -C [email protected]
$ cat .ssh/id_rsa.pub
$ exit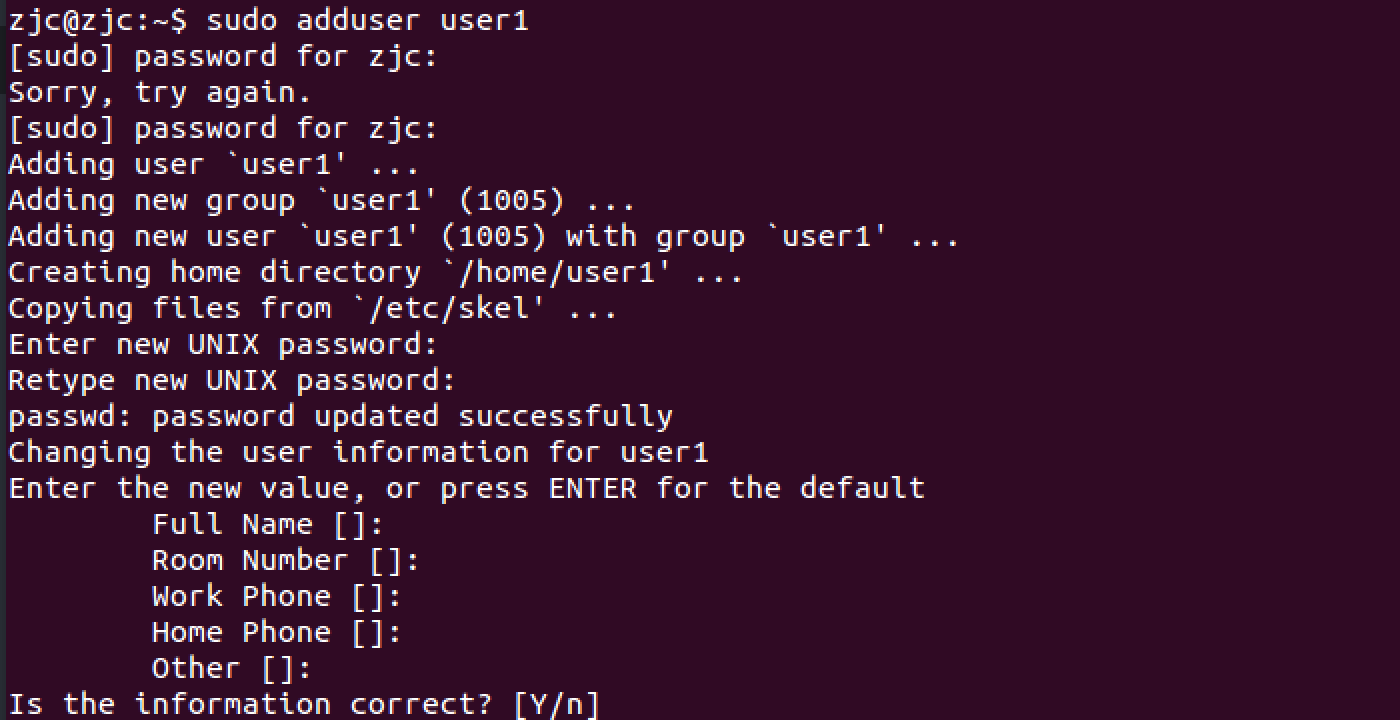
用user1登入Gitlab,更新SSH公鑰
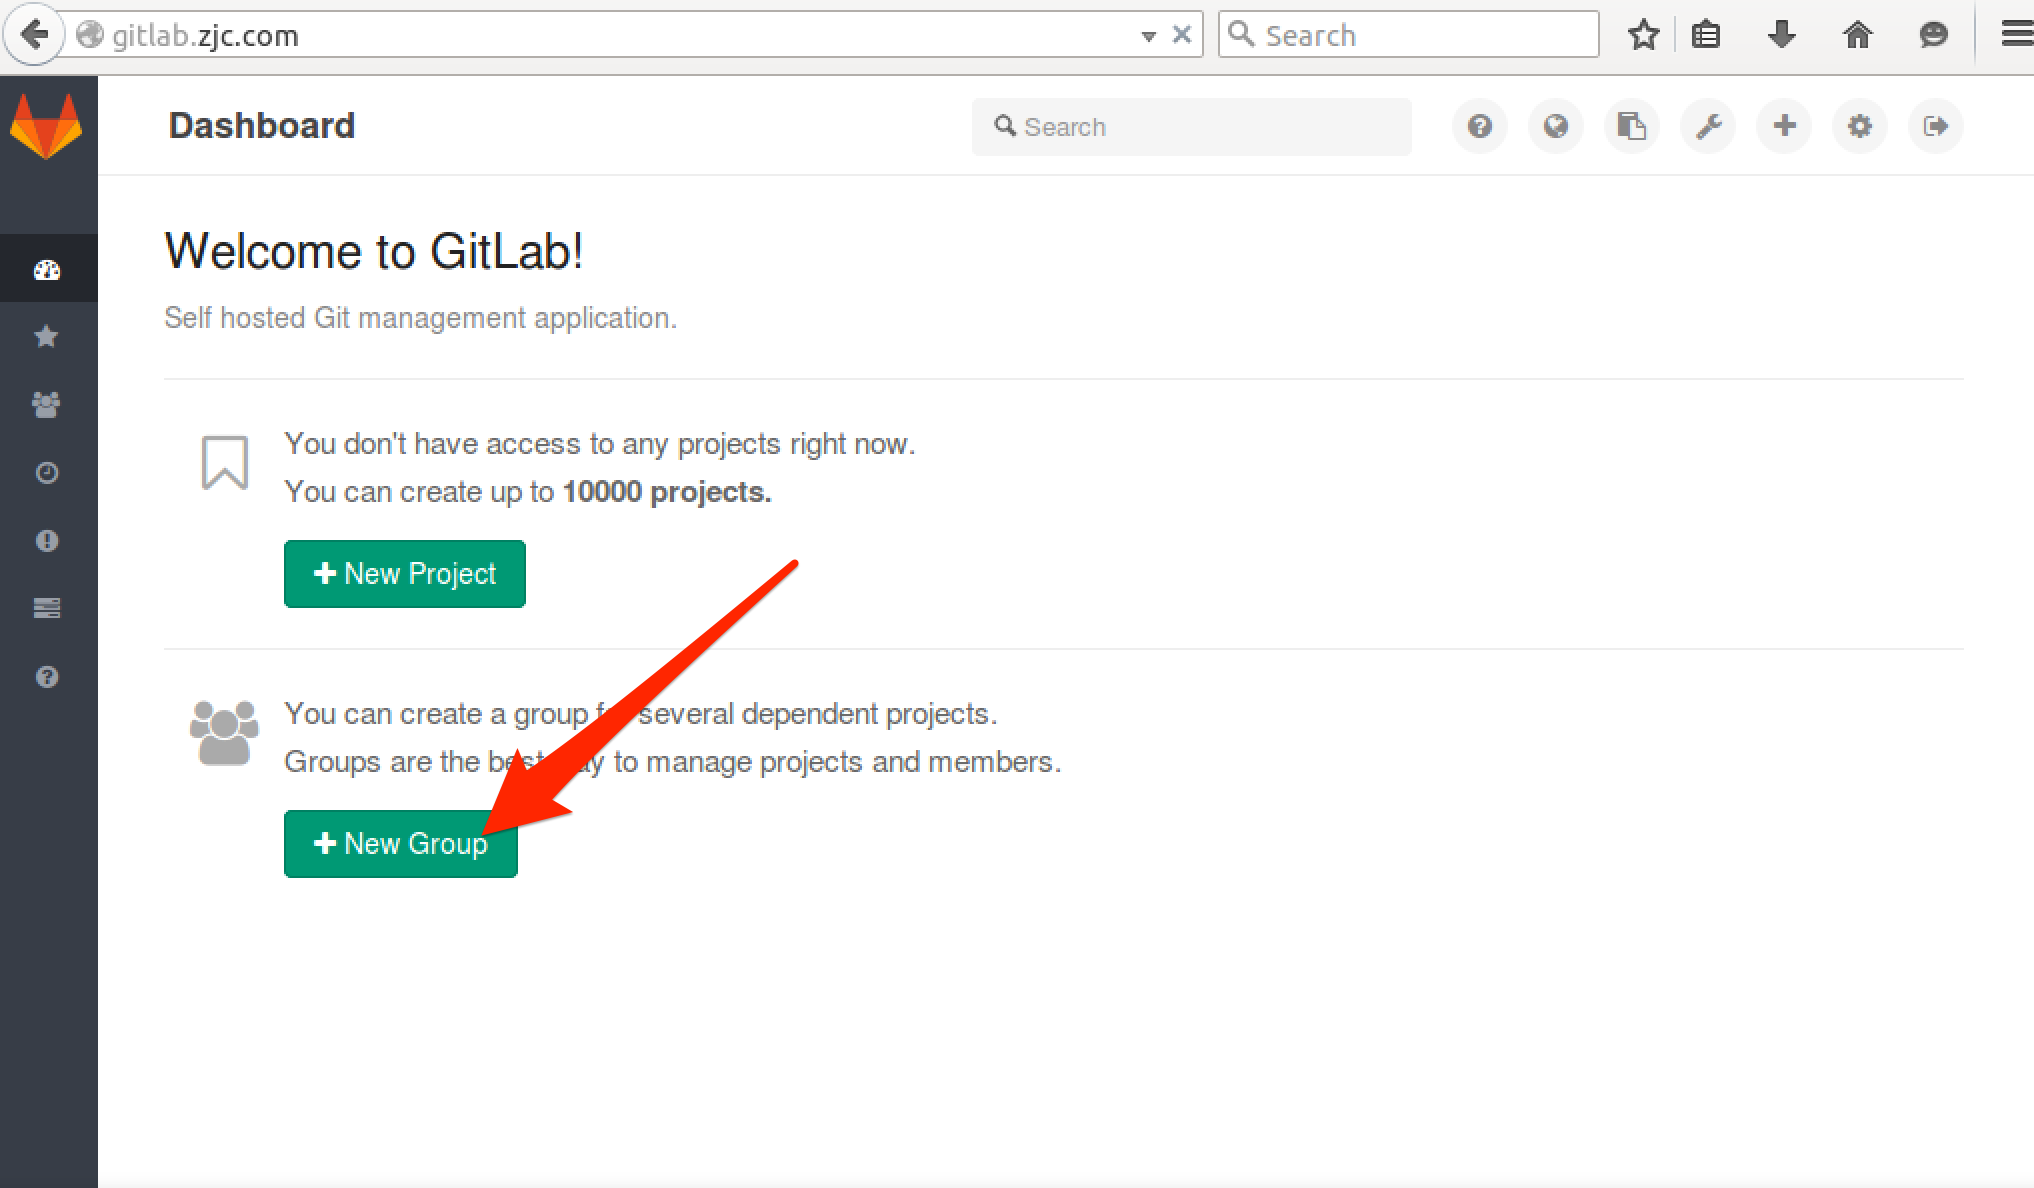
Gitlab建立組和專案,並配置user1身份
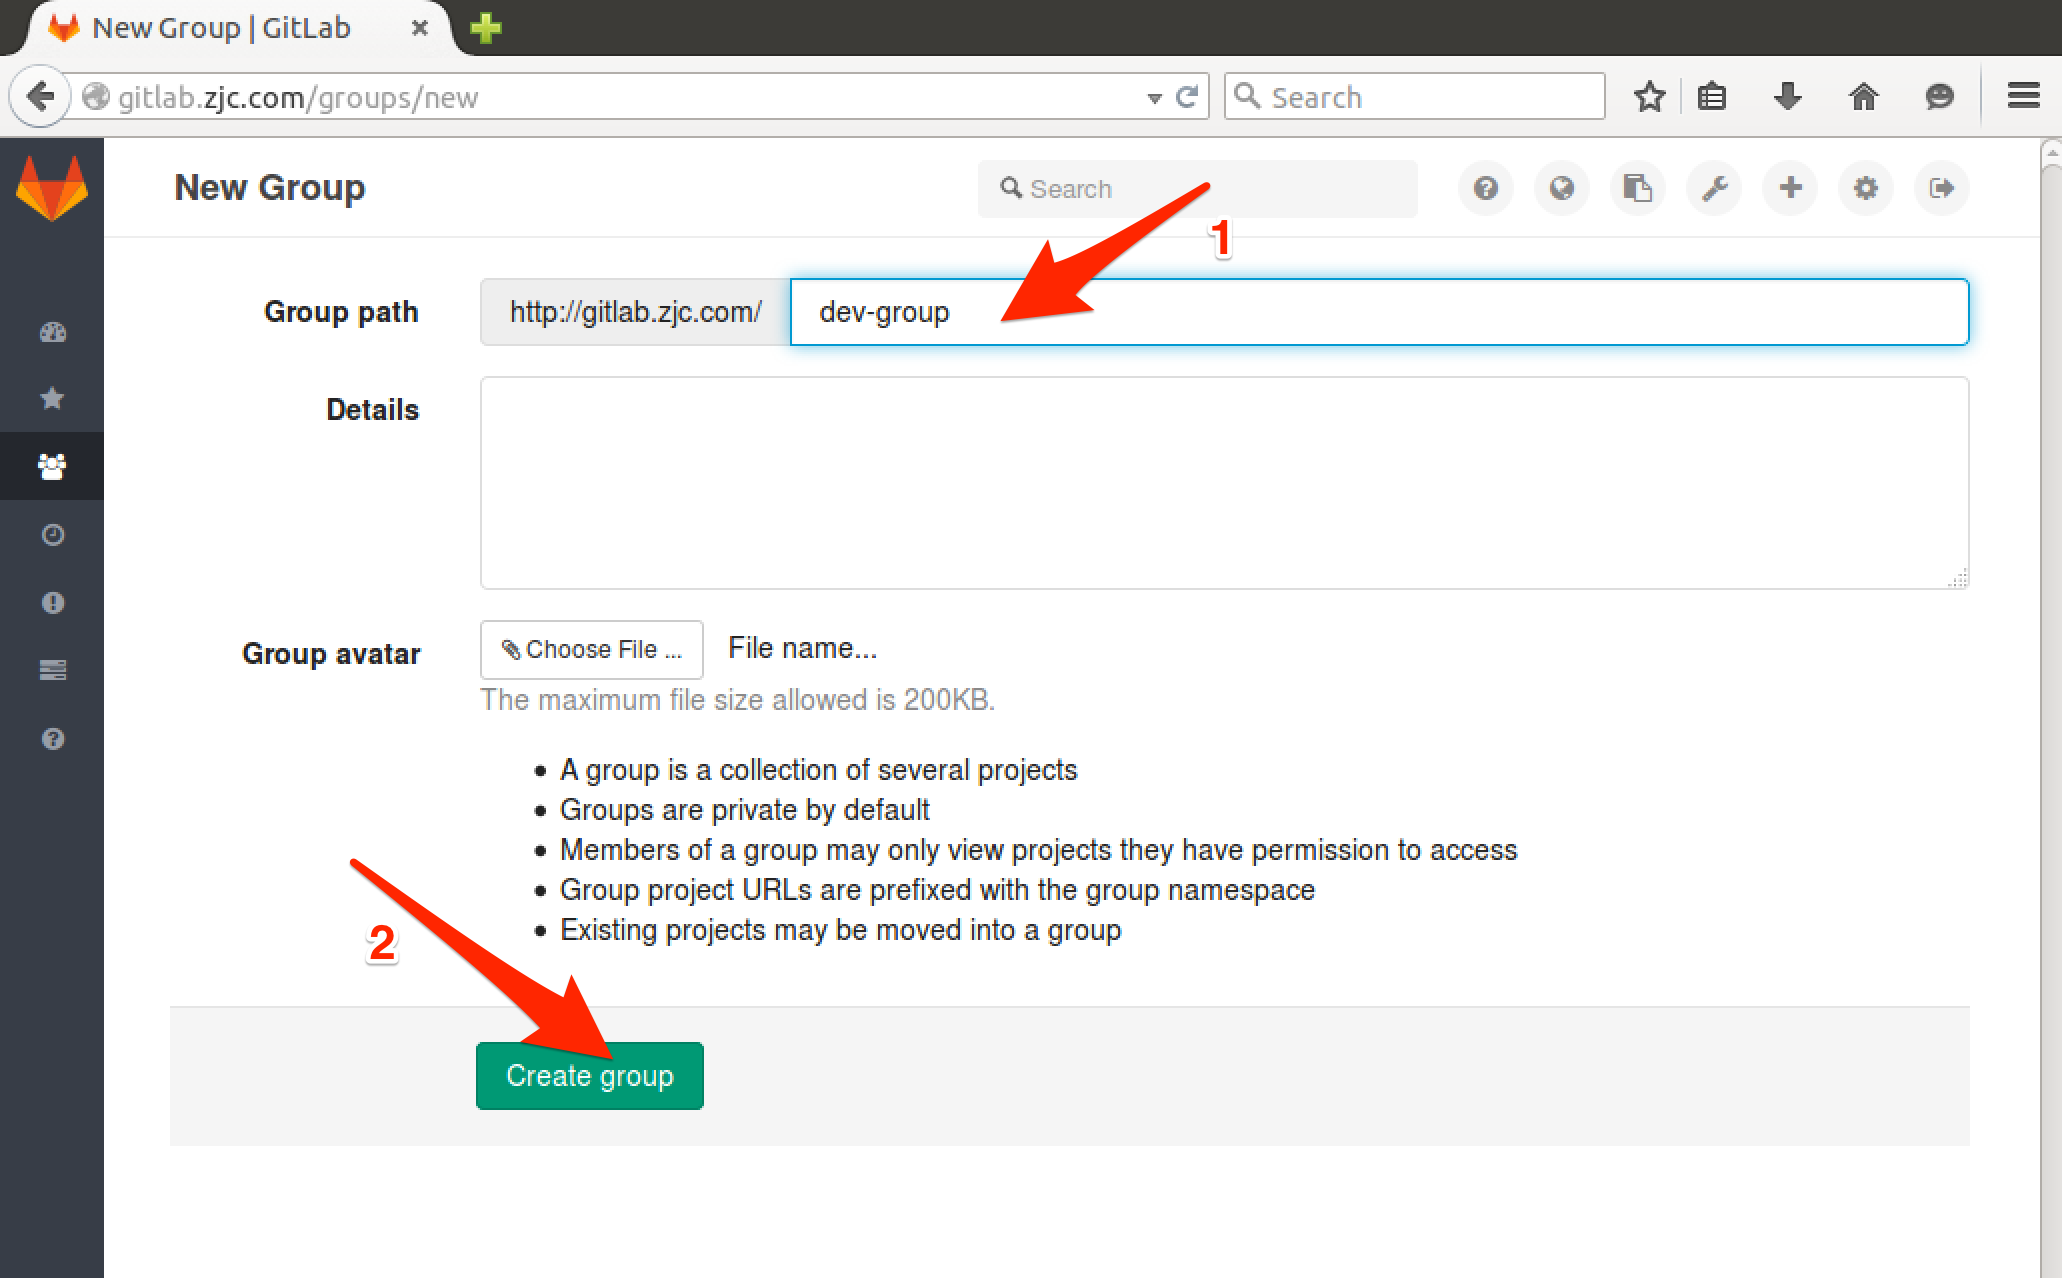
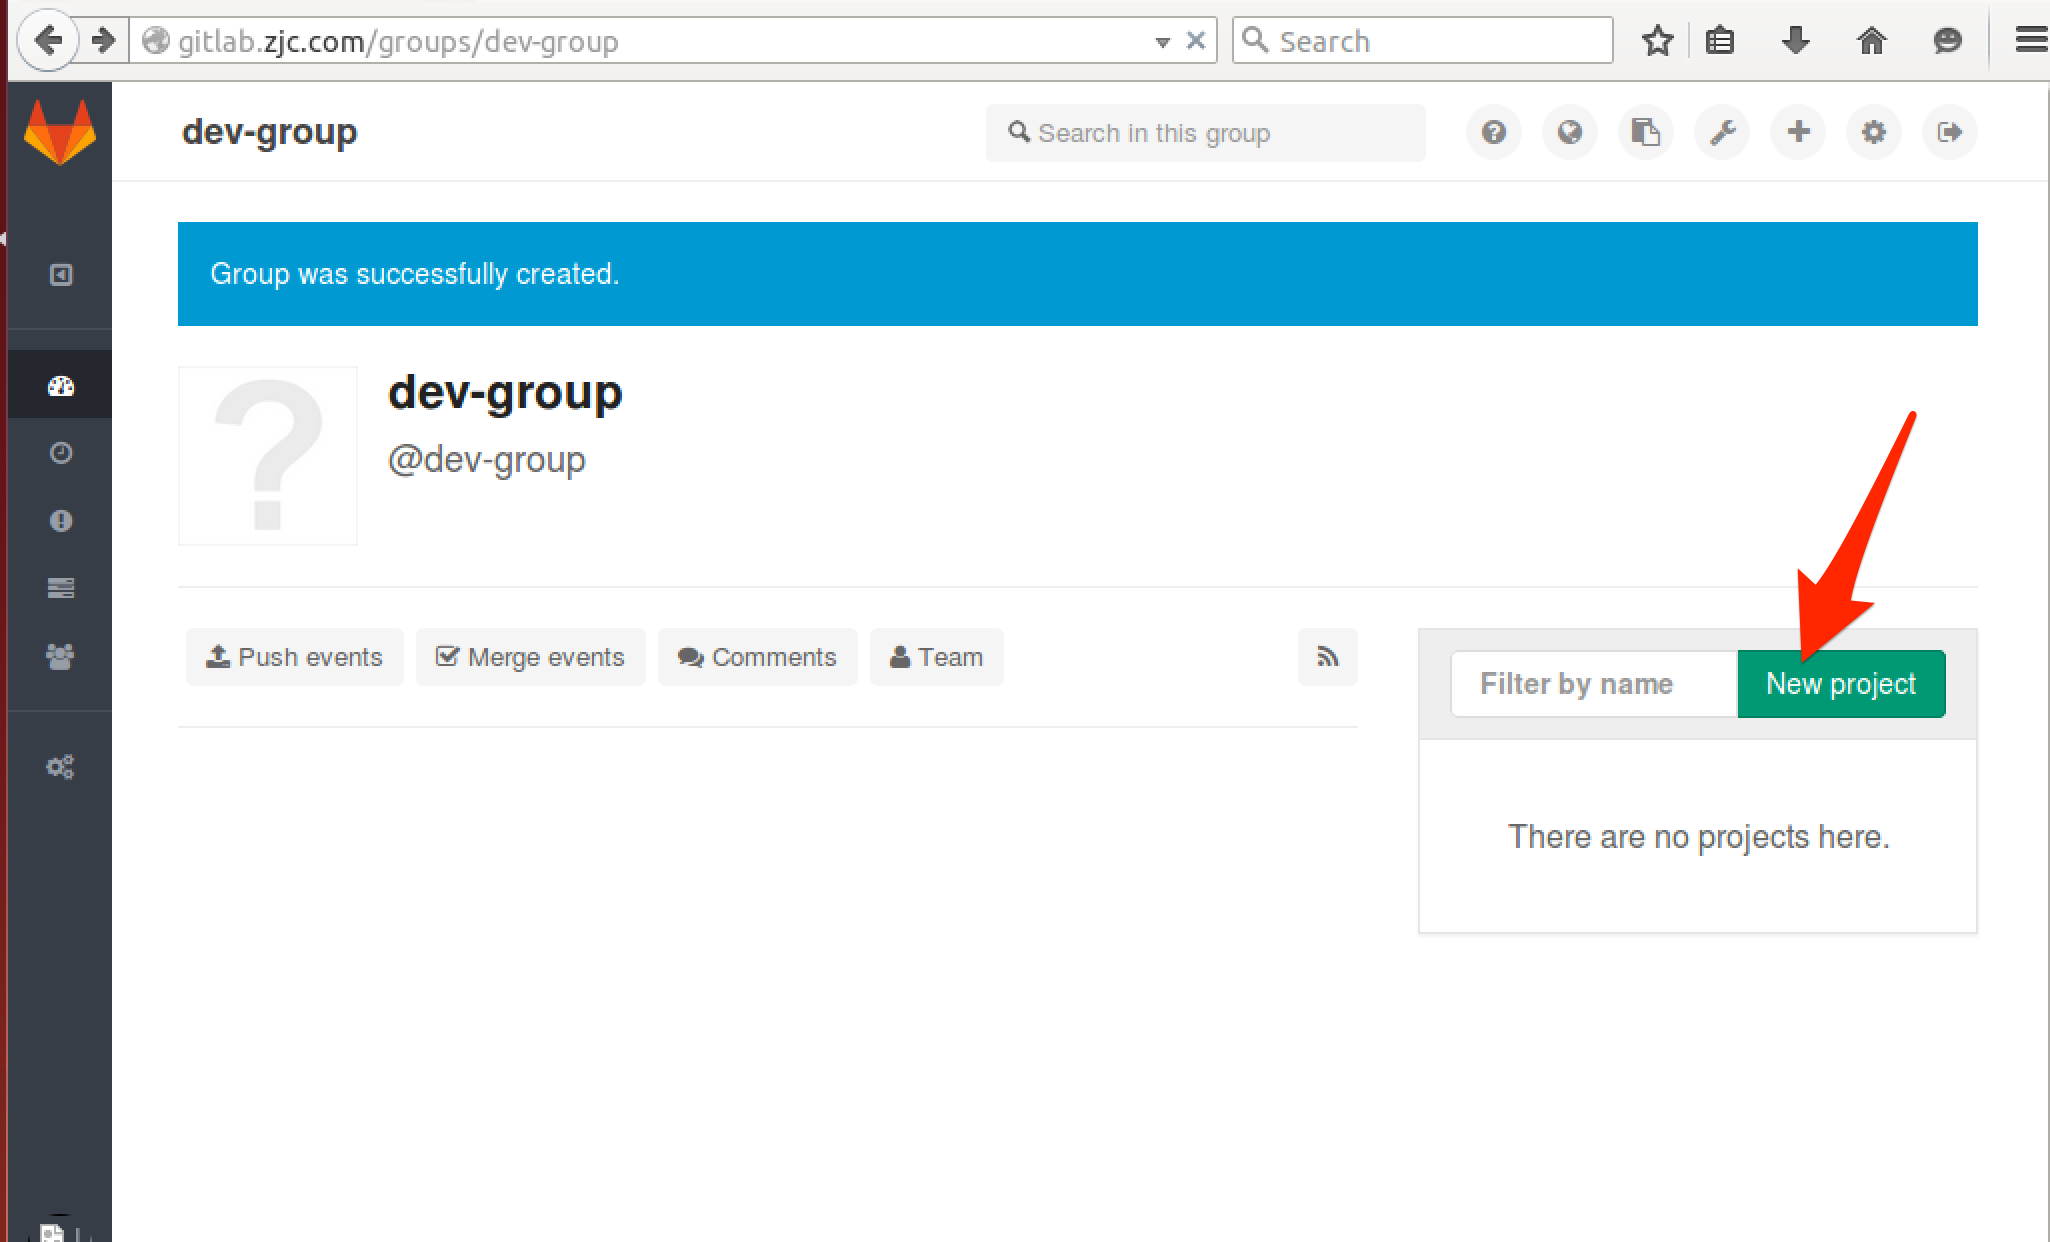
用root登入Gitlab,建立新Group為dev-group
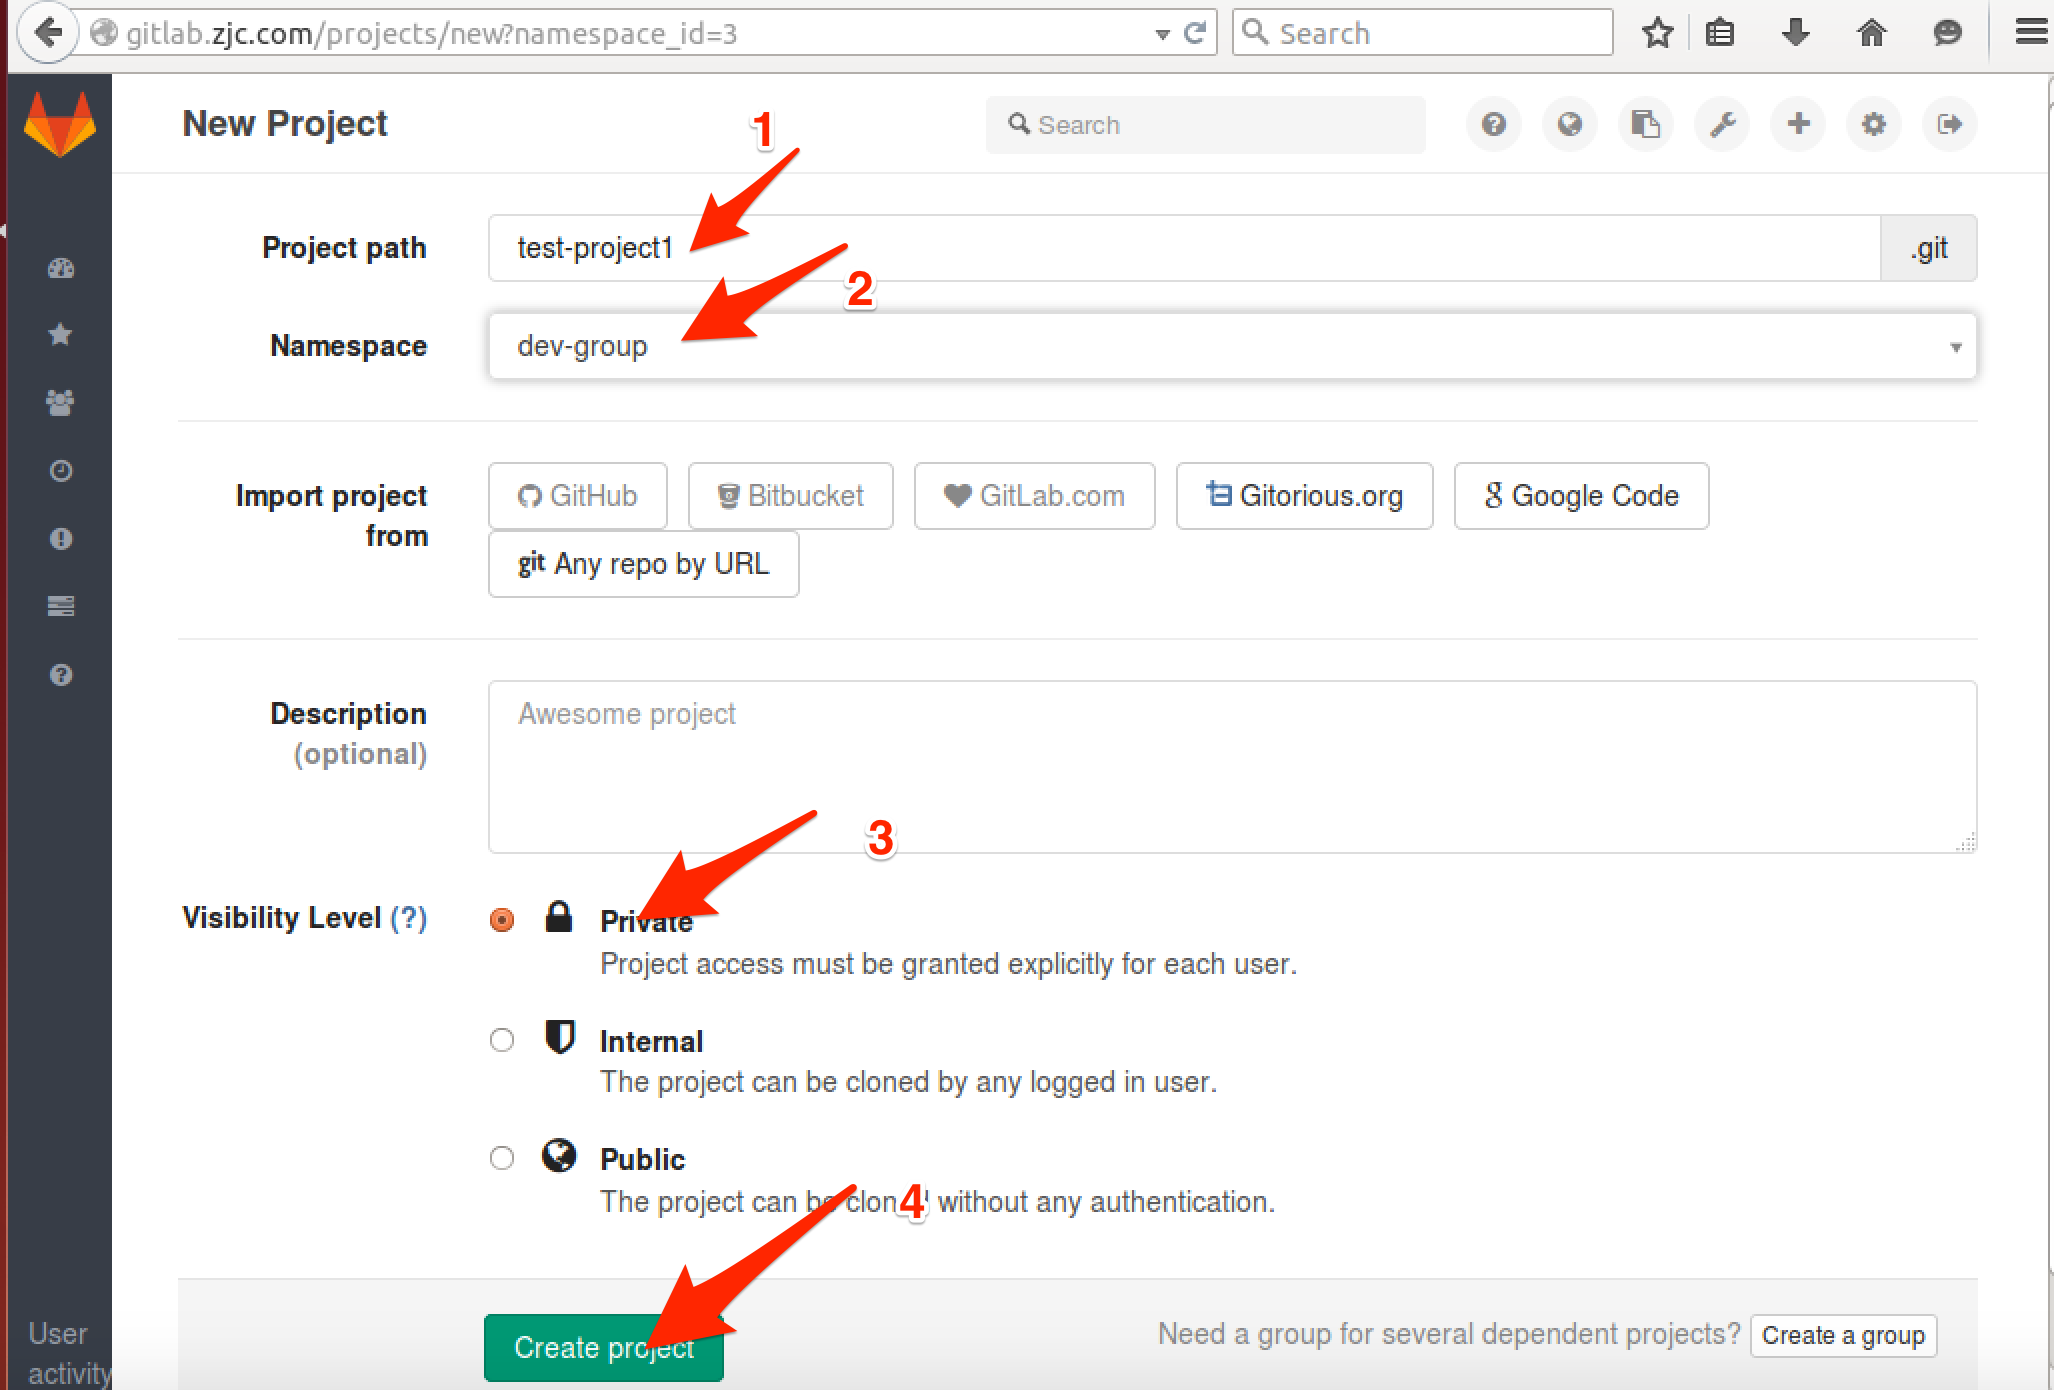
在dev-group中建立新專案test-project1
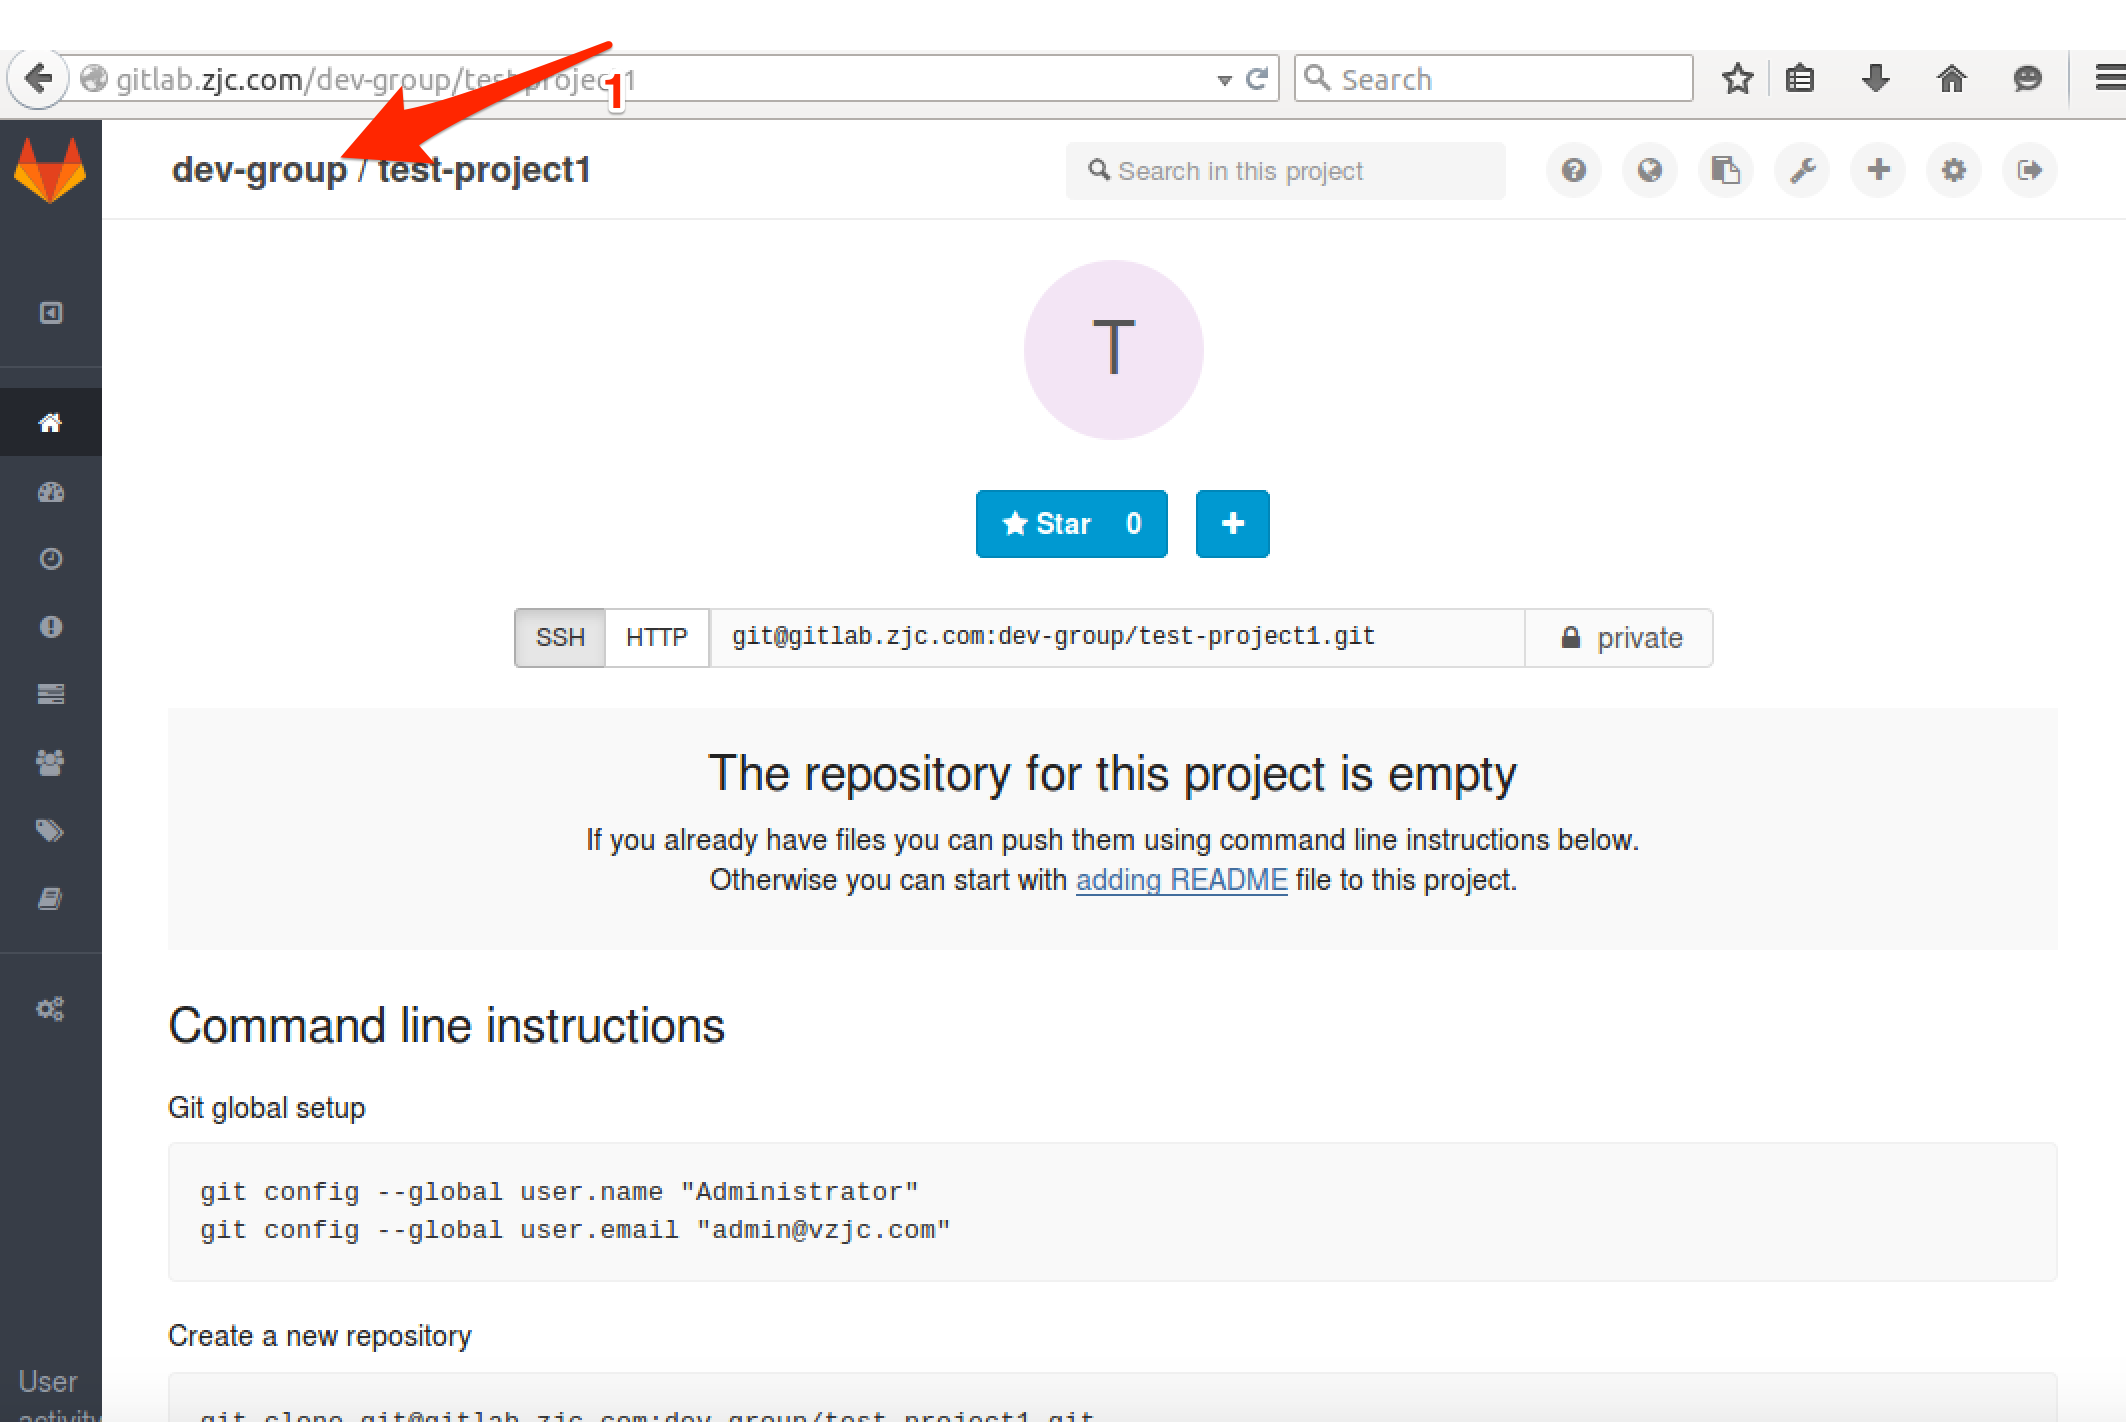
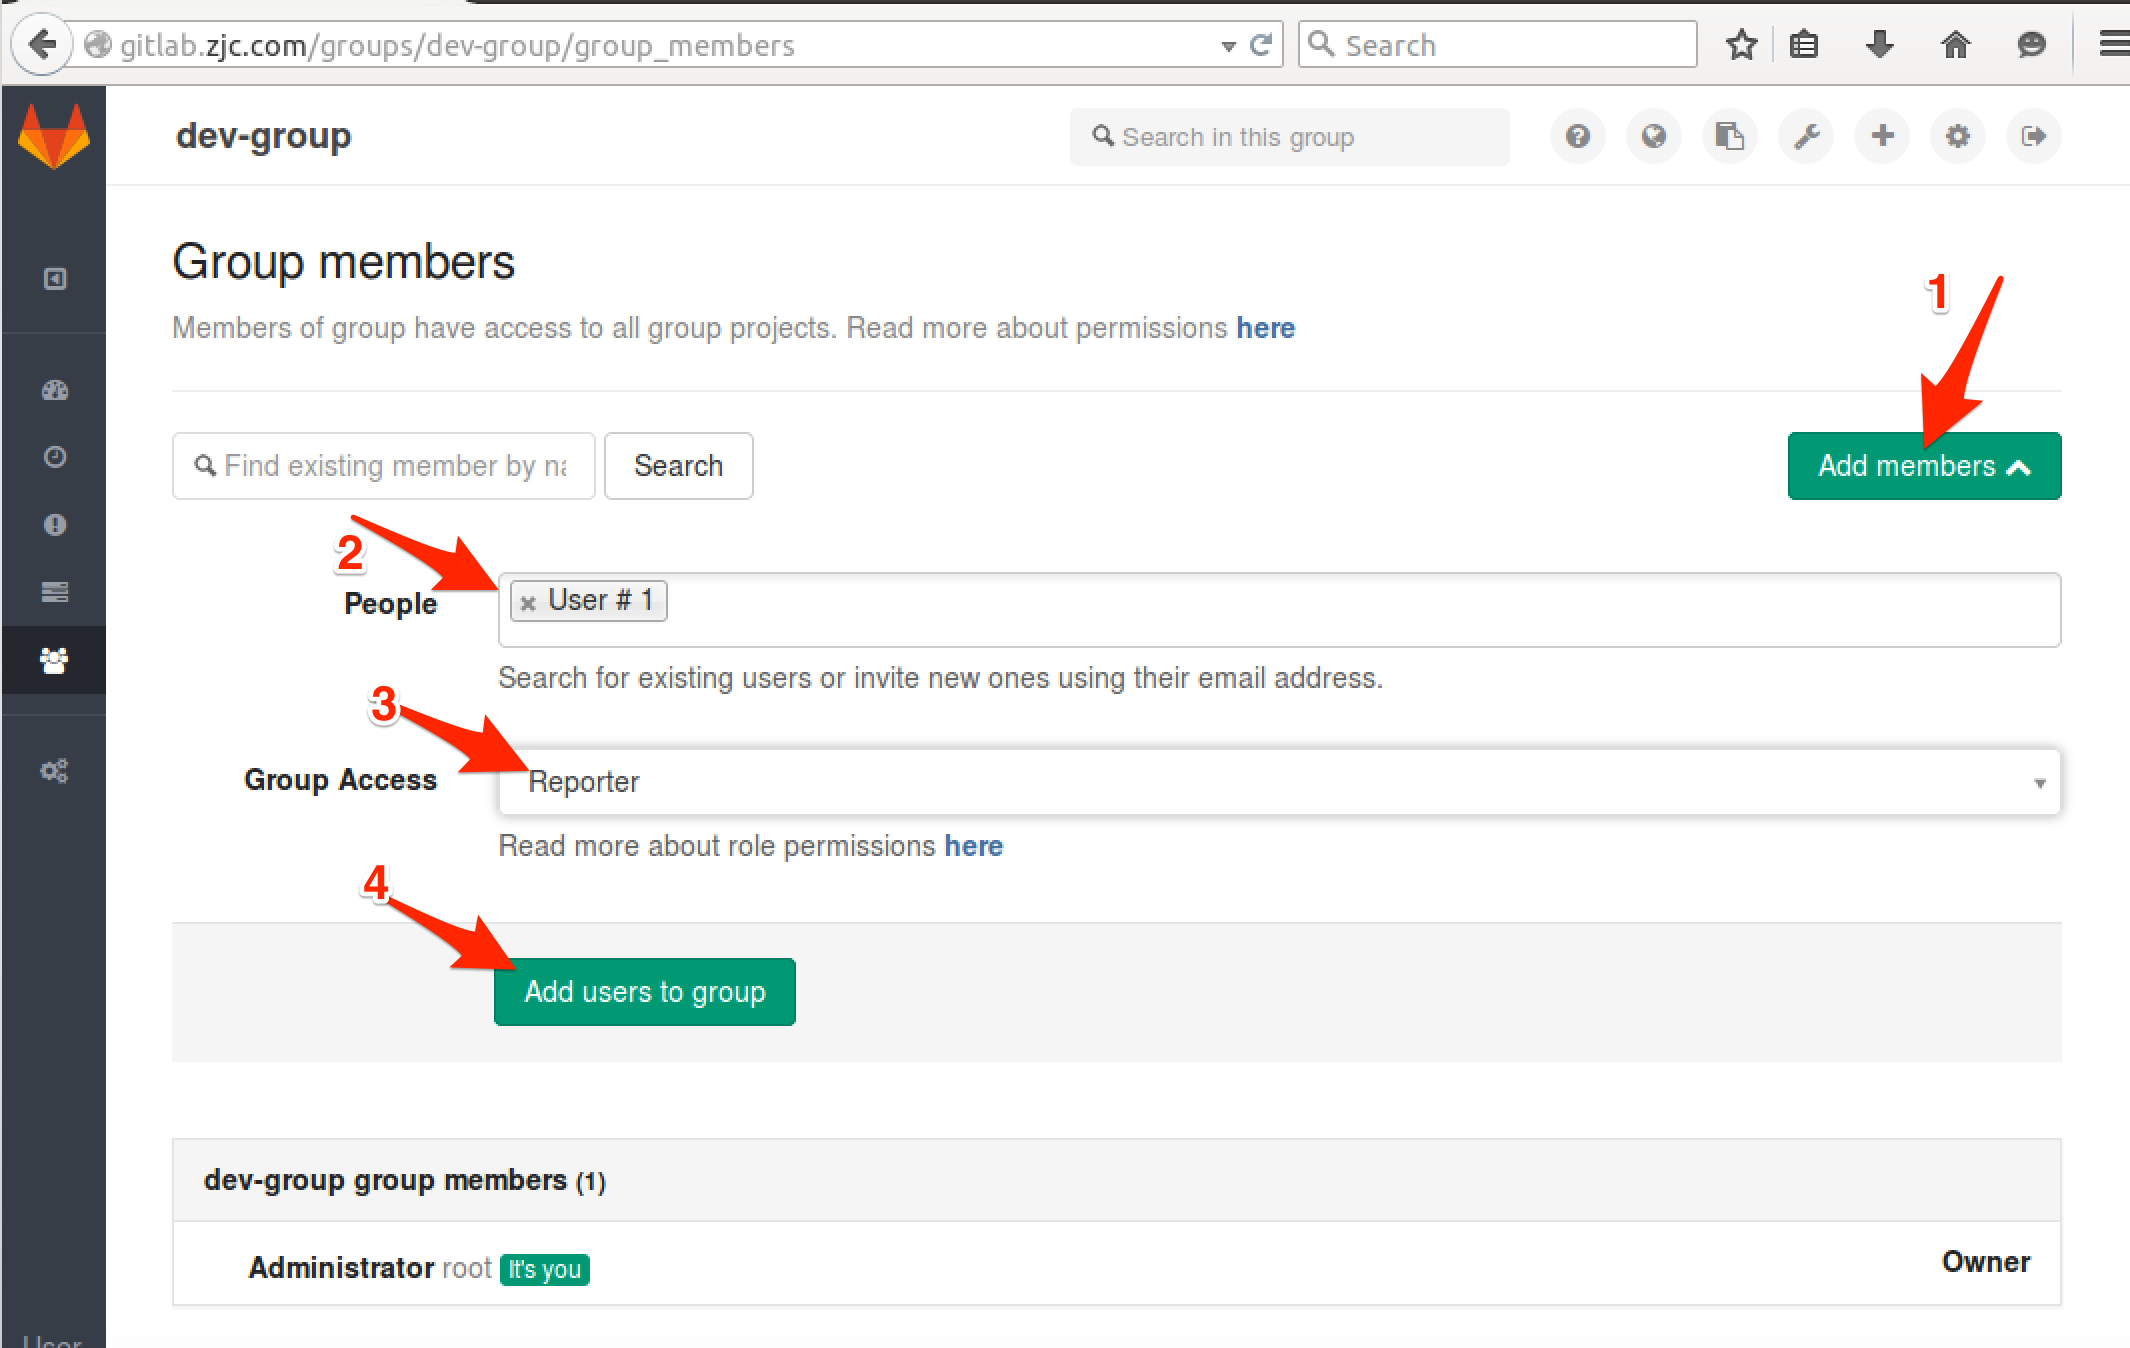
點選 test-project1 工程介面左上的 dev-group
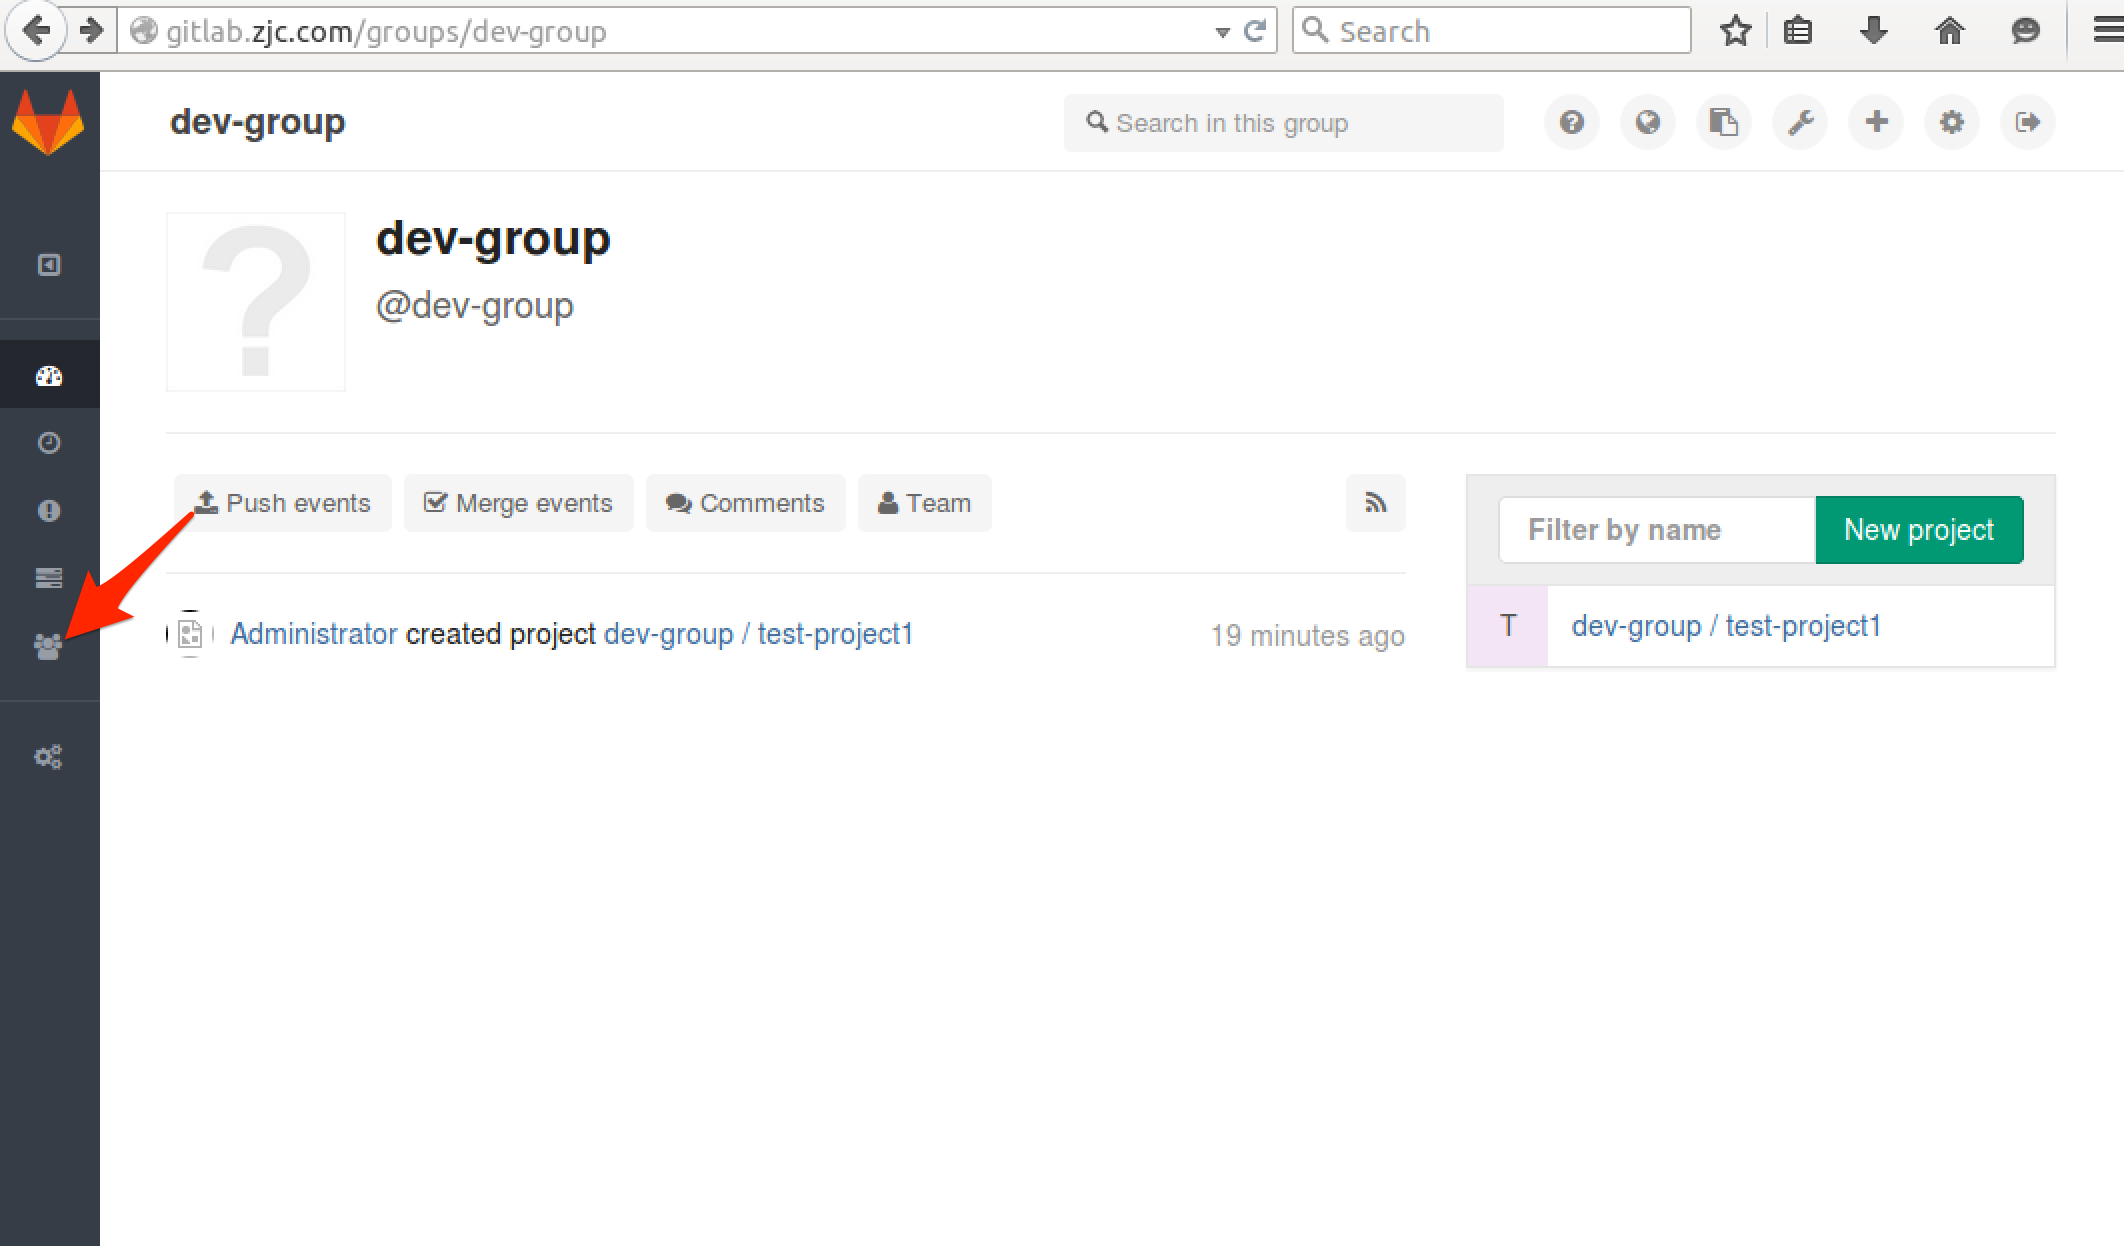
點選 Members
把 user1 作為 Reporter 身份新增到組 dev-group (Reporter可以下載程式碼但是沒上傳許可權)
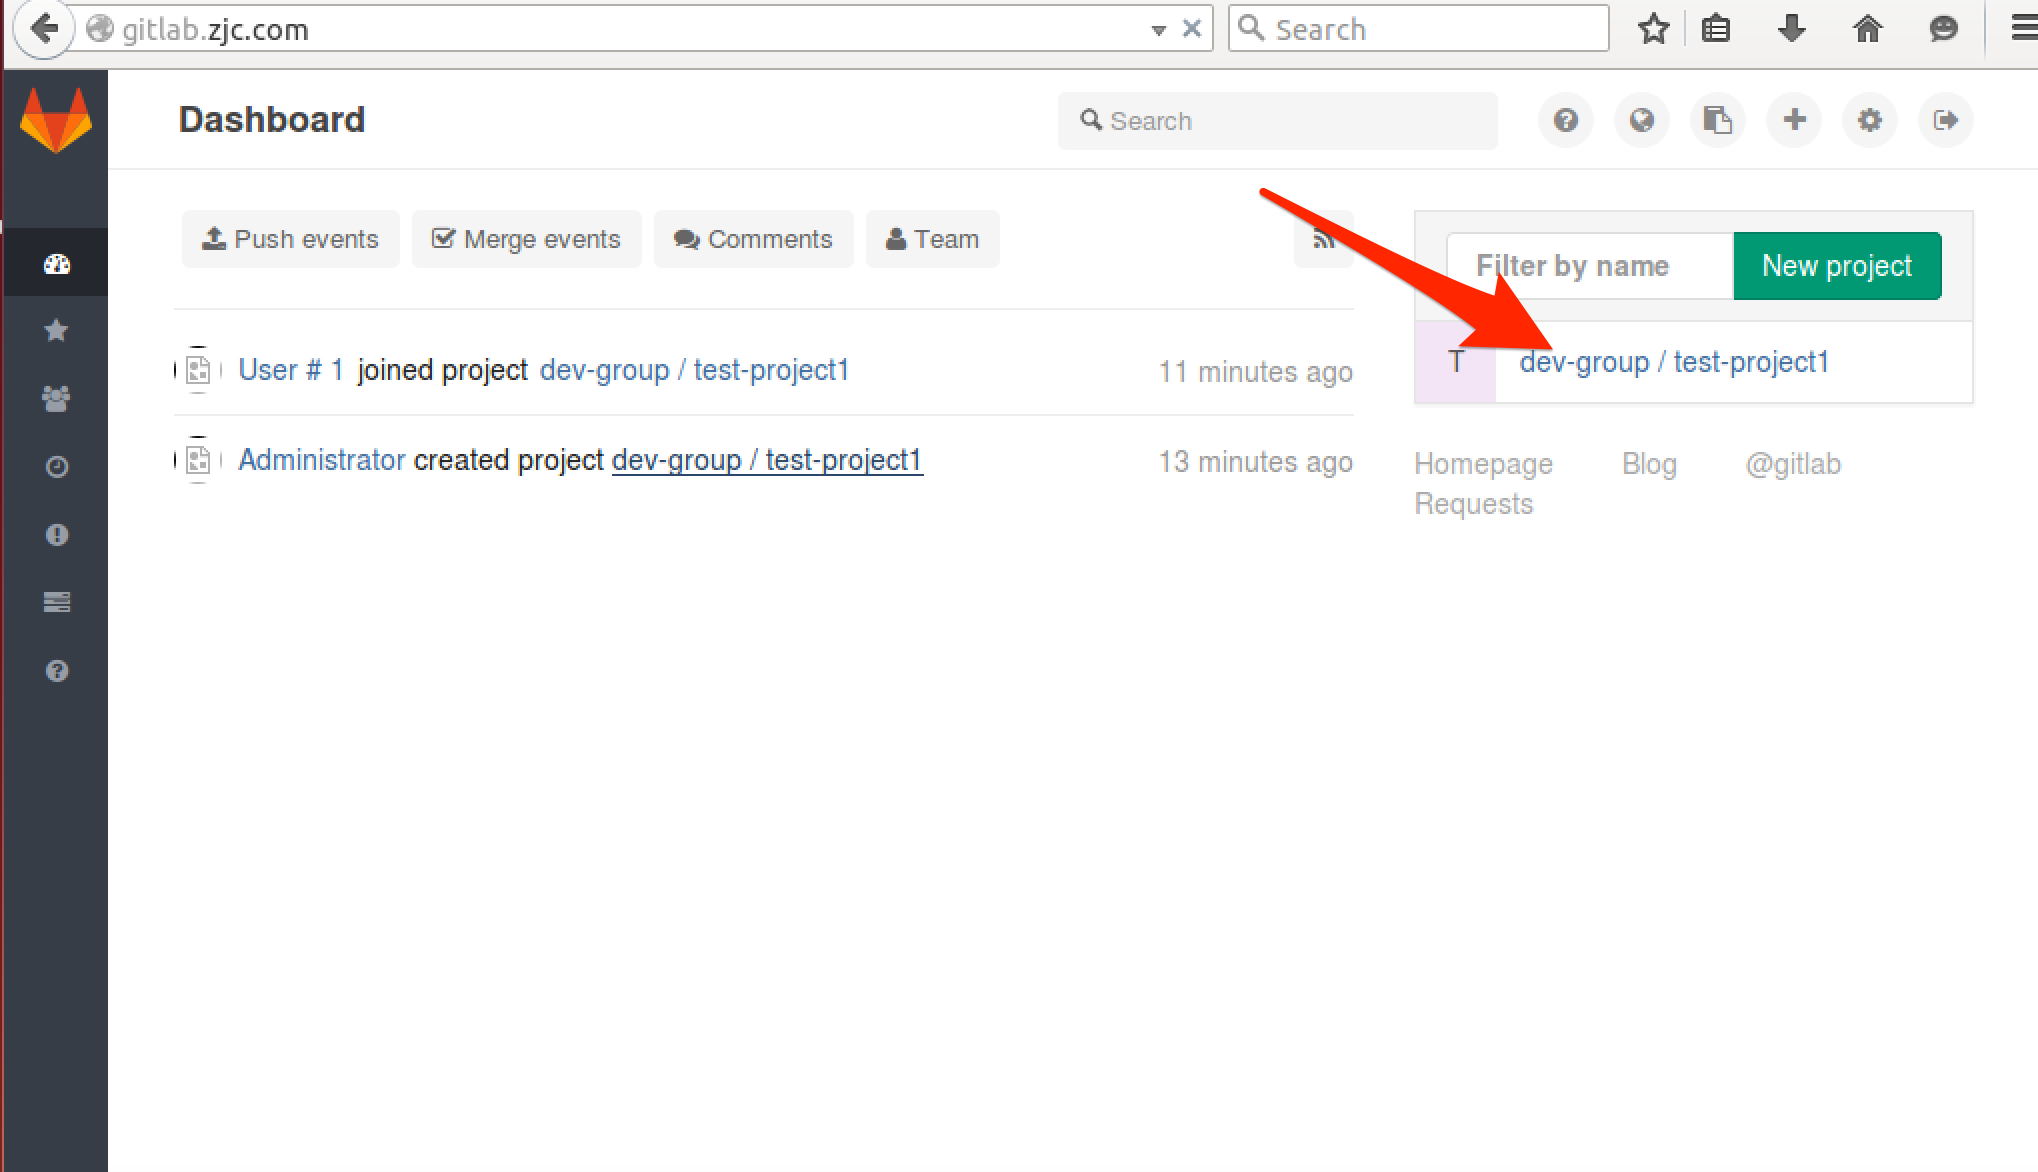
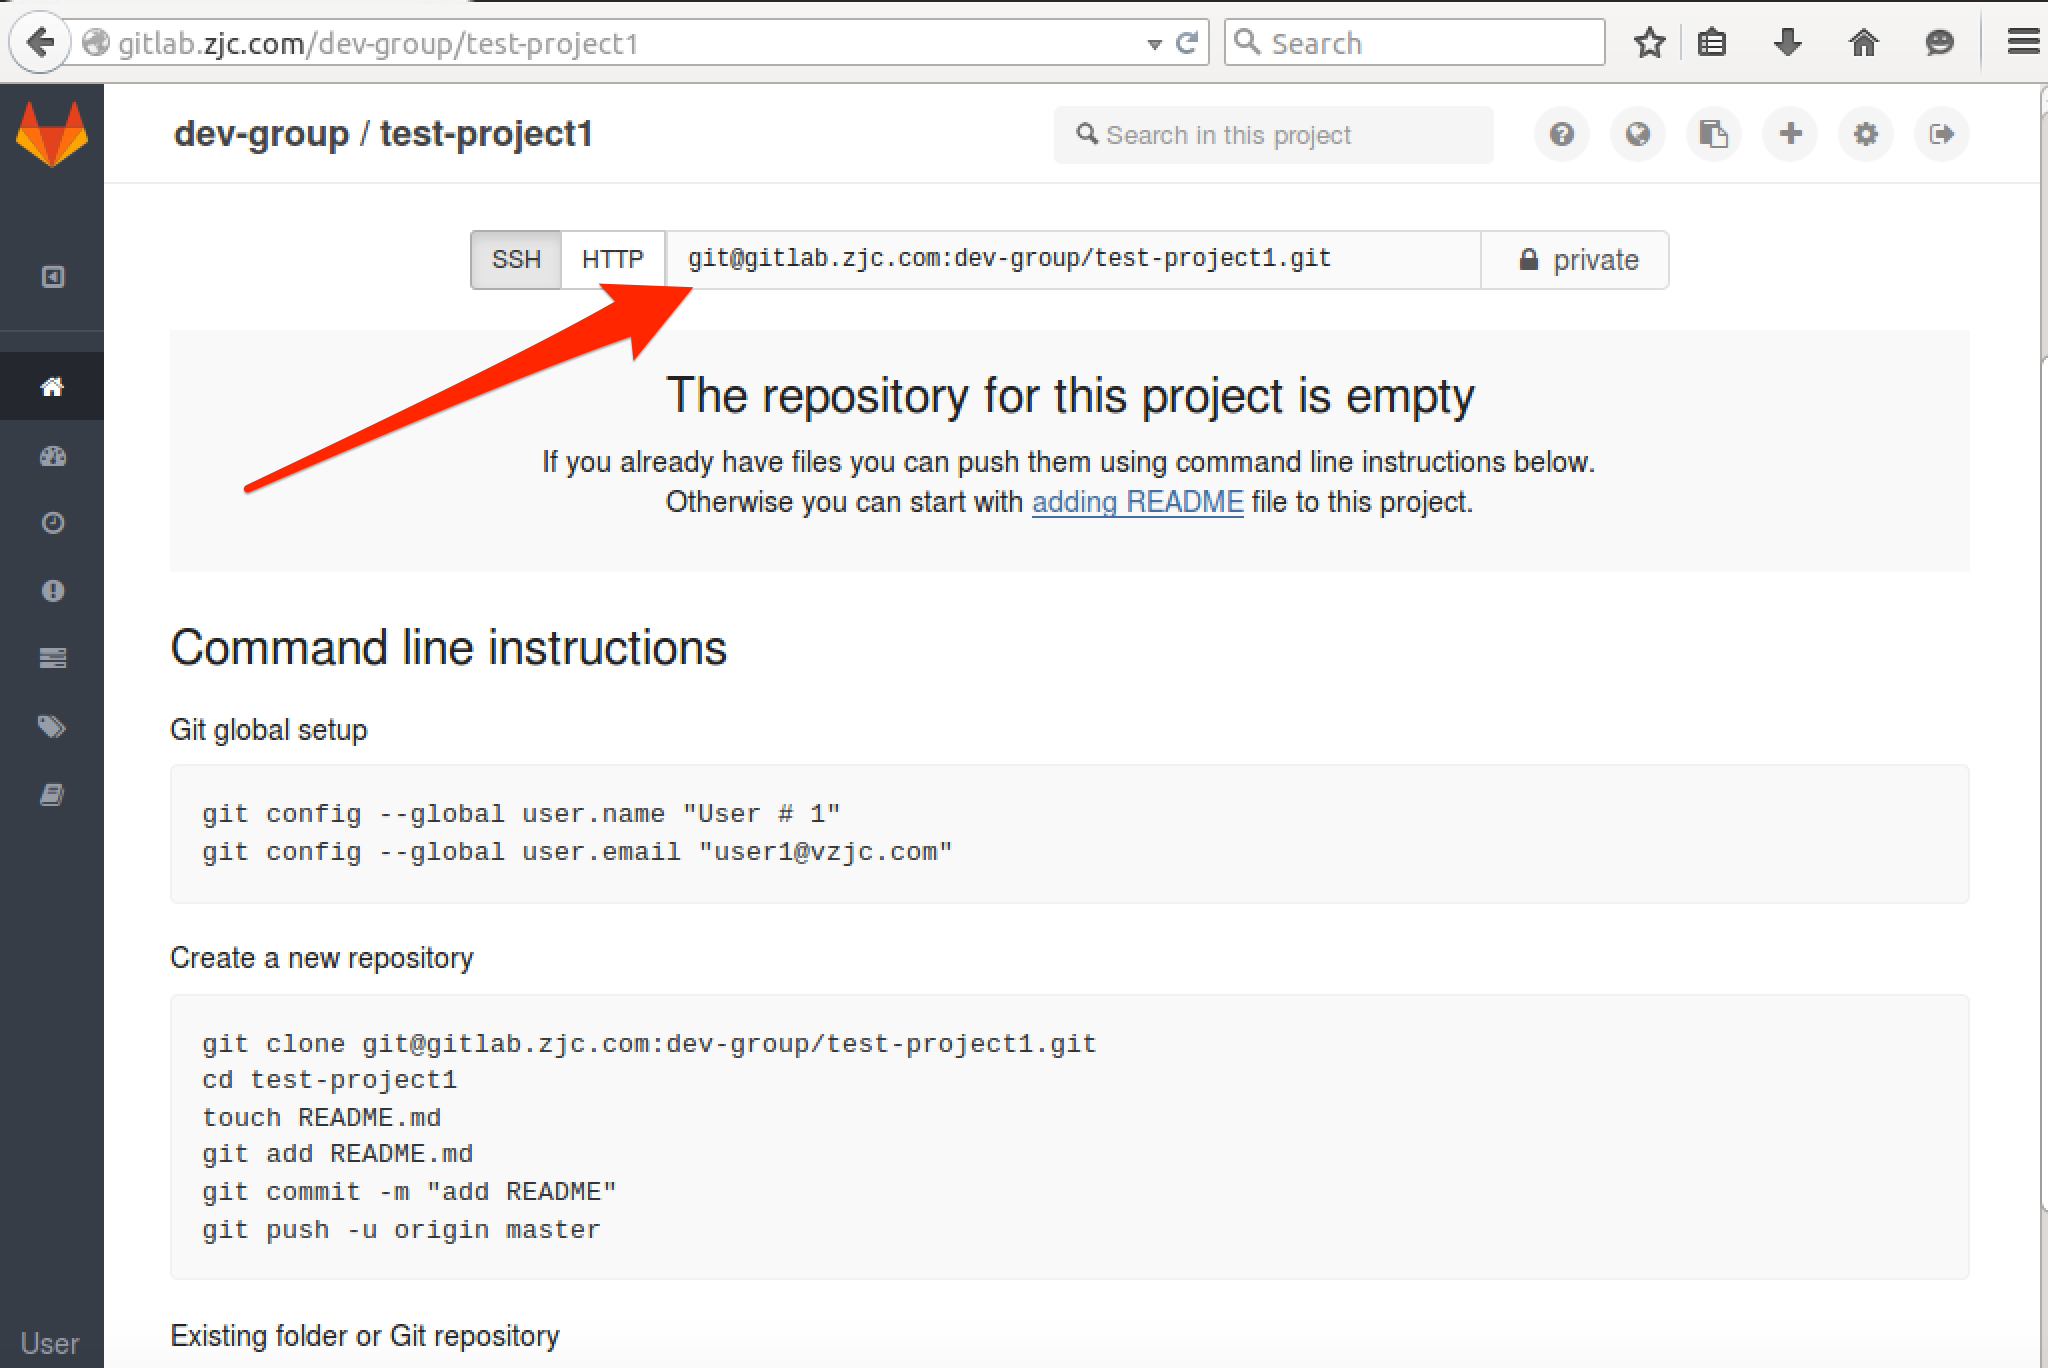
用user1登入Gitlab,檢視新專案test-project1的git地址
地址為
[email protected]:dev-group/test-project1.git
系統上登入user1,克隆工程,測試許可權
$ su - user1
$ cd ~
$ git clone [email protected]:dev-group/test-project1.git
$ exit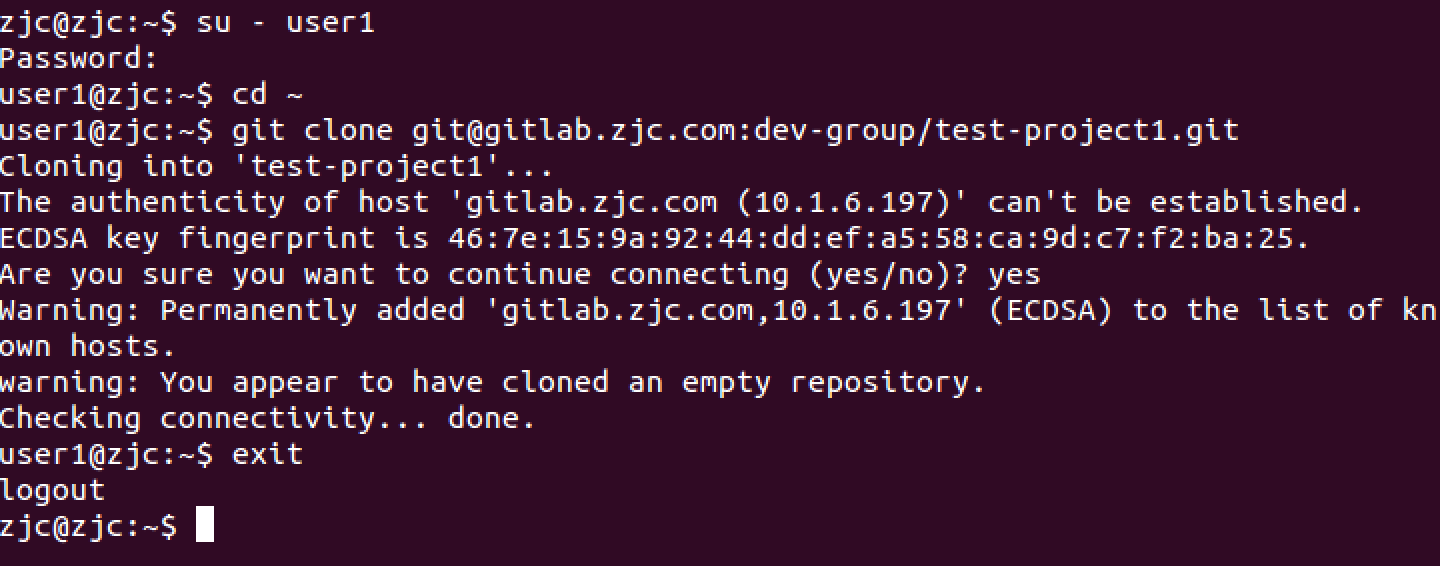
$ su - user1
$ cd ~/test-project1/
$ git config --global user.name 'user1'
$ git config --global user.email '[email protected]'
$ touch testfile
$ git add .
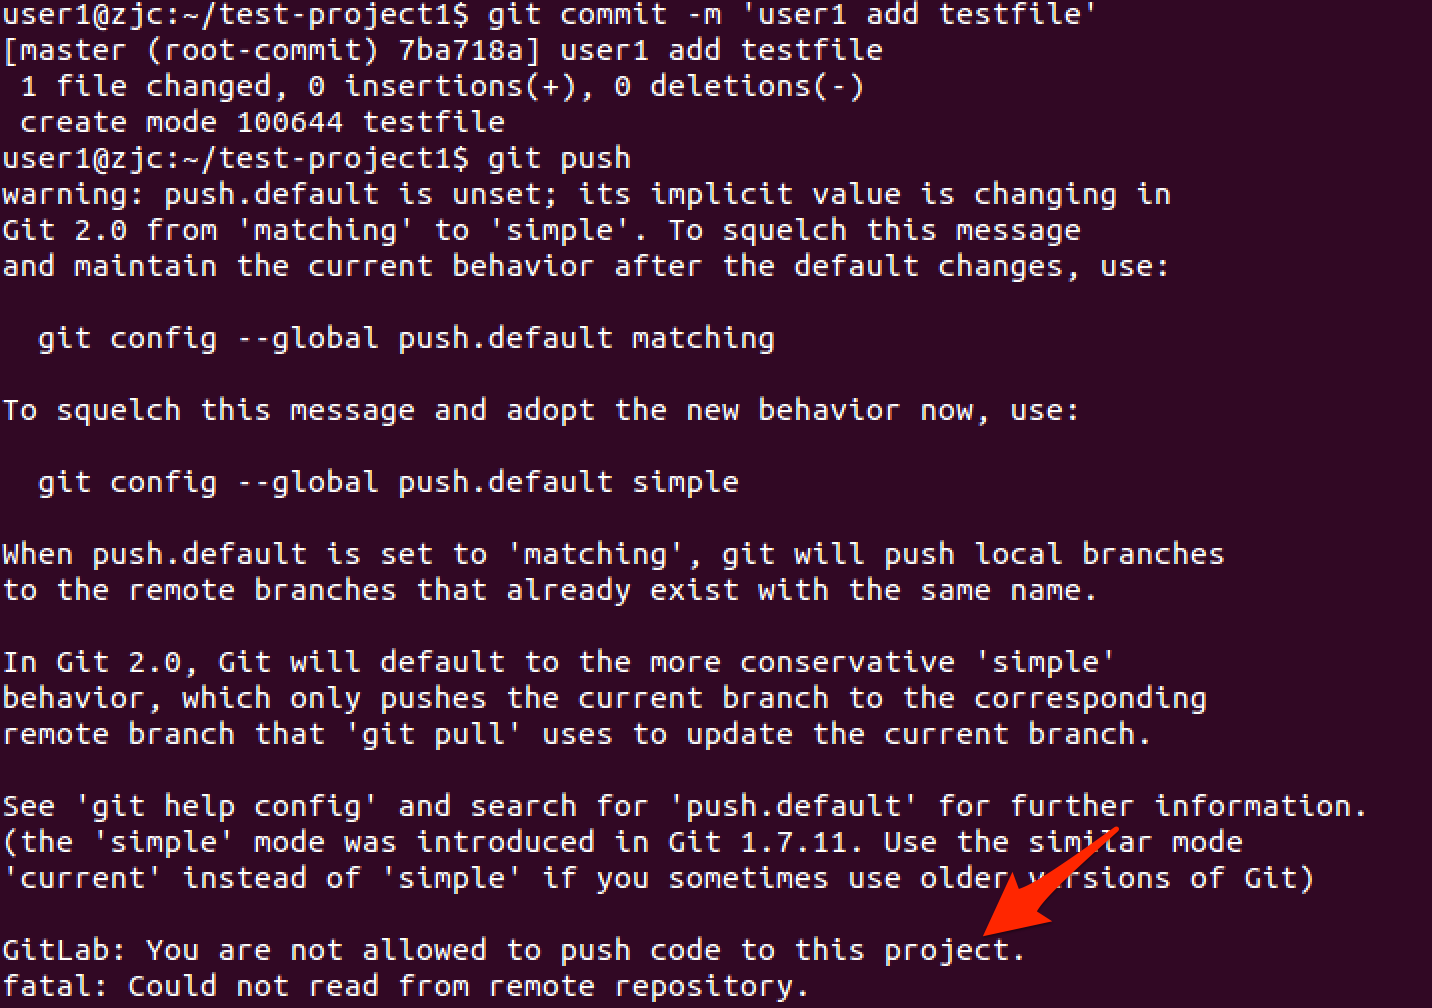
$ git commit -m 'user1 add testfile'
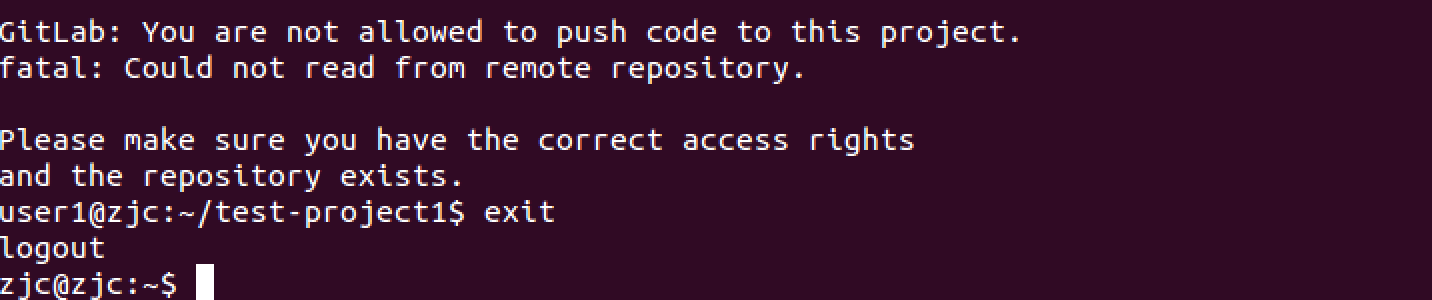
$ git push
$ exit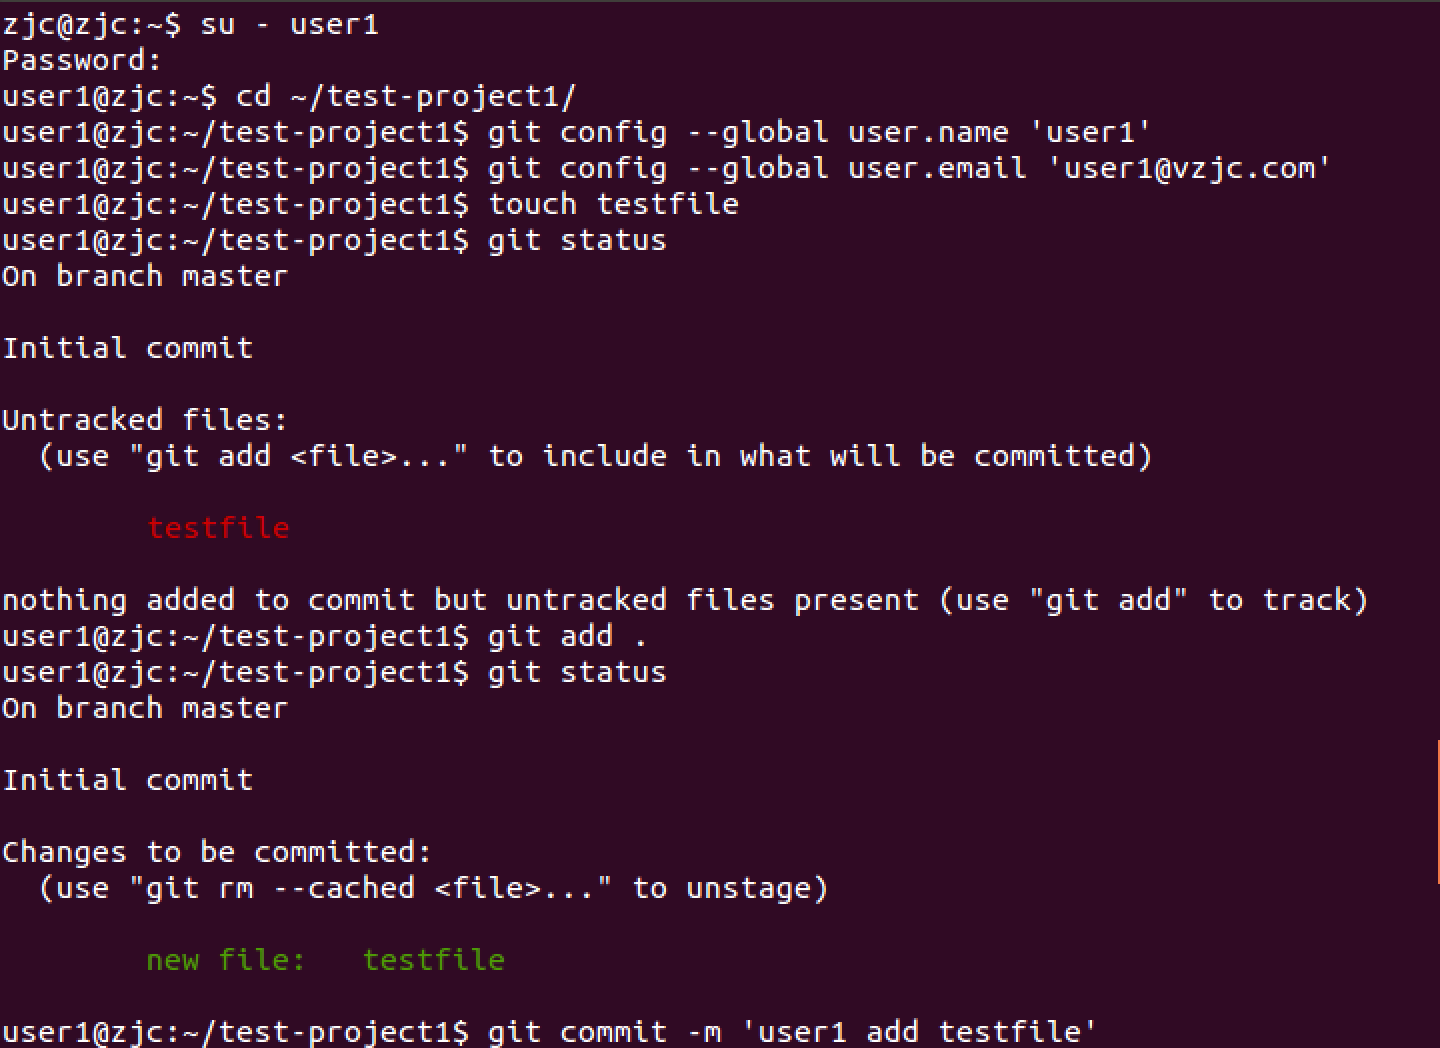
Gerrit配置
已經有了第一個賬戶admin並配置信箱為[email protected]
系統上登入admin,並獲取上步建立的公鑰
$ su - admin
$ cat ~/.ssh/id_rsa.pub
$ exit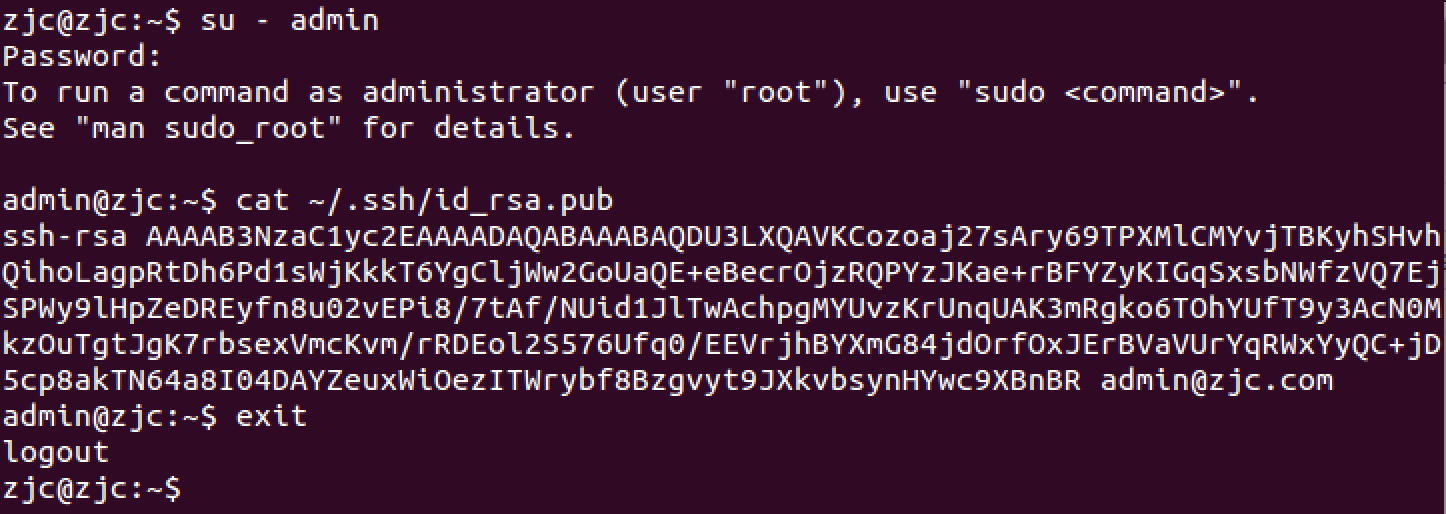
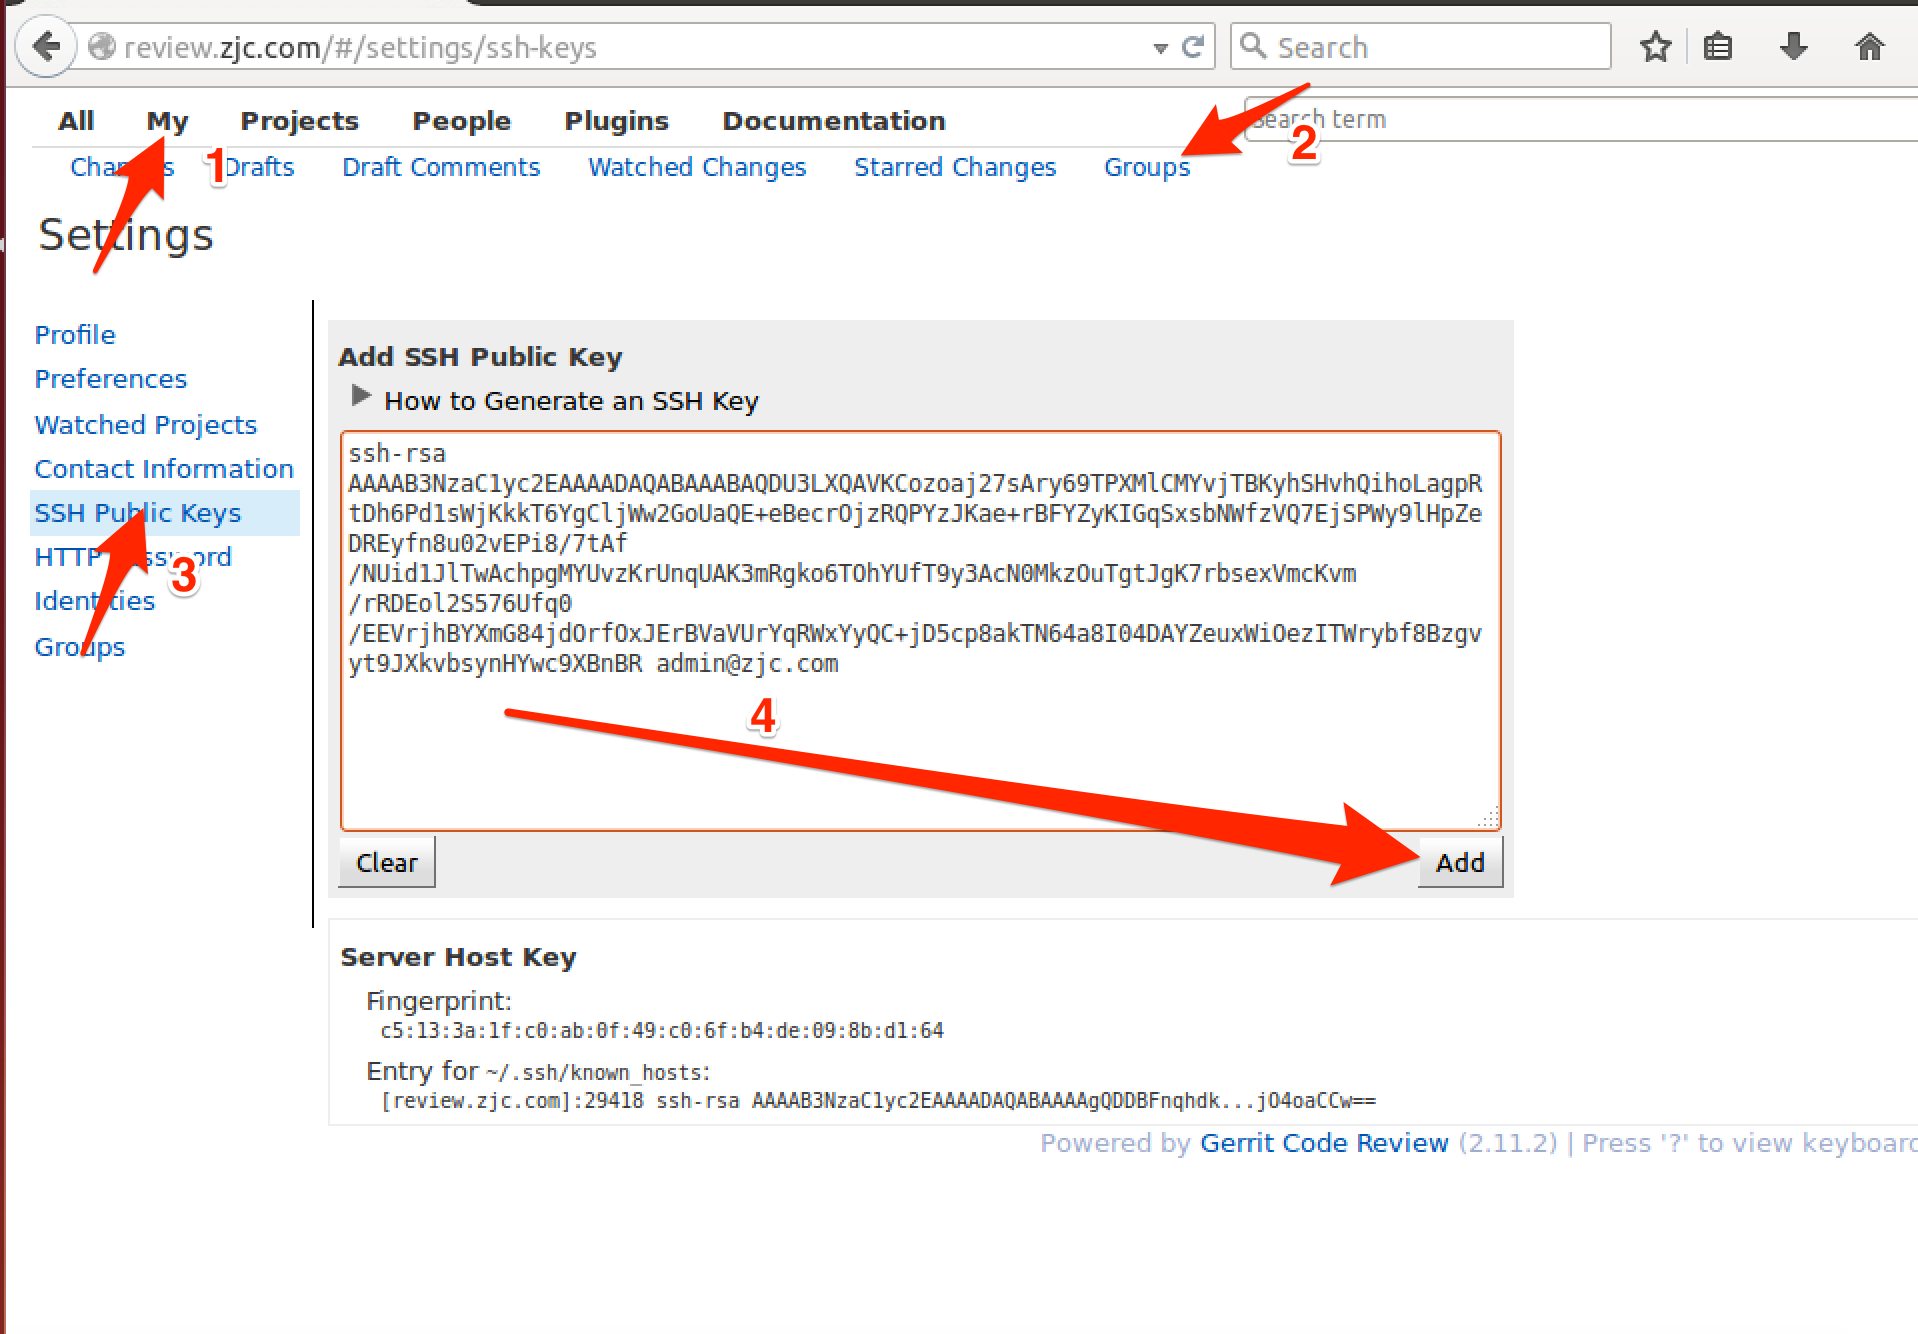
用admin賬戶登入gerrit,更新SSH公鑰
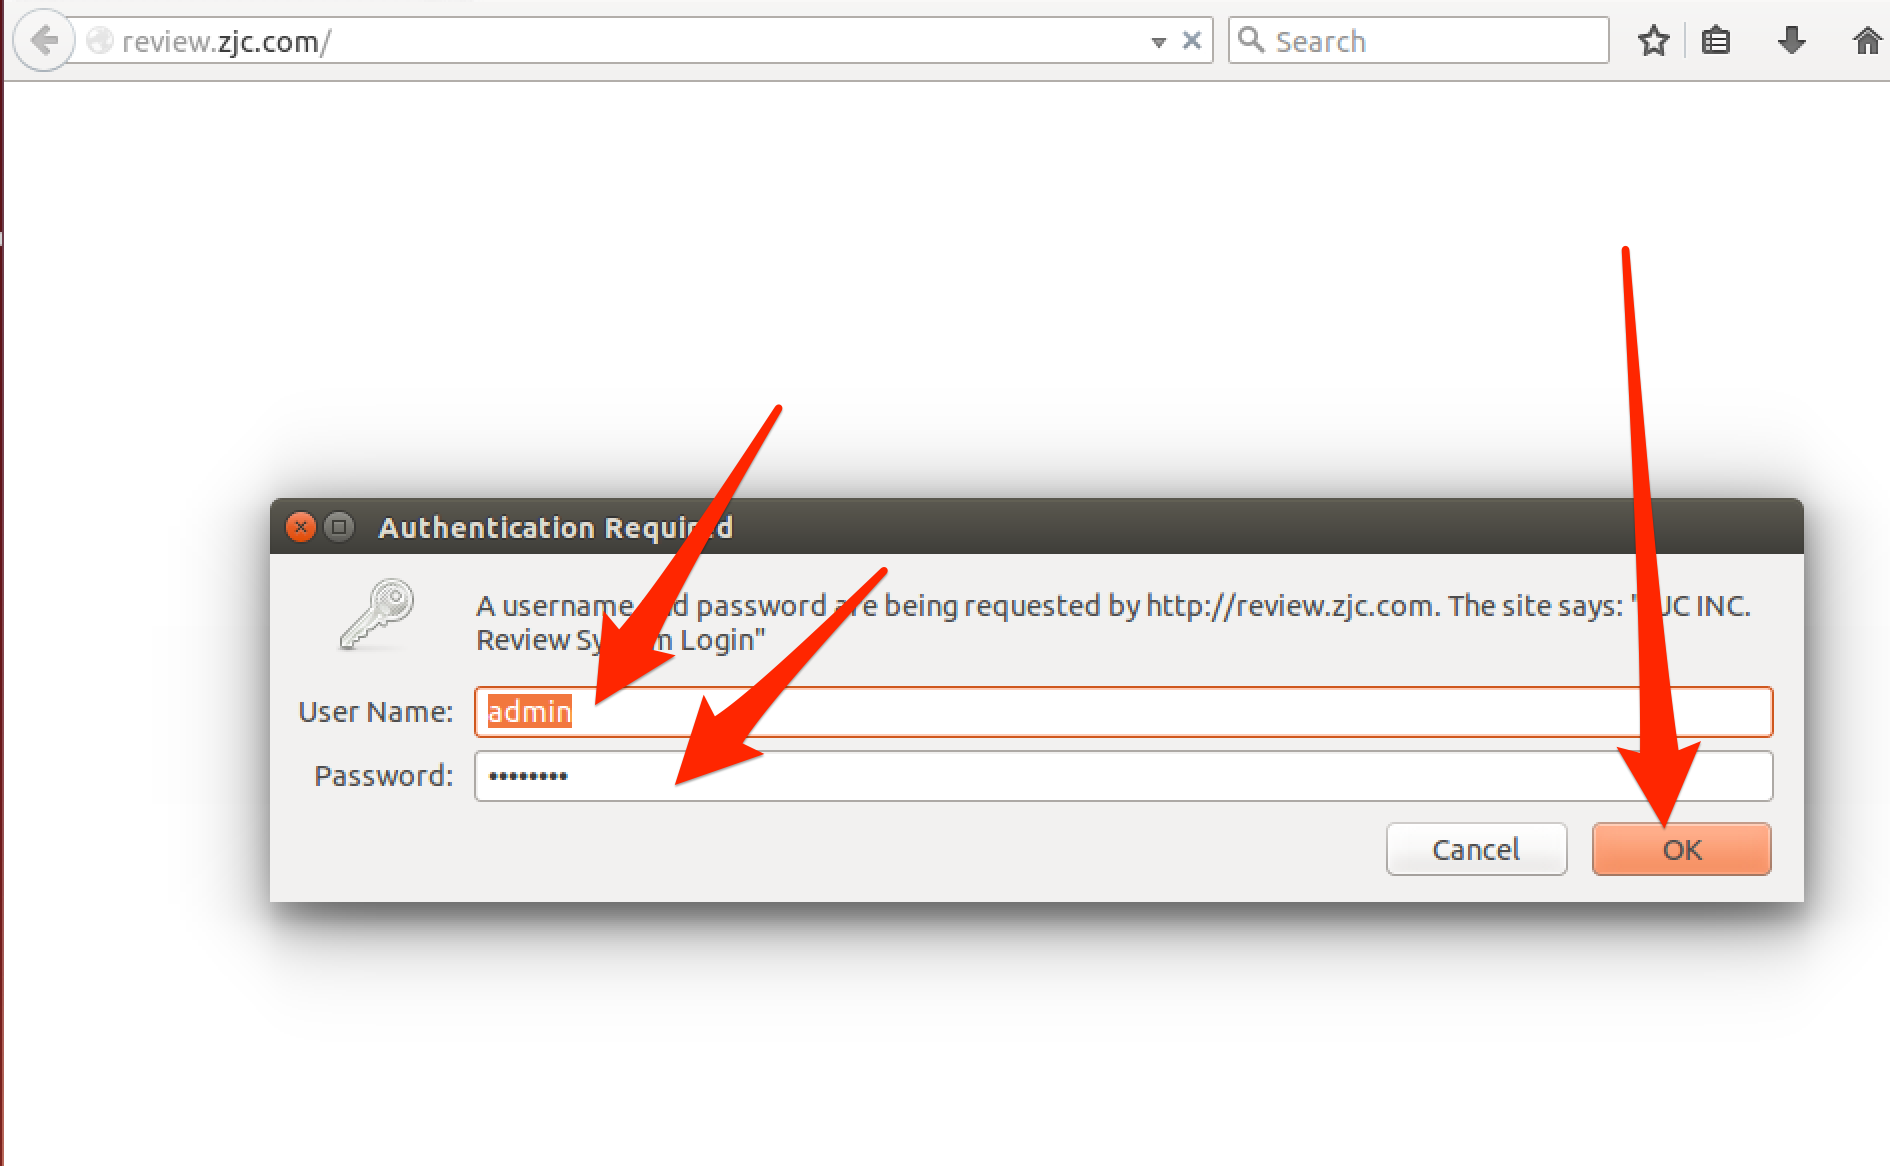
為Gerrit系統建立使用者user1並配置
使用htpasswd工具建立user1和密碼
$ sudo -u gerrit -H htpasswd /home/gerrit/gerrit/etc/htpasswd.conf user1使用user1登入gerrit,更新信箱為[email protected]
更新SSH公鑰 ([email protected]那個)
Jenkins配置
Jenkins系統已經建立了管理員賬戶jenkins並安裝了Gerrit Trigger外掛
配置jenkins使用者
為Gerrit系統建立使用者jenkins
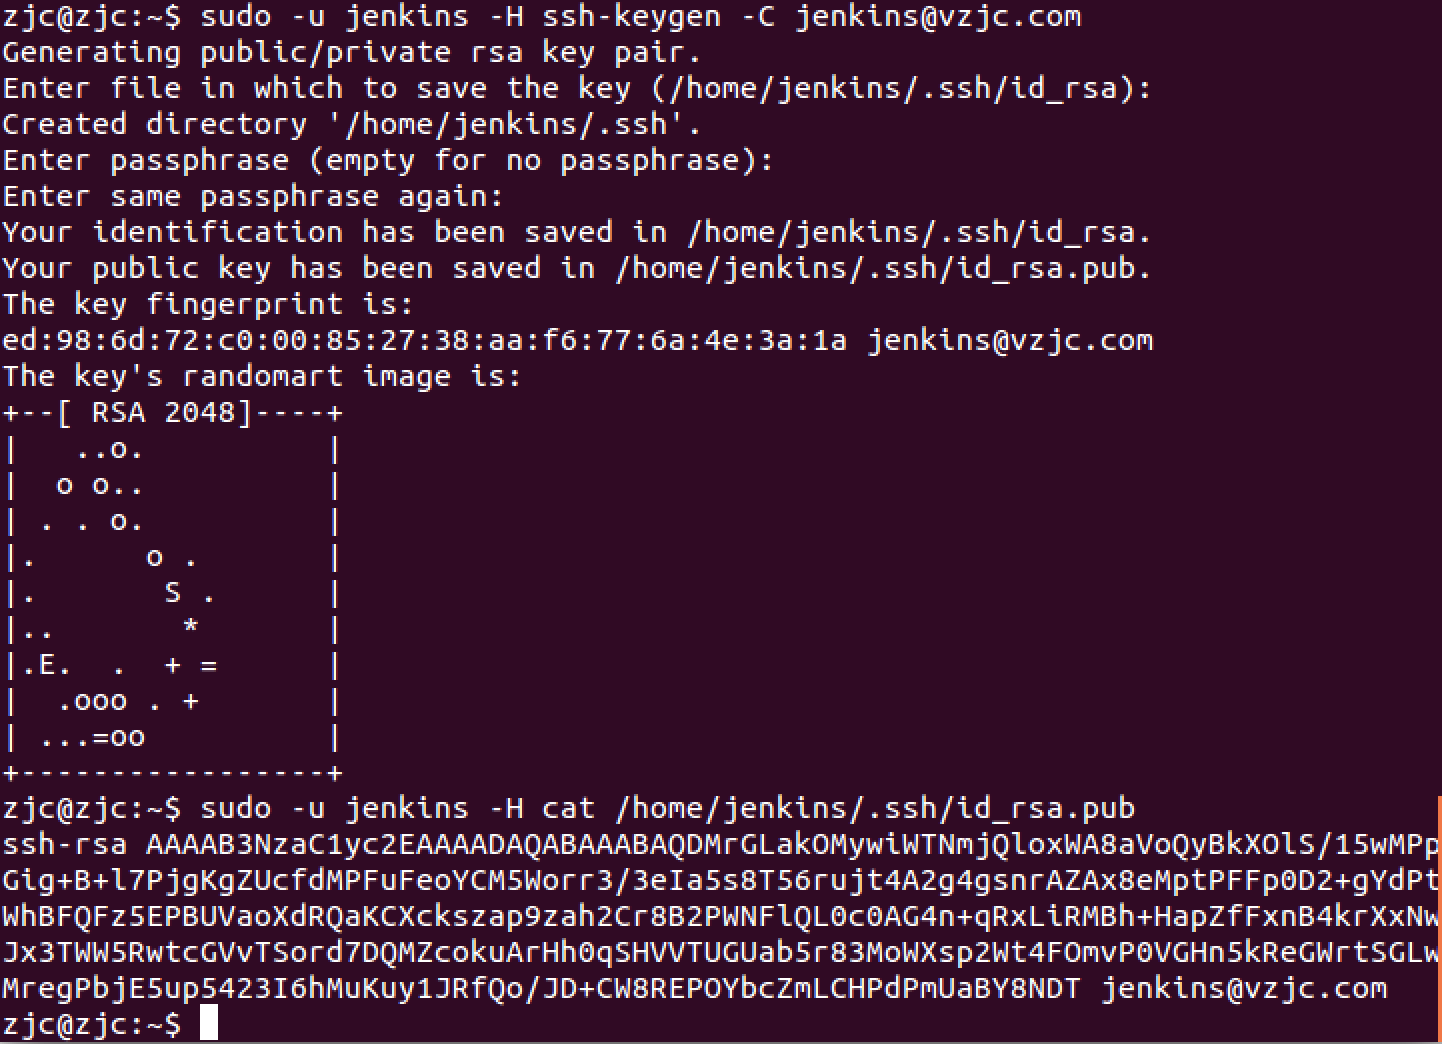
$ sudo -u gerrit -H htpasswd /home/gerrit/gerrit/etc/htpasswd.conf jenkins為系統使用者jenkins建立ssh祕鑰,並檢視公鑰
也可以用前面的su - jenkins登入後再操作。這樣就不用sudo -u jenkins -H字首了$ sudo -u jenkins -H ssh-keygen -C [email protected] $ sudo -u jenkins -H cat /home/jenkins/.ssh/id_rsa.pub用jenkins登入Gerrit更新郵箱並驗證
- 此處有個問題,如果在安裝Jenkins系統前沒有建立jenkins使用者(安裝時候系統會自動建立)並且使用的Dovecot來接收郵件並且用預設配置。那麼要先查一下是否系統使用者jenkins的uid是否大於500,如果不是,需要修改配置檔案
[email protected]:~$ id jenkins
uid=122(jenkins) gid=131(jenkins) groups=131(jenkins)
[email protected]:~$ sudo vim /etc/dovecot/conf.d/10-mail.conf
然後修改
first_valid_uid這個值用jenkins登入Gerrit,更新SSH公鑰為系統使用者jenkins的公鑰
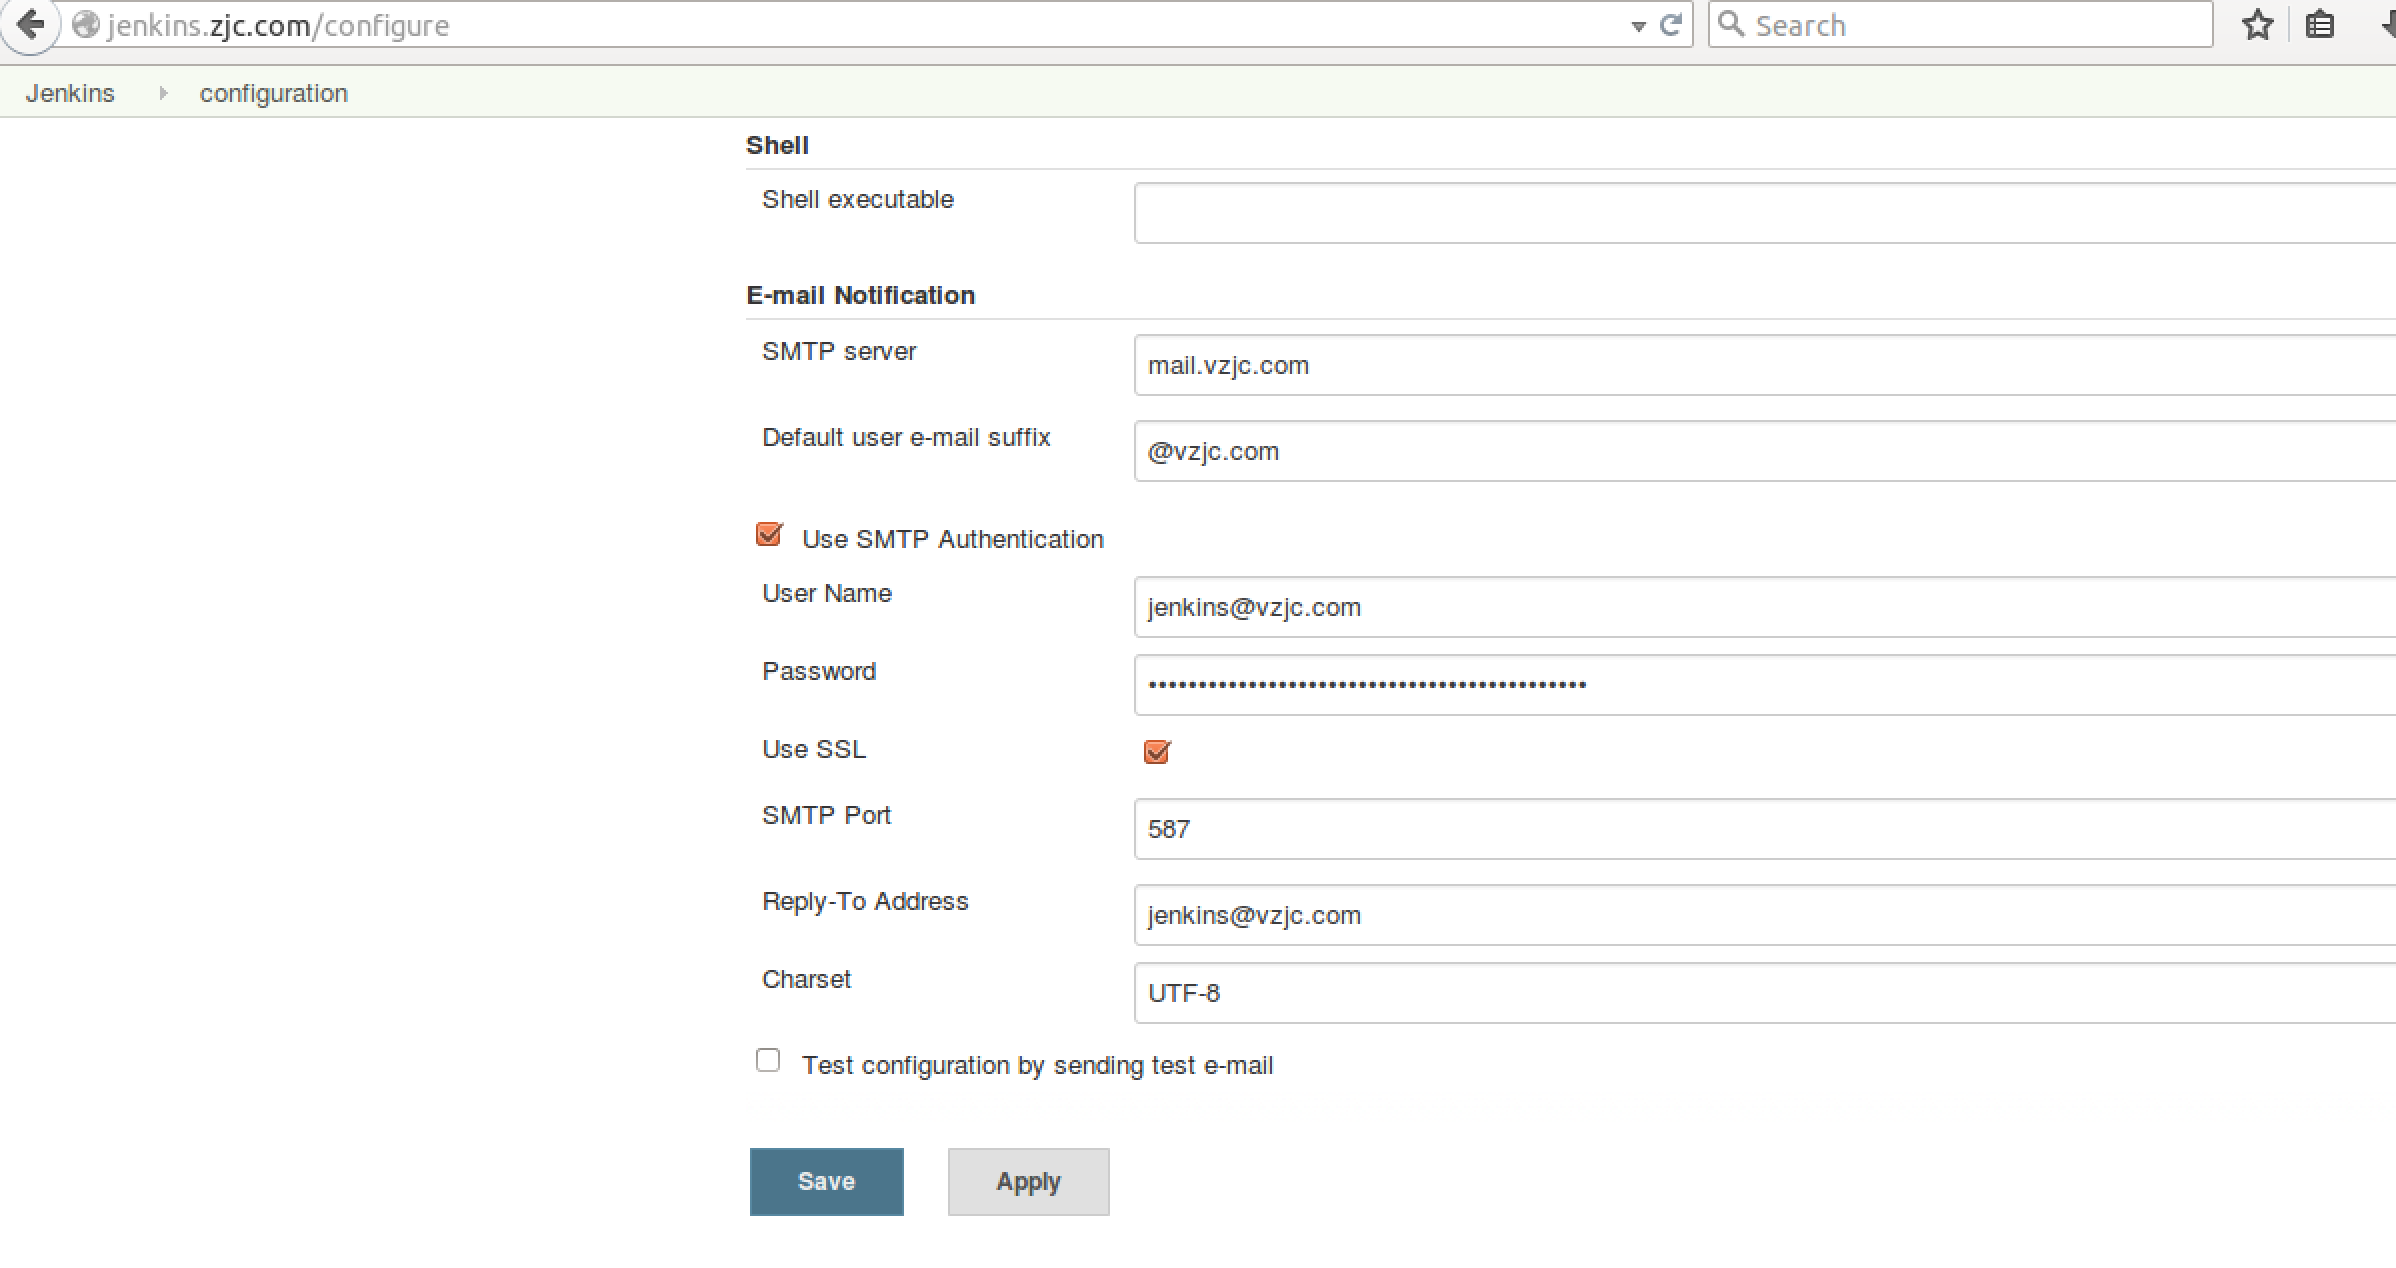
Jenkins系統的SMTP設定 (根據具體情況配置)
主頁面->Manage Jenkins->Configure System
Jenkins Location ->System Admin e-mail address : [email protected]
E-mail Notification
- SMTP server :
mail.vzjc.com - Default user e-mail suffix :
@vzjc.com - 勾選
Use SMTP Authentication - User Name :
[email protected] - Password : 輸入您設定的密碼
- 勾選
Use SSL - SMTP Port :
587 - Reply-To Address :
[email protected] - Charset :
UTF-8
- 勾選Test configuration by sending test e-mail,然後在出現的框中填
[email protected],測試如果出錯(好吧,如果用vzjc.com的郵件伺服器是肯定會出錯)Unrecognized SSL message, plaintext connection,則參考這個設定
- 勾選Test configuration by sending test e-mail,然後在出現的框中填
- SMTP server :

設定Gerrit Trigger
主頁面->Manage Jenkins->Gerrit Trigger->Add New Server
- Add New Server : Check4Gerrit
- 勾選 Gerrit Server With Default Configurations
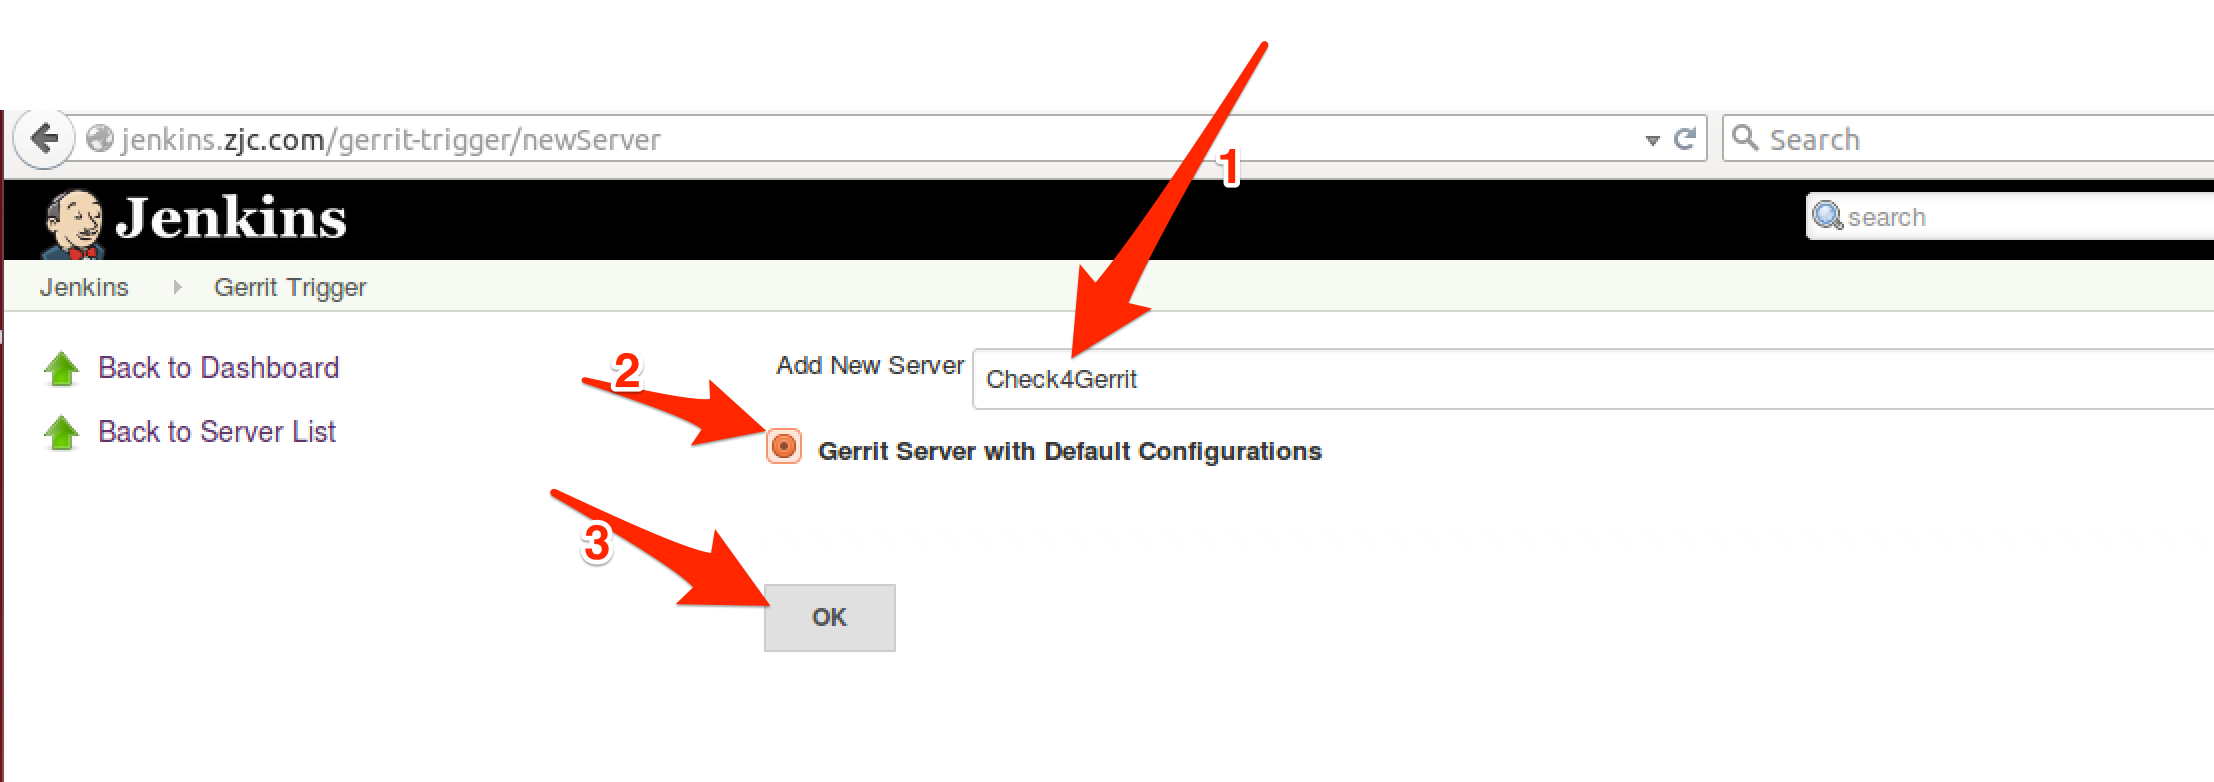
- Hostname : review.zjc.com
- Username : jenkins
- E-mail : [email protected]
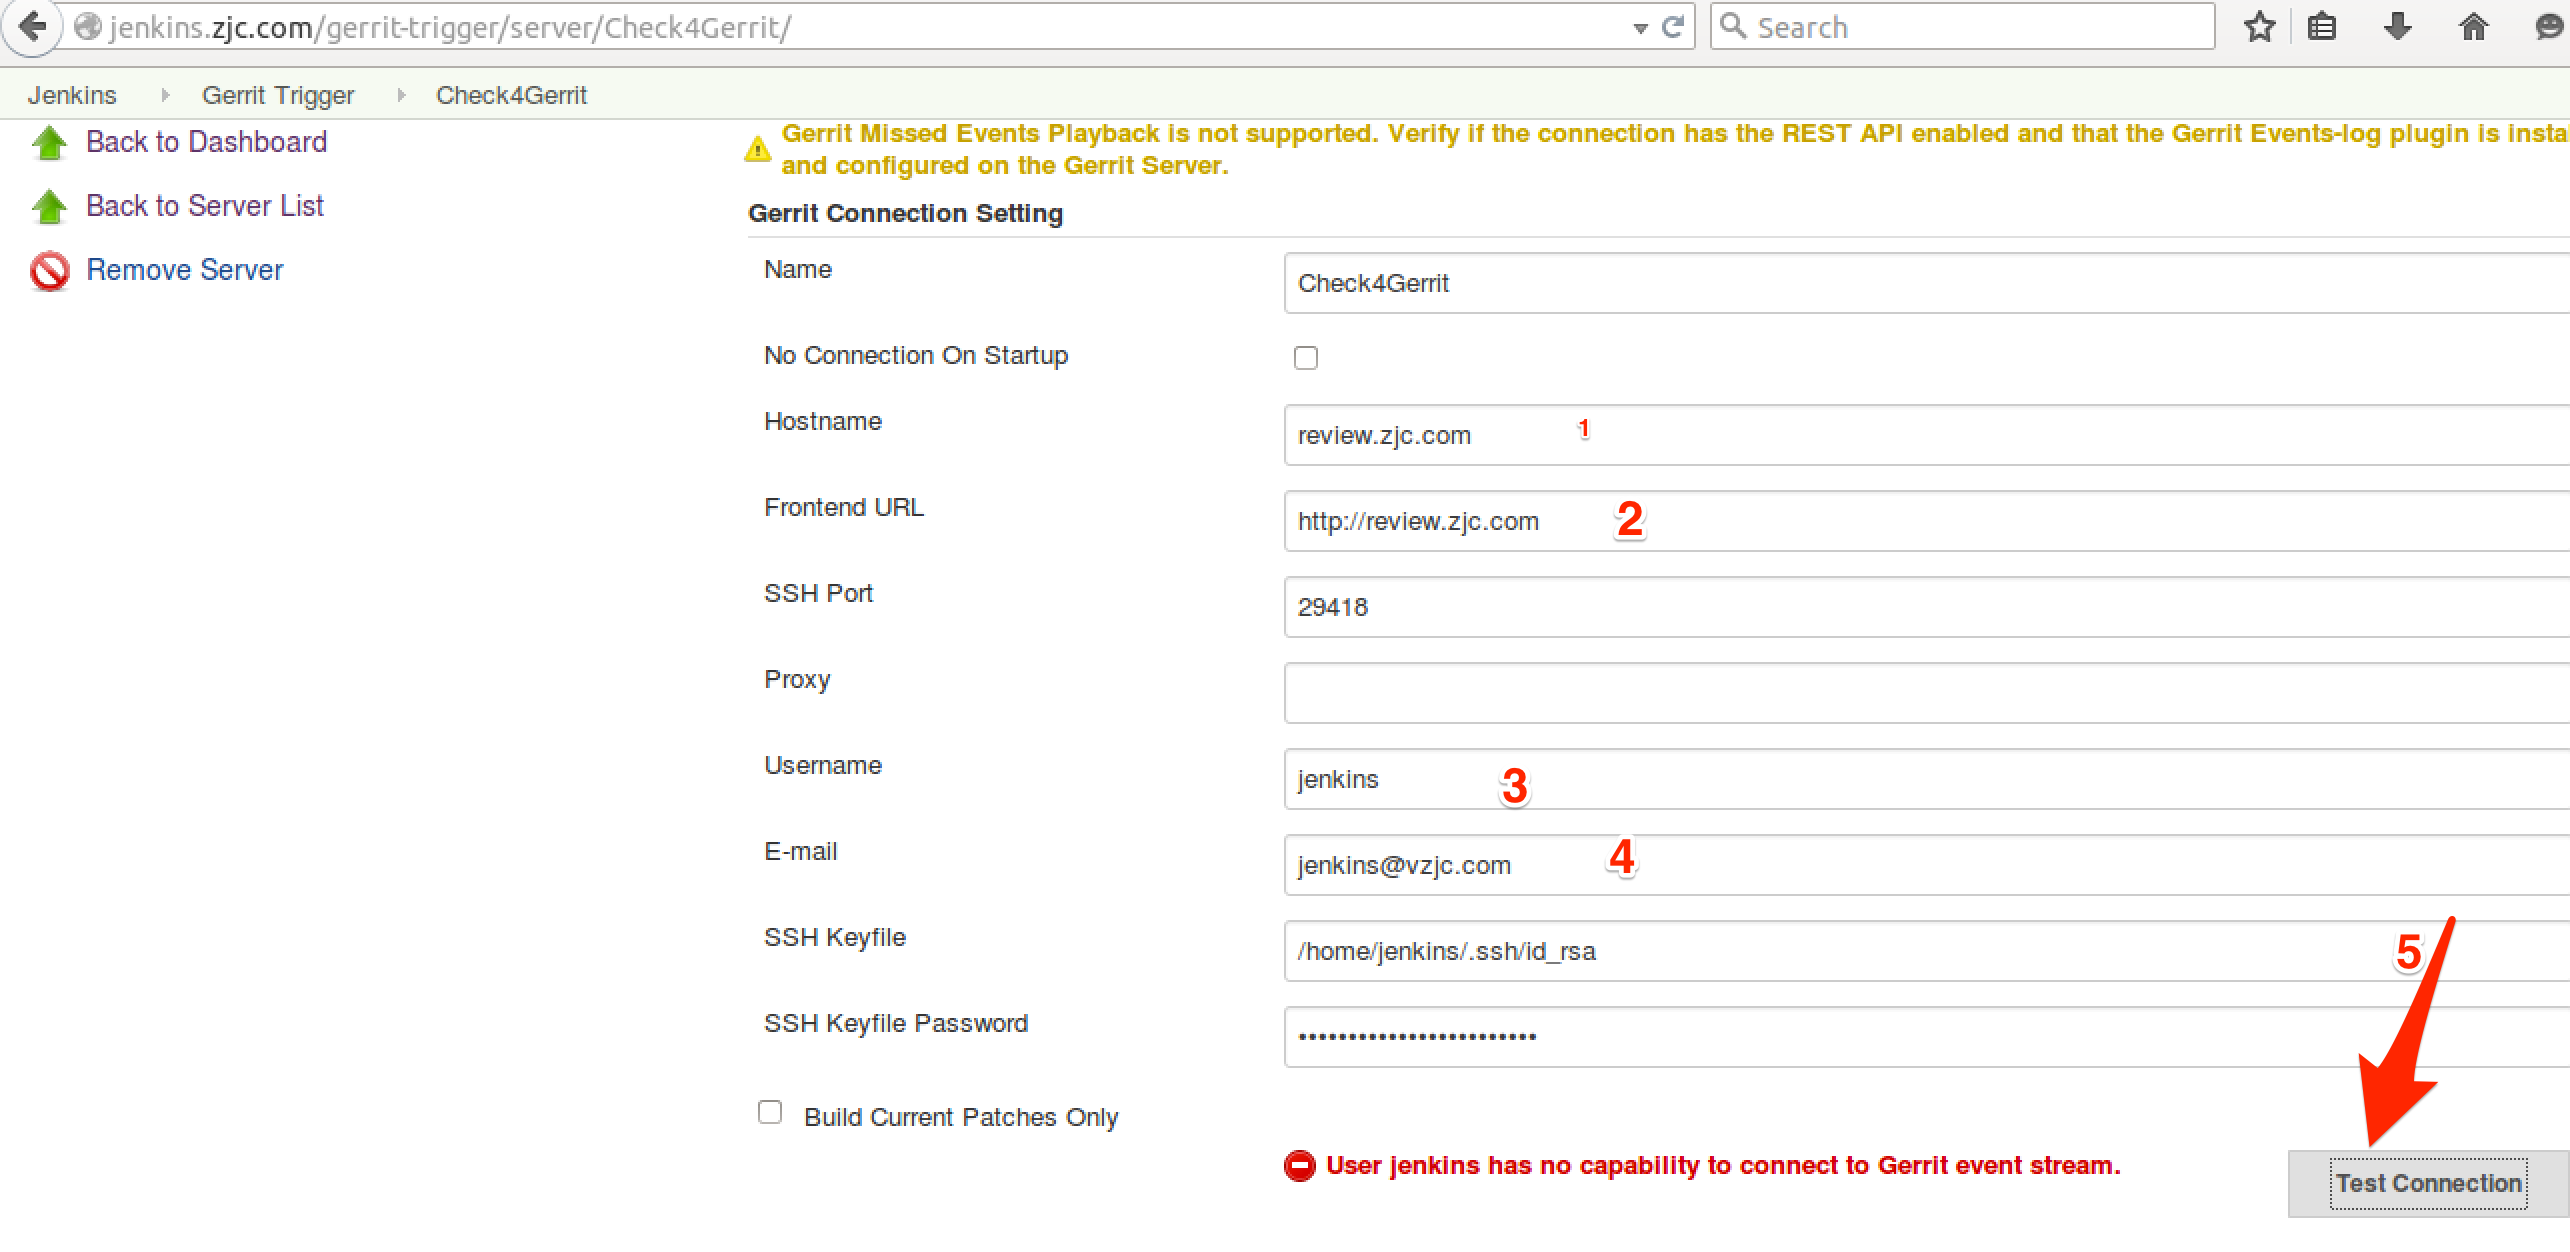
如果點選Test Connection後出現如圖所示的錯誤User jenkins has no capability to connect to Gerrit event stream.,這是因為因Jenkins 沒有許可權監聽 Gerrit 的 ‘Stream Events’,可如此配置
點選Test Connection,出現的字串為 success 則代表配置成功
點選下方的儲存按鈕來儲存設定
Gerrit 和 Jenkins 整合
讓 Gerrit 支援 Jenkins
如果安裝Gerrit時沒有或者沒有選擇新增Verified標籤功能[‘lable Verified’],需要自己新增
$ su - admin
$ git init cfg; cd cfg
$ git config --global user.name 'admin'
$ git config --global user.email '[email protected]'
$ git remote add origin ssh://[email protected]:29418/All-Projects
$ git pull origin refs/meta/config
$ vim project.config
在檔案末新增
[label "Verified"]
    function = MaxWithBlock
    value = -1 Fails
    value =  0 No score
    value = +1 Verified
$ git commit -a -m 'Updated permissions'
$ git push origin HEAD:refs/meta/config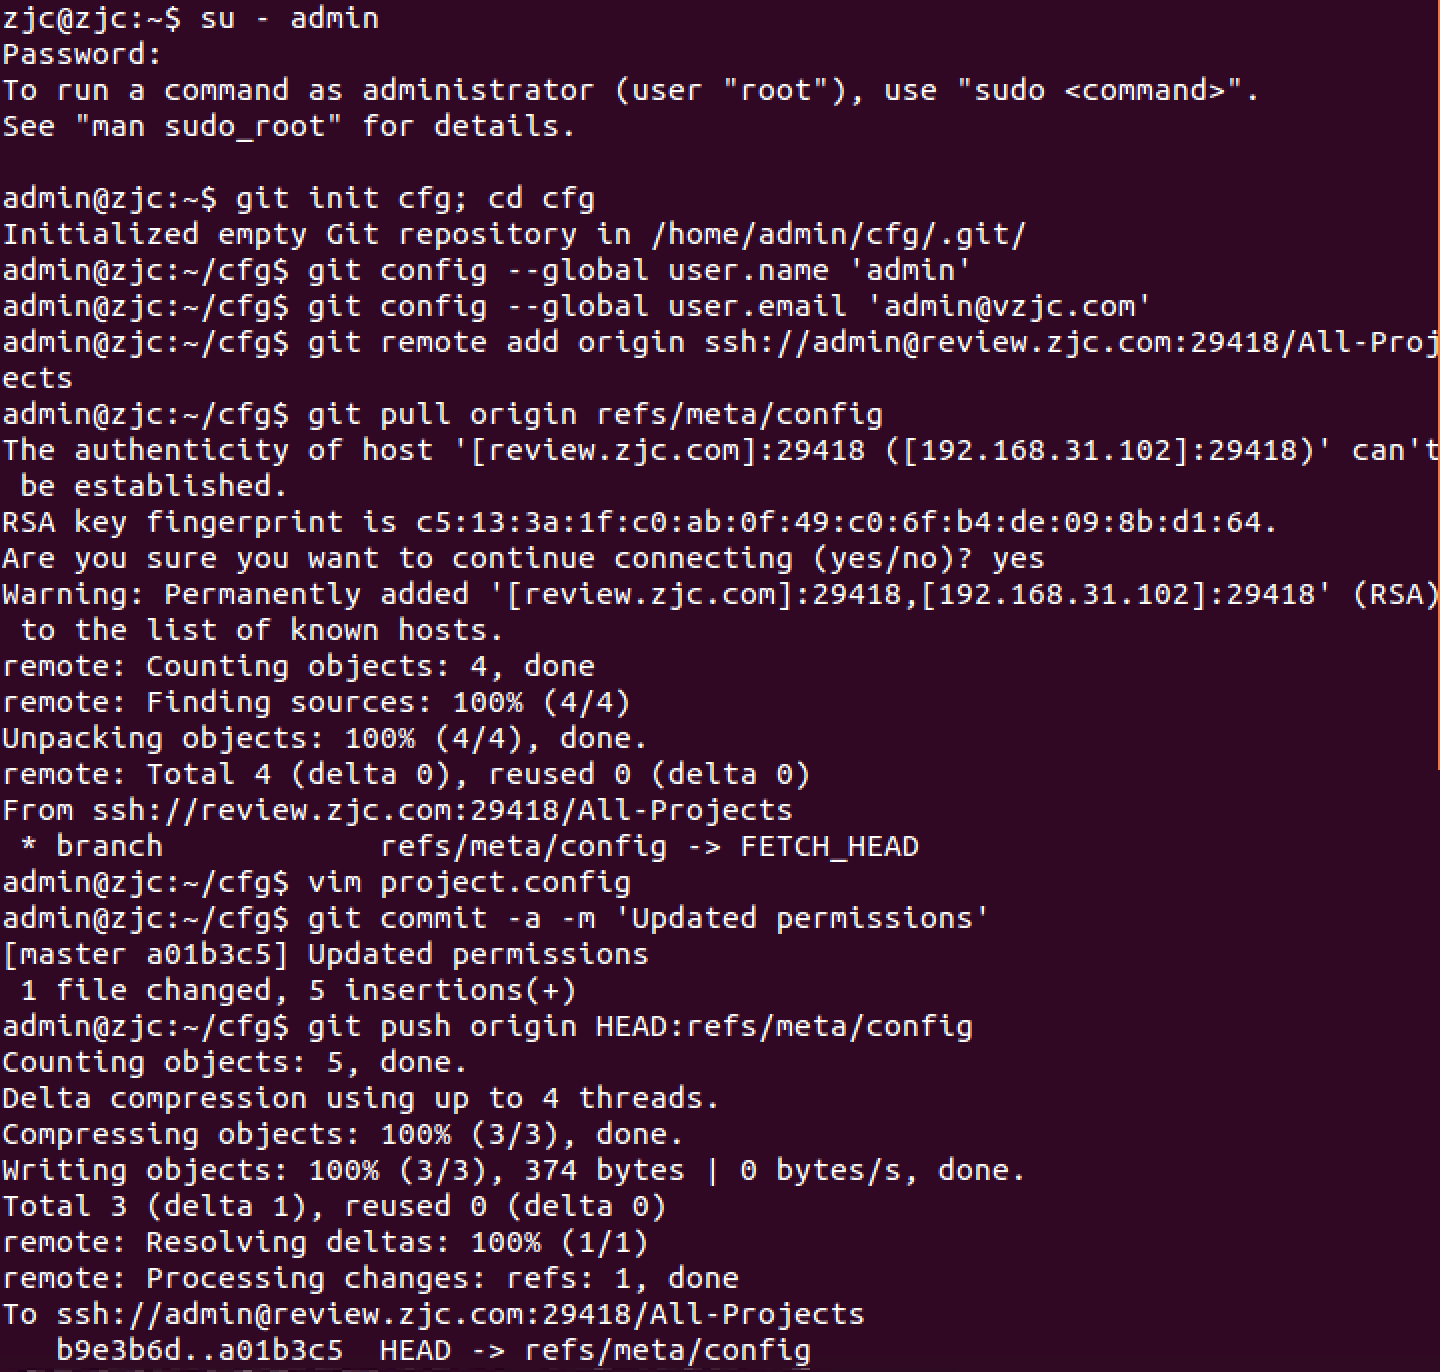

用admin登入Gerrit
現在提交的 Review 請求只有 Code Rivew 稽核,我們要求的是需要 Jenkins 的 Verified 和 Code Review 雙重保障,在 Projects 的 Access 欄裡,針對 Reference: refs/heads/ 項新增 Verified 功能
- Projects -> List -> All-Projects
- Projects -> Access -> Edit -> 找到 Reference: refs/heads/* 項 -> Add Permission -> Label Verified -> Group Name 裡輸入 Non-Interactive Users -> 回車 或者 點選Add 按鈕 -> 在最下面點選 Save Changes 儲存更改
Gitlab上設定test-project1工程
前面我們在Gitlab上搭建了一個 test-project1 的工程,普通使用者是沒有辦法去 push 的,只能使用 git review 命令提交. 而 git review 命令需要 .gitreview 檔案存在於專案目錄裡。
用 admin使用者新增.gitreview 檔案
$ su - admin
$ git clone [email protected]:dev-group/test-project1.git
$ cd test-project1
$ vim .gitreview
檔案內容為:
[gerrit]
host=review.zjc.com
port=29418
project=test-project1.git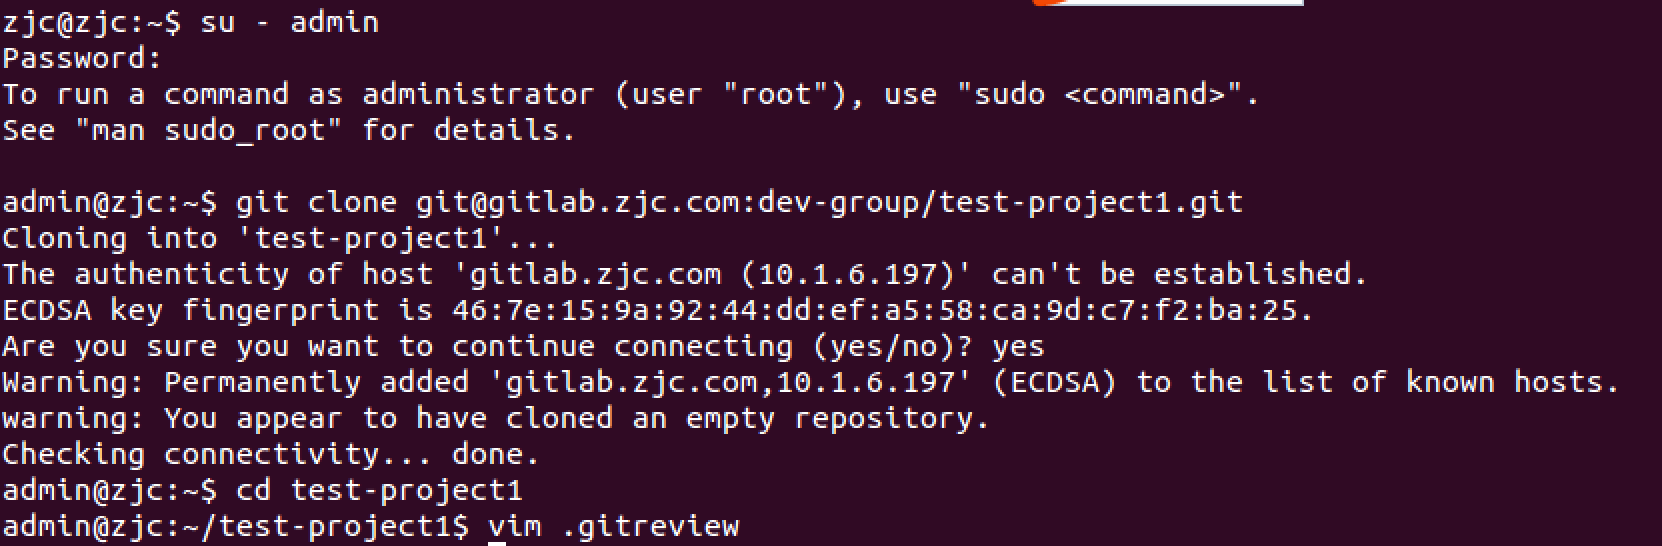
新增.gitreview到版本庫
$ git add .gitreview
$ git config --global user.name 'admin'
$ git config --global user.email '[email protected]'
$ git commit .gitreview -m 'add .gitreview file by admin.'
$ git push origin master
$ exit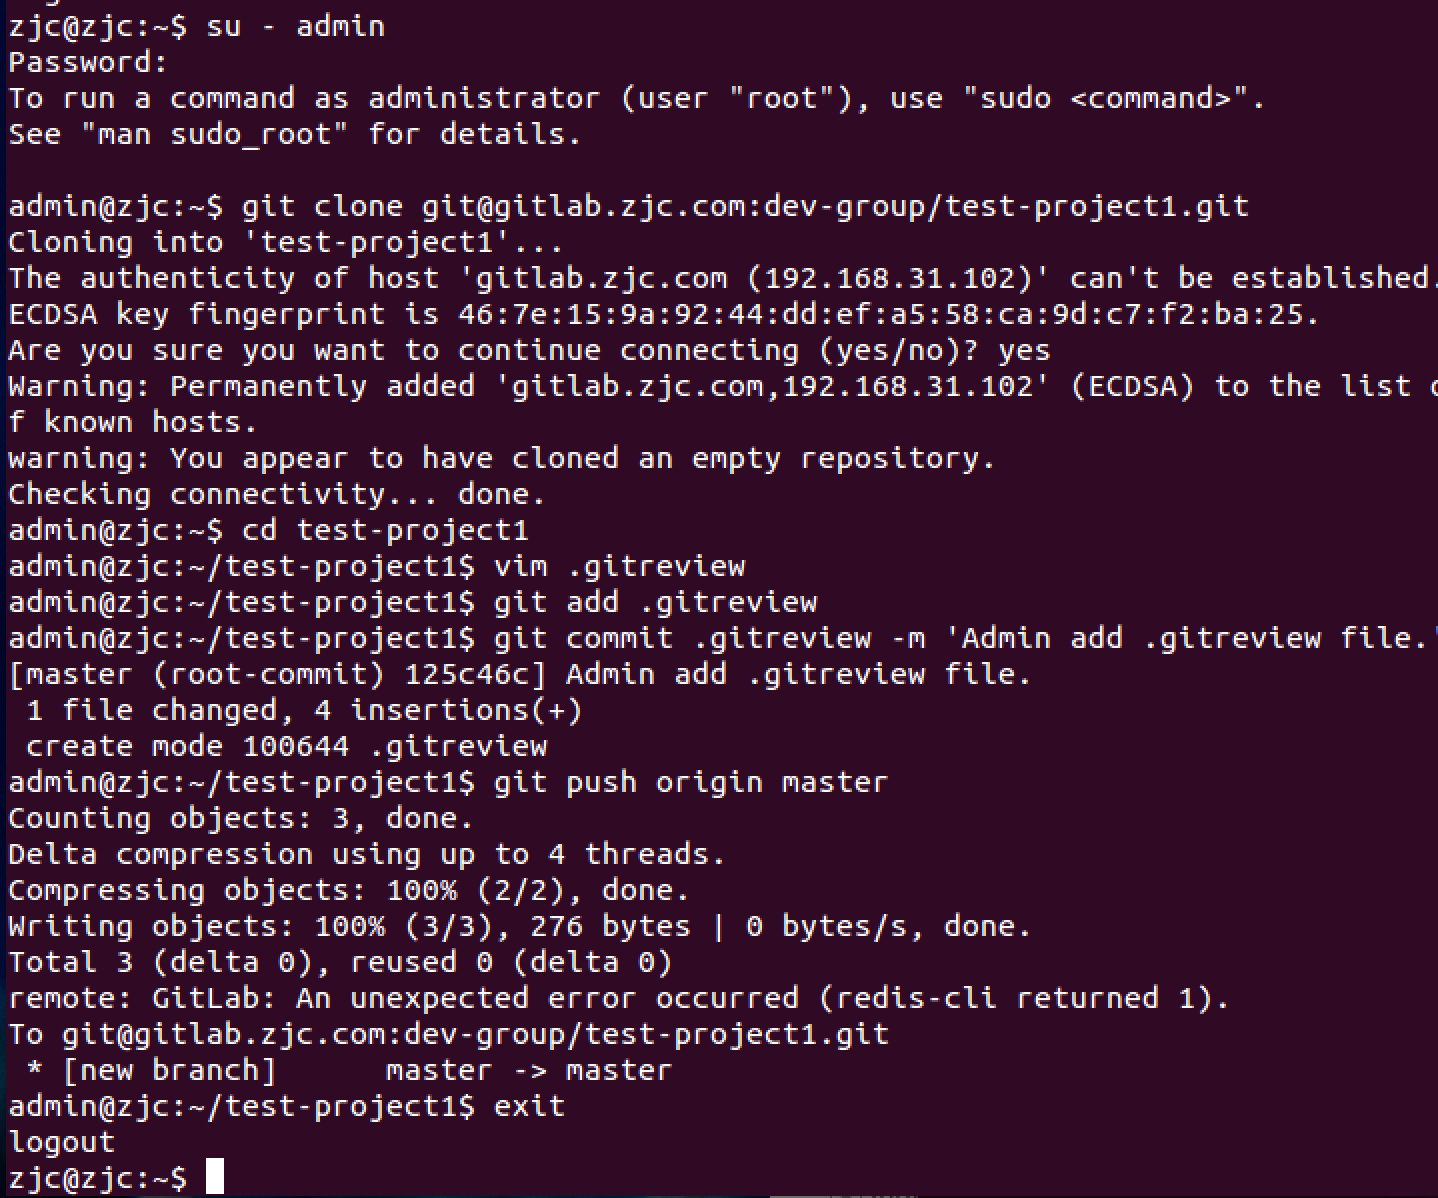
用 admin使用者新增.testr.conf 檔案
Python 程式碼我使用了 testr,需要先安裝 testr 命令
$ sudo apt-get install python-pip
$ sudo pip install testrepository
在 test-project1 這個專案中新增 .testr.conf 檔案
$ su - admin
$ cd test-project1
$ vim .testr.conf
檔案內容為:
[DEFAULT]
test_command=OS_STDOUT_CAPTURE=1 OS_STDERR_CAPTURE=1 OS_TEST_TIMEOUT=60 ${PYTHON:-python} -m subunit.run discover -t ./ ./ $LISTOPT $IDOPTION
test_id_option=--load-list $IDFILE
test_list_option=—list
提交到版本庫中
$ git add .testr.conf
$ git commit .testr.conf -m 'add .testr.conf file by admin'
$ git push origin master
$ exit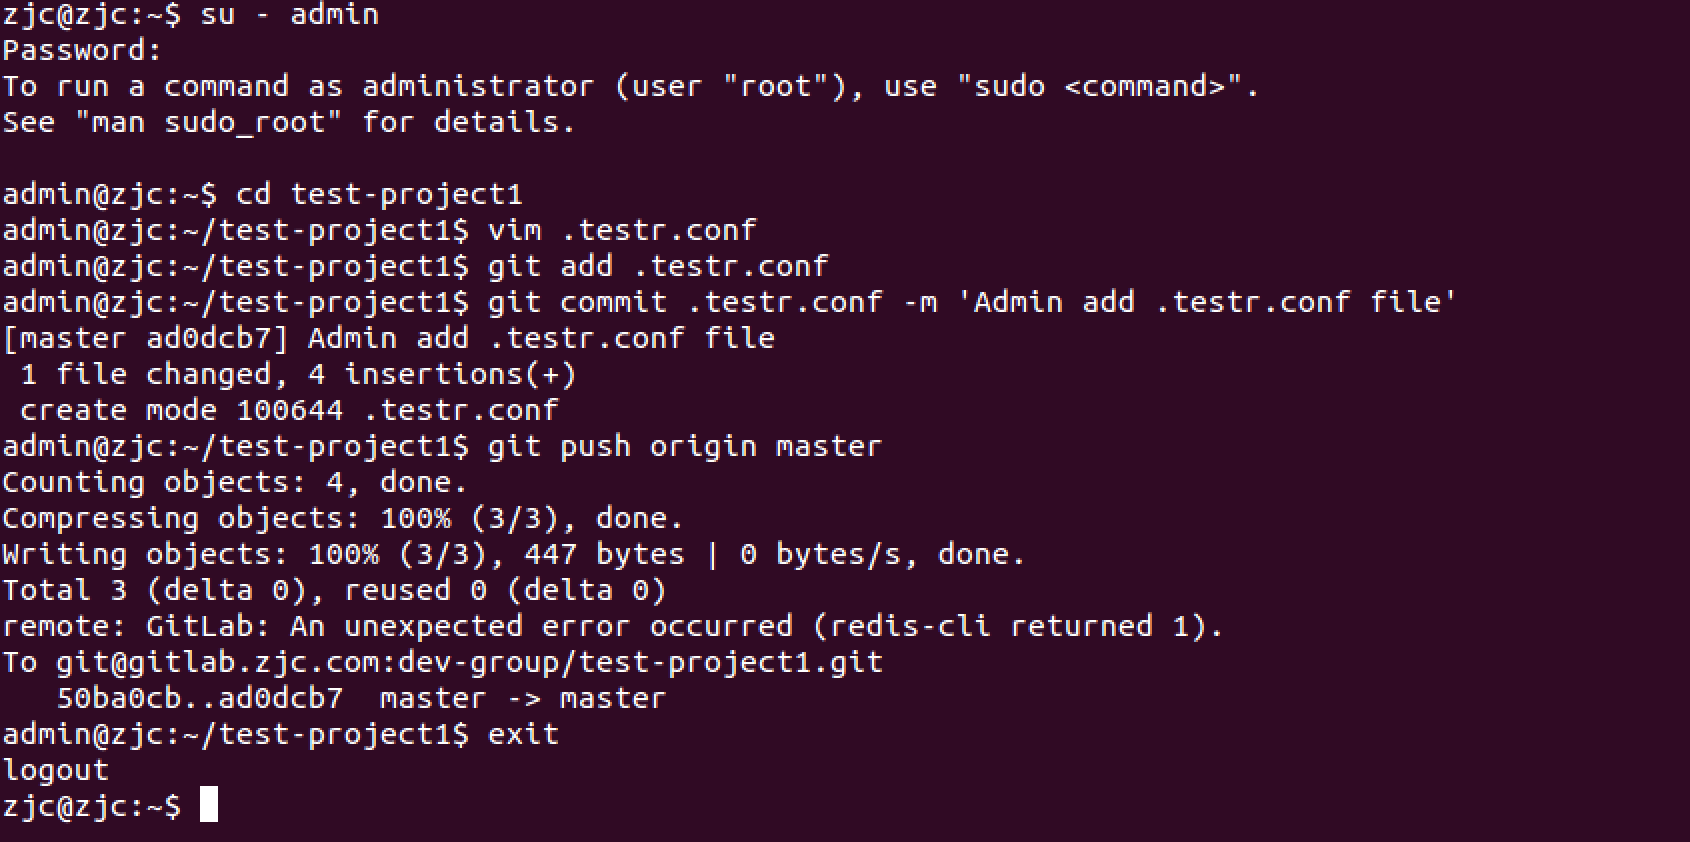
Gerrit上設定 test-project1工程
在 Gerrit 上建立 test-project1 專案
要知道 review 是在 gerrit 上,而 gerrit 上現在是沒有專案的,想讓 gitlab 上的專案能在 gerrit 上 review 的話,必須在 gerrit 上建立相同的專案,並有相同的倉庫檔案.
用 admin 使用者在 Gerrit 上建立 test-project1 專案
$ su - admin
$ ssh -p 29418 [email protected] gerrit create-project test-project1
$ exit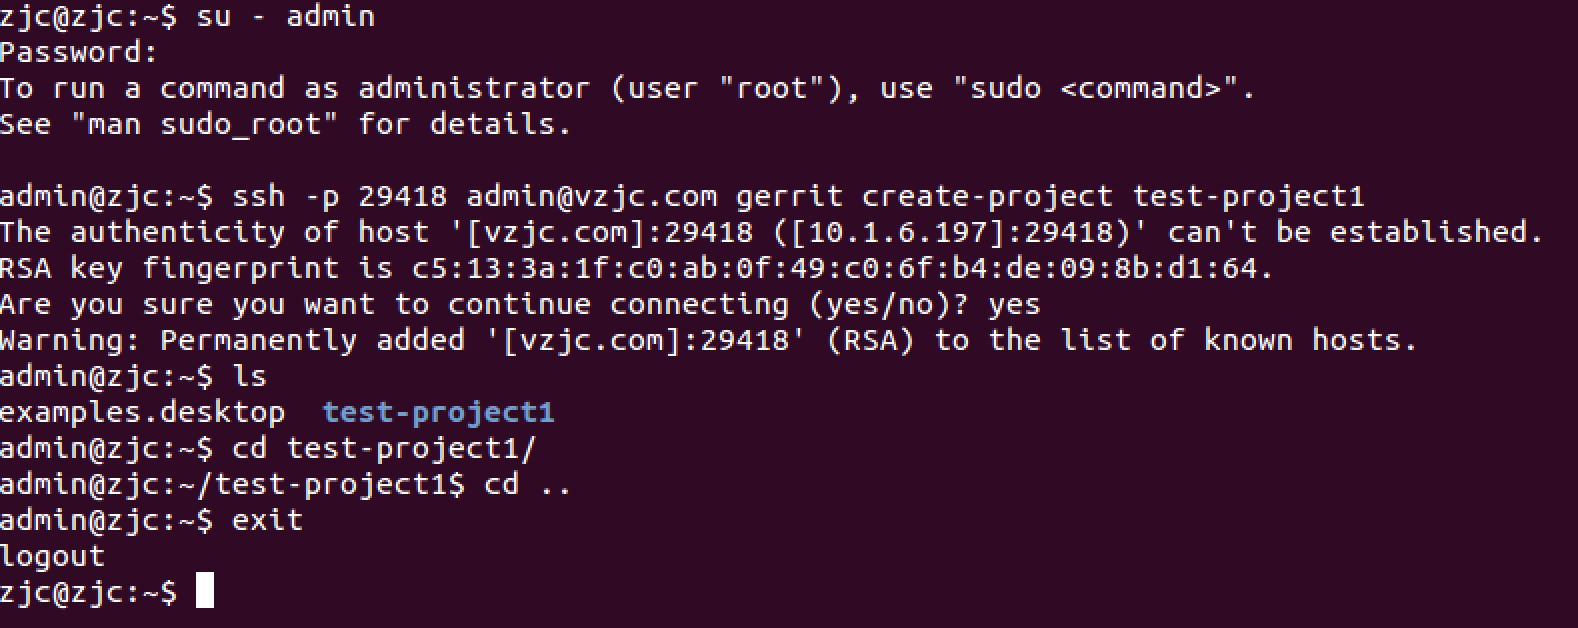
clone –bare Gitlab 上的倉庫到 Gerrit
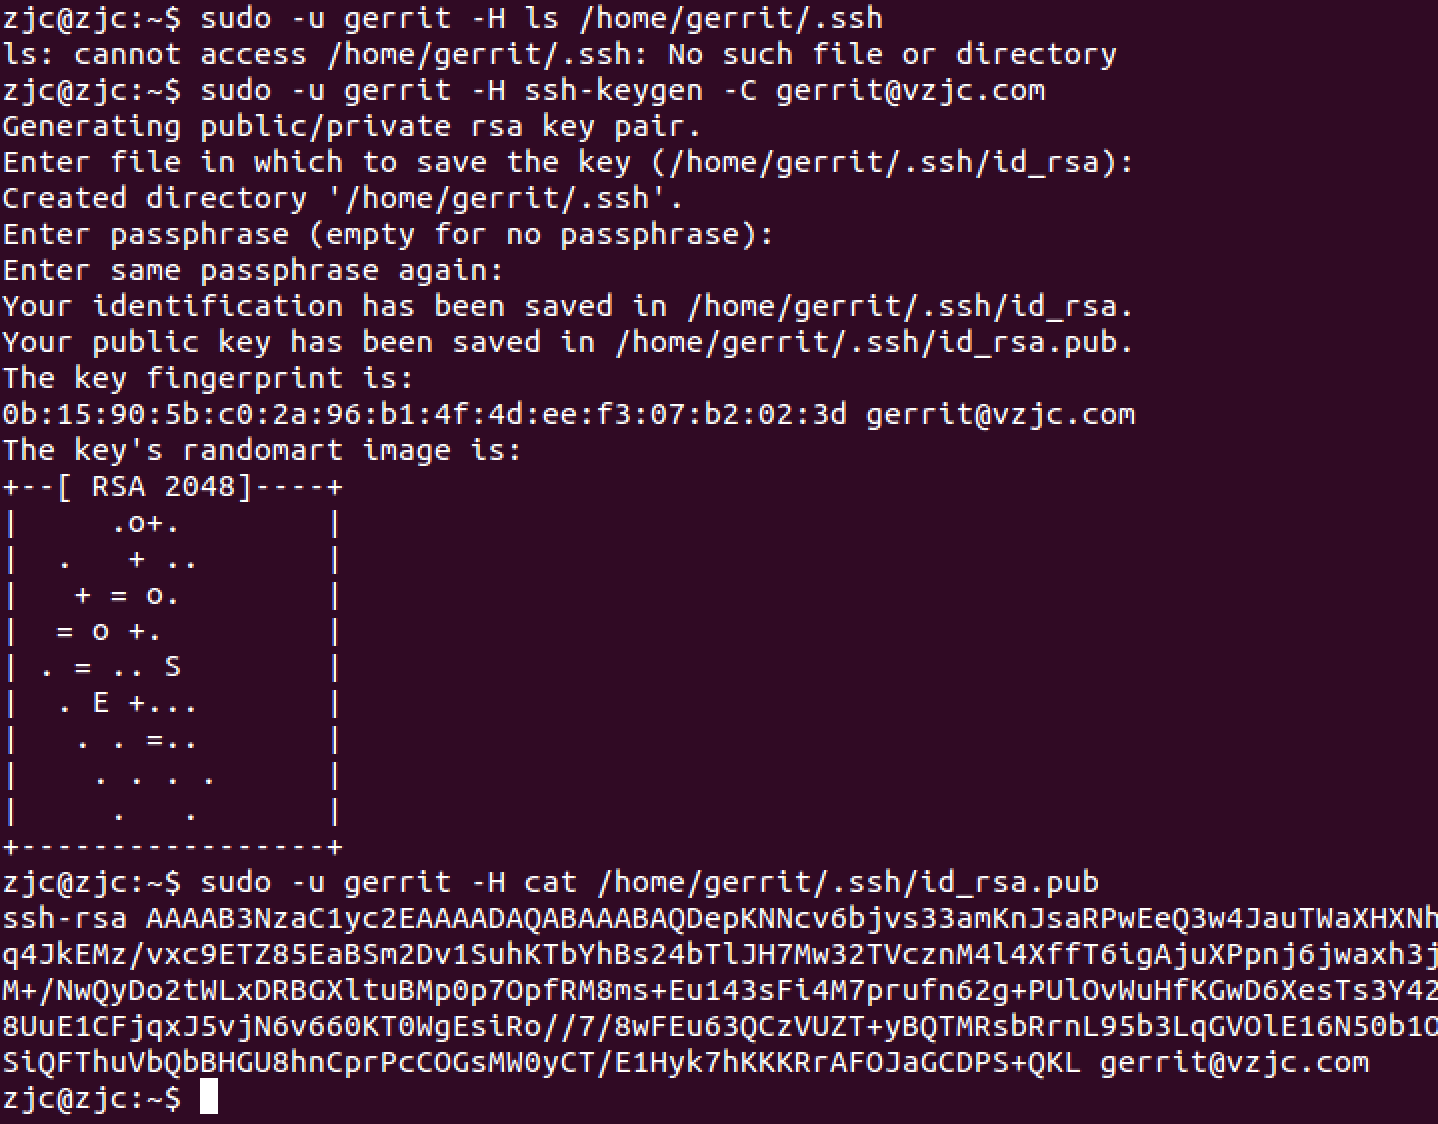
因為gerrit使用者無訪問gitlab的許可權。所以要先看是否gerrit使用者下已經存在了id_rsa金鑰,如果沒有則建立,然後把公鑰加入到gitlab的admin賬戶上(這裡加到 admin 賬戶上,是因為後面Gerrit系統還會有個複製 git 庫到 Gitlab的功能,需要管理員許可權)
賦予gerrit使用者訪問 test-project1 的許可權
$ sudo -u gerrit -H ls /home/gerrit/.ssh
$ sudo -u gerrit -H ssh-keygen -C [email protected]
$ sudo -u gerrit -H cat /home/gerrit/.ssh/id_rsa.pub
用 root 登入Gitlab,把公鑰新增到 admin 的SSH Key上 - 額,這是因為,Gerrit使用gerrit使用者身份執行的,而Gerrit得git庫複製功能需要許可權複製到Gitlab上
以 gerrit身份克隆 test-project1
$ cd /home/gerrit/gerrit/git
$ sudo -u gerrit -H rm -fr test-project1.git
$ sudo -u gerrit -H  git clone --bare [email protected]:dev-group/test-project1.git
同步 Gerrit 的 test-project1 專案到 Gitlab 上的 test-project1 專案目錄中
當用戶 git review 後,程式碼通過 jenkins 測試、人工 review 後,程式碼只是 merge 到了 Gerrit 的 test-project1 專案中,並沒有 merge 到 Gitlab 的 test-project1 專案中,所以需要當 Gerrit test-project1 專案倉庫有變化時自動同步到 Gitlab 的 test-project1 專案倉庫中。Gerrit 自帶一個 Replication 功能,同時我們在安裝 Gerrit 時候預設安裝了這個 Plugin。現在只需要新增一個 replication.config 給 Gerrit
$ sudo -u gerrit -H vim /home/gerrit/gerrit/etc/replication.config檔案內容為:
[remote "test-project1"]
  # Gerrit 上要同步專案的名字
  projects = test-project1
  url = git@gitlab.zjc.com:dev-group/test-project1.git
  push = +refs/heads/*:refs/heads/*
  push = +refs/tags/*:refs/tags/*
  push = +refs/changes/*:refs/changes/*
  threads = 3
設定gerrit使用者的 ~/.ssh/config
$ sudo -u gerrit -H vim /home/gerrit/.ssh/config檔案內容為:
Host gitlab.zjc.com:
    IdentityFile ~/.ssh/id_rsa
    PreferredAuthentications publickey
在gerrit使用者的~/.ssh/known_hosts 中,給 gitlab.zjc.com 新增 rsa 金鑰
$ sudo -u gerrit -H sh -c "ssh-keyscan -t rsa gitlab.zjc.com >> /home/gerrit/.ssh/known_hosts"
$ sudo -u gerrit -H sh -c "ssh-keygen -H -f /home/gerrit/.ssh/known_hosts"
重新啟動 Gerrit 服務
$ sudo /etc/init.d/gerrit restartGerrit 的複製功能配置完畢
在 gerrit 文件中有一個 ${name} 變數用來複制 Gerrit 的所有專案,這裡並不需要。如果有多個專案需要複製,則在 replication.config 中新增多個 [remote ….] 欄位即可。務必按照上面步驟配置複製功能。
在 Jenkins 上對 test-project1 專案建立構建任務
Jenkins上安裝git外掛
安裝 Git Plugin
- Manage Jenkins -> Manage Plugins -> Avalabile -> 安裝 Git Plugin
Jenkins上建立專案
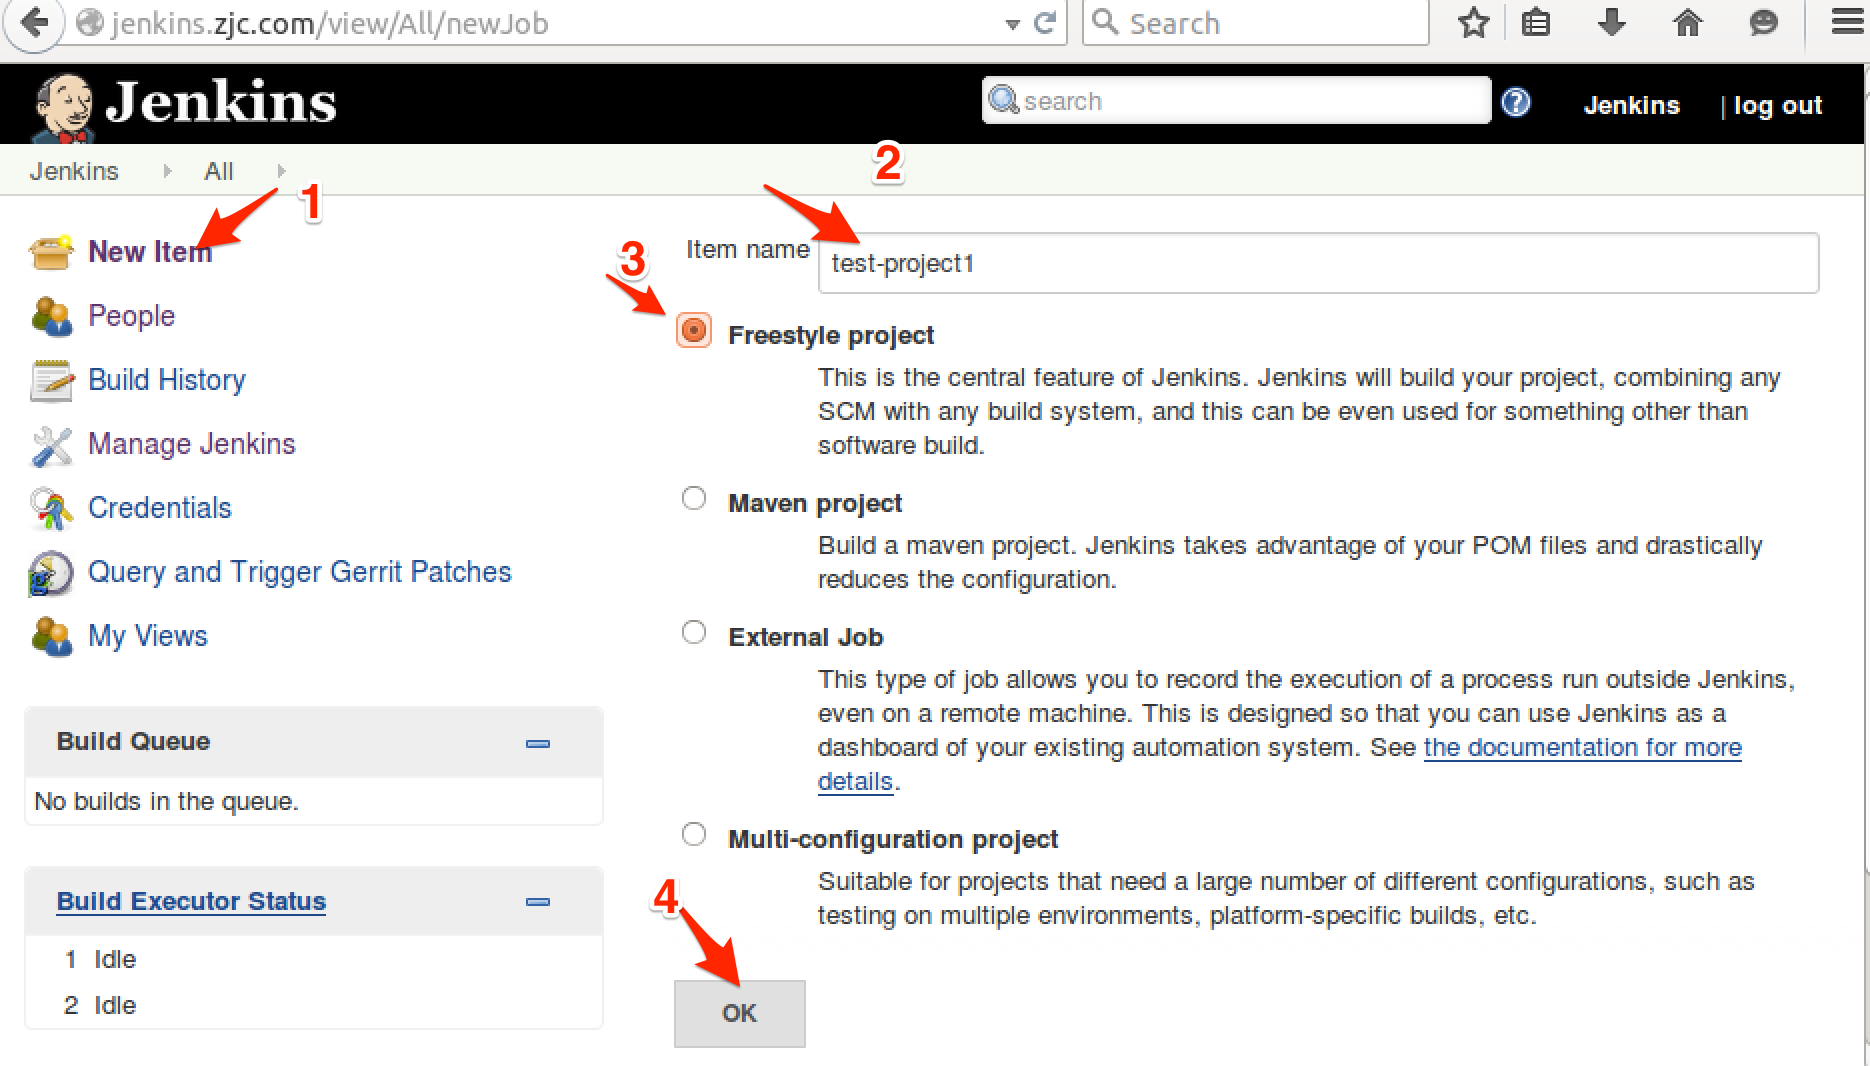
新增 test-project1工程
- 用 jenkins 登入 Jenkins
http://jenkins.zjc.com - New Item頁面設定
- Item name : test-project1
- Freestyle project
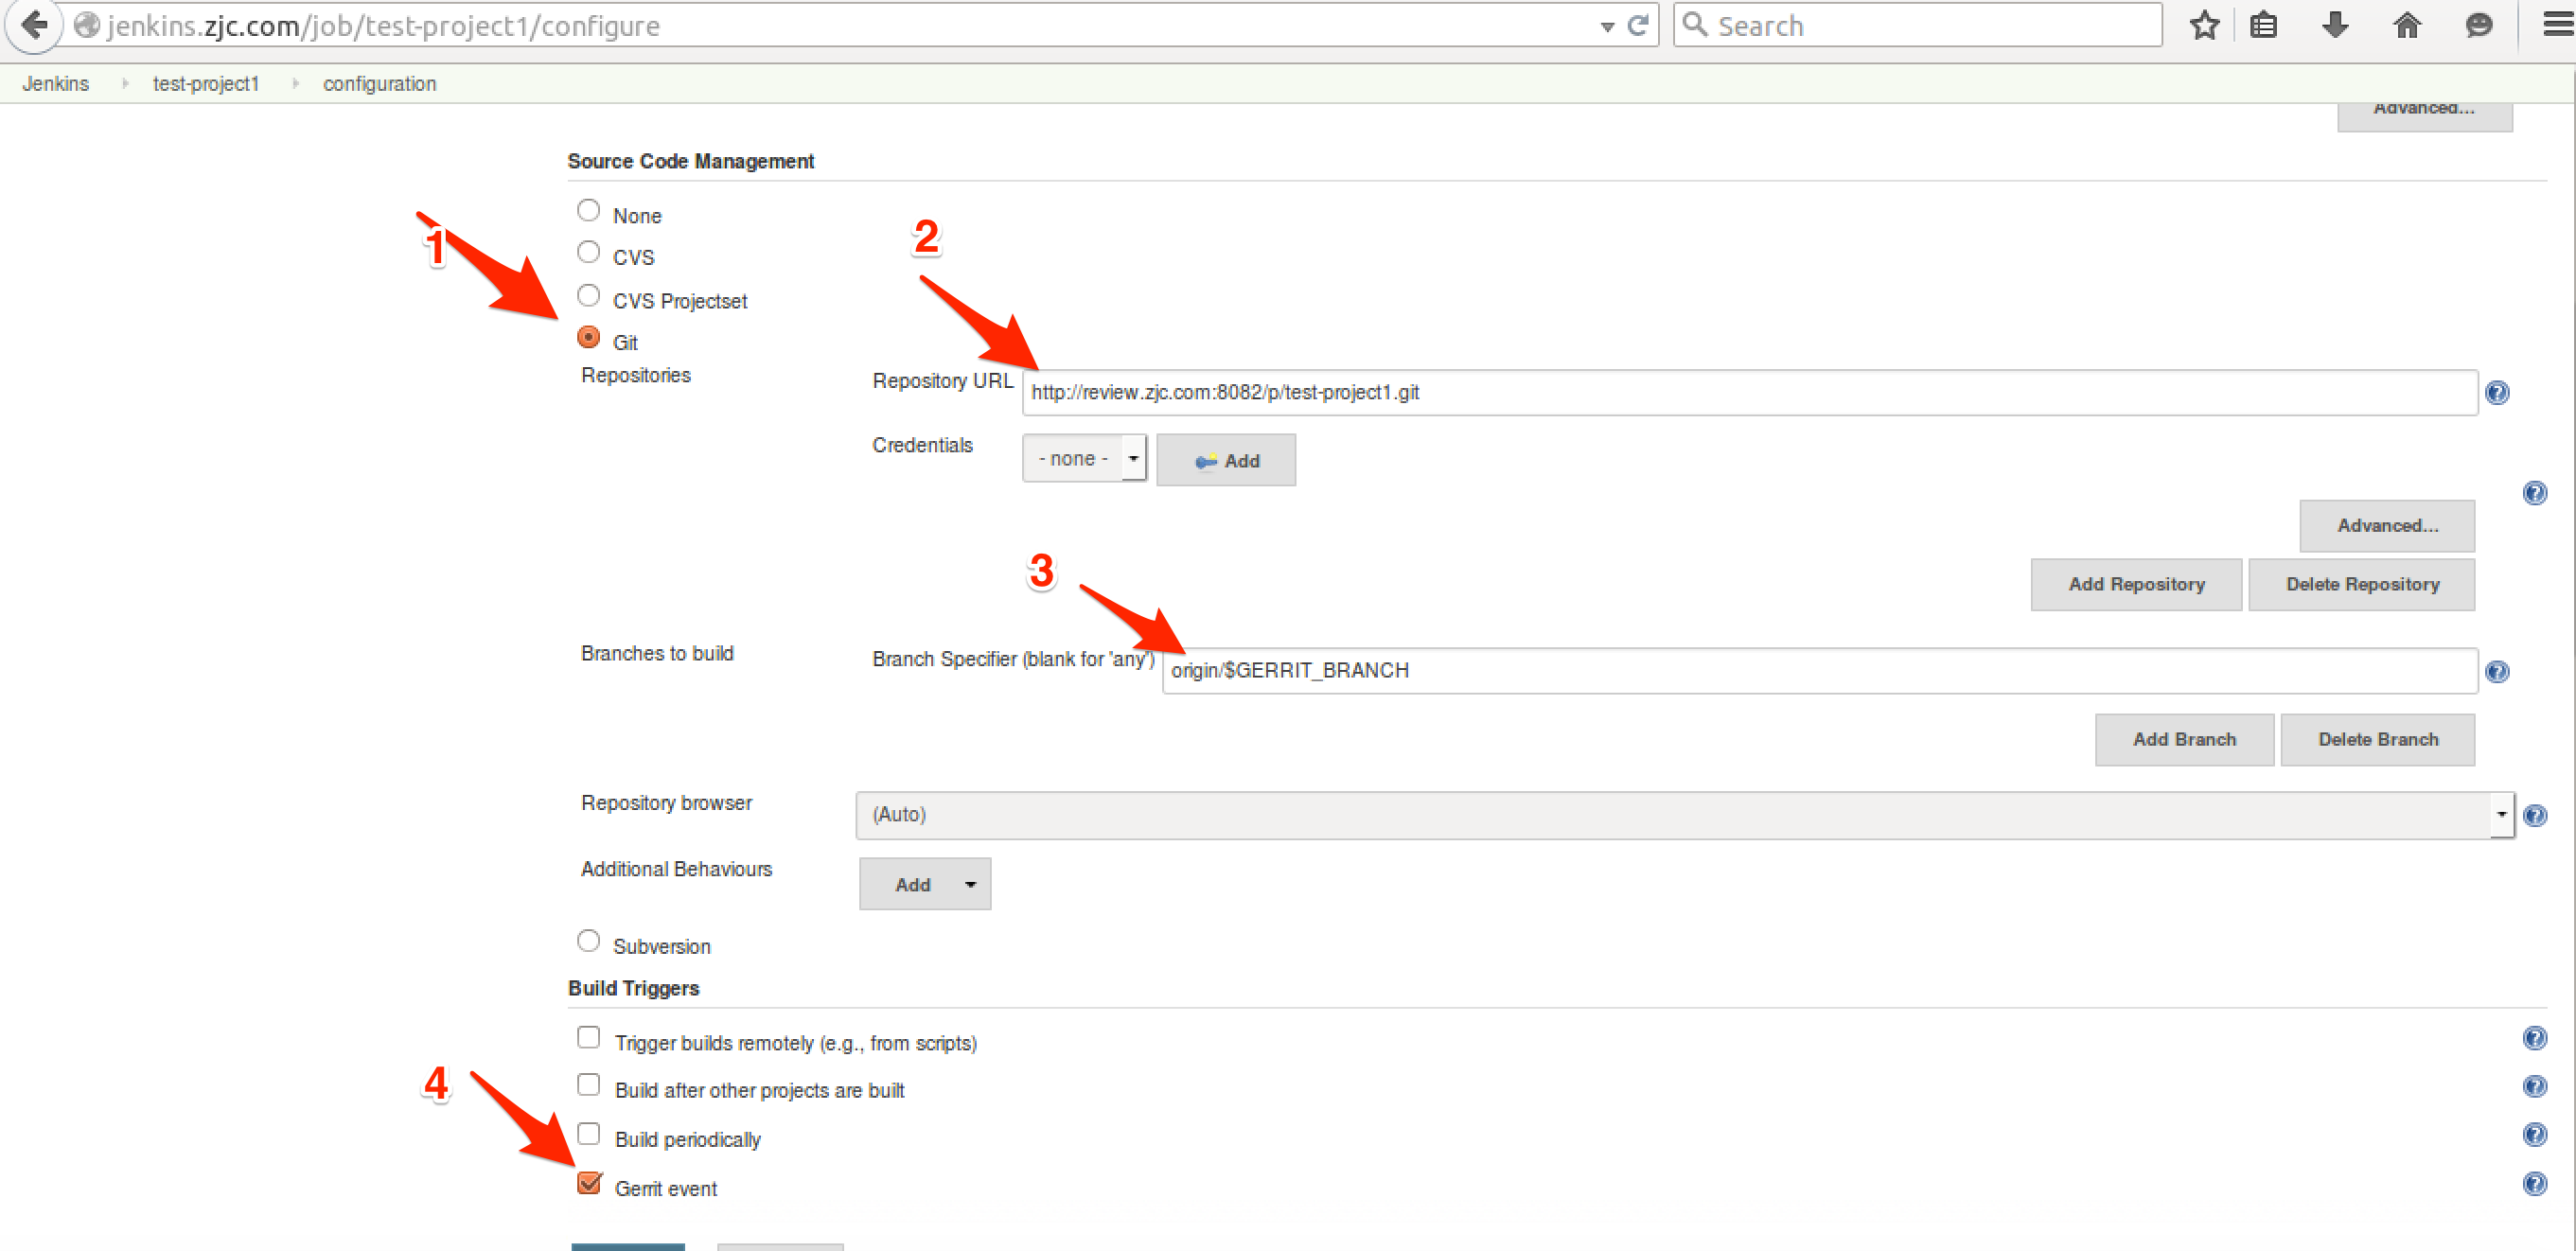
Git頁面設定
- Source Code Management : Git
- Branches to build : origin/$GERRIT_BRANCH
- Build Triggers : Gerrit event
- 按下文來配置,上面的無效 - 來自 這裡
To get the Git Plugin to download your change; set Refspec to $GERRIT_REFSPEC and the Choosing strategy to Gerrit Trigger. You may also need to set 'Branches to build' to $GERRIT_BRANCH. 本系統中可用的是下面的配置 If this does not work for you set Refspec to refs/changes/*:refs/changes/* and 'Branches to build' to $GERRIT_REFSPEC
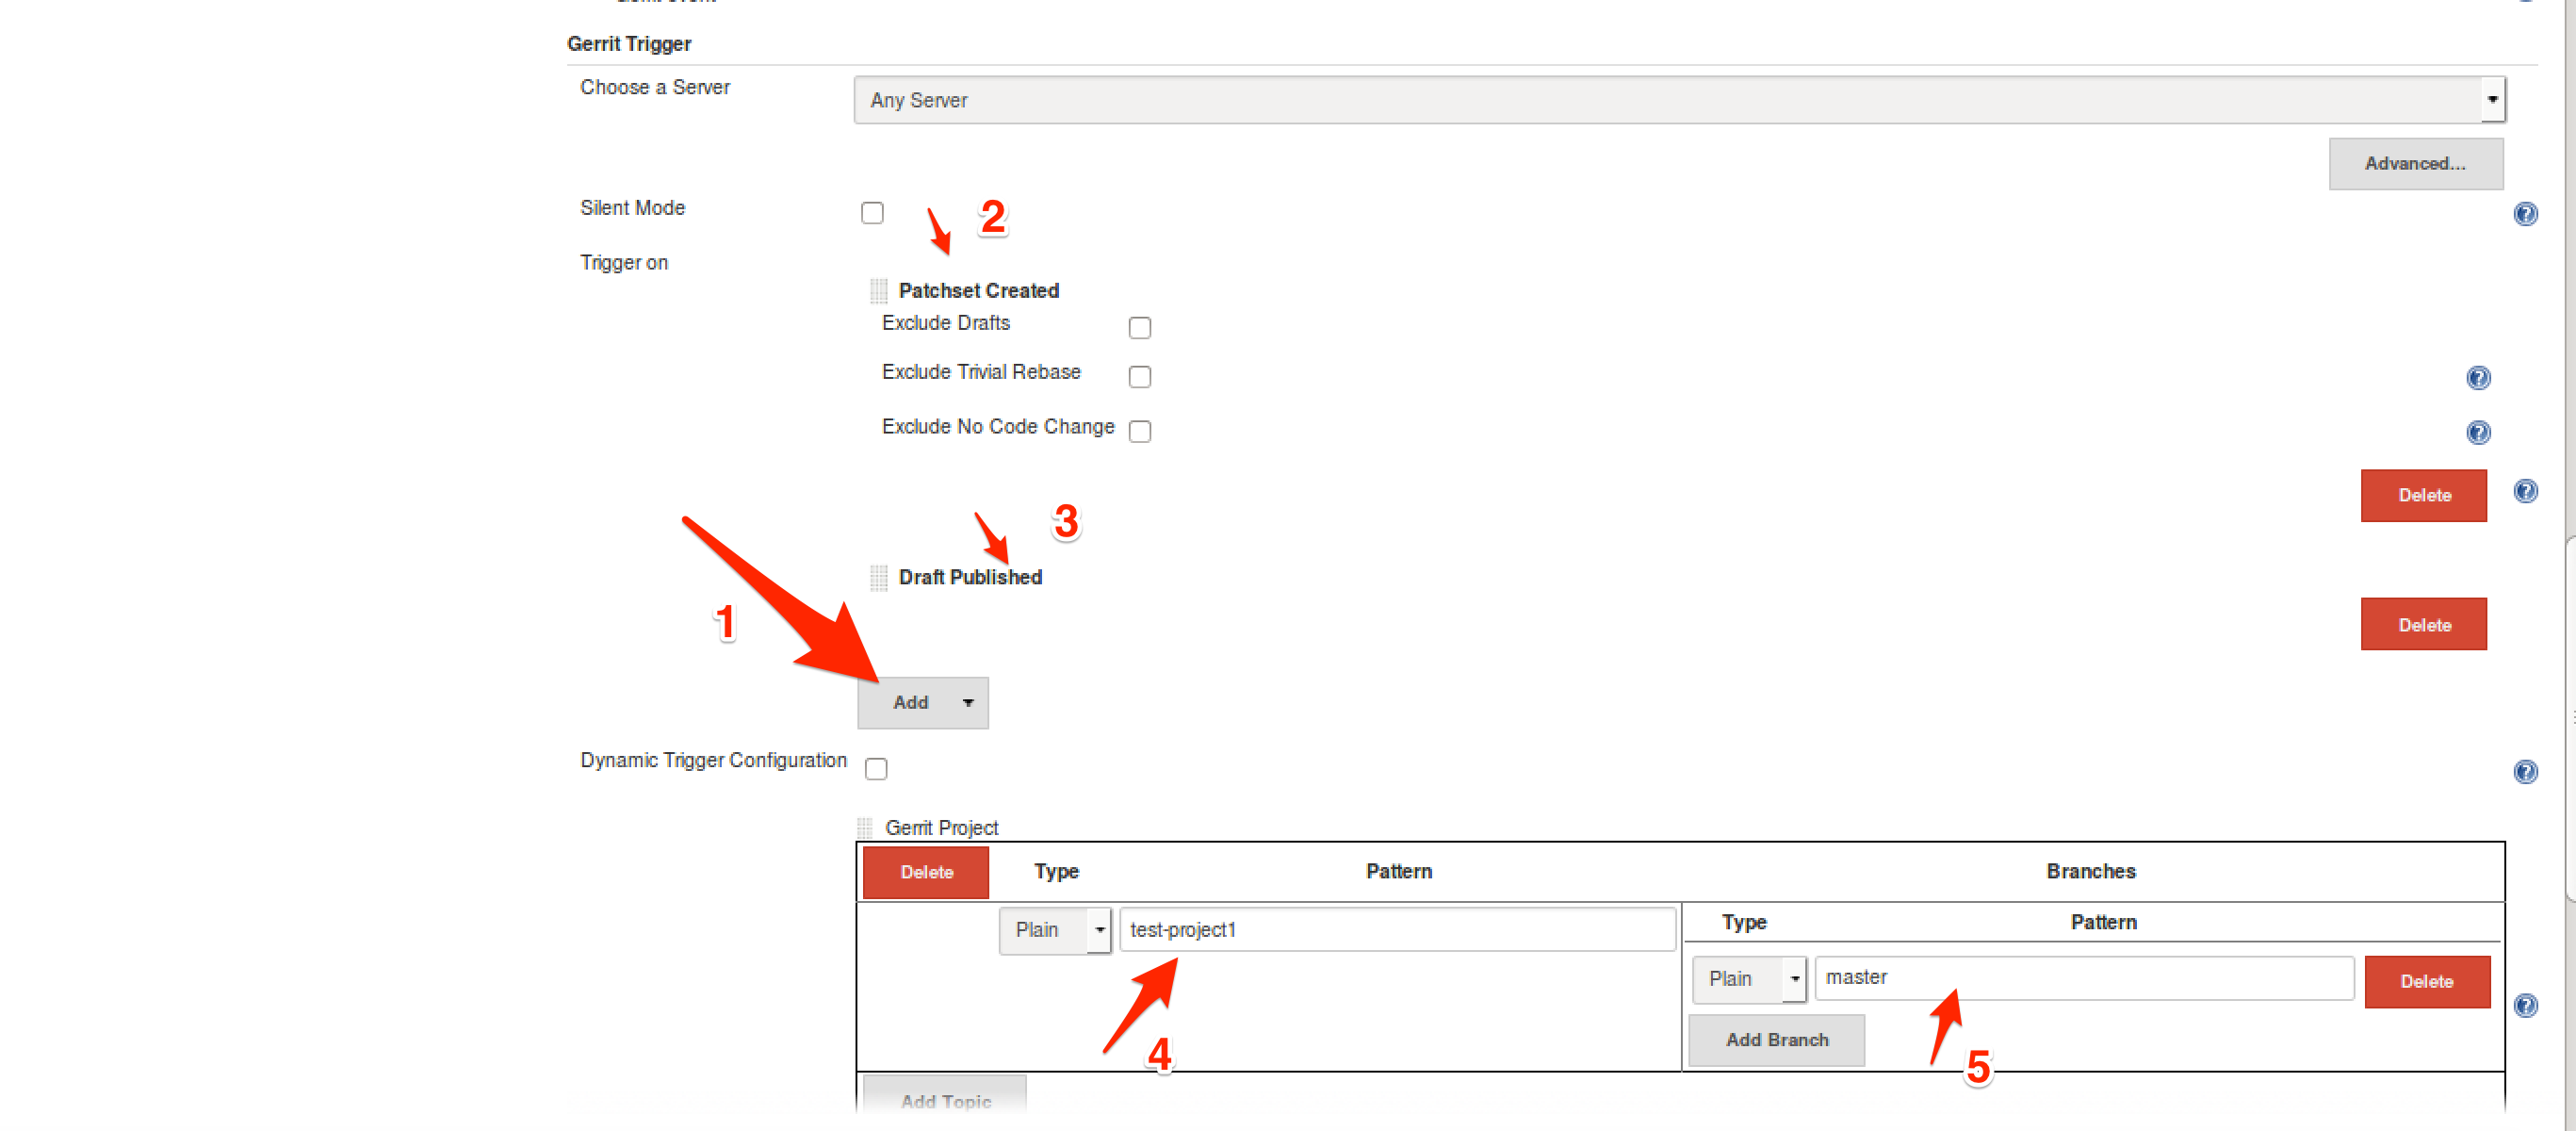
Note: Be aware that $GERRIT_BRANCH and $GERRIT_REFSPEC are not set in the Ref Updated case. If you want to trigger a build, you can set Refspec and 'Branches to build' to $GERRIT_REFNAME.這裡 Choose a Server 選的是 Any Server 因為只有一個伺服器 Check4Gerrit, 所以要確保這個伺服器是 Enable 狀態。可以去伺服器那裡去檢查一下看看
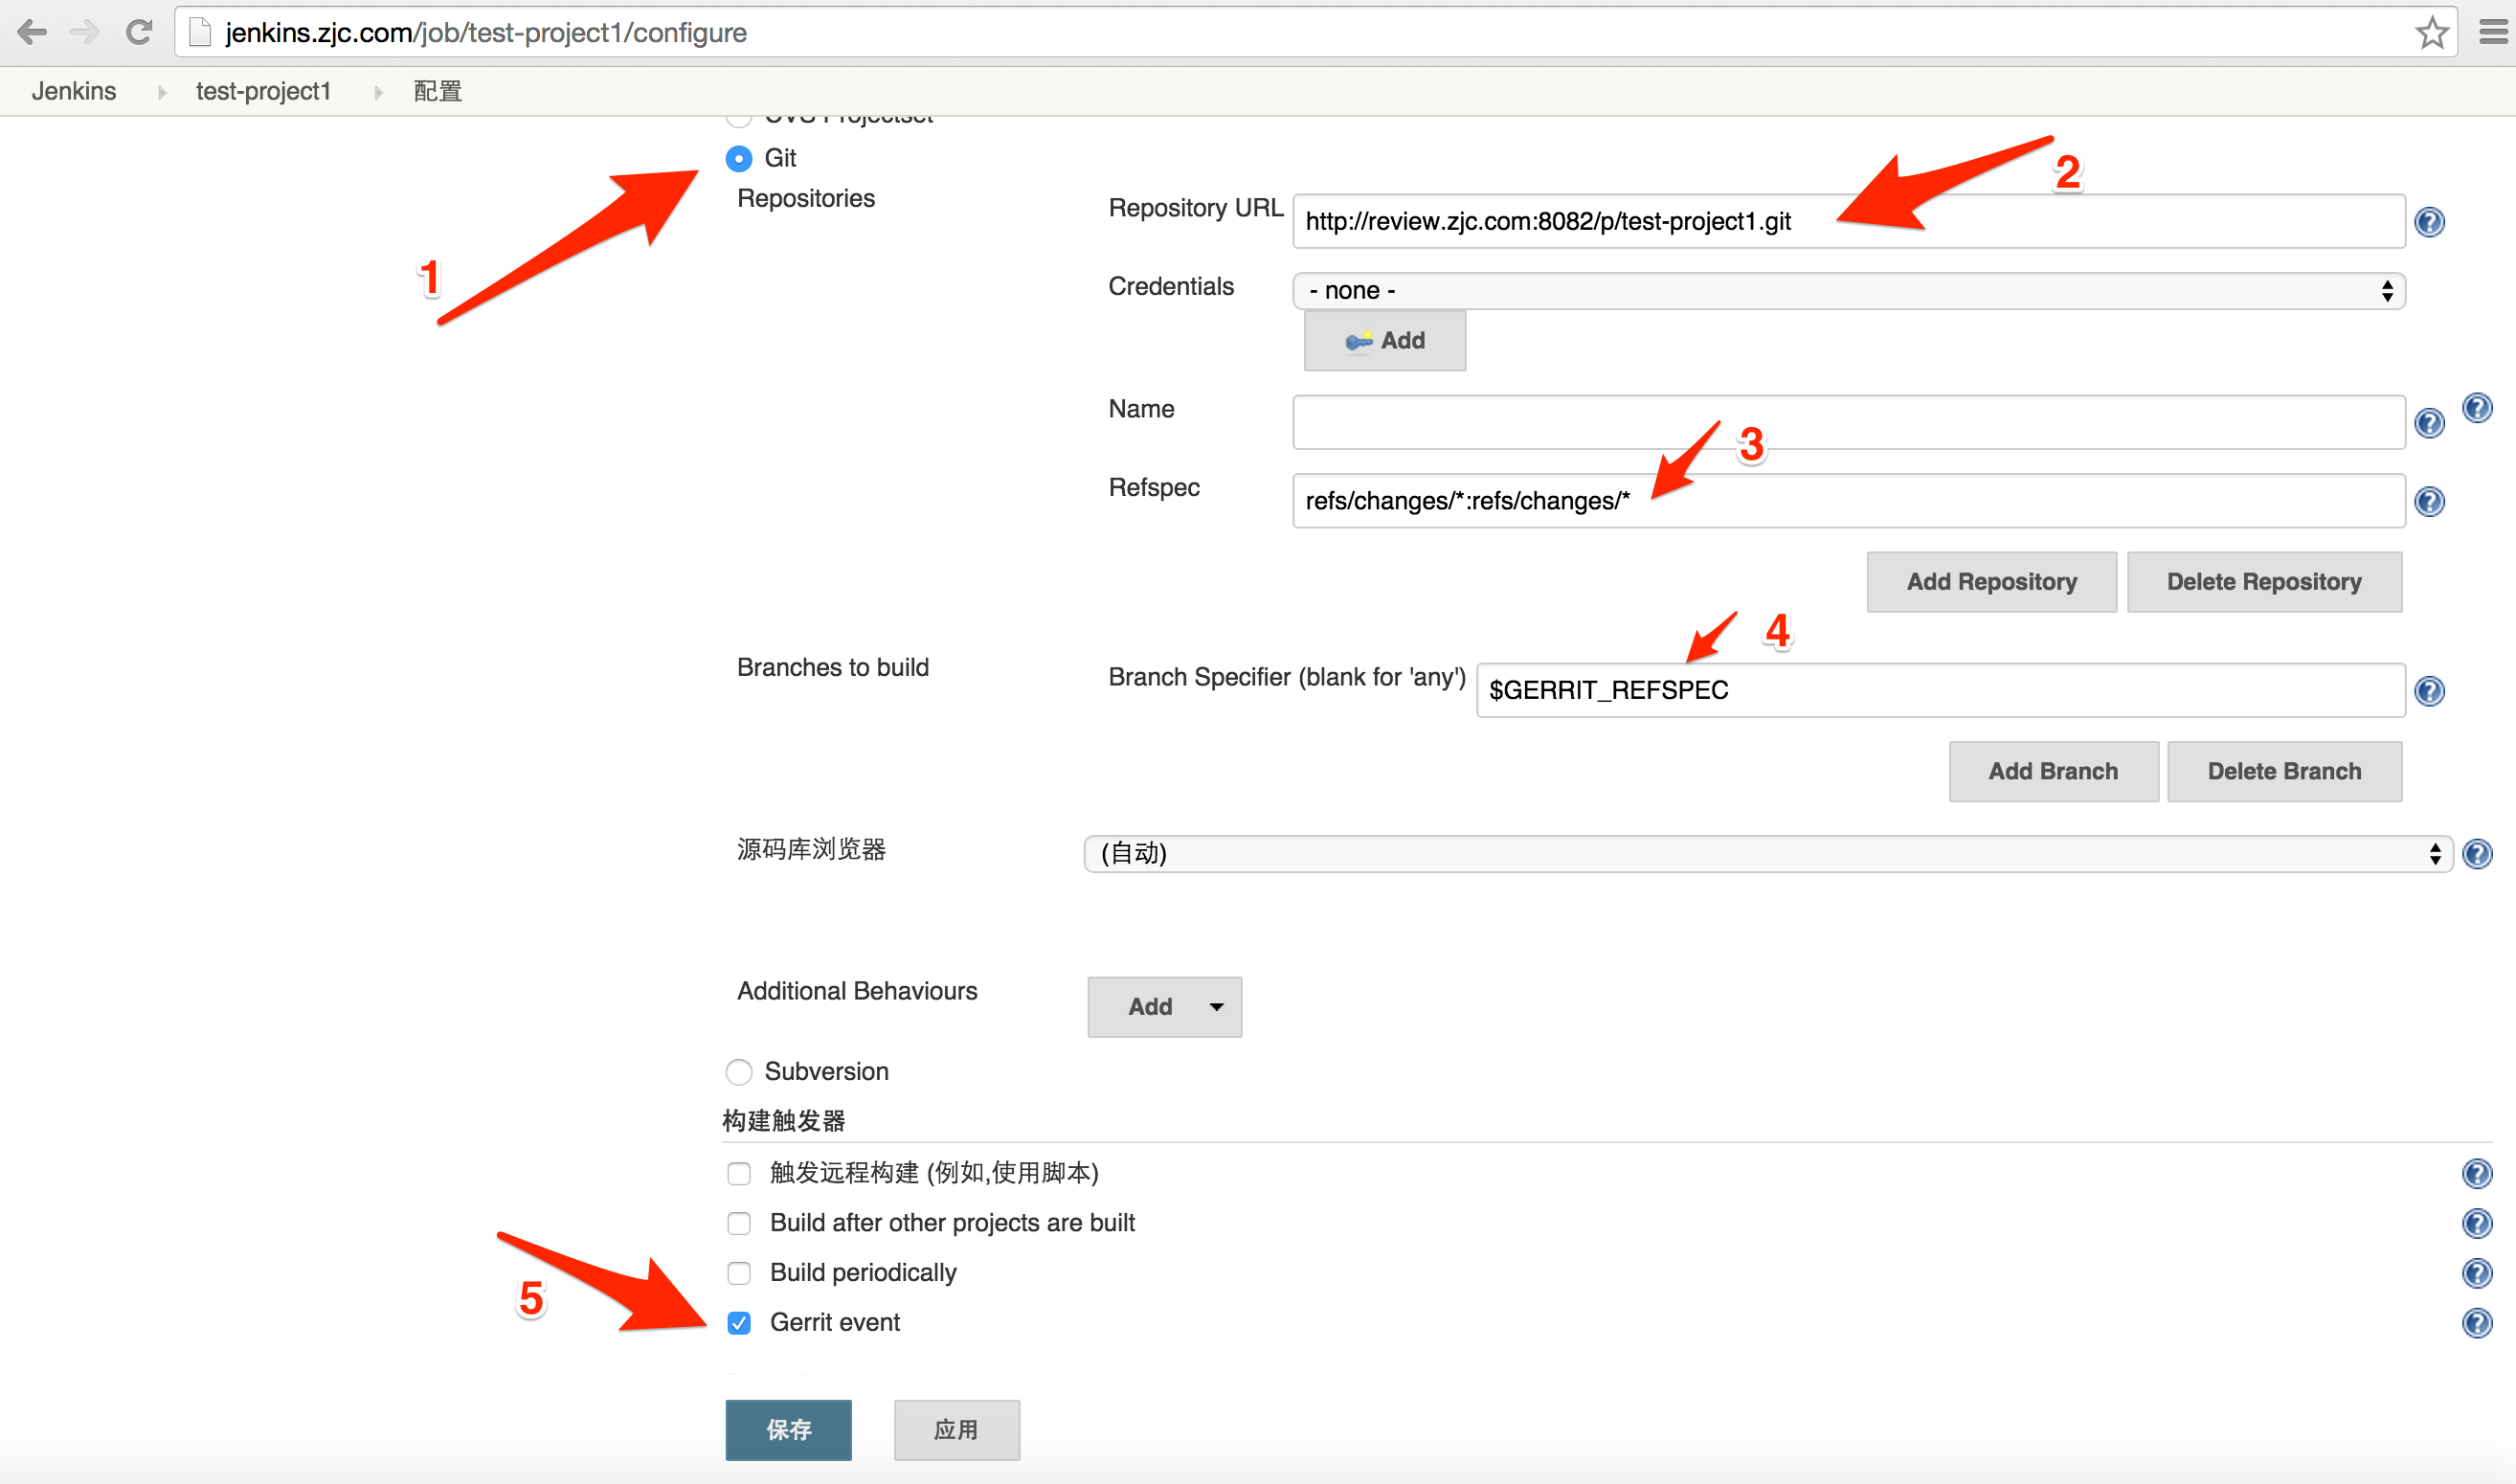
- Trigger on : 點選 Add 分別新增 Patchset Created 和 Draft Published
- Dynamic Trigger Configuration
- Pattern : test-project1
- Branches : master
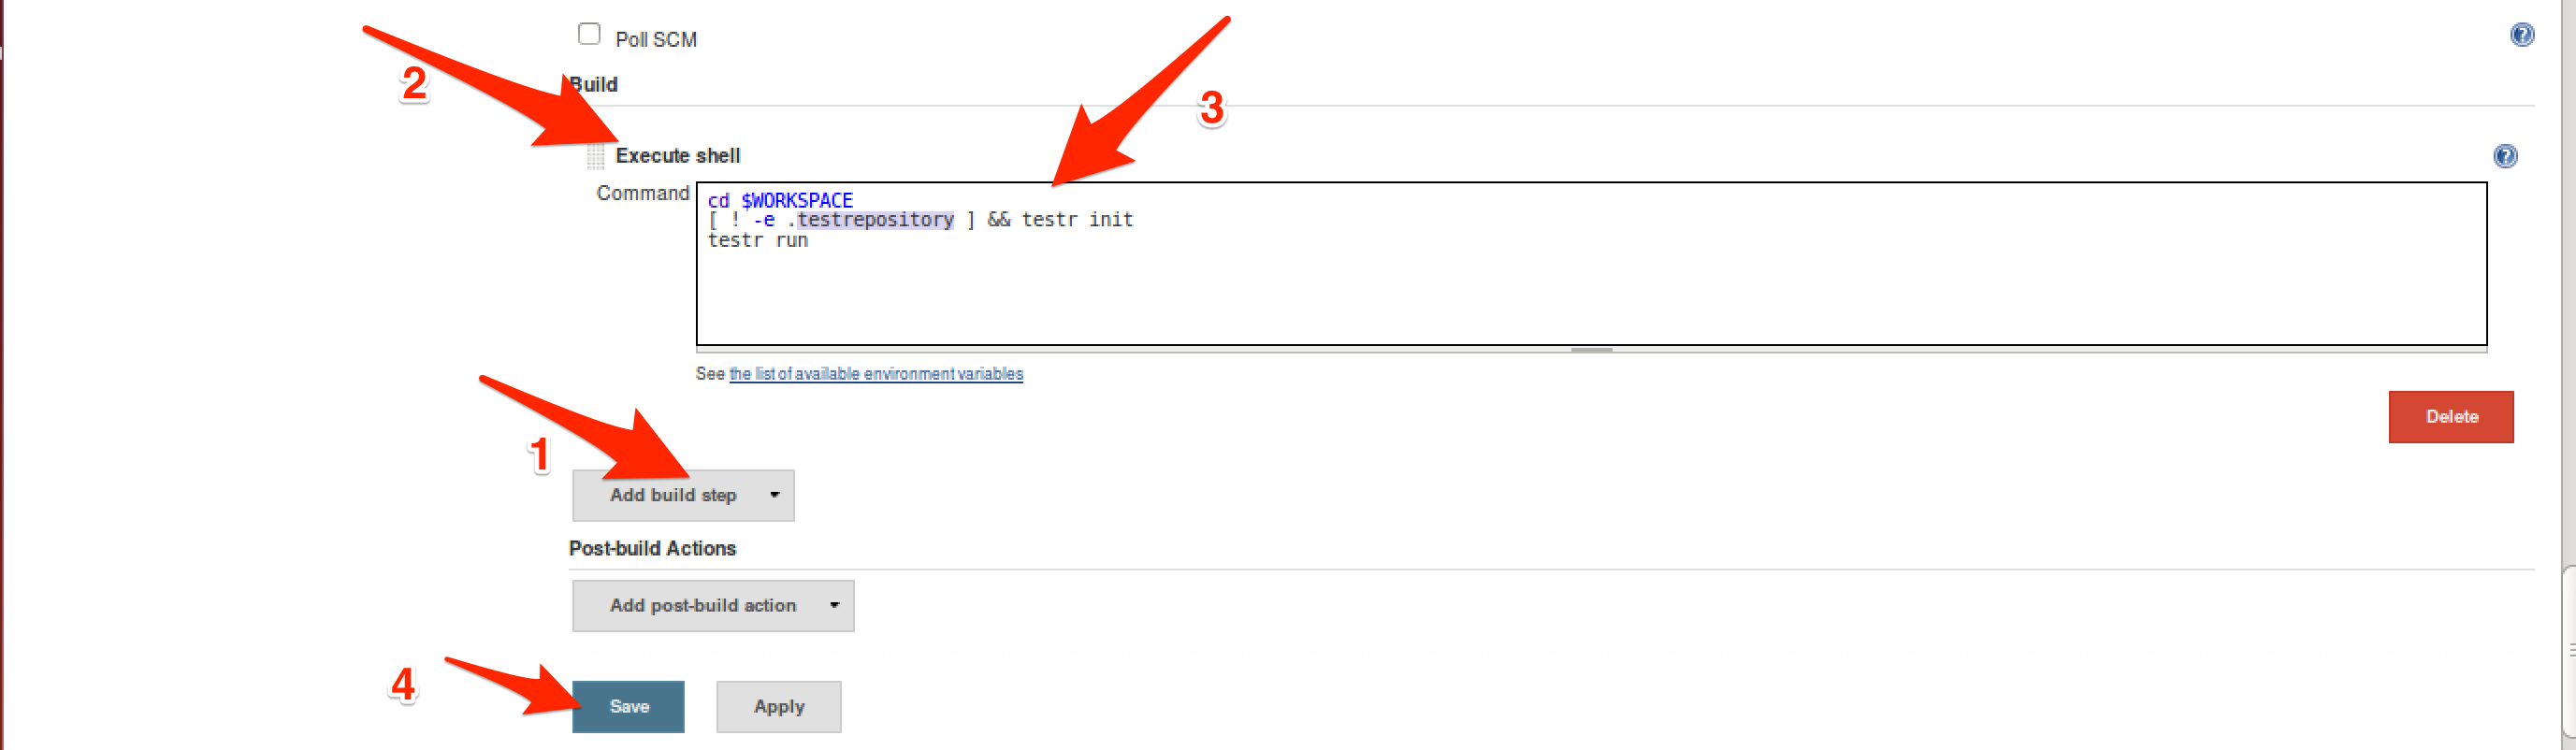
-
- Add build step -> Execute shell
cd $WORKSPACE
[ ! -e .testrepository ] && testr init
testr run -
測試
系統上 用 user1 提交一個更改
- 用 user1 登入
- 刪除目錄 test-project1
- 克隆 test-project1 工程
- 進入 test-project1 目錄
- 新增檔案、提交
git review增加 review 到Gerrit
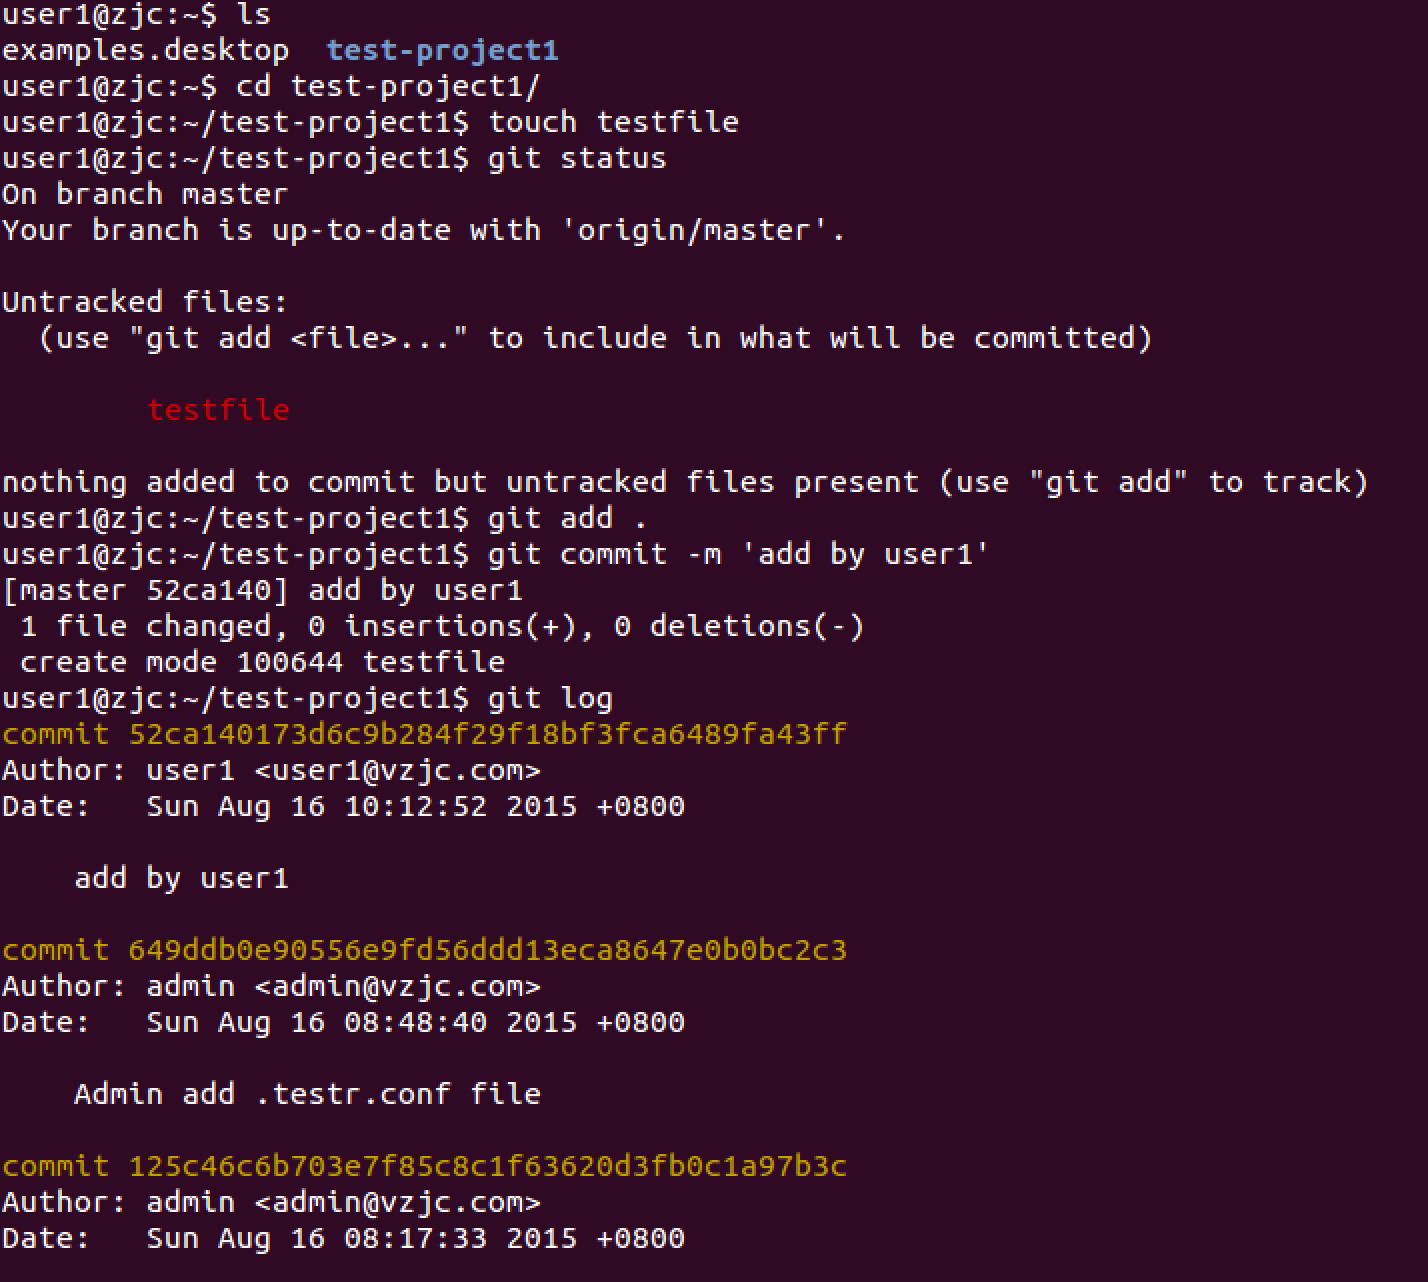
$ su - user1
$ rm -rf test-project1/
$ git clone [email protected]:dev-group/test-project1.git
$ cd test-project1/
$ touch testfile
$ git add .
$ git commit -m 'add by user1'
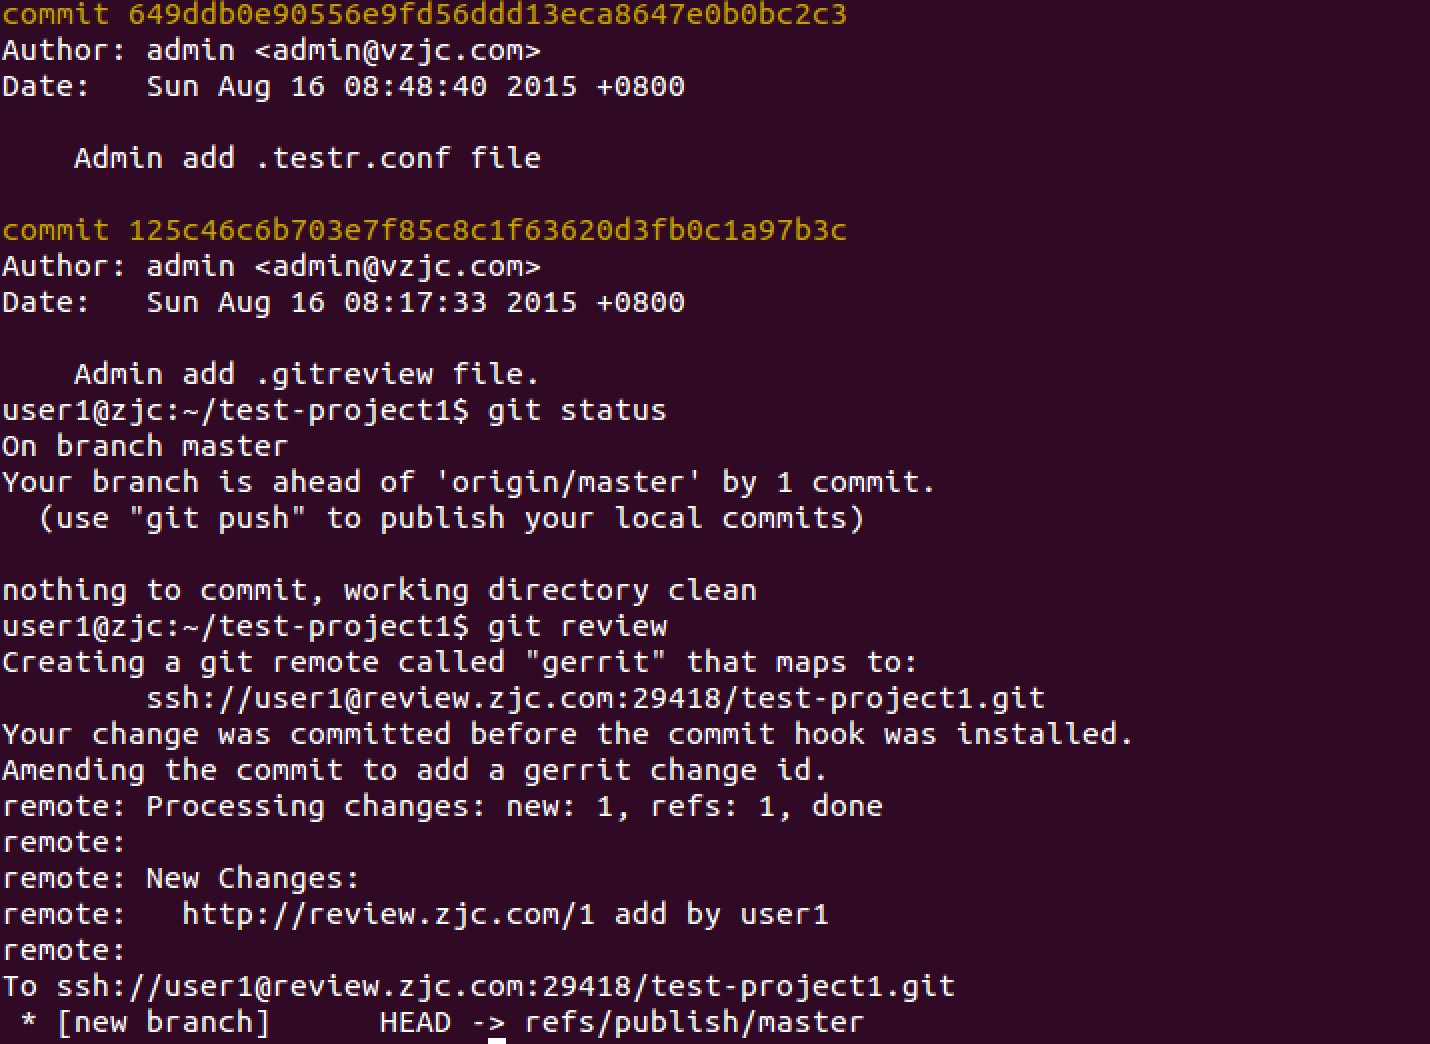
$ git review
$ exit我的環境還有一個問題 第一次 git review沒有問題,但是如果用 git commit --amend修改了提交資訊,再次 git reivew機會出現error: unpack failed: error Missing tree的錯誤,折中解決方案看這裡


用 admin 登入 Gerrit 系統,通過驗證,提交
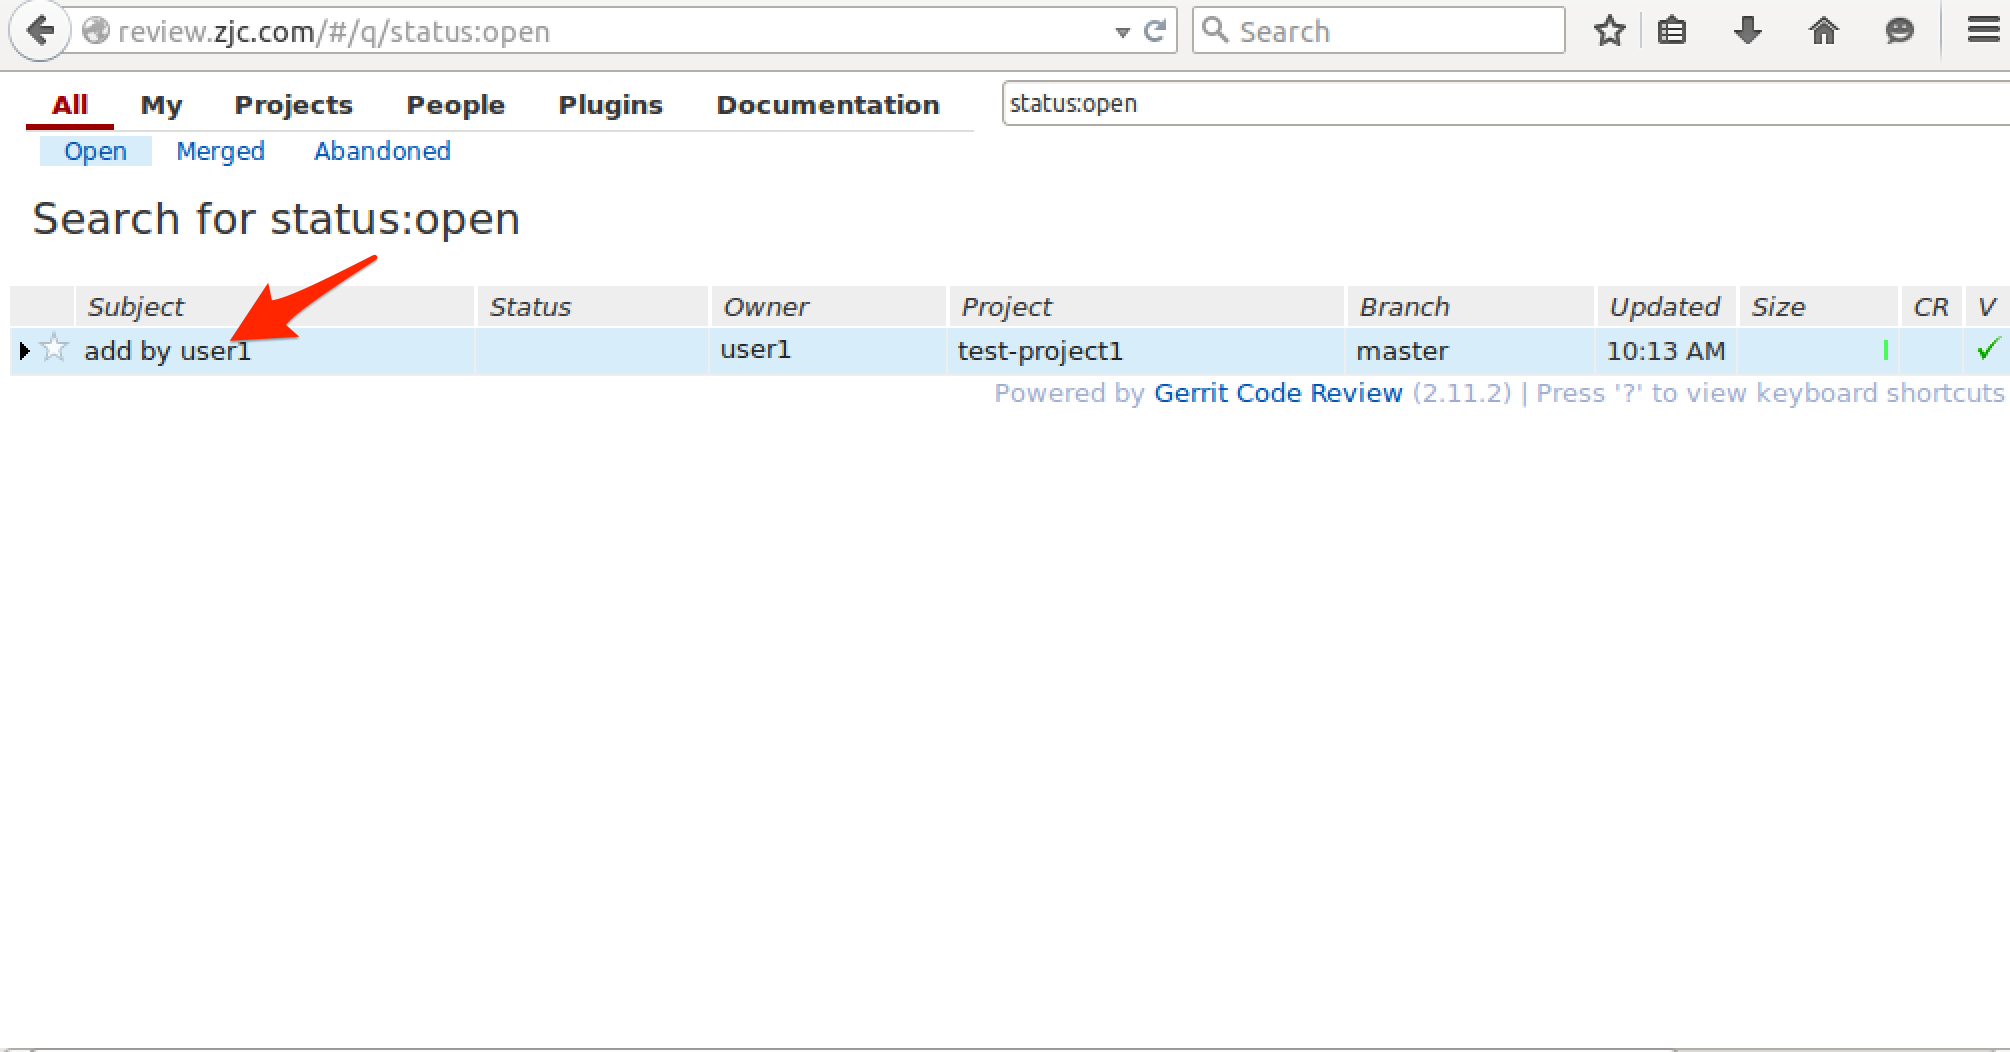

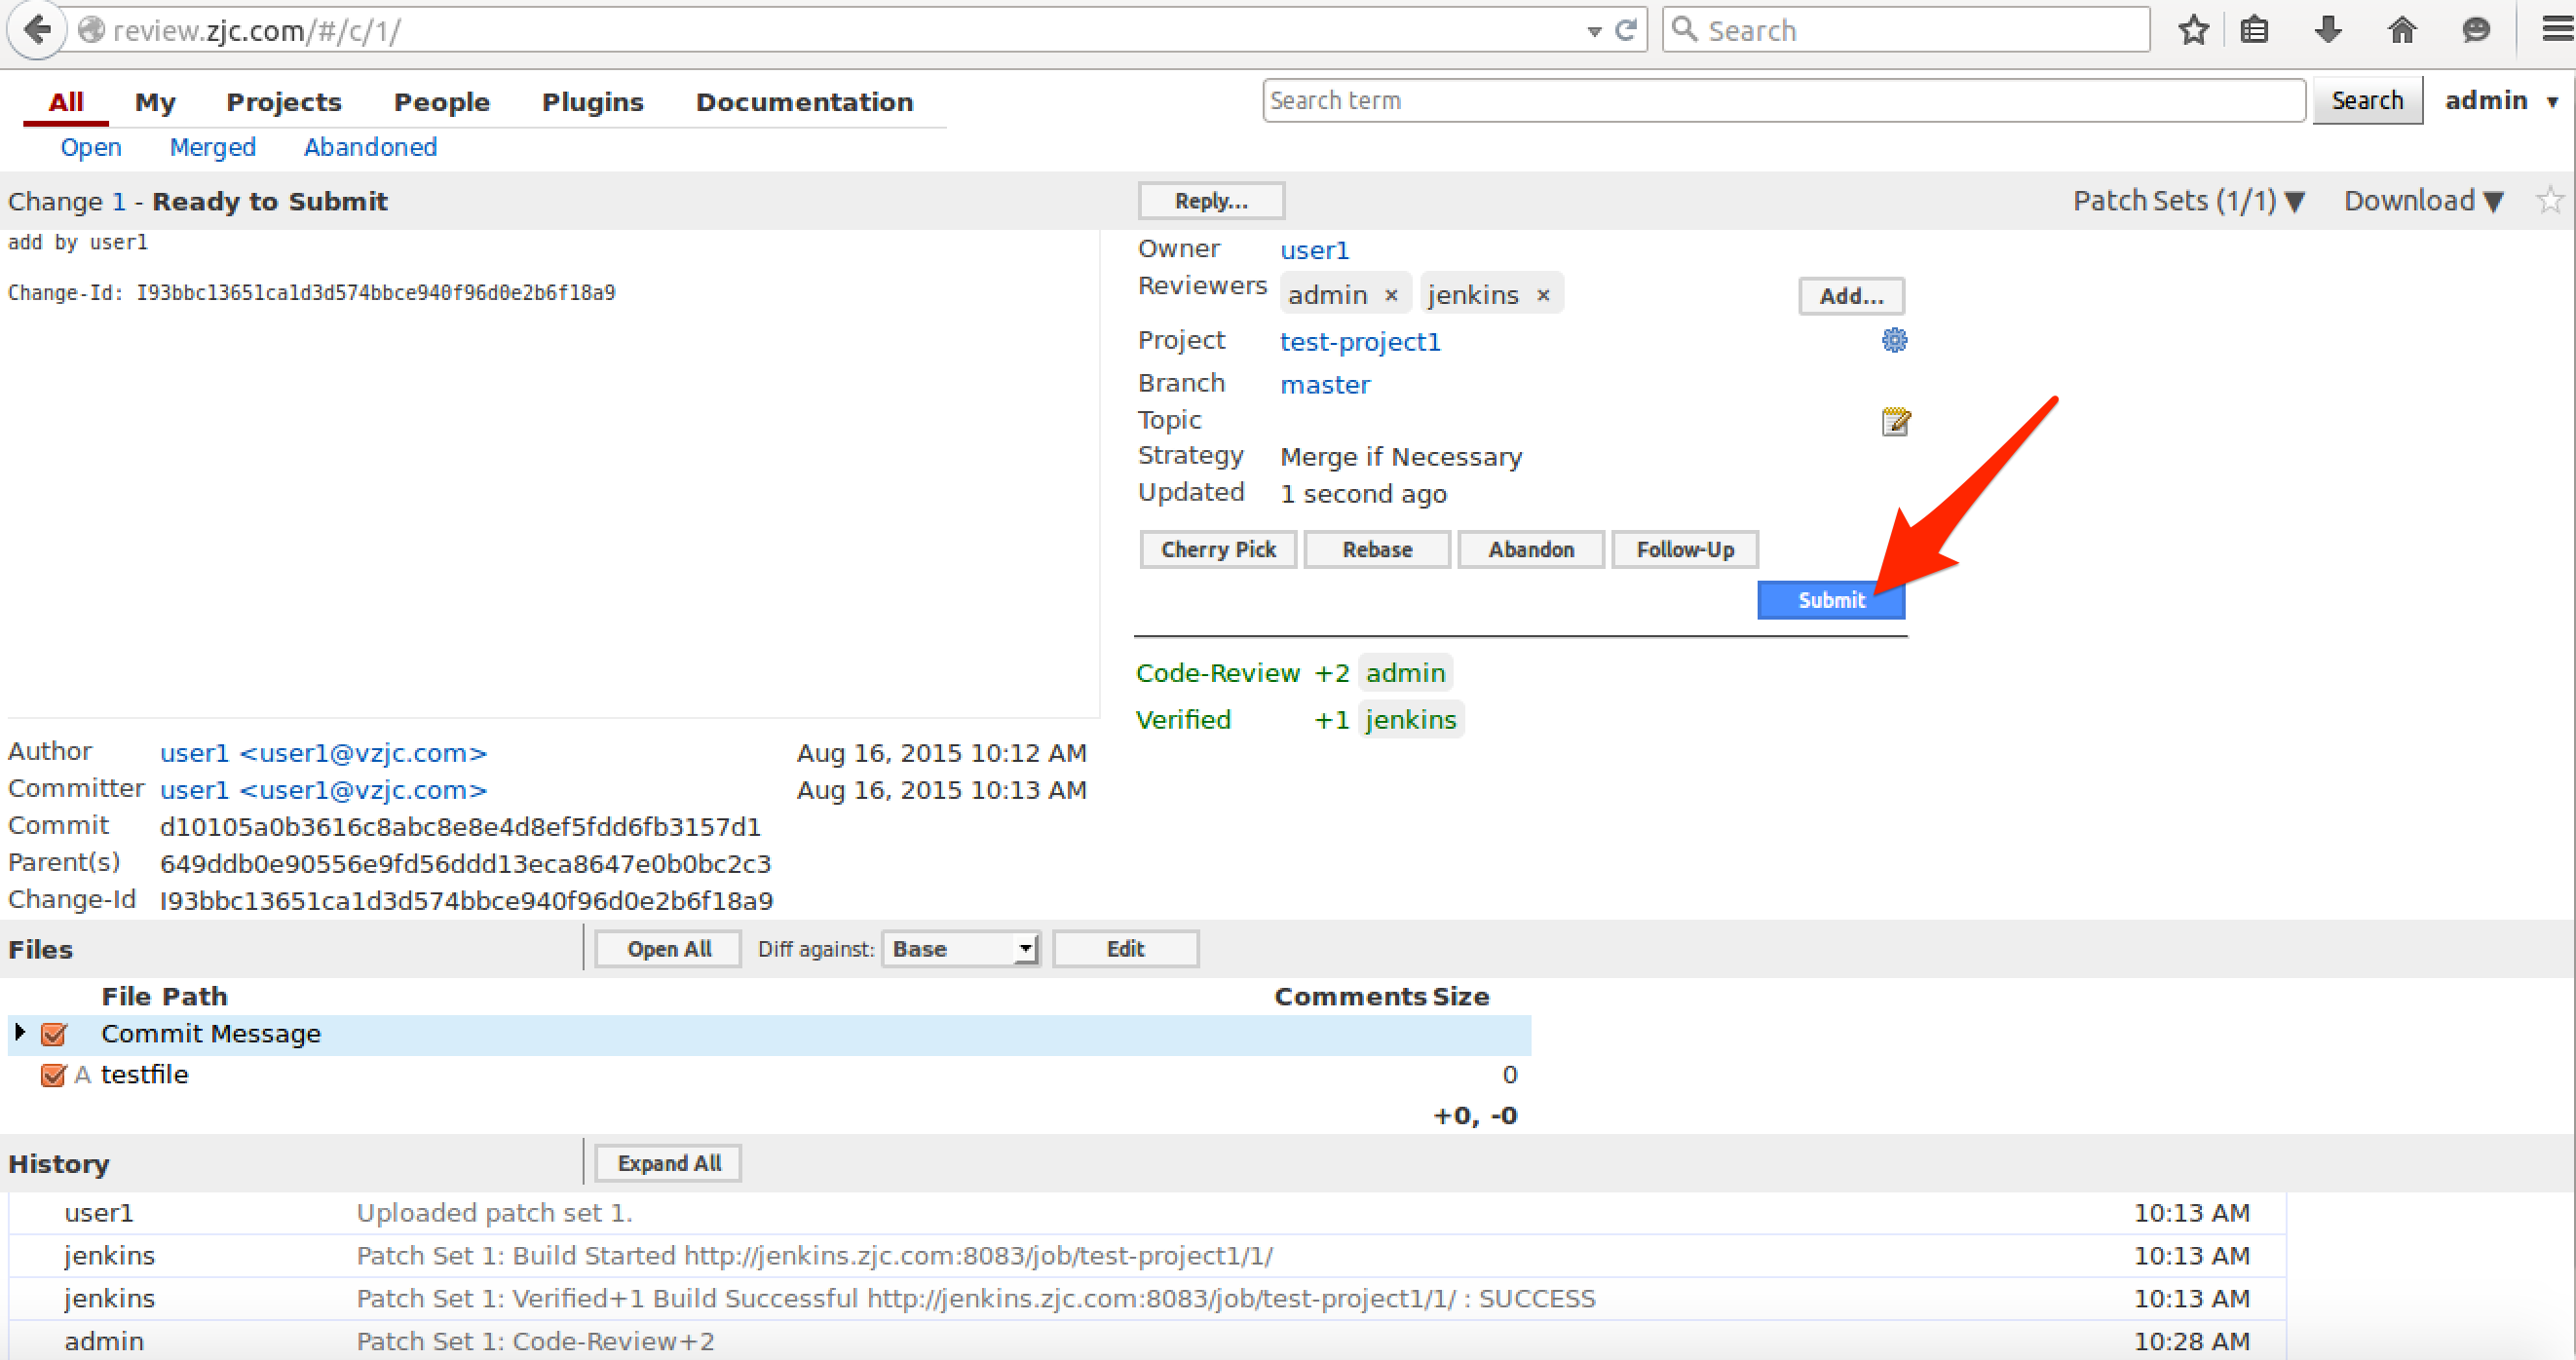
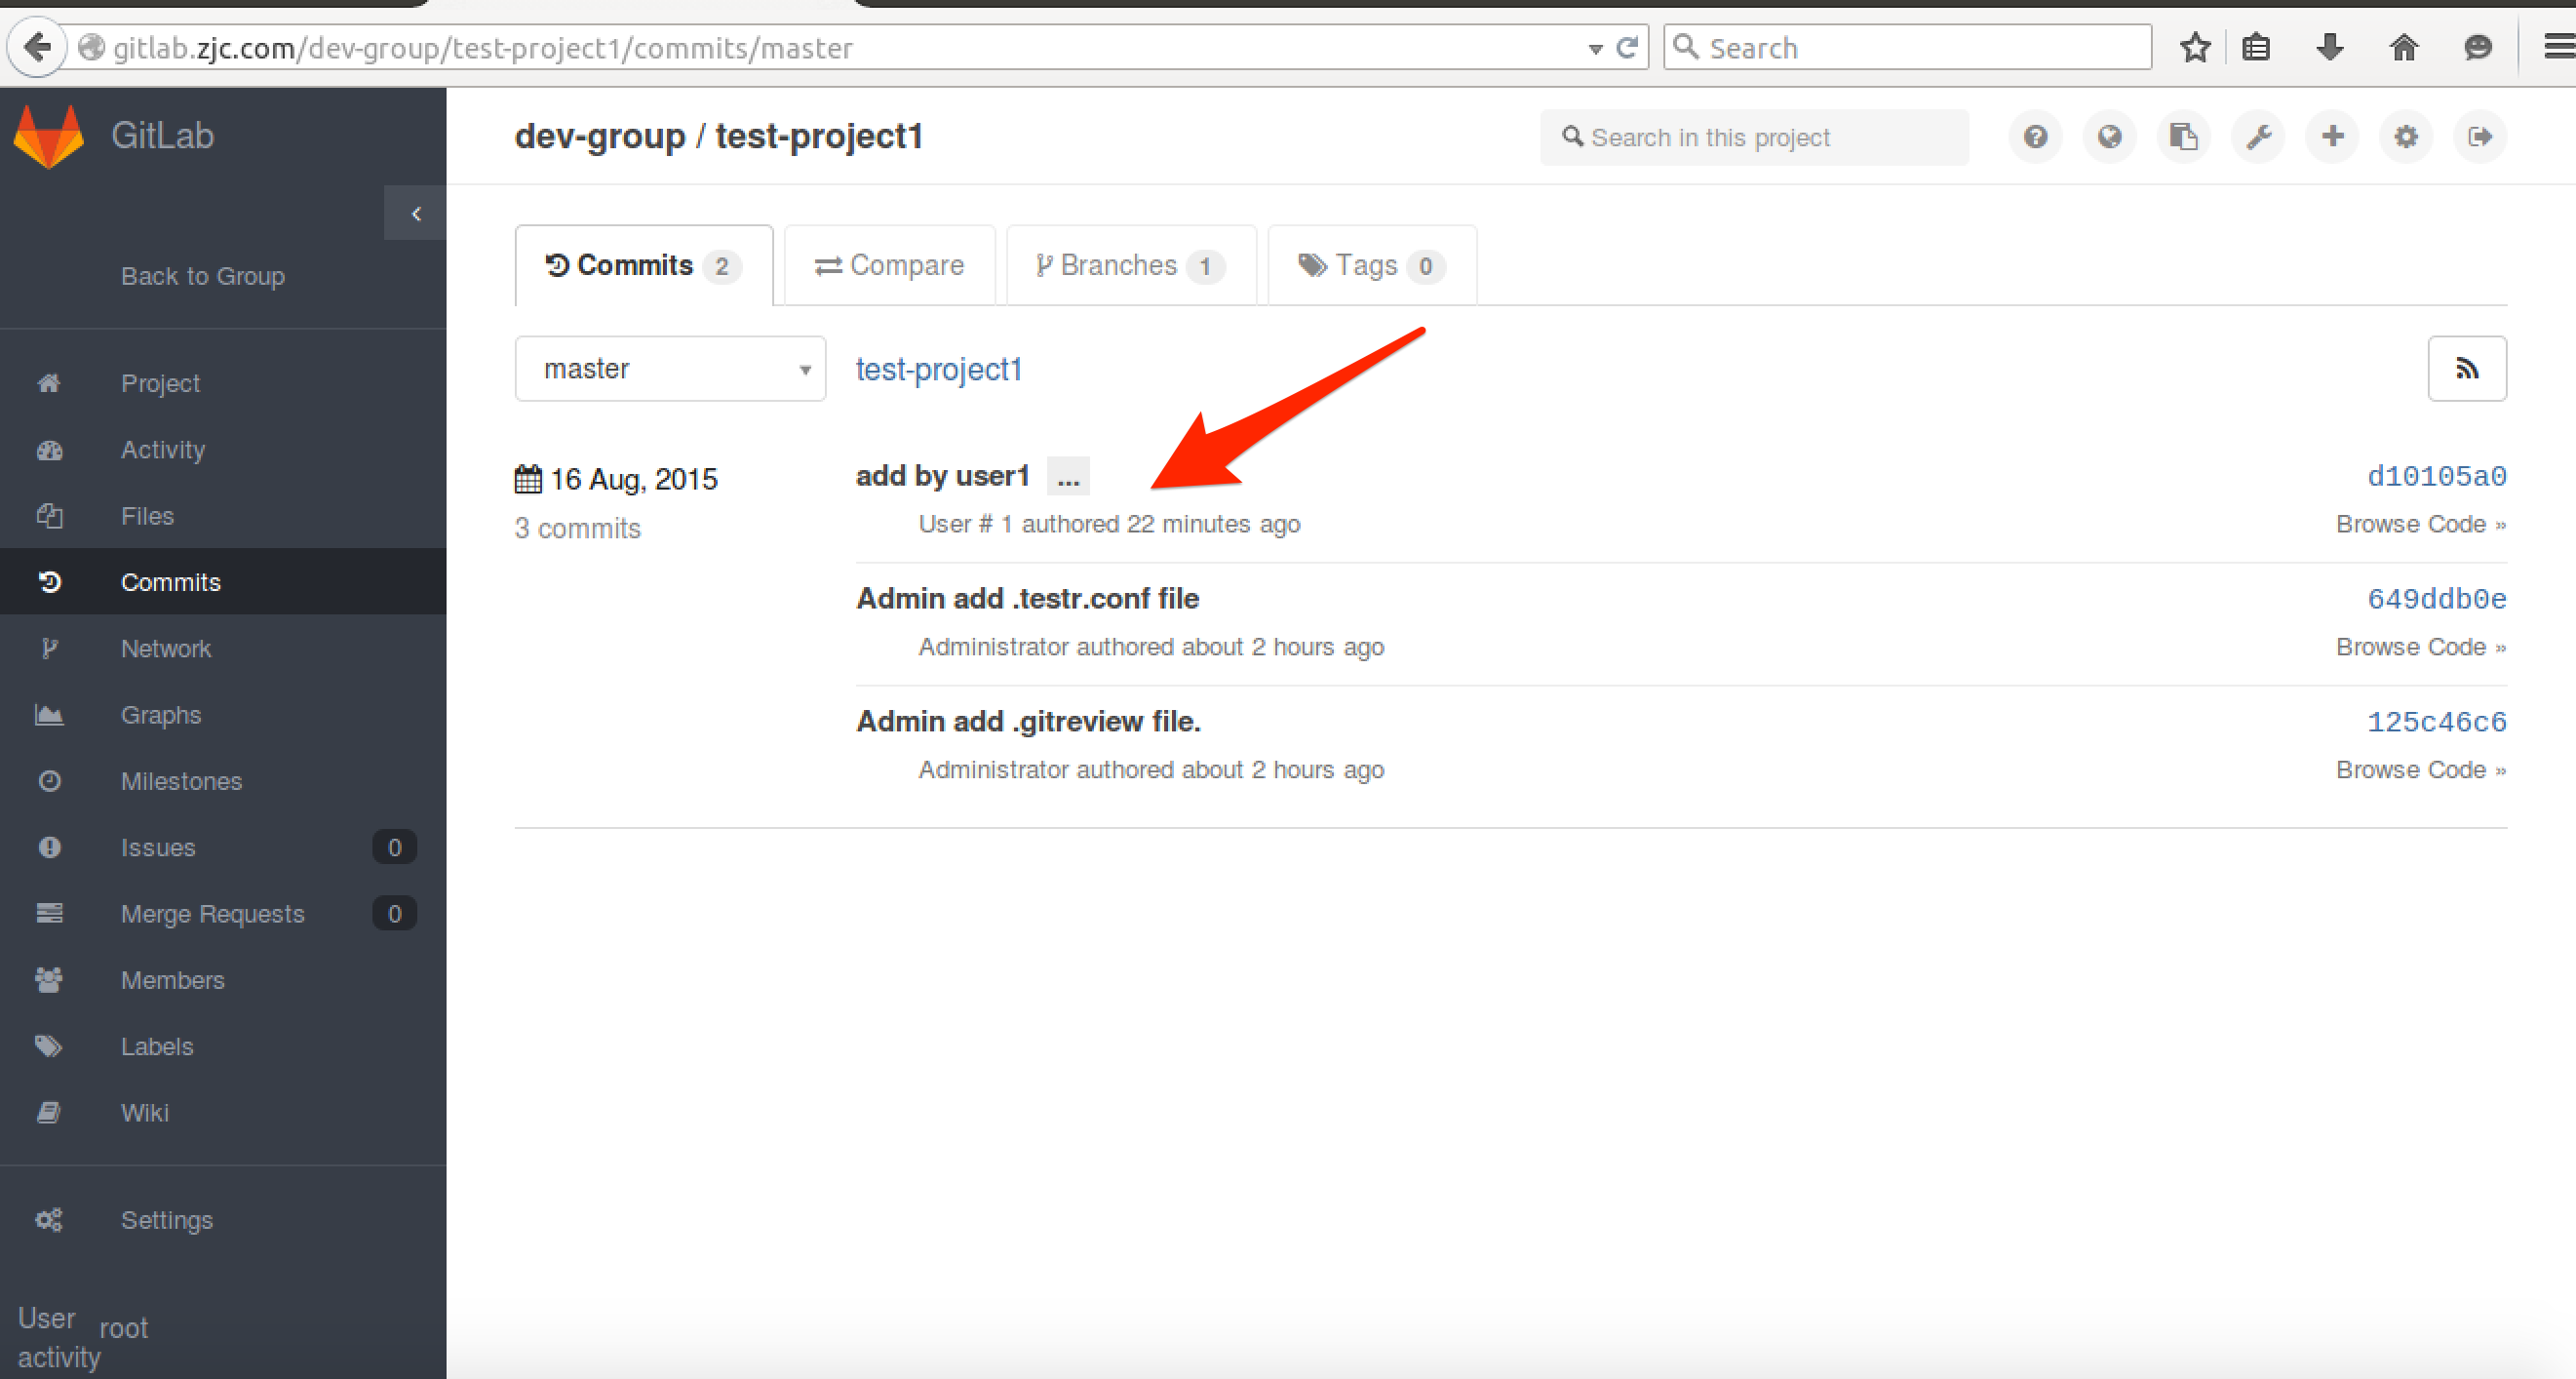
登入 Gitlab
檢視 test-project1 工程,可以看到新增加檔案操作已經同步過來了
參考
相關推薦
Ubuntu之Gitlab、Gerrit、Jenkins協調工作配置
前提 前提 建立郵箱 [email protected] 建立郵箱 [email protected] Gitlab配置 Gitlab已經配置了root賬戶的郵箱為[email protected]
Git、Gerrit、Repo使用及其關係
Git、Gerrit、Repo使用 三者各自功能 gii,版本管理庫,在git庫中沒有中心伺服器的概念,真正的分散式。 repo,repo就是多個git庫的管理工具。如果是多個git庫同時管理,可以使用repo。當然使用gerrit,就必須用repo。
jenkins+Gitlab+maven+tomcat實現自動化集成、打包、部署。
linux 編譯 oracle system group org 51cto check soft 為什麽需要持續集成呢? 1.因為在開發的過程中,用於階段性地構建出產品。這樣可以更加清楚地審視產品的不足之處。2.由於在某些情況下,例如有緊急bug的時候,研發的版本更新可能
Java全棧程序員之02:Ubuntu下Java環境安裝、配置、測試
配置文件 軟件 三方 shel class 系統配置文件 一件事 devel java10 在上文講完之後,我們手裏的ubuntu只能算是一個上網機,什麽也幹不了,本篇我們將折騰它為開發機。 這裏,我們這裏假定你對linux體系是初級選手,所以本篇會講的啰嗦一點,高手就出
Linux基礎之Ubuntu基礎命令-date、cal、bc(待更新)
基礎操作命令: 顯示日期與時間的命令: date 顯示日曆的命令: cal 簡單好用的計算器: bc 1. 顯示日期的命令: date 如果在文字介面中想要知道目前Linux系統的時間,那麼就直接在命令列模式輸入date即可顯示: [[email&#
Linux軟體之怎麼進行軟體管理?如何查詢、安裝、解除安裝軟體呢?(Ubuntu)
文章目錄 1. 如何搜尋和檢視軟體庫裡的軟體呢?使用apt-cache 2. 如何安裝和解除安裝軟體呢?使用apt-get 3. 如何檢視系統已安裝的軟體包呢?使用dpkg 4. 還有沒有更強大的功能呢?使用aptitude
搭建持續整合環境之——jenkins部署、安裝、配置
一、部署準備 1.遠端伺服器一臺:要求已安裝linux作業系統、tomcat、jdk; 2.從網上下載的jenkins.war包,推薦下載地址:http://Jenkins-ci.org/,或http://mirrors.jenkins.io/war-stable/ 二
Jenkins高階篇之Pipeline方法篇-Pipeline Basic Steps-2-方法fileExists、isUnix、pwd
繼續來學習pipeline basic steps裡面的方法,前面學習了資料夾相關的操作方法,這篇來學習幾個布林型別的返回值的方法。第一個是判斷一個檔案是否存在,第二個是判斷當前執行的環境是不是Linux還是windows。 1方法fileExists 這是判斷一個檔案是
Jenkins高階篇之Pipeline方法篇-Pipeline Basic Steps-1-方法deleteDir和dir、echo、error
這篇開始來學習一個最基礎的pipeline元件,這個也是一個獨立的外掛,在安裝pipeline的時候預設會自動安裝,外掛的名稱是pipeline basic steps, 你可以去你自己jenkins環境,外掛管理下的installed下面找到這個外掛。這篇我們先來學習下兩個關於資料夾路徑操作的
【Git、GitHub、GitLab】二 Git基本命令之建立Git倉庫
上一篇文章學習了Git的安裝與最小配置:【Git、GitHub、GitLab】一 Git安裝與Git最小配置 文章目錄 建立Git倉庫 建立Git倉庫 有兩種方式可以建立Git倉庫
Java全棧程式設計師之02:Ubuntu下Java環境安裝、配置、測試
在上文講完之後,我們手裡的ubuntu只能算是一個上網機,什麼也幹不了,本篇我們將折騰它為開發機。 這裡,我們這裡假定你對linux體系是初級選手,所以本篇會講的囉嗦一點,高手就出門左轉吧。 1.安裝 首先我們確定下我們安裝的Ubuntu系統是否已經安裝了java環境。 進入終端,敲入命令su,進
【Git、GitHub、GitLab】三 Git基本命令之建立倉庫並向倉庫中新增檔案
前兩篇文章已經學會了Git的基本命令與建立倉庫的命令,點選連結檢視上一篇文章:【Git、GitHub、GitLab】二 Git基本命令之建立Git倉庫,本篇文章就來建立一個有模有樣的倉庫。該倉庫中的程式碼是一個顯示靜態頁面的小工程程式碼。 文章目錄
使用Jenkins+Pipline 持構建自動化部署之安卓原始碼打包、測試、郵件通知
#一、引言 Jenkins 2.x的精髓是Pipeline as Code,那為什麼要用Pipeline呢?jenkins1.0也能實現自動化構建,但Pipeline能夠將以前project中的配置資訊以steps的方式放在一個腳本里,將原本獨立運行於單個或者多個節點的任務連線起來,實現單個任務難以完成的
使用Jenkins+Blue Ocean 持構建自動化部署之安卓原始碼打包、測試、郵件通知
#什麼是BlueOcean? BlueOcean重新考慮了Jenkins的使用者體驗。BlueOcean由Jenkins Pipeline設計,但仍然相容自由式工作,減少了團隊成員的混亂,增加了清晰度。 - 連續交付(CD)Pipeline的複雜視覺化,允許快速和直觀地瞭解Pipeline的狀態。 - Pi
mysql進階(二)之細談索引、分頁與慢日誌
連表 組合索引 rar 偏移量 最小值 num glob 要求 for 索引 1、數據庫索引 數據庫索引是一種數據結構,可以以額外的寫入和存儲空間為代價來提高數據庫表上的數據檢索操作的速度,以維護索引數據結構。索引用於快速定位數據,而無需在每次訪問數據庫表時搜索數據
Qt入門之基礎篇 ( 二 ) :Qt項目建立、編譯、運行和發布過程解析
qt 5 對話 讓我 進度 qmake ctr deploy 設定 設置 轉載請註明出處:CN_Simo。 題解: 本篇內容主講Qt應用從創建到發布的整個過程,旨在幫助讀者能夠快速走進Qt的世界。 本來計劃是講解Qt源碼靜態編譯,如此的話讀者可能並不能清楚地知
構建之法第八、九章學習
周期 常用 bcd 快速 區別 利益相關者 自省 生命 獲取 第八章:需求分析 這一章主要講述了軟件需求的類型、利益相關者、獲取用戶需求的常用方法和步驟、競爭性需求分析的框架NABCD、四象限方法、項目計劃和估計的技術。 確認軟件需求有以下步驟:1.獲取和引導需求、2.分析
構建之法三、四、五章總結
創業 安排 便是 為什麽 軟件 構建 似的 讓我 生活 趁著五一小短假期間閱讀了這三章,讓我感覺想要成為一名軟件工程師的路還要很長,在我面前就出現了一條分叉路:即是成為一名個人能力優異但不顧及團隊成員理解與否的程序員還是個人能力一般但會結合團隊人員的理解能力去編程的程序員,
Hadoop實戰-MapReduce之max、min、avg統計(六)
next combine output fileinput private pub eof pri use 1、數據準備: Mike,35 Steven,40 Ken,28 Cindy,32 2、預期結果 Max 40 Min 28 Avg 33 3、M
關於Ubuntu中passwd、shadow、group等文件
之間 文件的 最重要的 關聯 ice use 並不是 字段 新用戶 轉自https://yq.aliyun.com/articles/50327 在Ubuntu系統中,/etc目錄下,有三個文件:passwd shadow group,可能我們已經在用了,但是沒有註意到其詳