【SpringMVC學習04】Spring、MyBatis和SpringMVC的整合
1. jar包管理
我之前有寫過一篇spring、hibernate和struts2整合的文章,在整合的時候,我個人不喜歡亂,不喜歡啪嘰一下將所有jar包往lib中一扔,因為那樣沒有條理,所以在整合SSM的時候,我還是遵循jar包分類的原則,首先看一下SSM整合都用到了哪些jar包(
這裡我用的是dbcp,當然也可以用c3p0等其他連線池,歸歸類後jar包就很有條理。
2. 整合思路
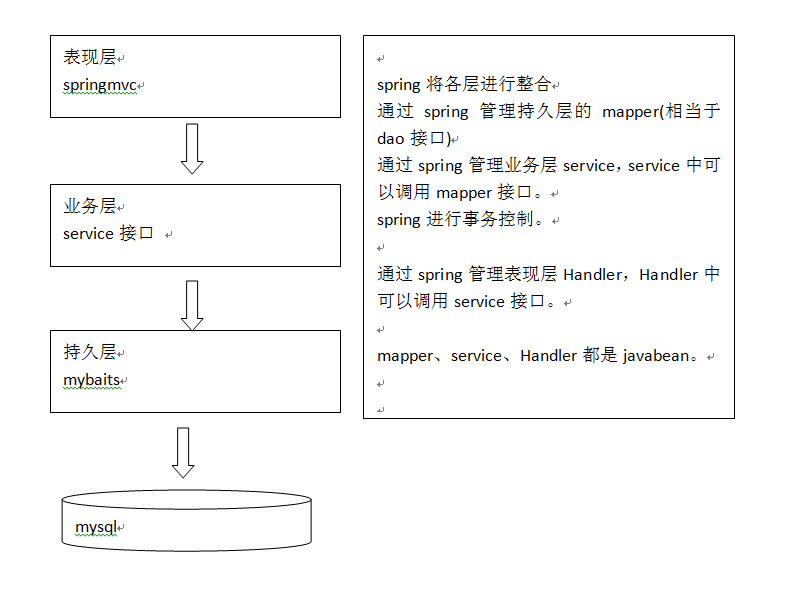
關於SSM的架構可以簡單看一下下面的草圖:
可以看出,spring在進行管理時,是很有條理的,每個層都由spring管理,然後不同的層可以呼叫其它層,Handler呼叫service,service呼叫mapper等。根據這個架構,我們來總結一下整合的思路,根據這個呼叫關係,我們可以從下往上一步步整合。
- 整合dao層。mybatis和spring整合,通過spring管理mapper介面。
使用mapper的掃描器自動掃描mapper介面在spring中進行註冊。- 整合service層。通過spring管理 service介面。
使用配置方式將service介面配置在spring配置檔案中。
實現事務控制。- 整合springmvc。由於springmvc是spring的模組,不需要整合。
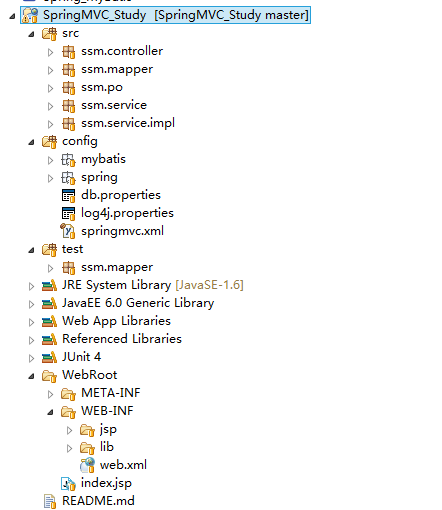
現在思路清晰了,接下來就開始整合了。在整合前先看一下我整合完的工程結構:
3. 整合dao層
整合dao層也就是整合持久層,那麼需要spring的核心包,持久層包,mybatis包,資料庫以及連線池的包。所以將spring-persistence/spring-core/mysql-connector/mybatis/dbcp幾個資料夾中的jar包拷貝到lib中。
3.1 mybatis全域性配置檔案
首先得寫mybatis的全域性配置檔案sqlMapConfig.xml,如下:
<?xml version="1.0" encoding="UTF-8" ?>
<!DOCTYPE configuration
PUBLIC "-//mybatis.org//DTD Config 3.0//EN"
"http://mybatis.org/dtd/mybatis-3-config.dtd">
<configuration>
    <!-- setting配置根據需要再新增 -->
    <!-- 配置別名 -->
    <typeAliases>
        <package name="ssm.po"/>
    </typeAliases>

    <!-- mapper這裡不需要配置了,因為跟spring整合後,在spring那邊會進行mapper的掃描
        但必須遵循:mapper.xml和mapper.java必須同名且在一個目錄
    -->
</configuration>
可以看出,整合的時候,這個全域性配置檔案已經很清爽了,基本沒啥東東了,因為資料來源啊、mapper啊啥的都交給spring去管理了。
關於db.properties和log4j.properties中的內容,我就不寫了,可以參考我之前寫的mybatis相關博文,也可以直接看我的原始碼。
3.2 配置spring配置檔案
配置完了mybatis的全域性配置檔案後,接下來就要配置spring的配置檔案了,spring的配置檔案我將分類寫在不同的檔案中,都放在config/spring/目錄下了,這裡是對dao的整合,所以起名applicationContext-dao.xml。
<?xml version="1.0" encoding="UTF-8"?>
<beans xmlns="http://www.springframework.org/schema/beans"
       xmlns:xsi="http://www.w3.org/2001/XMLSchema-instance"
       xmlns:mvc="http://www.springframework.org/schema/mvc"
       xmlns:context="http://www.springframework.org/schema/context"
       xmlns:aop="http://www.springframework.org/schema/aop"
       xmlns:tx="http://www.springframework.org/schema/tx"
       xsi:schemaLocation="http://www.springframework.org/schema/beans
        http://www.springframework.org/schema/beans/spring-beans-4.2.xsd
        http://www.springframework.org/schema/mvc
        http://www.springframework.org/schema/mvc/spring-mvc-4.2.xsd
        http://www.springframework.org/schema/context
        http://www.springframework.org/schema/context/spring-context.xsd
        http://www.springframework.org/schema/aop
        http://www.springframework.org/schema/aop/spring-aop-4.2.xsd
        http://www.springframework.org/schema/tx
        http://www.springframework.org/schema/tx/spring-tx.xsd">

    <!-- 載入db.properties檔案中的內容 -->
    <context:property-placeholder location="classpath:db.properties"/>

    <!-- 配置資料來源dbcp -->
    <bean id="dataSource" class="org.apache.commons.dbcp.BasicDataSource" destroy-method="close">
        <property name="driverClassName" value="${jdbc.driver}" />
        <property name="url" value="${jdbc.url}" />
        <property name="username" value="${jdbc.username}" />
        <property name="password" value="${jdbc.password}" />
        <property name="maxActive" value="10" />
        <property name="maxIdle" value="5" />
    </bean>

    <!-- 配置sqlSessionFactory -->
    <bean id="sqlSessionFactory" class="org.mybatis.spring.SqlSessionFactoryBean">
        <property name="dataSource" ref="dataSource" />
        <property name="configLocation" value="classpath:mybatis/sqlMapConfig.xml"/>
    </bean>

    <!-- 配置mapper掃描器 -->
    <bean class="org.mybatis.spring.mapper.MapperScannerConfigurer">
        <!-- 掃描包的路徑,如果需要掃描多個包,中間使用半形 逗號隔開-->
        <property name="basePackage" value="ssm.mapper"/>
        <property name="sqlSessionFactoryBeanName" value="sqlSessionFactory"></property>
    </bean>

</beans>
可以看出,整合dao層的時候主要配置一下資料來源、sqlSessionFactory和mapper掃描器,這樣的話,資料來源,sqlSessionFactory和mapper在tomcat啟動時就被spring例項化到了容器中。接下來就是準備po類及mapper了。
3.3 逆向工程生成po類及mapper
關於如何使用mybatis的逆向工程我就不再贅述了,如果不太清楚的童鞋請看一下這篇文章:☞點我檢視。
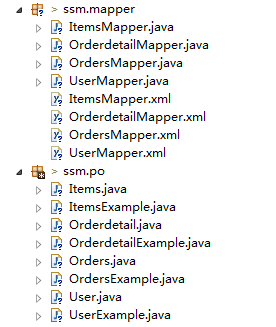
將生成的程式碼拷貝到我們自己的工程中即可,如下(那些檔案前的問號不管它,是我還沒同步到github的緣故):
到這裡dao層就整合好了,下面來做個測試,整合的時候一定要步步為營,別啪啪啪整合完了再一起測試,到時候出錯再找就不太方便了。我們針對ItemsMapper介面中的SelectByPrimaryKey()方法做一個測試:
public class ItemsMapperTest {

    ApplicationContext applicationContext = null;
    @Before
    public void setUp() throws Exception {

        applicationContext = new ClassPathXmlApplicationContext("classpath:spring/applicationContext-dao.xml");
    }

    @Test
    public void testSelectByPrimaryKey() {
        ItemsMapper itemsMapper = (ItemsMapper) applicationContext.getBean("itemsMapper");
        Items items = itemsMapper.selectByPrimaryKey(1);
        System.out.println(items);
    }
}
能打印出id為1的Items物件說明沒有問題。
3.4 一個小插曲
這裡需要注意一個問題,剛剛逆向工程生成的程式碼,我們儘量不要去改動它,為什麼呢?比如我現在改動了生成後的程式碼,後面萬一需求改變,我肯定會根據新的表關係再生成一次,然後再拷到自己的工程,這樣之前修改的東西就會被覆蓋,如果又不想被覆蓋,那就很麻煩了……要改的地方就太多了……所以我們永遠不去修改生成之後的程式碼,如果有需要,我們在生成的程式碼基礎上進行擴充套件(繼承,組合等),這樣就算程式碼重新生成,也不會影響我們的擴充套件類。
我舉個例子:假如現在有個需求:
SELECT * FROM items WHERE items.name LIKE ‘%引數%’
這個引數我們要通過一個Items的包裝類傳進來,Items的包裝類指的是,裡面封裝了Items的資訊,還封裝了其他資訊。因為這個包裝類除了查詢Items相關資訊外,還可能有關聯查詢,所以裡面不僅僅就只有Items本身的資訊。
要實現這個需求,我們不能直接去改Items類,不能直接在Items類中新增東西,原因上面已經分析了,我們可以這麼做:
- 先寫一個Items的繼承類
- 在這個繼承類上進行擴充套件
為啥要先寫一個繼承類呢?直接寫Items的擴充套件類不就行了麼?原因還是上面提到的,完以後面這個Items改了咋整?這是一點,還有就是Items的繼承類裡面,我就可以做一些新的操作了。看一下實現:
//Items的繼承類
public class ItemsCustom extends Items {

    //可以新增商品資訊的擴充套件屬性,如果不新增,其實就是Items

}
//這個就是Items的包裝類,我們從service開始,傳遞下去的都是包裝類
public class ItemsQueryVo {
//原始的商品資訊
private Items items;
//為了系統 可擴充套件性,對原始生成的po進行擴充套件
private ItemsCustom itemsCustom;
public Items getItems() {
return items;
}
public void setItems(Items items) {
this.items = items;
}
public ItemsCustom getItemsCustom() {
return itemsCustom;
}
public void setItemsCustom(ItemsCustom itemsCustom) {
this.itemsCustom = itemsCustom;
}
}然後我們定義itemsMapperCustom.xml對映檔案:
<?xml version="1.0" encoding="UTF-8" ?>
<!DOCTYPE mapper PUBLIC "-//mybatis.org//DTD Mapper 3.0//EN" "http://mybatis.org/dtd/mybatis-3-mapper.dtd" >
<mapper namespace="ssm.mapper.ItemsMapperCustom" >
    <!-- 定義商品查詢的sql片段,就是商品查詢條件 -->
    <sql id="query_items_where">
        <!-- 使用動態sql,通過if判斷,滿足條件進行sql拼接 -->
        <!-- 查詢條件通過ItemsQueryVo包裝物件中的itemsCustom屬性來傳遞-->
        <if test="itemsCustom != null">
            <if test="itemsCustom.name != null and itemsCustom.name != ''">
                items.name LIKE '%${itemsCustom.name}%'
            </if>
        </if>
    </sql>

    <select id="findItemsList" parameterType="ssm.po.ItemsQueryVo"
            resultType="ssm.po.ItemsCustom">
        SELECT items.* FROM items
        <where>
            <include refid="query_items_where"></include>
        </where>
    </select>
</mapper>
當然咯,對應的mapper介面要定義一下:
public interface ItemsMapperCustom {

    public List<ItemsCustom> findItemsList(ItemsQueryVo itemsQueryVo) throws Exception;
}
最後針對這個介面寫一個測試類:
public class ItemsMapperCustomTest {

    ApplicationContext applicationContext = null;
    @Before
    public void setUp() throws Exception {

        applicationContext = new ClassPathXmlApplicationContext("classpath:spring/applicationContext-dao.xml");
    }


    @Test
    public void testFindItemsList() throws Exception {
        ItemsMapperCustom itemsMapper = (ItemsMapperCustom) applicationContext.getBean("itemsMapperCustom");

        ItemsQueryVo itemsQueryVo = new ItemsQueryVo();
        ItemsCustom itemsCustom = new ItemsCustom();
        itemsCustom.setName("手機");
        itemsQueryVo.setItemsCustom(itemsCustom);


        List<ItemsCustom> itemsCustomList = itemsMapper.findItemsList(itemsQueryVo);
        System.out.println(itemsCustomList);
    }

}
可以看到,我們操作的都是Items的繼承類ItemsCustom和包裝類ItemsQueryVo,這個ItemsQueryVo將貫穿整條線,從service呼叫,到dao層。由逆向工程生成的原始的po類我們不去操作它們,除非是簡單的查詢,那麼直接查即可。
3. 整合service層
先把jar包導了再說,整合service層需要配置事務了,所以要匯入spring-aop中所有的jar包到lib中。
之前提到過,service是用來呼叫mapper的,mapper是用來操作資料庫的,其實上面的小插曲中的測試程式碼就有點類似service層做的事,先獲取mapper介面的代理物件,然後操作資料庫。所以在service層,我們首先要獲取mapper介面的代理物件,只不過在這裡我們通過spring注入進來,然後通過這個代理物件去操作資料庫。下面看一下整個整合的步驟:
3.1 先寫service介面
public interface ItemsService {

    public List<ItemsCustom> findItemsList(ItemsQueryVo itemsQueryVo) throws Exception;

}
可以看出,這個介面和上面那個mapper介面其實是一樣的,當然並不是說一定一樣,只不過這裡要實現的邏輯都一樣而已。
3.2 service實現類
public class ItemsServiceImpl implements ItemsService {

    @Autowired
    private ItemsMapperCustom itemsMapperCustom;

    @Override
    public List<ItemsCustom> findItemsList(ItemsQueryVo itemsQueryVo)
            throws Exception {

        //通過itemsMapperCustom查詢資料庫
        return itemsMapperCustom.findItemsList(itemsQueryVo);
    }

}
可以看出,實現類中是通過@Autowired注入itemsMapperCustom,這個itemsMapperCustom是上面那個插曲中定義的一個mapper。它會通過spring配的掃描器掃描到,並將物件裝到spring容器中,然後在這注入進來,然後呼叫findItemsList方法來操作資料庫。至於itemQueyVo,實際中,是將前臺傳來的資料封裝進來,然後傳進來的。這樣就打通了service與dao之間的通道了。
3.3 配置applicationContext-service.xml
這裡是第二個spring的配置檔案了,還是在config/spring資料夾下面,主要是用來配置所有的service的,如下:
<?xml version="1.0" encoding="UTF-8"?>
<beans xmlns="http://www.springframework.org/schema/beans"
       xmlns:xsi="http://www.w3.org/2001/XMLSchema-instance"
       xmlns:mvc="http://www.springframework.org/schema/mvc"
       xmlns:context="http://www.springframework.org/schema/context"
       xmlns:aop="http://www.springframework.org/schema/aop"
       xmlns:tx="http://www.springframework.org/schema/tx"
       xsi:schemaLocation="http://www.springframework.org/schema/beans
        http://www.springframework.org/schema/beans/spring-beans-4.2.xsd
        http://www.springframework.org/schema/mvc
        http://www.springframework.org/schema/mvc/spring-mvc-4.2.xsd
        http://www.springframework.org/schema/context
        http://www.springframework.org/schema/context/spring-context.xsd
        http://www.springframework.org/schema/aop
        http://www.springframework.org/schema/aop/spring-aop-4.2.xsd
        http://www.springframework.org/schema/tx
        http://www.springframework.org/schema/tx/spring-tx.xsd">

   <!-- 商品管理的service -->
   <bean id="itemsService" class="ssm.service.impl.ItemsServiceImpl"/>

</beans>
當然咯,如果使用註解的話,這裡就不用配了,先用xml的方式吧。
3.4 配置applicationContext-transaction.xml
這裡是第三個spring的配置檔案了,還是在config/spring資料夾下面,主要是用來配置spring事務管理的,如下:
<?xml version="1.0" encoding="UTF-8"?>
<beans xmlns="http://www.springframework.org/schema/beans"
       xmlns:xsi="http://www.w3.org/2001/XMLSchema-instance"
       xmlns:mvc="http://www.springframework.org/schema/mvc"
       xmlns:context="http://www.springframework.org/schema/context"
       xmlns:aop="http://www.springframework.org/schema/aop"
       xmlns:tx="http://www.springframework.org/schema/tx"
       xsi:schemaLocation="http://www.springframework.org/schema/beans
        http://www.springframework.org/schema/beans/spring-beans-4.2.xsd
        http://www.springframework.org/schema/mvc
        http://www.springframework.org/schema/mvc/spring-mvc-4.2.xsd
        http://www.springframework.org/schema/context
        http://www.springframework.org/schema/context/spring-context.xsd
        http://www.springframework.org/schema/aop
        http://www.springframework.org/schema/aop/spring-aop-4.2.xsd
        http://www.springframework.org/schema/tx
        http://www.springframework.org/schema/tx/spring-tx.xsd">

   <!-- 事務管理器 -->
   <!-- 對mybatis操作資料事務控制,spring使用jdbc的事務控制類 -->
   <bean id="transactionManager" class="org.springframework.jdbc.datasource.DataSourceTransactionManager">
        <!-- 資料來源dataSource在applicationContex-dao.xml中配置了 -->
        <property name="dataSource" ref="dataSource"/>
   </bean>

   <!-- 通知 -->
   <tx:advice id="txAdvice" transaction-manager="transactionManager">
        <tx:attributes>
            <tx:method name="save*" propagation="REQUIRED"/>
            <tx:method name="delete*" propagation="REQUIRED"/>
            <tx:method name="update*" propagation="REQUIRED"/>
            <tx:method name="insert*" propagation="REQUIRED"/>
            <tx:method name="find*" propagation="SUPPORTS" read-only="true"/>
            <tx:method name="get*" propagation="SUPPORTS" read-only="true"/>
            <tx:method name="select*" propagation="SUPPORTS" read-only="true"/>
        </tx:attributes>
   </tx:advice>

   <aop:config>
        <aop:advisor advice-ref="txAdvice" pointcut="execution(* ssm.service.impl.*.*(..))"/>
   </aop:config>

</beans>
這樣service層就整合完了。接下來就是整合springmvc了。
4. 整合springmvc
上面提到過,springmvc是spring的一個模組,所以不需要整合,我們只需要加入springmvc所需的包即可,將springmvc資料夾下的jar包匯入到lib中即可。關於springmvc的使用,在前面幾篇文章都寫了,這裡為了完整性,也總結一下。
4.1 配置前端控制器
前端控制器要配置在WEB-INF/web.xml中,如下:
<?xml version="1.0" encoding="UTF-8"?>
<web-app xmlns:xsi="http://www.w3.org/2001/XMLSchema-instance" xmlns="http://java.sun.com/xml/ns/javaee" xsi:schemaLocation="http://java.sun.com/xml/ns/javaee http://java.sun.com/xml/ns/javaee/web-app_3_0.xsd" id="WebApp_ID" version="3.0">
  <display-name>SpringMVC_Study</display-name>
  <welcome-file-list>
    <welcome-file>index.jsp</welcome-file>
  </welcome-file-list>
  <!-- 配置前端控制器DispatcherServlet -->
  <servlet>
    <servlet-name>springmvc</servlet-name>
    <servlet-class>org.springframework.web.servlet.DispatcherServlet</servlet-class>
    <init-param>
        <param-name>contextConfigLocation</param-name>
        <param-value>classpath:springmvc.xml</param-value>
    </init-param>
  </servlet>

  <servlet-mapping>
    <servlet-name>springmvc</servlet-name>
    <url-pattern>*.action</url-pattern>
  </servlet-mapping>
</web-app>
4.2 配置處理器對映器、處理器介面卡和檢視解析器
這裡使用註解的方式配置,因為註解的方式比較簡單。配置在springmvc.xml中
<?xml version="1.0" encoding="UTF-8"?>
<beans xmlns="http://www.springframework.org/schema/beans"
       xmlns:xsi="http://www.w3.org/2001/XMLSchema-instance"
       xmlns:mvc="http://www.springframework.org/schema/mvc"
       xmlns:context="http://www.springframework.org/schema/context"
       xmlns:aop="http://www.springframework.org/schema/aop"
       xmlns:tx="http://www.springframework.org/schema/tx"
       xsi:schemaLocation="http://www.springframework.org/schema/beans
        http://www.springframework.org/schema/beans/spring-beans-4.2.xsd
        http://www.springframework.org/schema/mvc
        http://www.springframework.org/schema/mvc/spring-mvc-4.2.xsd
        http://www.springframework.org/schema/context
        http://www.springframework.org/schema/context/spring-context.xsd
        http://www.springframework.org/schema/aop
        http://www.springframework.org/schema/aop/spring-aop-4.2.xsd
        http://www.springframework.org/schema/tx
        http://www.springframework.org/schema/tx/spring-tx.xsd">

    <!-- 一個配置節解決對映器和介面卡的配置註解配置 -->
    <mvc:annotation-driven></mvc:annotation-driven>

    <!-- 掃描所有的Controller -->
    <context:component-scan base-package="ssm.controller"></context:component-scan>

    <!-- 配置檢視解析器
        進行jsp解析,預設使用jstl標籤,classpath下得有jstl的包
    -->
    <bean class="org.springframework.web.servlet.view.InternalResourceViewResolver" />
</beans>
4.3 編寫Controller(即Handler)
接下來寫一個Controller,如下:
@Controller
public class ItemsController {

    @Autowired
    private ItemsService itemsService;

    @RequestMapping("/queryItems")
    public ModelAndView queryItems() throws Exception {

        //呼叫service查詢資料庫,查詢商品列表
        //這裡傳入進去一個null表示沒有附加條件,查詢所有的。因為service中接收的是一個ItemsQueryVo物件
        List<ItemsCustom> itemsList = itemsService.findItemsList(null);

        //返回ModelAndView
        ModelAndView modelAndView = new ModelAndView();
        modelAndView.addObject("itemsList", itemsList);
        modelAndView.setViewName("/WEB-INF/jsp/items/itemsList.jsp");

        return modelAndView;
    }
}- 前臺jsp頁面還是第二篇博文中寫的那個,沒有變,就不寫了。最後還有個重要的步驟就是載入spring容器。
4.4 載入spring容器
在web.xml中新增spring容器監聽器,載入spring容器:
<!-- 載入spring容器 -->
 <context-param>
    <param-name>contextConfigLocation</param-name>
    <param-value>classpath:spring/applicationContext-*.xml</param-value>
 </context-param>
 <listener>
    <listener-class>org.springframework.web.context.ContextLoaderListener</listener-class>
 </listener>
相關推薦
【SpringMVC學習04】Spring、MyBatis和SpringMVC的整合
前兩篇springmvc的文章中都沒有和mybatis整合,都是使用靜態資料來模擬的,但是springmvc開發不可能不整合mybatis,另外mybatis和spring的整合我之前學習mybatis的時候有寫過一篇,但是僅僅是整合mybatis和spring,所以這篇文
SpringMVC學習(四)——Spring、MyBatis和SpringMVC的整合
creat .com www. dispatch cte scanner scan fault framework 本文我再來講SpringMVC和MyBatis整合開發的方法,這樣的話,Spring、MyBatis和SpringMVC三大框架的整合開發我們就學會了。這裏我
【Web篇04】Servlet、Tomcat、JSP、web.xml區別
很多初學者可能對這四個概念都有點傻傻分不清楚,下面就詳細講解一下這四個Web入門概念的區別: TomCat,是一個在小型專案開發和學習中,經常用到的一個小型的Web應用伺服器;它是一個Servlet/JSP容器,負責處理客戶請求,並把請求傳給servlet;然後將servlet
【C++學習筆記】四、C++中的程式結構、輸入輸出以及語句(選擇、迴圈結構)
1.C++程式結構 c++的每個程式單元由三部分組成: (1)預處理指令:#include 和#define (2)全域性宣告:在函式外部對資料型別、函式以及變數的宣告。它的有效範圍是從宣告開始到本程式單位結束。 (3)函式:包含函式首部和函式體,函式體中包含宣告語句和執行語句。
【C++學習筆記】三、C++的資料型別、儲存以及基本運算
本文記錄了C++中的資料型別以及基本運算,這部分是典型的每次記每次忘型別,所以烙印在此,以便用時隨時查閱。 主要參考:http://www.runoob.com/cplusplus/cpp-data-types.html 1. C++中的資料型別 (1)基本型別 C++ 為程式
【C++學習筆記】二、對於C++語法新手常犯的錯誤
從python到C++,表示需要注意的習慣性細節還是蠻多的,作為一個不看就忘星人,還是決定老老實實把一個個易錯點記錄下來,也再一次加深印象。 首先看個樣例,來自譚浩強老師的《C++程式設計第3版》,第一章習題9: #include <iostream> using namespa
【C++學習筆記】一、如何使用Visual Studio2015進行C++專案建立
C++學習常用的編譯環境是Visual Studio系列和GCC系列,其中VS是Win下的編譯器,GCC有Win、Linux和UNIX版本,二者皆可以從網上下載到,GCC是最接近C++標準的,後續有嘗試的價值,作為初學者本文先從VS系列進行學習。 本文內容轉載自:https://www.cnbl
【機器學習基礎】熵、KL散度、交叉熵
熵(entropy)、KL 散度(Kullback-Leibler (KL) divergence)和交叉熵(cross-entropy)在機器學習的很多地方會用到。比如在決策樹模型使用資訊增益來選擇一個最佳的劃分,使得熵下降最大;深度學習模型最後一層使用 softmax 啟用函式後,我們也常使用交叉熵來
【python學習筆記】列表、元組和字典的迭代
在python中,列表和元組的迭代是通過for....in....來完成的; >>> a=[1,2,3,4,5,6,7] >>> for index in a: ... print(index) ... 1 2 3 4 5
【Nginx學習04】nginx伺服器上https站點解析php
前言 雙十一的時候在阿里雲上買了一個學生機,趁著沒過期,拿來折騰一下。 基於WordPress搭建了一個個人網站,用來記錄自己的技術部落格,後來網站升級換成了https的,發現原來的http+php不能使用,遂記錄一下升級過程。 http升級為https後,怎麼修改配置檔案
【opencv學習筆記】1、opencv縮放圖片
#include <opencv2\opencv.hpp> using namespace std; int main() { //定義原圖視窗標題 const char *windowsTitle = "原圖"; //定義縮放後窗口標題 const char *
【Python學習筆記】四、對映(Mapping)
• 通過名字來引用值得資料結構稱為對映字典(Dict)• 字典是鍵值對(key-value pair)的無序可變集合。(1)字典的操作①字典的建立• 字典中的每個元素包含兩部分:鍵和值。• 鍵和值用冒號分隔,元素間用逗號分隔,所有元素放在一對大括號中。d = {key1
【Python學習筆記】三、序列(Sequence)
3.1序列簡介• 資料結構是通過某種方式組織在一起的元素的集合。• 容器(Container)是一種Python的資料結構,基本上是包含其他物件的任意物件。序列和對映(如字典)是兩類主要的容器。集合(Set)也是容器型別。• 序列是最基本的資料結構,是通過對資料元
【Android學習筆記】onInterceptTouchEvent()、onTouchEvent()
一、資源: 二、重點 首先要明確onInterceptTouchEvent()這個方法只針對於ViewGroup,事件傳到ViewGroup一般先觸發onInterceptTouchEvent(),View是沒有這個方法的具體傳遞的流程見資源1,很詳細,對理解很有幫助 onInterceptTouchE
【SpringMVC學習筆記】03 使用maven建立springMVC專案
6.建立controller@ControllerpublicclassIndexController {/** * 主頁設定 "/"的話預設情況下就訪問 * @return */@RequestMapping("/")public String home() {return"home";
【機器學習筆記】二、 Regression迴歸
一、基礎 這裡面,輸入變數x有兩個,一個是居住面積(living area),一個是房間數目(bedrooms)。 所以x 是一個二維向量。表示第i組資料中的居住面積(living area)。表示第i組資料中的房間數目。 我們假設輸入和輸出呈線性關係,那麼便有下面的公式
【機器學習系列】特徵值、奇異值以及奇異值分解
前言: 上一次寫了關於PCA與LDA的文章,PCA的實現一般有兩種,一種是用特徵值分解去實現的,一種是用奇異值分解去實現的。在上篇文章中便是基於特徵值分解的一種解釋。特徵值和奇異值在大部分人的印象中,往往是停留在純粹的數學計算中。而且線性代數或者矩陣論裡面
【python學習筆記】python函式定義和傳參方法說明
一、函式定義方式 函式定義用關鍵字def,其引數傳遞不用設定型別,也不用定義返回,然後在函式名稱後加上:號,這點和java很不一樣,相對來說更加簡單了;另外包含關係上用四個空格來標識,而非java的;號; 如下為一個範例,定義了一個函式用來生成任意上界的菲波那契數列: # -*- c
【Docker學習總結】4.Docker安裝和部署
之前的總結分別介紹了Docker是什麼,以及Docker由哪些部分組成。本篇將為大家詳細介紹Docker是怎樣安裝、部署和使用的。 我們這裡在Windows機器上使用VMware來模擬在Linux的CentOS 7版本上來安裝Docker。 首先開啟虛擬機器: 記住IP地
【python學習筆記】列表生成式和生成器
一、列表生成式 列表生成式即List Comprehensions,是Python內建的非常簡單卻強大的可以用來建立list的生成式。 列表生成式由包含一個表示式的括號組成,表示式後面跟隨一個for子句,之後可以有零或多個for或if子句。結果是一個列表,由表示


