
Ble藍芽的使用手冊

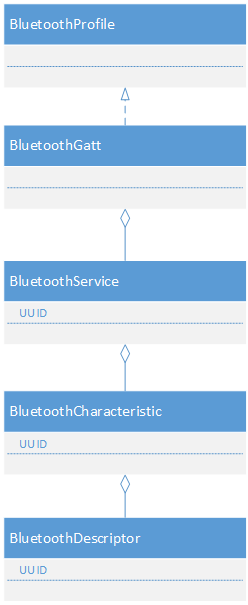
如上圖所示,使用低功耗藍芽可以包括多個Profile,一個Profile中有多個Service,一個Service中有多個Characteristic,一個Characteristic中包括一個value和多個Descriptor。
Android中進行藍芽開發需要使用到的類的執行過程是:
1、使用BluetoothAdapter.startLeScan來掃描低功耗藍芽裝置
2、在掃描到裝置的回撥函式中會得到BluetoothDevice物件,並使用BluetoothAdapter.stopLeScan停止掃描
3、使用BluetoothDevice.connectGatt來獲取到BluetoothGatt物件
4、執行BluetoothGatt.discoverServices,這個方法是非同步操作,在回撥函式onServicesDiscovered中得到status,通過判斷status是否等於BluetoothGatt.GATT_SUCCESS來判斷查詢Service是否成功
5、如果成功了,則通過BluetoothGatt.getService來獲取BluetoothGattService
6、接著通過BluetoothGattService.getCharacteristic獲取BluetoothGattCharacteristic
7、然後通過BluetoothGattCharacteristic.getDescriptor獲取BluetoothGattDescriptor
使用低功耗藍芽需要用到的許可權:
<uses-permission android:name="android.permission.BLUETOOTH"/>
<uses-permission android:name="android.permission.BLUETOOTH_ADMIN"/>
下面介紹怎樣使用BLE:

1、準備BLE

    1)獲取BluetoothAdapter

     BluetoothAdapter是從系統服務獲取到的,全系統就一個。

// Initializes Bluetooth adapter.
final BluetoothManager bluetoothManager =
        (BluetoothManager) getSystemService(Context.BLUETOOTH_SERVICE);
mBluetoothAdapter = bluetoothManager.getAdapter();
 2)檢測藍芽是否開啟

    如果藍芽未開啟,系統會自動開啟,會彈出系統框展示開啟藍芽。

private BluetoothAdapter mBluetoothAdapter;
...
// Ensures Bluetooth is available on the device and it is enabled. If not,
// displays a dialog requesting user permission to enable Bluetooth.
if (mBluetoothAdapter == null || !mBluetoothAdapter.isEnabled()) {
    Intent enableBtIntent = new Intent(BluetoothAdapter.ACTION_REQUEST_ENABLE);
    startActivityForResult(enableBtIntent, REQUEST_ENABLE_BT);
}
2、查詢BLE裝置
因為掃描BLE裝置是電源密集型操作,浪費電量,因此要保證以下原則:
1)掃描到需要的裝置後,馬上停止掃描;
2)給掃描一個時間限制
掃描示例程式碼如下:
/**
* Activity for scanning and displaying available BLE devices.
*/
public class DeviceScanActivity extends ListActivity {
private BluetoothAdapter mBluetoothAdapter;
private boolean mScanning;
private Handler mHandler;
// Stops scanning after 10 seconds.
private static final long SCAN_PERIOD = 10000;
...
private void scanLeDevice(final boolean enable) {
if (enable) {
// Stops scanning after a pre-defined scan period.
mHandler.postDelayed(new Runnable() {
@Override
public void run() {
mScanning = false;
mBluetoothAdapter.stopLeScan(mLeScanCallback);
}
}, SCAN_PERIOD);
mScanning = true;
mBluetoothAdapter.startLeScan(mLeScanCallback);
} else {
mScanning = false;
mBluetoothAdapter.stopLeScan(mLeScanCallback);
}
...
}
...
}
如果只是要掃描到特定型別的裝置,則使用介面 startLeScan(UUID[], BluetoothAdapter.LeScanCallback),通過UUID來查詢裝置。
掃描回撥的程式碼如下所示:
private LeDeviceListAdapter mLeDeviceListAdapter;
...
// Device scan callback.
private BluetoothAdapter.LeScanCallback mLeScanCallback =
new BluetoothAdapter.LeScanCallback() {
@Override
public void onLeScan(final BluetoothDevice device, int rssi,
byte[] scanRecord) {
runOnUiThread(new Runnable() {
@Override
public void run() {
mLeDeviceListAdapter.addDevice(device);
mLeDeviceListAdapter.notifyDataSetChanged();
}
});
}
};
注意:我們既可以掃描BLE裝置,也可以掃描普通藍芽裝置,也可以同時將BLE裝置和普通藍芽裝置一起掃描到。
3、連線到GATT Server

   獲取到BluetoothGatt例項,

mBluetoothGatt = device.connectGatt(this, false, mGattCallback);
    具體例項如下:

// A service that interacts with the BLE device via the Android BLE API.
public class BluetoothLeService extends Service {
    private final static String TAG = BluetoothLeService.class.getSimpleName();

    private BluetoothManager mBluetoothManager;
    private BluetoothAdapter mBluetoothAdapter;
    private String mBluetoothDeviceAddress;
    private BluetoothGatt mBluetoothGatt;
    private int mConnectionState = STATE_DISCONNECTED;

    private static final int STATE_DISCONNECTED = 0;
    private static final int STATE_CONNECTING = 1;
    private static final int STATE_CONNECTED = 2;

    public final static String ACTION_GATT_CONNECTED =
            "com.example.bluetooth.le.ACTION_GATT_CONNECTED";
    public final static String ACTION_GATT_DISCONNECTED =
            "com.example.bluetooth.le.ACTION_GATT_DISCONNECTED";
    public final static String ACTION_GATT_SERVICES_DISCOVERED =
            "com.example.bluetooth.le.ACTION_GATT_SERVICES_DISCOVERED";
    public final static String ACTION_DATA_AVAILABLE =
            "com.example.bluetooth.le.ACTION_DATA_AVAILABLE";
    public final static String EXTRA_DATA =
            "com.example.bluetooth.le.EXTRA_DATA";

    public final static UUID UUID_HEART_RATE_MEASUREMENT =
            UUID.fromString(SampleGattAttributes.HEART_RATE_MEASUREMENT);

    // Various callback methods defined by the BLE API.
    private final BluetoothGattCallback mGattCallback =
            new BluetoothGattCallback() {
        @Override
        public void onConnectionStateChange(BluetoothGatt gatt, int status,
                int newState) {
            String intentAction;
            if (newState == BluetoothProfile.STATE_CONNECTED) {
                intentAction = ACTION_GATT_CONNECTED;
                mConnectionState = STATE_CONNECTED;
                broadcastUpdate(intentAction);
                Log.i(TAG, "Connected to GATT server.");
                Log.i(TAG, "Attempting to start service discovery:" +
                        mBluetoothGatt.discoverServices());

            } else if (newState == BluetoothProfile.STATE_DISCONNECTED) {
                intentAction = ACTION_GATT_DISCONNECTED;
                mConnectionState = STATE_DISCONNECTED;
                Log.i(TAG, "Disconnected from GATT server.");
                broadcastUpdate(intentAction);
            }
        }

        @Override
        // New services discovered
        public void onServicesDiscovered(BluetoothGatt gatt, int status) {
            if (status == BluetoothGatt.GATT_SUCCESS) {
                broadcastUpdate(ACTION_GATT_SERVICES_DISCOVERED);
            } else {
                Log.w(TAG, "onServicesDiscovered received: " + status);
            }
        }

        @Override
        // Result of a characteristic read operation
        public void onCharacteristicRead(BluetoothGatt gatt,
                BluetoothGattCharacteristic characteristic,
                int status) {
            if (status == BluetoothGatt.GATT_SUCCESS) {
                broadcastUpdate(ACTION_DATA_AVAILABLE, characteristic);
            }
        }
     ...
    };
...
}
    其中,discoverService方式是非同步的,它的回撥方法是上面程式碼中的onServiceDiscovered。

private void broadcastUpdate(final String action) {
    final Intent intent = new Intent(action);
    sendBroadcast(intent);
}

private void broadcastUpdate(final String action,
                             final BluetoothGattCharacteristic characteristic) {
    final Intent intent = new Intent(action);

    // This is special handling for the Heart Rate Measurement profile. Data
    // parsing is carried out as per profile specifications.
    if (UUID_HEART_RATE_MEASUREMENT.equals(characteristic.getUuid())) {
        int flag = characteristic.getProperties();
        int format = -1;
        if ((flag & 0x01) != 0) {
            format = BluetoothGattCharacteristic.FORMAT_UINT16;
            Log.d(TAG, "Heart rate format UINT16.");
        } else {
            format = BluetoothGattCharacteristic.FORMAT_UINT8;
            Log.d(TAG, "Heart rate format UINT8.");
        }
        final int heartRate = characteristic.getIntValue(format, 1);
        Log.d(TAG, String.format("Received heart rate: %d", heartRate));
        intent.putExtra(EXTRA_DATA, String.valueOf(heartRate));
    } else {
        // For all other profiles, writes the data formatted in HEX.
        final byte[] data = characteristic.getValue();
        if (data != null && data.length > 0) {
            final StringBuilder stringBuilder = new StringBuilder(data.length);
            for(byte byteChar : data)
                stringBuilder.append(String.format("%02X ", byteChar));
            intent.putExtra(EXTRA_DATA, new String(data) + "\n" +
                    stringBuilder.toString());
        }
    }
    sendBroadcast(intent);
}


// Handles various events fired by the Service.
// ACTION_GATT_CONNECTED: connected to a GATT server.
// ACTION_GATT_DISCONNECTED: disconnected from a GATT server.
// ACTION_GATT_SERVICES_DISCOVERED: discovered GATT services.
// ACTION_DATA_AVAILABLE: received data from the device. This can be a
// result of read or notification operations.
private final BroadcastReceiver mGattUpdateReceiver = new BroadcastReceiver() {
    @Override
    public void onReceive(Context context, Intent intent) {
        final String action = intent.getAction();
        if (BluetoothLeService.ACTION_GATT_CONNECTED.equals(action)) {
            mConnected = true;
            updateConnectionState(R.string.connected);
            invalidateOptionsMenu();
        } else if (BluetoothLeService.ACTION_GATT_DISCONNECTED.equals(action)) {
            mConnected = false;
            updateConnectionState(R.string.disconnected);
            invalidateOptionsMenu();
            clearUI();
        } else if (BluetoothLeService.
                ACTION_GATT_SERVICES_DISCOVERED.equals(action)) {
            // Show all the supported services and characteristics on the
            // user interface.
            displayGattServices(mBluetoothLeService.getSupportedGattServices());
        } else if (BluetoothLeService.ACTION_DATA_AVAILABLE.equals(action)) {
            displayData(intent.getStringExtra(BluetoothLeService.EXTRA_DATA));
        }
    }
};
4、讀BLE屬性
一旦獲取到GATT的Services,就可以讀寫他們的屬性了,例項如下:
public class DeviceControlActivity extends Activity {
...
// Demonstrates how to iterate through the supported GATT
// Services/Characteristics.
// In this sample, we populate the data structure that is bound to the
// ExpandableListView on the UI.
private void displayGattServices(List<BluetoothGattService> gattServices) {
if (gattServices == null) return;
String uuid = null;
String unknownServiceString = getResources().
getString(R.string.unknown_service);
String unknownCharaString = getResources().
getString(R.string.unknown_characteristic);
ArrayList<HashMap<String, String>> gattServiceData =
new ArrayList<HashMap<String, String>>();
ArrayList<ArrayList<HashMap<String, String>>> gattCharacteristicData
= new ArrayList<ArrayList<HashMap<String, String>>>();
mGattCharacteristics =
new ArrayList<ArrayList<BluetoothGattCharacteristic>>();
// Loops through available GATT Services.
for (BluetoothGattService gattService : gattServices) {
HashMap<String, String> currentServiceData =
new HashMap<String, String>();
uuid = gattService.getUuid().toString();
currentServiceData.put(
LIST_NAME, SampleGattAttributes.
lookup(uuid, unknownServiceString));
currentServiceData.put(LIST_UUID, uuid);
gattServiceData.add(currentServiceData);
ArrayList<HashMap<String, String>> gattCharacteristicGroupData =
new ArrayList<HashMap<String, String>>();
List<BluetoothGattCharacteristic> gattCharacteristics =
gattService.getCharacteristics();
ArrayList<BluetoothGattCharacteristic> charas =
new ArrayList<BluetoothGattCharacteristic>();
// Loops through available Characteristics.
for (BluetoothGattCharacteristic gattCharacteristic :
gattCharacteristics) {
charas.add(gattCharacteristic);
HashMap<String, String> currentCharaData =
new HashMap<String, String>();
uuid = gattCharacteristic.getUuid().toString();
currentCharaData.put(
LIST_NAME, SampleGattAttributes.lookup(uuid,
unknownCharaString));
currentCharaData.put(LIST_UUID, uuid);
gattCharacteristicGroupData.add(currentCharaData);
}
mGattCharacteristics.add(charas);
gattCharacteristicData.add(gattCharacteristicGroupData);
}
...
}
...
}
在獲取Service的時候,每個藍芽裝置都會有兩個預設的Service,它們和對應的UUID分別如下:
Bluetooth Generic Access Profile {00001800-0000-1000-8000-00805f9b34fb}
Bluetooth Generic Attribute Profile {00001801-0000-1000-8000-00805F9B34FB}
5、收到GATT通知

   如果裝置主動給手機發資訊,則可以通過notification的方式,這種方式不用手機去輪詢地讀裝置上的資料。手機可以用如下方式給裝置設定notification功能。

private BluetoothGatt mBluetoothGatt;
BluetoothGattCharacteristic characteristic;
boolean enabled;
...
mBluetoothGatt.setCharacteristicNotification(characteristic, enabled);
...
BluetoothGattDescriptor descriptor = characteristic.getDescriptor(
        UUID.fromString(SampleGattAttributes.CLIENT_CHARACTERISTIC_CONFIG));
descriptor.setValue(BluetoothGattDescriptor.ENABLE_NOTIFICATION_VALUE);
mBluetoothGatt.writeDescriptor(descriptor);
    如果notificaiton方式對於某個Characteristic是enable的,那麼當裝置上的這個Characteristic改變時,手機上的onCharacteristicChanged() 回撥就會被促發。如下所示:

@Override
// Characteristic notification
public void onCharacteristicChanged(BluetoothGatt gatt,
        BluetoothGattCharacteristic characteristic) {
    broadcastUpdate(ACTION_DATA_AVAILABLE, characteristic);
}
6、關閉客戶端藍芽

public void close() {
    if (mBluetoothGatt == null) {
        return;
    }
    mBluetoothGatt.close();
    mBluetoothGatt = null;
}
在我的專案中的一小部分步驟總結:
1,開啟一個執行緒去掃描藍芽裝置,將有的藍芽裝置顯示在ListView中,點選item觸發監聽去連線藍芽裝置,將藍芽裝置的地址返回給上一頁
		2,得到Intent中的 BluetoothDevice.EXTRA_DEVICE ,開啟 BlueToothService服務,將藍芽的地址儲存到sqlite中
		3,在BlueToothService 中bindService      UartService  啟動UartService
		   註冊廣播接收器:UARTStatusChangeReceiver   用於連線、接收、傳送的藍芽服務
		   註冊廣播接收器:BluetoothStateListener  用於監聽藍芽狀態

		4,UartService 	用於連線、接收、傳送的藍芽服務
		   提供的connect方法:connect(final String address)
							  1,判斷傳遞過來的地址是否為空,
							  2,判斷以前是否連線過,
							  3,通過mBluetoothAdapter.getRemoteDevice(address);得到藍芽裝置
							  4,device.connectGatt(this, false, mGattCallback)
相關推薦
Ble藍芽的使用手冊
如上圖所示,使用低功耗藍芽可以包括多個Profile,一個Profile中有多個Service,一個Service中有多個Characteristic,一個Characteristic中包括一個value和多個Descriptor。 Android中進行藍芽開發需要使
IOS--swift BLE藍芽通訊管理(多裝置)
之前一直做的是Android,公司IOS端突然要同時進行多個專案,IOS同學表示壓力山大,所以臨危受命由我來完成專案中關於BLE通訊的功能模組,由於之前做過Android版本的,並且執行狀況良好,一直都比較穩定,因此分享出來,也希望大家能提出好的建議。 總共有4個swift檔案。 如圖
Android BLE 藍芽快速開發框架。
FastBle 專案地址:Jasonchenlijian/FastBle 簡介:Android BLE 藍芽快速開發框架。 更多:作者 提 Bug 標籤: 藍芽- Thanks to th
Android BLE藍芽4.0開發—Android手機與BLE終端通訊
轉載自: https://blog.csdn.net/fu908323236/article/details/76208997 這篇部落格主要講解AndroidBLE藍芽4.0的基本概念,以及基礎用法。 BLE 即 Bluetooth Low Energy,藍芽低功耗技術,是藍芽
[原創]經驗分享,如何選擇一款適合你的低功耗BLE藍芽模組?
隨著智慧手機普及,及感測器的廣泛應用,低功耗藍芽得到大量使用。但由於天線方向有原因,許多客戶還是會選擇外購模組而不是自己來設計。再說如果用量不大,自己來設計而且還需要研發軟體,投入產出不成比,也沒多大必要。 那麼如何選擇一款適合的藍芽模組呢? 按照需求從大到小來羅列: 1
ble藍芽模組音訊資料透傳晶片ic選型對比說明
簡介 ble藍芽晶片模組的選型,無論是做半成品,還是做成品,我覺得選擇一個合適的方案,太重要了。選型的平衡點就是剛剛合適,既不浪費,也不要不夠。同時我覺得儘量選擇一些充分競爭的大品類的晶片,來做一些小眾市場的應用,其實這種方式是最優的。因為你可以享受到最大出貨量和充分競爭帶來
IOS Ble藍芽開發實現
1.本篇博文闡述如何開發Ble藍芽。在藍芽中的一些常見服務,掃描,以及連結; 主藍芽類檔案.h 主藍芽類檔案.m UUID檔案 藍芽列表展示的檔案 一:引入Ble藍芽的框架<CoreBluetooth/CoreBluetooth.h>
IOS之BLE藍芽讀取資料與寫入資料
1.本篇文章歸納了詳細的藍芽讀取,與藍芽寫入的通訊。 2.藉助公司最近一直研發藍芽裝置專案,博主一路走過來,也遇到不少的坑,希望在此能夠給予更多看官的幫助。 藍芽的讀取 UUID的主要類檔案,歸納放置在一個檔案:Constants.h #define APP
ble藍芽技術
/** *搜尋BLE終端 * */ public class BleManager{ private BluetoothManager bluetoothManager; public static BluetoothAdapter mBluetoot
初學BLE藍芽底層開發的常識
藍芽微控制器 CC254x :完全支援BLE,採用經典51核心(C8051)。 EW 是 IAR Embedded Workbench 的簡稱,是C/C++的編譯環境和偵錯程式,應用於嵌入式系統的開發工具。 IAR 有各種平臺,我們開發cc2540用IAR for 80
Android ble藍芽使用注意
以下均為自己在Android ble開發專案中遇到的問題 1.儘量不要在BluetoothGattCallback裡面的回撥函式中執行讀寫通知操作,最多一個,因為例如在onServicesDiscovered回撥函式中只會傳一個寫操作,不管裡面有多少個,而通知如setCharacteristicN
BLE藍芽4.0串列埠除錯助手
支援HEX和文字傳送接收,僅175K 無廣告 無高階許可權 Android 除錯助手(支援藍芽經典/BLE串列埠助手,WIFI NFC GPS USB TCP UDP) http://zhushou.360.cn/detail/index/soft_id/30925
Android BLE藍芽詳細解讀
前言: 對BLE藍芽感興趣的朋友可以加入我們討論群: QQ:494309361(Android藍芽開發小縱隊) 隨著物聯網時代的到來,越來越多的智慧硬體裝置開始流行起來,比如智慧手環、心率檢測儀、以及各式各樣的智慧傢俱和玩具類產品。安卓4.3(
Android BLE 藍芽學習總結(一):手機作為周邊BluetoothGattServer的實現
低功耗藍芽的基本概念: 在BLE協議中,有兩個角色,周邊(Periphery)和中央(Central)。周邊是資料的提供者,中央是資料的使用和處理者。在Android SDK裡面,Android4.3以後手機可以作為中央使用;Android5.0以後手機才可以
微信小程式-BLE藍芽實現demo
終於實現了藍芽的功能,也找到了合適的硬體,記錄一下自己需要注意和總結的地方 具體的搜尋、連線、斷開、訊息傳輸都已經實現了,作為專案的一個頁面完成了 相應的程式碼地址,具體的藍芽程式碼在pages/bluetooth當中 一.硬體部分 HC-08 藍芽模組 4
Anroid BLE藍芽(手機分別作為中心裝置和外圍裝置)
藍芽是一種短距的無線通訊技術,可實現固定裝置、移動裝置之間的資料交換。一般將藍芽3.0之前的BR/EDR藍芽稱為傳統藍芽,而將藍芽4.0規範下的LE藍芽稱為低功耗藍芽。BLE藍芽模組主要應用領域 1、移動擴充套件裝置 2、汽車電子裝置 3、健
BLE 藍芽 與APP 得互動 內設 外設
藍芽設定 CoreBluetooth框架的核心其實是:peripheral和central,對應他們分別有一組相關的API和類 這兩組api粉筆對應不同的業務常見:左側叫中心模式,就是以你的app作為中心,連線其他的外設的場景;而右側稱為外設模式,使用`手機作為外設`
Android經典藍芽和Ble藍芽的對比
Android中的藍芽開發要說到藍芽,小夥伴們聽到的可能有藍芽1.0、藍芽2.0、藍芽3.0、藍芽4.0之類的以數字結尾的藍芽版本號,而實際上,在最新的標準中,已經不再使用數字版本號作為藍芽版本的區分了,取而代之的是經典藍芽與低功耗藍芽(BLE)這兩種區別。這裡提到的低功耗藍芽也會有很多人會誤解為就是藍芽4.
android ble藍芽開發總結(附帶自己專案中提取整理的demo地址)
一些基本的知識我就不寫了,很多其他部落格都可以查到。我主要寫幾點我在其他部落格沒有看到的東西以及我在實際開發中遇到的問題。最後我會貼上程式碼的地址。 1.需要設定2個或3個uuid。通常連線裝置後會得
android ble藍芽開發略解
Android 藍芽4.0開發 1、 許可權和相關屬性 “android:required="true"表示apk只有在具有bluetooth_le屬性的系統裡執行,這個4.3之前android系統沒有 <uses-featureandroid:name="and