Android典型介面設計——FragmentTabHost+Fragment實現底部tab切換
| 一、問題描述 |
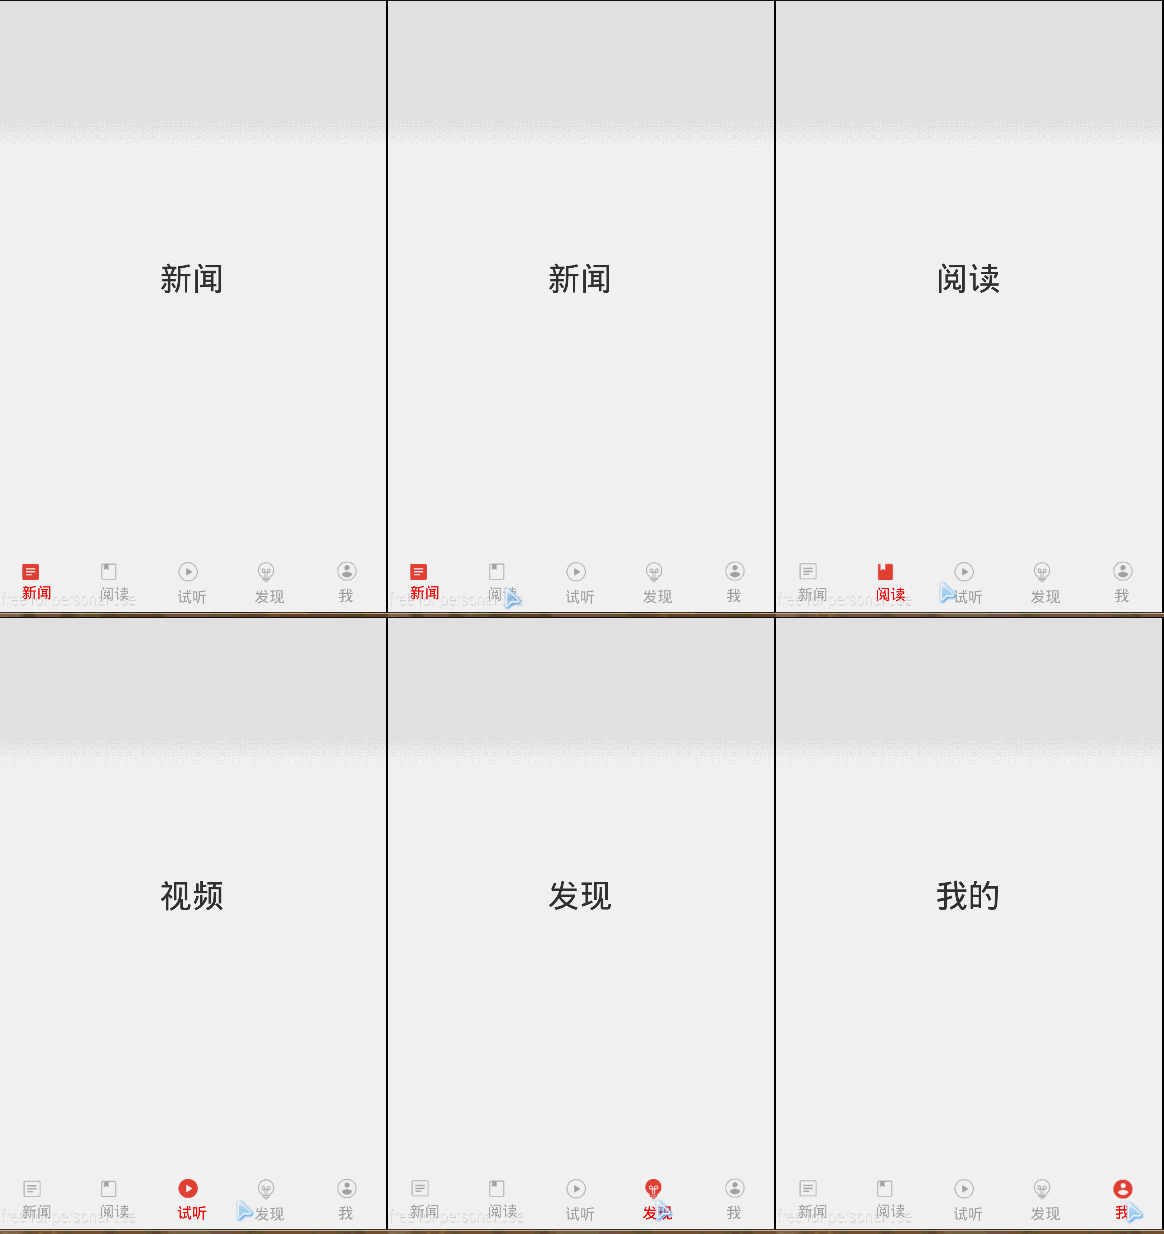
在上次博文中,我們使用RadioGroup+ViewPage+Fragmen實現了頂部滑動導航(檢視文章:http://www.cnblogs.com/jerehedu/p/4607599.html#dxjmsj ),接下來我們使用FragmentTabHost+Fragment實現底部tab切換,效果如圖所示

| 二、案例主要元件 |
1、MainActivity佈局
把整個Activity分成兩部TabHost和TabContent,TabHost包含各個tab,tab之間切換將在TabContent所關聯的FrameLayout區域中顯示各自板塊的內容
<LinearLayout xmlns:android="http://schemas.android.com/apk/res/android" xmlns:tools="http://schemas.android.com/tools" android:layout_width="match_parent" android:layout_height="match_parent" android:orientation="vertical" tools:context=".MainActivity" > <FrameLayoutandroid:id="@+id/contentLayout" android:layout_width="match_parent" android:layout_height="0dp" android:layout_weight="1"> </FrameLayout> <android.support.v4.app.FragmentTabHost android:id="@android:id/tabhost" android:layout_width="match_parent"android:layout_height="wrap_content" android:background="#F6F6F6" > <FrameLayout android:id="@android:id/tabcontent" android:layout_height="0dp" android:layout_width="0dp" /> </android.support.v4.app.FragmentTabHost> </LinearLayout>
2、MainActivity程式碼
public class MainActivity extends FragmentActivity
 implements OnTabChangeListener{
    private FragmentTabHost tabHost;
    @Override
    protected void onCreate(Bundle savedInstanceState) {
        super.onCreate(savedInstanceState);
        setContentView(R.layout.activity_main);
        tabHost=(FragmentTabHost)super.findViewById(android.R.id.tabhost);
        tabHost.setup(this,super.getSupportFragmentManager()
                ,R.id.contentLayout);
        tabHost.getTabWidget().setDividerDrawable(null);
        tabHost.setOnTabChangedListener(this);
        initTab();

    }
    private void initTab(){
        String tabs[]=TabDb.getTabsTxt();
        for(int i=0;i<tabs.length;i++){
            TabSpec tabSpec=tabHost.newTabSpec(tabs[i]).setIndicator(getTabView(i));
            tabHost.addTab(tabSpec,TabDb.getFragments()[i],null);
            tabHost.setTag(i);
        }
    }
    private View getTabView(int idx){
        View view=LayoutInflater.from(this).inflate(R.layout.footer_tabs,null);
        ((TextView)view.findViewById(R.id.tvTab)).setText(TabDb.getTabsTxt()[idx]);
        if(idx==0){
            ((TextView)view.findViewById(R.id.tvTab)).setTextColor(Color.RED);
    ((ImageView)view.findViewById(R.id.ivImg)).setImageResource(TabDb.getTabsImgLight()[idx]);
        }else{
            ((ImageView)view.findViewById(R.id.ivImg)).setImageResource(TabDb.getTabsImg()[idx]);
        }
        return view;
    }
    @Override
    public boolean onCreateOptionsMenu(Menu menu) {
        // Inflate the menu; this adds items to the action bar if it is present.
        getMenuInflater().inflate(R.menu.main, menu);
        return true;
    }
    @Override
    public void onTabChanged(String tabId) {
        // TODO Auto-generated method stub
        updateTab();
    }
    private void updateTab(){
        TabWidget tabw=tabHost.getTabWidget();
        for(int i=0;i<tabw.getChildCount();i++){
            View view=tabw.getChildAt(i);
            ImageView iv=(ImageView)view.findViewById(R.id.ivImg);
            if(i==tabHost.getCurrentTab()){
                ((TextView)view.findViewById(R.id.tvTab)).setTextColor(Color.RED);
                iv.setImageResource(TabDb.getTabsImgLight()[i]);
            }else{        ((TextView)view.findViewById(R.id.tvTab)).setTextColor(getResources().getColor(R.color.foot_txt_gray));
                iv.setImageResource(TabDb.getTabsImg()[i]);
            }

        }
    }

}
3、TabDb元件
提供介面設計所需的tab文字、tab圖片和Fragment型別資料
public class TabDb {
    public static String[] getTabsTxt(){
        String[] tabs={"新聞","閱讀","試聽","發現"," 我"};
        return tabs;
    }
    public static int[] getTabsImg(){
        int[] ids={R.drawable.foot_news_normal,R.drawable.foot_read_normal,R.drawable.foot_vdio_normal,R.drawable.foot_fond_normal,R.drawable.foot_out_normal};
        return ids;
    }
    public static int[] getTabsImgLight(){
        int[] ids={R.drawable.foot_news_light,R.drawable.foot_read_light,R.drawable.foot_vdio_light,R.drawable.foot_found_light,R.drawable.foot_out_light};
        return ids;
    }
    public static Class[] getFragments(){
        Class[] clz={NewsFragment.class,ReadFragment.class,VideoFragment.class,FoundFragment.class,OwnerFragment.class};
        return clz;
    }
}
4、每個tab各自對應的Fragment元件
共5個Fragment為NewsFragment、ReadFragment、FoundFragment、OwnerFragment、VideoFragment,根據不同板塊各自設計介面,這裡重點是如何實現底部tab切換,簡單佈局一下即可,以NewsFragment為例程式碼如下:
public class NewsFragment extends Fragment {
    @Override
    public void onAttach(Activity activity) {
        // TODO Auto-generated method stub
        super.onAttach(activity);
    }
    @Override
    public View onCreateView(LayoutInflater inflater, ViewGroup container,
            Bundle savedInstanceState) {
        // TODO Auto-generated method stub
        TextView tvTitle=new TextView(super.getActivity());
        tvTitle.setText("新聞");
        tvTitle.setLayoutParams(new LayoutParams(LayoutParams.MATCH_PARENT,LayoutParams.MATCH_PARENT));
        tvTitle.setGravity(Gravity.CENTER);
        tvTitle.setTextSize(30);
        return tvTitle;
    }
    @Override
    public void setArguments(Bundle args) {
        // TODO Auto-generated method stub
        super.setArguments(args);
    }

}
5、tab佈局樣式(footer_tabs.xml)
<?xml version="1.0" encoding="utf-8"?>
<RelativeLayout xmlns:android="http://schemas.android.com/apk/res/android"
    android:layout_width="fill_parent"
    android:layout_height="wrap_content"
    android:gravity="center"
    android:padding="5dp"
    android:background="#F6F6F6"
    >
    <ImageView
        android:id="@+id/ivImg"
        android:layout_width="wrap_content"
        android:layout_height="wrap_content"
        android:layout_alignParentLeft="true"
        android:layout_alignParentTop="true"
       />
    <TextView
        android:id="@+id/tvTab"
        android:layout_width="wrap_content"
        android:layout_height="wrap_content"
        android:layout_alignParentLeft="true"
        android:layout_below="@+id/ivImg"
          android:textColor="#AEAEAE"
        android:text="新聞" android:layout_marginTop="2dp"/>
想要了解更多內容的小夥伴,可以點選檢視原始碼,親自執行測試。
疑問諮詢或技術交流,請加入官方QQ群: (452379712)
出處:
本文版權歸煙臺傑瑞教育科技有限公司和部落格園共有,歡迎轉載,但未經作者同意必須保留此段宣告,且在文章頁面明顯位置給出原文連線,否則保留追究法律責任的權利。
相關推薦
Android典型介面設計——FragmentTabHost+Fragment實現底部tab切換
一、問題描述 在上次博文中,我們使用RadioGroup+ViewPage+Fragmen實現了頂部滑動導航(檢視文章:http://www.cnblogs.com/jerehedu/p/4607599.html#dxjmsj ),接下來我們使用FragmentTabHost+F
Android典型介面設計——ViewPage+Fragment實現區域頂部tab滑動切換
public class MainActivity extends FragmentActivity implements OnPageChangeListener{ private ViewPager viewPager; private RadioGroup rgChannel=n
Android典型介面設計(4)——使用ActionBar+Fragment實現tab切換
public class TBActivity extends Activity { private ActionBar actionBar; protected void onCreate(Bundle savedInstanceState) { super.onC
Android典型介面設計(6)——ActionBar Tab+ViewPager+Fagment實現滑動導航
public class MachineFragment extends Fragment { private String title; public void setArguments(Bundle bundle) { title=bundle.getSt
Android典型介面設計(5)——使用SlidingMenu和DrawerLayout分別實現左右側邊欄
public class MainActivity extends Activity { private DrawerLayout drawerLayout; private ActionBarDrawerToggle toggle; private ActionBar ac
Android典型介面設計(3)——訪網易新聞實現雙導航tab切換
public class NewsFragment extends Fragment implements OnPageChangeListener { private View view=null; private RadioGroup rgChannel=null; p
Android典型介面設計(8) ——ViewPager+PagerSlidingTabStrip實現雙導航
public class NewsFragment extends Fragment { @Override public void onAttach(Activity activity) { super.onAttach(activity); }
Android典型介面設計(7) ——DrawerLayout+Fragement+ViewPager+PagerTabStrip實現雙導航
public class MainActivity extends ActionBarActivity implements OnItemClickListener{ private DrawerLayout drawerLayout; private ActionBarDrawe
Android 仿微信介面 使用RadioGroup+ViewPager實現底部按鈕切換以及滑動
先來效果圖哈哈 和hide()來切換以保持Fragment狀態
在android開發的佈局中,國內大量的使用底部選單,這個本來不符合android的規範,我個人是深惡痛絕的,但是產品是這樣設計的,也只能是這樣做了。在這篇部落格中,我將結合網上的資料以及自己的使用經驗來實現一個底部選單,解決了很多網友提出的各種問題,在文章中,
【Android】 FragmentTabHost+Fragment實現多標籤頁
Android TabHost多標籤頁幾乎是所有APP中必備的控制元件,如通迅錄的【撥號、通話記錄、聯絡人】,微信的【聊天、聯絡人、發現】,如下圖 Android API13之後官方就不推薦使用TabActivity了,取而代之的是FragmentActivity+F
Android利用碎片fragment實現底部標題欄(Github模板開源)
在安卓開發當中,一個十分重要的佈局則是底部標題欄了,擁有了底部標題欄,我們就擁有了整個軟體UI開發的框架,一般而言,整個軟體的佈局首先就是從底部標題欄開始構建,然後再開始其他模組的編寫,組成一個完善的軟體,那麼如何才能夠編寫一個底部標題欄呢,我這裡使用了碎片來實現,當然是碎片的動態載入的方式,靜態載入的話則不
Android使用者介面設計
View 檢視 佔據螢幕上的一塊矩形區域,負責提供元件繪製和事件處理的方法。Android 比喻成窗戶,每塊玻璃就是一個 view。 View 類是所有UI元件的基類,位於 android.view 包中;文字框元件 TextView 是 View 類的子類,位於 android.widget 包
Android 使用者介面設計之TextView
5.富文字 先說一下什麼是富文字,富文字就是對文字中一些特殊文字或者圖片的特殊顯示。例如我們我們發一段話“你還沒有還我100塊錢。”這句話我們要強調“100塊錢”這是後我們可以把它顯示為特殊的顏色,這其實就是一種富文字。有時候我們QQ聊天經常發表情,其實這也是一種富文字。富文字
Android 使用者介面設計之EditText
layout佈局檔案中相應的EditText要新增如下語句: android:password="true" 結果: 輸入限制 控制輸入的內容,例如我們要定義一個輸入手機號的輸入框,這是我們就不允許輸入字母或者漢字,我們只允
關於用FragmentTabHost的實現底部導航欄的一些注意的地方~
參考程式碼出處:http://blog.csdn.net/yangyu20121224/article/details/9016223 其中有些地方用的不是太明白,自己在Demo中好好好折騰了下,算是弄白了一些沒看懂得東西,現在記下來,以便備忘~ 一:改進後的專案效果圖: 自
TabLayout+ViewPager+Fragment實現底部導航
MainActivity extends AppCompatActivity { private TabLayout mTabLayout; //Tab 文字 private final int[] TAB_TITLES = new int[]{R.string.weixin,R.string.con
Android使用者介面設計之建立列表檢視程式
列表檢視(ListView)是Android平臺下用於顯示不定數量的資料最有用的檢視控制元件之一。在這個教程中,我們將向你展示如何使用ListView來瀏覽文章列表。 在之前的文章中,你看到了許多關於不同佈局控制元件的教程。應用程式本身非常簡單:它將顯示文章標題列表,當
Fragment實現底部選項卡切換效果
現在很多APP的樣式都是底部選項卡做為首頁的,實現這樣的效果,我們一般有這樣幾種方式,第一,最屌絲的做法,我直接自定義選項卡檢視,通過監聽選項卡檢視,邏輯控制內容頁的切換,這樣做的想法一般是反正這幾個介面基本都是常駐記憶體的,不用去關心它的快取和回收。第二種,用TabHos
Android通過介面回撥來實現資料更新(Kotlin版)
最近開發一個專案,用的是kotlin,本人kotlin水平有限,還請諒解,需要在fragment修改資料,然後更新到activity中,我使用介面回撥來完成這個需求。 先上一張圖來看一下 修改完暱稱,不僅要在fragment裡更新資料,還要同步更新act
