
elasticsearch實戰三部曲之二:文件操作
本文是《elasticsearch實戰三部曲》系列的第二篇,上一篇文章我們動手熟悉了索引相關的基本操作,現在一起來熟悉文件相關的操作;
系列文章連結
環境資訊
- 本次實戰用到的elasticsearch版本是6.5.4,安裝在Ubuntu 16.04.5 LTS,客戶端工具是postman6.6.1;
- 如果您需要搭建elasticsearch環境,請參考《Linux環境快速搭建elasticsearch6.5.4叢集和Head外掛》;
基本情況介紹
本次實戰的elasticsearch環境以及搭建完畢,是由兩個機器搭建的叢集,並且elasticsearch-head也搭建完成:
- 一號機器,IP地址:192.168.119.152;
- 二號機器:IP地址:192.168.119.153;
- elasticsearch-head安裝在一號機器,訪問地址:http://192.168.119.152:9100
- 已經建立了索引test001;
資料格式說明
為了便於和讀者溝通,我們來約定一下如何在文章中表達請求和響應的資訊:
- 假設通過Postman工具向伺服器傳送一個PUT型別的請求,地址是:http://192.168.119.152:9200/test001/article/1
- 請求的內容是JSON格式的,內容如下:
{
	“id”:1,
	"title":"標題a",
	"posttime":"2019-01-12",
	"content":"一起來熟悉文件相關的操作"
}
對於上面的請求,我在文章中就以如下格式描述:
PUT test001/article/1

{
	“id”:1,
	"title":"標題a",
	"posttime":"2019-01-12",
	"content":"一起來熟悉文件相關的操作"
}
讀者您看到上述內容,就可以在postman中發起PUT請求,地址是"test001/article/1"前面加上您的伺服器地址,內容是上面的JSON;
新建文件
在索引test001下建立一個文件,型別是article,id為1:
PUT test001/article/1

{
	"id":1,
	"title":"標題a",
	"posttime":"2019-01-12",
	"star":100,
	"content":"一起來熟悉文件相關的操作"
}
收到返回碼201,body內容如下,可見version為1:
{
    "_index": "test001",
    "_type": "article",
    "_id": "1",
    "_version": 1,
    "result": "created",
    "_shards": {
        "total": 2,
        "successful": 2,
        "failed": 0
    },
    "_seq_no": 2,
    "_primary_term": 3
}
查詢文件
根據id查詢剛剛建立的那一條文件:
GET test001/article/1
收到返回碼200,body內容如下,索引、型別、id、版本號等全部返回了:
{
    "_index": "test001",
    "_type": "article",
    "_id": "1",
    "_version": 1,
    "found": true,
    "_source": {
        "id": 1,
        "title": "標題a",
        "posttime": "2019-01-12",
        "star": 100,
        "content": "一起來熟悉文件相關的操作"
    }
}
如果查詢的文件不存在,返回碼為400,返回內容如下:
{
    "_index": "test001",
    "_type": "article",
    "_id": "11",
    "found": false
}
檢查文件是否存在
HEAD test001/article/1
該請求的響應沒有body,只有返回碼,存在時返回200,不存在返回404
根據id一次獲取多個文件(_mget命令)
一次查詢三條記錄,id為1和2的記錄真實存在,id為999的記錄不存在,請求報文如下:
GET test001/_mget

{
	"docs":[
		{
			"_id":"1"
		},
		{
			"_id":"2"
		},
		{
			"_id":"999"
		}
	]
}
返回內容如下所示,可見id為999的記錄,found欄位為false,表示不存在:
{
    "docs": [
        {
            "_index": "test001",
            "_type": "article",
            "_id": "1",
            "_version": 1,
            "found": true,
            "_source": {
                "id": 1,
                "title": "標題a",
                "posttime": "2019-01-12",
                "star": 100,
                "content": "一起來熟悉文件相關的操作"
            }
        },
        {
            "_index": "test001",
            "_type": "article",
            "_id": "2",
            "_version": 1,
            "found": true,
            "_source": {
                "id": 2,
                "title": "標題b",
                "posttime": "2019-01-13",
                "star": 20,
                "content": "Ubuntu16安裝nodejs10"
            }
        },
        {
            "_index": "test001",
            "_type": null,
            "_id": "999",
            "found": false
        }
    ]
}
根據id一次獲取多個文件(元欄位_id)
除了使用_mget命令,還可以通過_search命令的方式,以元欄位"_id"作為搜尋條件,一次獲取多個文件:
GET test001/_search

{
	"query":{
		"terms":{"_id":["1", "2"]}
	}
}
返回碼200表示成功,body是搜尋結果:
{
    "took": 20,
    "timed_out": false,
    "_shards": {
        "total": 5,
        "successful": 5,
        "skipped": 0,
        "failed": 0
    },
    "hits": {
        "total": 2,
        "max_score": 1,
        "hits": [
            {
                "_index": "test001",
                "_type": "article",
                "_id": "2",
                "_score": 1,
                "_source": {
                    "id": 2,
                    "title": "標題b",
                    "posttime": "2019-01-13",
                    "content": "elasticsearch實戰三部曲之二"
                }
            },
            {
                "_index": "test001",
                "_type": "article",
                "_id": "1",
                "_score": 1,
                "_source": {
                    "id": 1,
                    "title": "標題1",
                    "posttime": "2019-01-13",
                    "content": "Flink消費kafka訊息實戰"
                }
            }
        ]
    }
}
更新文件(doc方式)
對於id為1的文件,如果要更新其title欄位,請求報文如下,根節點名為"doc",可以對指定欄位進行替換:
POST test001/article/1/_update

{
 "doc":{
 	"title":"abc"
 }
}
更新成功後,返回碼200,返回body:
{
    "_index": "test001",
    "_type": "article",
    "_id": "1",
    "_version": 4,
    "result": "updated",
    "_shards": {
        "total": 2,
        "successful": 2,
        "failed": 0
    },
    "_seq_no": 5,
    "_primary_term": 3
}
更新文件(指令碼方式)
還有一種更新文件的方式是提交一段elasticsearch支援的指令碼,如下所示,“lang”:"painless"表示指令碼語言型別為painless,params的內容就是入參,inline的值就是指令碼的內容,表示將star欄位的值增加100:
POST test001/article/1/_update

{
 "script":{
 	"inline":"ctx._source.star += params.star",
 	"lang":"painless",
 	"params":{
 		"star":100
 	}
 }
}
執行成功的返回碼200,報文:
{
    "_index": "test001",
    "_type": "article",
    "_id": "1",
    "_version": 6,
    "result": "updated",
    "_shards": {
        "total": 2,
        "successful": 2,
        "failed": 0
    },
    "_seq_no": 7,
    "_primary_term": 3
}
查詢更新
前面介紹的更新都是指定id的,有的時候我們需要用其他欄位查詢並更新,例如查詢title等於"abc"的記錄,將其content欄位更新為"123456":
POST test001/_update_by_query

{
 "script":{
 	"inline":"ctx._source.content = '123456'",
 	"lang":"painless"
 },
 "query":{
 	"term":{"title":"abc"}
 }
}
收到返回碼200,body內容如下:
{
    "took": 48,
    "timed_out": false,
    "total": 1,
    "updated": 1,
    "deleted": 0,
    "batches": 1,
    "version_conflicts": 0,
    "noops": 0,
    "retries": {
        "bulk": 0,
        "search": 0
    },
    "throttled_millis": 0,
    "requests_per_second": -1,
    "throttled_until_millis": 0,
    "failures": []
}
刪除文件(指定ID)
DELETE test001/article/2
刪除成功返回碼200,body如下:
{
    "_index": "test001",
    "_type": "article",
    "_id": "2",
    "_version": 2,
    "result": "deleted",
    "_shards": {
        "total": 2,
        "successful": 2,
        "failed": 0
    },
    "_seq_no": 3,
    "_primary_term": 2
}
刪除文件(帶查詢條件)
如果想刪除title欄位等於"abc"的文件:
DELETE test001

{
 "query":{
 	"term":{"title":"abc"}
 }
}
刪除成功返回碼200,body如下:
{
    "acknowledged": true
}
同樣的操作再試一次,就會返回404錯誤,因為記錄已經不存在了;
批量操作
要新增多個文件,可以將內容寫入json檔案,再通過批量操作的介面,將資料一次性POST;
- 首先建立一個名為book.json的檔案,內容如下:
{"index":{ "_index": "books", "_type": "IT", "_id": "1" }}
{"id":"1","title":"Java程式設計思想","language":"java","author":"Bruce Eckel","price":70.20,"publish_time":"2007-10-01","description":"Java學習必讀經典,殿堂級著作!贏得了全球程式設計師的廣泛讚譽。"}
{"index":{ "_index": "books", "_type": "IT", "_id": "2" }}
{"id":"2","title":"Java程式效能優化","language":"java","author":"葛一鳴","price":46.50,"publish_time":"2012-08-01","description":"讓你的Java程式更快、更穩定。深入剖析軟體設計層面、程式碼層面、JVM虛擬機器層面的優化方法"}
{"index":{ "_index": "books", "_type": "IT", "_id": "3" }}
{"id":"3","title":"Python科學計算","language":"python","author":"張若愚","price":81.40,"publish_time":"2016-05-01","description":"零基礎學python,光碟中作者獨家整合開發winPython執行環境,涵蓋了Python各個擴充套件庫"}
{"index":{ "_index": "books", "_type": "IT", "_id": "4" }}
{"id":"4","title":"Python基礎教程","language":"python","author":"Helant","price":54.50,"publish_time":"2014-03-01","description":"經典的Python入門教程,層次鮮明,結構嚴謹,內容翔實"}
{"index":{ "_index": "books", "_type": "IT", "_id": "5" }}
{"id":"5","title":"JavaScript高階程式設計","language":"javascript","author":"Nicholas C. Zakas","price":66.40,"publish_time":"2012-10-01","description":"JavaScript技術經典名著"}
如上所示,第一行指定了索引、型別、id等基本資訊,第二行就是該記錄的各個欄位的內容;
2. 如果您的電腦可以使用curl命令,那麼在book.json檔案所在資料夾下面執行此命令即可提交:
curl -XPOST "http://192.168.119.152:9200/_bulk?pretty" -H 'Content-Type: application/json' --data-binary @books.json
-
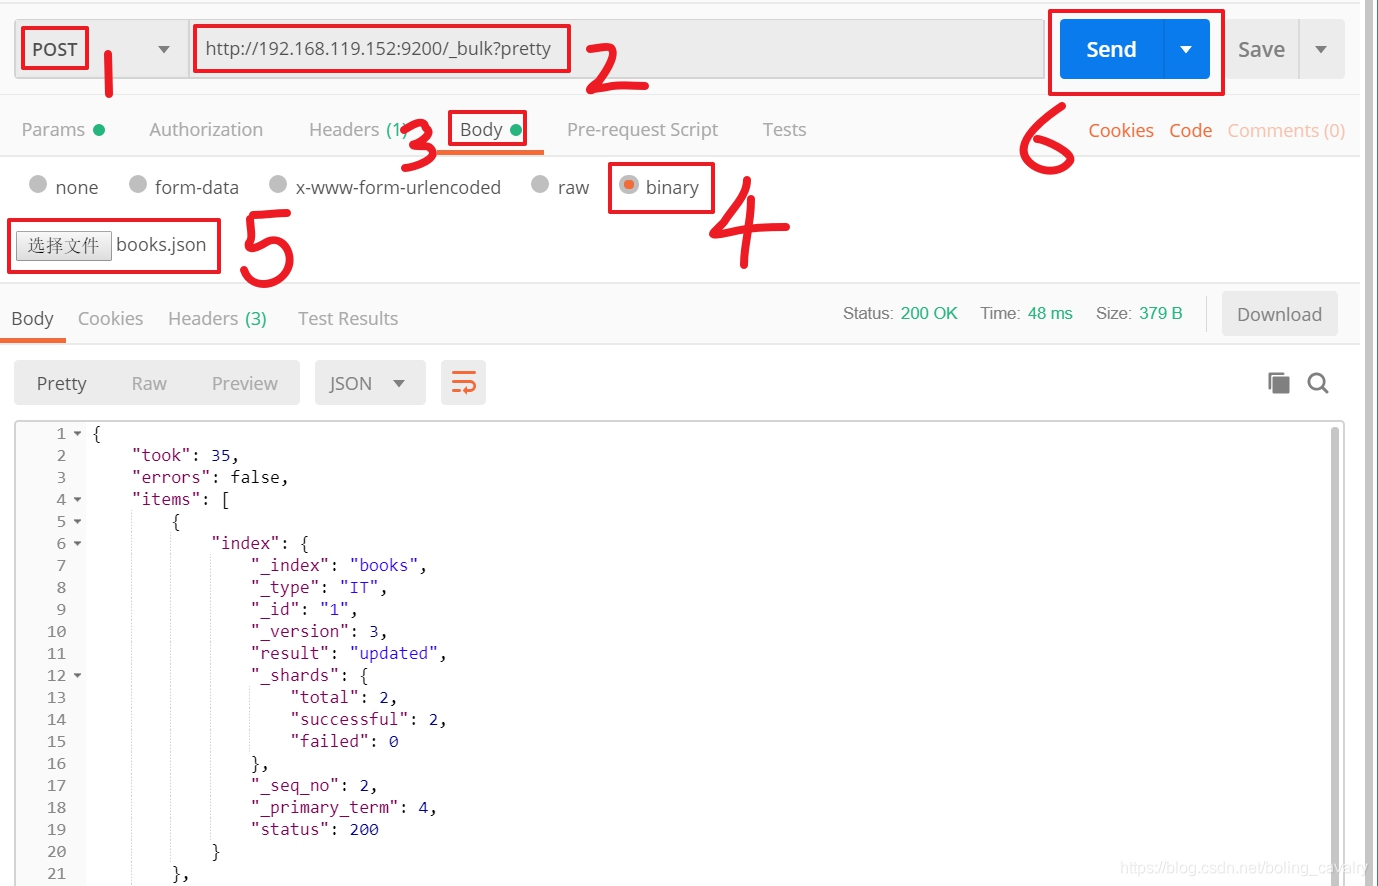
如果您在使用postman軟體,請按下圖方式提交,請注意操作步驟遵循圖中的1到6的順序,url地址是:_bulk?pretty
-
批量資料提交後,用head可見新增了一個索引,下面有5條記錄,如下圖:

至此,和文件有關的基本操作實戰已經完成了,接下來的文章中,我們會進行搜尋相關的實戰;
注意:文中用到的book.json檔案,來自實體書《從Lucene到Elasticsearch全文檢索實戰》提供的線上下載原始碼包中的內容,感謝姚攀大師精心準備的用例和資料,如果您認為我文章中使用的資料有侵權行為,請及時告知我,我會第一時間刪除,我的郵箱:[email protected]