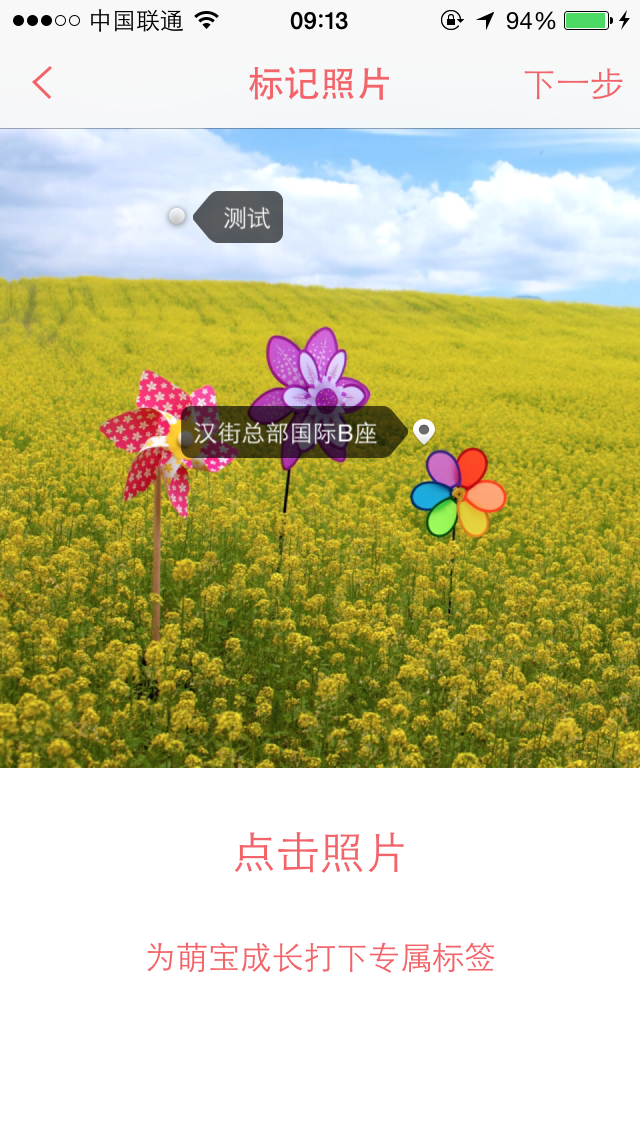
iOS給圖片加標籤(原創)
現在越來越多涉及到圖片展示的應用都會加入標籤功能,標籤功能也越來越流行。想起以前做過的一個專案用到過這個功能,所以趁有時間,整理一下,僅供參考,不足之處還請多多指教。
1、標記介面
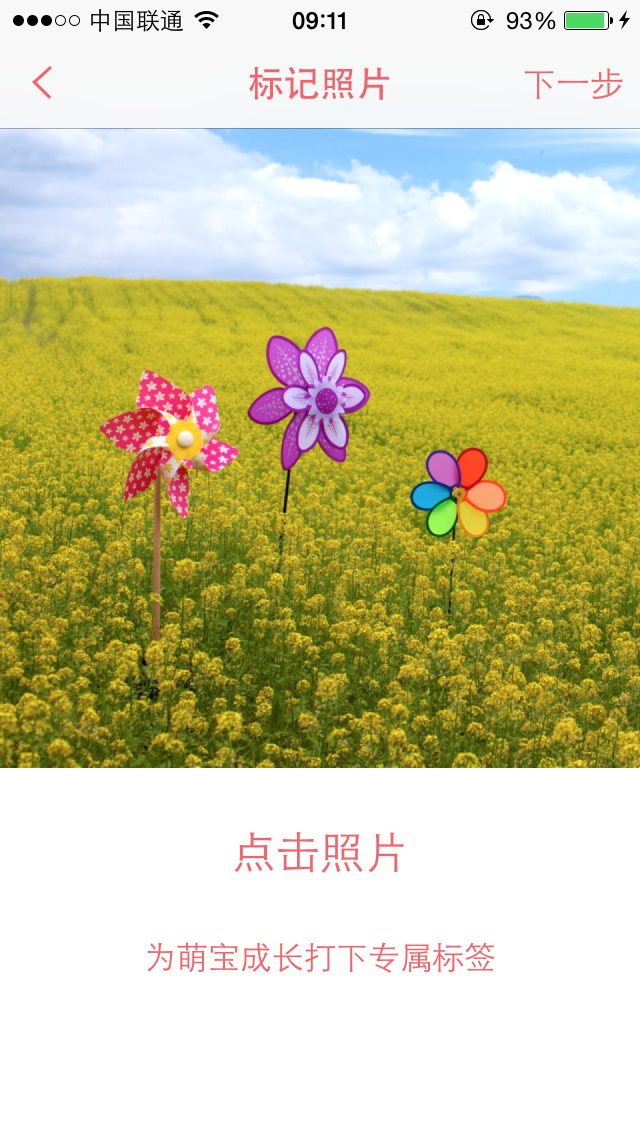
這個介面放一個UIImageView,寬高比例1:1。進入這個介面之前,圖片建議是裁剪成1:1,這個比例有利於標籤的展示。這個介面程式碼就不用展示了。
還有給這個UIImageView加入一個點選事件,記得設定userInteractionEnabled = YES。
2、加標籤按鈕
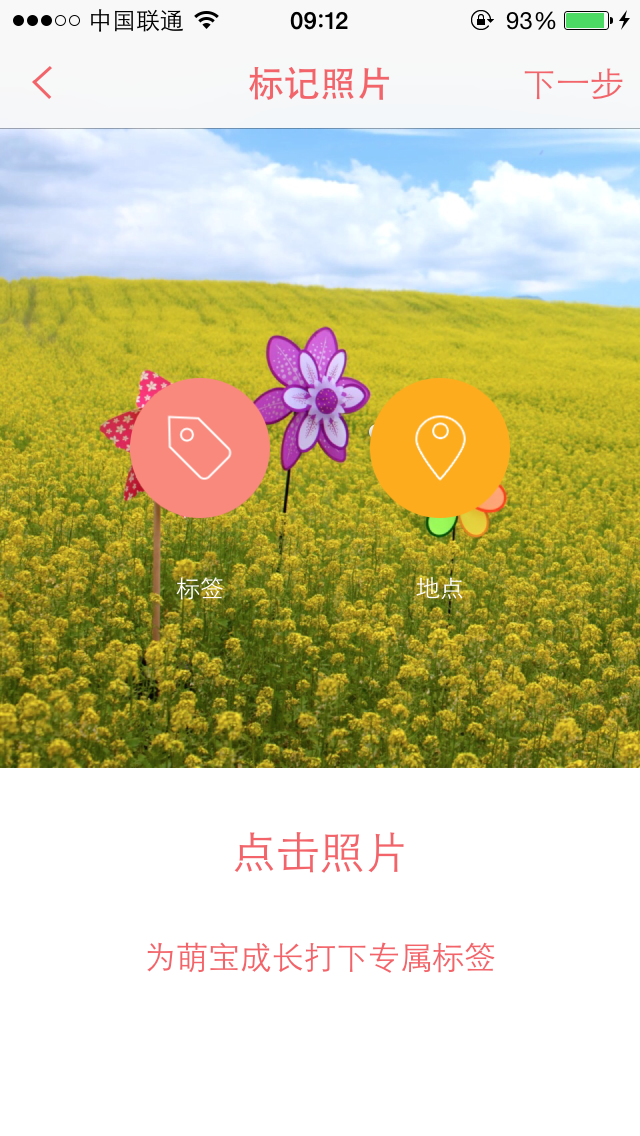
我們專案中是將標籤分為兩類,文字標籤和地理位置標籤,基本上是相同的。按鈕的佈局可以參考我的,也可以自定義。
- (void)setupButton { CGFloat btnWH = 70 CGFloat btnMargin = 50 UIButton *textBtn = [[UIButton alloc] initWithFrame:CGRectMake((screenW - btnWH * 2 - btnMargin) * 0.5, -btnWH, btnWH, btnWH)]; [textBtn setImage:[UIImage imageNamed:@"addtag"] forState:UIControlStateNormal]; [textBtn setImage:[UIImage imageNamed:@"addtag_selected"] forState:UIControlStateSelected]; [textBtn addTarget:self action:@selector(clickText) forControlEvents:UIControlEventTouchUpInside]; [self.view addSubview:textBtn]; self.textBtn = textBtn; UILabel *textLabel = [[UILabel alloc] init]; textLabel.frame= (CGRect){{textBtn.frame.origin.x, CGRectGetMaxY(textBtn.frame)}, textBtn.frame.size}; textLabel.text = @"標籤"; textLabel.textAlignment = NSTextAlignmentCenter; textLabel.textColor = [UIColor whiteColor]; textLabel.font = [UIFont systemFontOfSize:12]; [self .view addSubview:textLabel]; self.textLabel = textLabel; UIButton *locationBtn = [[UIButton alloc] initWithFrame:CGRectMake(textBtn.frame.origin.x + btnWH + btnMargin, -btnWH, btnWH, btnWH)]; [locationBtn setImage:[UIImage imageNamed:@"addtaglocation"] forState:UIControlStateNormal]; [locationBtn setImage:[UIImage imageNamed:@"addtaglocation_selected"] forState:UIControlStateSelected]; [locationBtn addTarget:self action:@selector(clickLocation) forControlEvents:UIControlEventTouchUpInside]; [self.view addSubview:locationBtn]; self.locationBtn = locationBtn; UILabel *locationLabel = [[UILabel alloc] init]; locationLabel.frame = (CGRect){{locationBtn.frame.origin.x, CGRectGetMaxY(locationBtn.frame)}, locationBtn.frame.size}; locationLabel.text = @"地點"; locationLabel.textAlignment = NSTextAlignmentCenter; locationLabel.textColor = [UIColor whiteColor]; locationLabel.font = [UIFont systemFontOfSize:12]; [self .view addSubview:locationLabel]; self.locationLabel = locationLabel; }
好了,定義好這兩個按鈕,其實是看不見的。因為我們做了一個效果,當點選圖片,按鈕會蹦出來,當再點選圖片,按鈕會蹦回去。在這個過程,我只是做了簡單的平移動畫,從上到下出現。有興趣的可以自己定義動畫(比如彈簧效果)。
點選圖片的響應方法
- (void)clickimage:(UITapGestureRecognizer *)sender
{
    //記得定義成員變數isClick用來判斷是否點選圖片,初始化為NO
    if (self.isClick) {
        //如果有點選圖片,讓按鈕消失
        self.isClick = NO;

        //按鈕消失動畫
        [UIView animateWithDuration:1.0 animations:^{
            self.textBtn.frame = CGRectMake((screenW - btnWH * 2 - btnMargin) * 0.5, -btnWH, btnWH, btnWH);
            self.locationBtn.frame = CGRectMake(self.textBtn.frame.origin.x + btnWH + btnMargin, -btnWH, btnWH, btnWH);
            self.textLabel.frame = (CGRect){{self.textBtn.frame.origin.x, CGRectGetMaxY(self.textBtn.frame) + 5}, self.textBtn.frame.size};
            self.locationLabel.frame = (CGRect){{self.locationBtn.frame.origin.x, CGRectGetMaxY(self.locationBtn.frame) + 5}, self.locationBtn.frame.size};
        }];
    } else {
        //如果沒有點選圖片,讓按鈕出現。此時就是使用者開始進行新增標籤過程
        self.isClick = YES;

        //記錄下使用者點選的位置,點選的位置就是所新增標籤的位置。
        CGPoint point = [sender locationInView:self.imageview];
        //用成員變數儲存點選的位置
        self.clickpoint = point;
        //用小圓圈圖片做一個標記,讓使用者知道自己點了哪裡。
        UIImageView *pointView = [[UIImageView alloc] initWithFrame:CGRectMake(point.x, point.y, 15, 15)];
        pointView.image = [UIImage imageNamed:@"tagpoint"];
        pointView.tag = 1001;
        [self.imageview addSubview:pointView];
        //按鈕出現動畫
        [UIView animateWithDuration:1.0 animations:^{
                self.textBtn.frame = CGRectMake((screenW - btnWH * 2 - btnMargin) * 0.5, (screenW - btnWH) * 0.5 + 64, btnWH, btnWH);
                self.locationBtn.frame = CGRectMake(self.textBtn.frame.origin.x + btnWH + btnMargin, (screenW - btnWH) * 0.5 + 64, btnWH, btnWH);
                self.textLabel.frame = (CGRect){{self.textBtn.frame.origin.x, CGRectGetMaxY(self.textBtn.frame)}, self.textBtn.frame.size};
                self.locationLabel.frame = (CGRect){{self.locationBtn.frame.origin.x, CGRectGetMaxY(self.locationBtn.frame)}, self.locationBtn.frame.size};
        }];
    }
}
3、響應按鈕點選
- (void)clickText
{
//將狀態變成未點選
    self.isClick = NO;

    [UIView animateWithDuration:0.3 animations:^{
        self.textBtn.frame = CGRectMake((screenW - btnWH * 2 - btnMargin) * 0.5, -btnWH, btnWH, btnWH);
        self.locationBtn.frame = CGRectMake(self.textBtn.frame.origin.x + btnWH + btnMargin, -btnWH, btnWH, btnWH);
        self.textLabel.frame = (CGRect){{self.textBtn.frame.origin.x, CGRectGetMaxY(self.textBtn.frame) + 5}, self.textBtn.frame.size};
        self.locationLabel.frame = (CGRect){{self.locationBtn.frame.origin.x, CGRectGetMaxY(self.locationBtn.frame) + 5}, self.locationBtn.frame.size};
    }];
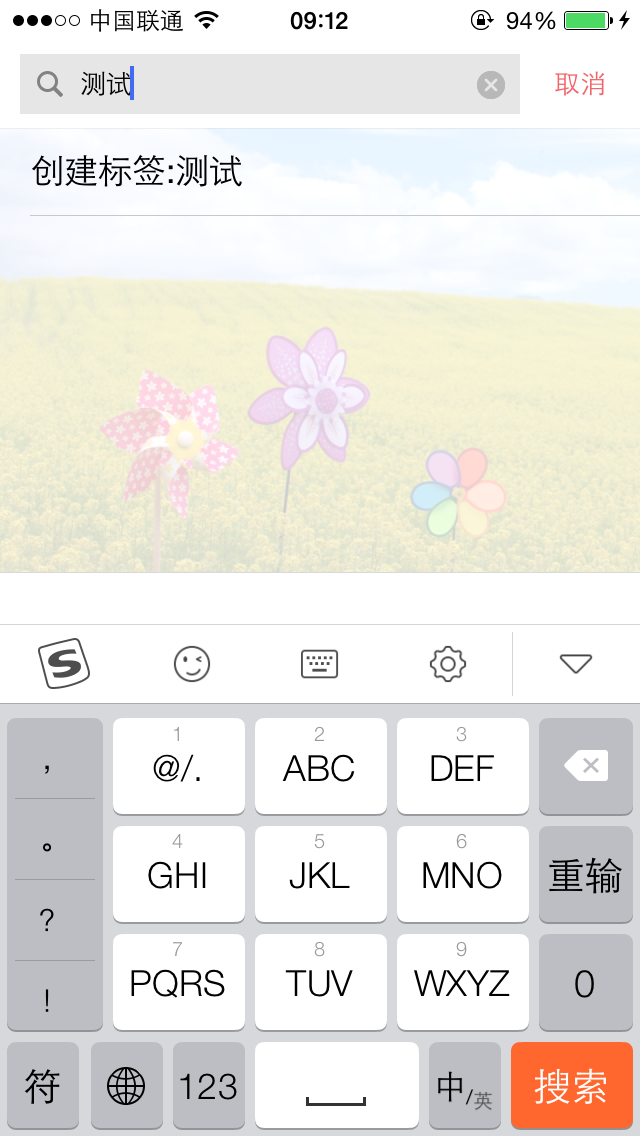
//自定義一個新增文字的View,如下圖所示。
    UIWindow *windows = [UIApplication sharedApplication].keyWindow;
    LMAddTextTagView *addtext = [[LMAddTextTagView alloc] init];
    addtext.delegate = self;
    addtext.frame = [UIScreen mainScreen].bounds;
    addtext.tagListArray = self.taglistArray;
    [windows addSubview:addtext];
}
在這個介面,使用者可以自己建立標籤文字。這個介面並不難,新增好後,將文字傳到新增標籤介面,通過代理就可以實現,不貼程式碼了。
4、封裝標籤資訊並顯示標籤
這裡我們定義了兩個實體類,LMTagInfo和LMTagFrameInfo。前一個封裝了標籤資訊,後一個封裝了標籤子控制元件的frame資訊。
//
//  LMTagInfo.h
//  辣媽萌寶
#import <Foundation/Foundation.h>

@interface LMTagInfo : NSObject

@property(nonatomic, assign)CGFloat tagX;
@property(nonatomic, assign)CGFloat tagY;
/**
 0表示文字標籤
 1表示位置標籤
 **/
@property(nonatomic, assign)int tagType;
@property(nonatomic, copy)NSString *tagText;

@end
//
//  LMTagFrameInfo.h
//  辣媽萌寶
#import <Foundation/Foundation.h>

@class LMTagInfo;
@interface LMTagFrameInfo : NSObject
@property(nonatomic, strong)LMTagInfo *tagInfo;

/**
 整個View
 **/
@property(nonatomic, assign)CGRect viewF;
/**
 logoView
 **/
@property(nonatomic, assign)CGRect logoViewF;
/**
 文字按鈕
 **/
@property(nonatomic, assign)CGRect textButtonF;
/**
 文字
 **/
@property(nonatomic, assign)CGRect textLabelF;
/**
 左右判斷
 **/
@property(nonatomic, assign)int isRight;
根據標籤資訊算好標籤的Frame
//
//  LMTagFrameInfo.m
//  辣媽萌寶

#import "LMTagFrameInfo.h"
#import "LMTagInfo.h"

#define pointWH 15
#define textBGW 22
#define textBGH  27

@implementation LMTagFrameInfo

- (void)setTagInfo:(LMTagInfo *)tagInfo
{
    _tagInfo = tagInfo;

    CGSize textSize = [tagInfo.tagText sizeWithAttributes:@{NSFontAttributeName:[UIFont systemFontOfSize:12]}];

    CGFloat viewX;
    CGFloat viewY = tagInfo.tagY - textBGH * 0.5;
    CGFloat viewW = textBGW + textSize.width + pointWH;
    CGFloat viewH = textBGH;

    CGFloat logoViewX;
    CGFloat logoViewWH = pointWH;
    CGFloat logoViewY = (viewH - logoViewWH) * 0.5;

    CGFloat textButtonX;
    CGFloat textButtonY = 0;
    CGFloat textButtonW = textBGW + textSize.width;
    CGFloat textButtonH = textBGH;

    CGFloat textLabelX;
    CGFloat textLabelY = (textButtonH - textSize.height) * 0.5;
    CGFloat textLabelW = textSize.width;
    CGFloat textLabelH = textSize.height;

    if (textSize.width + textBGW + pointWH + tagInfo.tagX >= screenW) {
        //文字朝左
        _isRight = 0;
        viewX = tagInfo.tagX - textSize.width - textBGW - pointWH * 0.5;
        logoViewX = textButtonW;
        textButtonX = 0;
        textLabelX = 0.3 * textBGW;
    } else {
        //文字朝右
        _isRight = 1;
        viewX = tagInfo.tagX - pointWH * 0.5;
        logoViewX = 0;
        textButtonX = logoViewWH;
        textLabelX = textButtonX + 0.7 *textBGW;
    }
    _viewF = CGRectMake(viewX, viewY, viewW, viewH);
    _logoViewF = CGRectMake(logoViewX, logoViewY, logoViewWH, logoViewWH);
    _textButtonF = CGRectMake(textButtonX, textButtonY, textButtonW, textButtonH);
    _textLabelF = CGRectMake(textLabelX, textLabelY, textLabelW, textLabelH);
}

@end
然後就是自定義標籤View
//
//  LMTagView.h
//  辣媽萌寶

#import <UIKit/UIKit.h>

@class LMTagFrameInfo;
@interface LMTagView : UIImageView
@property(nonatomic, strong)LMTagFrameInfo *tagFrameInfo;
//用來判斷這個標籤是否可以移動改變其位置
@property(nonatomic, assign)BOOL isTouch;
@end
//
//  LMTagView.m
//  辣媽萌寶

#import "LMTagView.h"
#import "LMTagFrameInfo.h"
#import "LMTagInfo.h"
#import "UIImage+MJ.h"
@interface LMTagView ()

@property(nonatomic, weak)UIImageView *logoView;
@property(nonatomic, weak)UIImageView *textButton;
@property(nonatomic, weak)UILabel *textLabel;
@property(nonatomic, weak)UIImageView *animationView;
@property(nonatomic, assign)CGPoint beginPoint;
@property(nonatomic, assign)CGPoint beginCenter;
@end

@implementation LMTagView

- (id)initWithFrame:(CGRect)frame
{
    self = [super initWithFrame:frame];
    if (self) {
        self.userInteractionEnabled = YES;
        self.backgroundColor = [UIColor clearColor];

        UIImageView *logoView = [[UIImageView alloc] init];
        [self addSubview:logoView];
        self.logoView = logoView;

        UIImageView *textButton = [[UIImageView alloc] init];
        textButton.userInteractionEnabled = YES;
        [self addSubview:textButton];
        self.textButton = textButton;

        UILabel *textLabel = [[UILabel alloc] init];
        textLabel.textColor = [UIColor whiteColor];
        textLabel.textAlignment = NSTextAlignmentCenter;
        textLabel.font = [UIFont systemFontOfSize:12];
        [self addSubview:textLabel];
        self.textLabel = textLabel;
    }
    return self;
}

- (void)setTagFrameInfo:(LMTagFrameInfo *)tagFrameInfo
{
    _tagFrameInfo = tagFrameInfo;

    LMTagInfo *tagInfo  = tagFrameInfo.tagInfo;

    self.logoView.frame = tagFrameInfo.logoViewF;
    if (tagInfo.tagType == 0) {
        self.logoView.image = [UIImage imageNamed:@"tagpoint"];
    } else {
        self.logoView.image = [UIImage imageNamed:@"taglocation"];
    }

    self.textButton.frame = tagFrameInfo.textButtonF;
    if (tagFrameInfo.isRight == 1) {
        self.textButton.image = [UIImage resizedImageWithName:@"tag_text_bg_left" left:0.7 top:0.5];
    } else {
        self.textButton.image = [UIImage resizedImageWithName:@"tag_text_bg_right" left:0.3 top:0.5];
    }

    self.textLabel.frame = tagFrameInfo.textLabelF;
    self.textLabel.text = tagInfo.tagText;

}


- (void)touchesBegan:(NSSet *)touches withEvent:(UIEvent *)event
{
    if (!self.isTouch) {
        return;
    }
    UITouch *touch = [touches anyObject];
    self.beginPoint = [touch locationInView:self];
    self.beginCenter = self.center;
}

- (void)touchesMoved:(NSSet *)touches withEvent:(UIEvent *)event
{
    if (!self.isTouch) {
        return;
    }
    UITouch *touch = [touches anyObject];

    CGPoint nowPoint = [touch locationInView:self];

    float offsetX = nowPoint.x - self.beginPoint.x;
    float offsetY = nowPoint.y - self.beginPoint.y;

    CGPoint newcenter = CGPointMake(self.center.x + offsetX, self.center.y + offsetY);

    float halfx = CGRectGetMidX(self.bounds);

    newcenter.x = MAX(halfx, newcenter.x);
    newcenter.x = MIN(self.superview.bounds.size.width - halfx, newcenter.x);

    float halfy = CGRectGetMidY(self.bounds);
    newcenter.y = MAX(halfy, newcenter.y);
    newcenter.y = MIN(self.superview.bounds.size.height - halfy, newcenter.y);

    self.center = newcenter;


}

- (void)touchesEnded:(NSSet *)touches withEvent:(UIEvent *)event
{
    if (!self.isTouch) {
        return;
    }
    self.tagFrameInfo.tagInfo.tagX += self.center.x - self.beginCenter.x;
    self.tagFrameInfo.tagInfo.tagY += self.center.y - self.beginCenter.y;
}
@end
好了,我們需要的資訊和view都定義好了,其中這個標籤新增好後,是可以拖拽它,更改它的位置。然後用到的圖片素材我會放到最後。
接著在控制器中響應新增標籤方法
- (void)addTextTagWith:(NSString *)tagtext
{
    LMTagInfo *tagInfo = [[LMTagInfo alloc] init];
    tagInfo.tagX = self.clickpoint.x;
    tagInfo.tagY = self.clickpoint.y;
    tagInfo.tagText = tagtext;

    tagInfo.tagType = 0;
    //addtagArray用於存放標籤資訊,因為標籤可能不止一個。
    [self.addtagArray addObject:tagInfo];

    LMTagFrameInfo *tagFrameInfo = [[LMTagFrameInfo alloc] init];
    tagFrameInfo.tagInfo = tagInfo;

    LMTagView *tagView = [[LMTagView alloc] init];
    tagView.userInteractionEnabled = YES;
    //同時點選標籤可以提示是否刪除此標籤,刪除方法中將tagInfo從addtagArray陣列中刪除然後再將tagView從superview刪除即可。
    UITapGestureRecognizer *tagtap = [[UITapGestureRecognizer alloc] initWithTarget:self action:@selector(clickDelete:)];
    [tagView addGestureRecognizer:tagtap];
    tagView.isTouch = YES;
    tagView.frame = tagFrameInfo.viewF;
    tagView.tagFrameInfo = tagFrameInfo;
    [self.imageview addSubview:tagView];
}
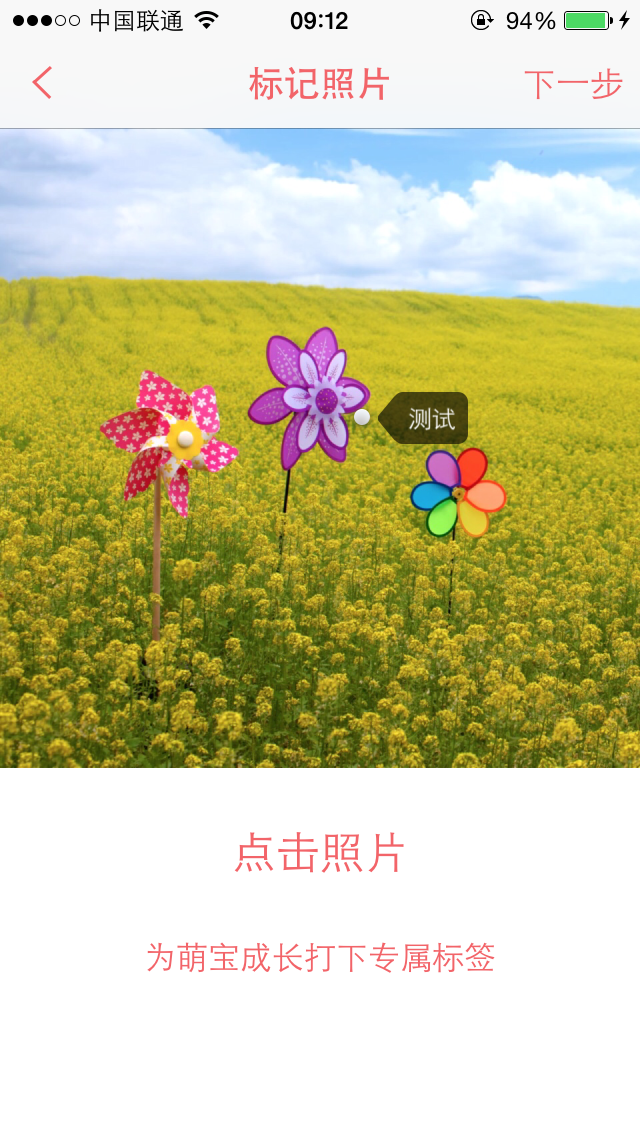
效果如圖所示
可以拖拽標籤改變其位置哦,嘿嘿。另外地理標籤同位置標籤一樣,將tagType設定為1就行了。
文字資訊建議使用高德地圖,可以獲取到使用者附近建築物地址,使用者選擇好,傳回地址文字資訊就行了。
5、提交資訊到伺服器。
需要伺服器端配合,我們做的標籤圖片,標籤資訊和圖片資訊是分開的,但需要一一對應。
6、用到的資源




![]()
![]()
![]()
![]()
#import "UIImage+MJ.h"

@implementation UIImage (MJ)
//用於拉伸圖片的分類
+ (UIImage *)resizedImageWithName:(NSString *)name
{
    return [self resizedImageWithName:name left:0.5 top:0.5];
}

+ (UIImage *)resizedImageWithName:(NSString *)name left:(CGFloat)left top:(CGFloat)top
{
    UIImage *image = [self imageNamed:name];
    return [image stretchableImageWithLeftCapWidth:image.size.width * left topCapHeight:image.size.height * top];
}
@end
相關推薦
iOS給圖片加標籤(原創)
現在越來越多涉及到圖片展示的應用都會加入標籤功能,標籤功能也越來越流行。想起以前做過的一個專案用到過這個功能,所以趁有時間,整理一下,僅供參考,不足之處還請多多指教。 1、標記介面 這個介面放一個UIImageView,寬高比例1:1。進入這個介面之前,圖片建議是裁剪成1:1,這個比例有利於標籤的
android影象處理系列之五--給圖片新增邊框(中)
分享一下我老師大神的人工智慧教程!零基礎,通俗易懂!http://blog.csdn.net/jiangjunshow 也歡迎大家轉載本篇文章。分享知識,造福人民,實現我們中華民族偉大復興!
android影象處理系列之六--給圖片新增邊框(下)-圖片疊加
分享一下我老師大神的人工智慧教程!零基礎,通俗易懂!http://blog.csdn.net/jiangjunshow 也歡迎大家轉載本篇文章。分享知識,造福人民,實現我們中華民族偉大復興!
android影象處理系列之四--給圖片新增邊框(上)
分享一下我老師大神的人工智慧教程!零基礎,通俗易懂!http://blog.csdn.net/jiangjunshow 也歡迎大家轉載本篇文章。分享知識,造福人民,實現我們中華民族偉大復興!
使用Javaswing自定義圖片作為按鈕(原創)
本人初學習Javaswing沒多久,剛開始找不到怎麼把圖片放在按鈕上,上網查詢資料都是涵蓋了在專案中的,自己摸索後才知道原來沒有那麼難。下面是我寫的例子: package com.iconButtonDemo; import javax.swing.ImageIcon; i
圓形圖片(或者給頭像加個描邊)CircleImageView的使用和分析
在專案開發中,我們經常需要用到圓形圖片效果,典型案例是使用者頭像的顯示。如圖所示。下面我們使用開源控制元件CircleImageView來實現該效果。CircleImageView專案下載地址:https://github.com/hdodenhof/CircleImageV
CentOS 6.4 添加永久靜態路由所有方法匯總(原創)
eth targe 失效 linux 2.0 href nbsp 無法自動 flag 轉摘,原文章地址:http://blog.sina.com.cn/s/blog_828e50020101ern5.html查看路由的命令route -n CentOS添加永久靜態路由
HTML學習筆記 CSS塊元素加偽類選擇器 第三節 (原創)
筆記 solid oct 元素 是否 選擇器 size set 區域 <!DOCTYPE html><html lang="en"><head> <meta charset="UTF-8"> <title&g
IDEA使用 live template添加groovy腳本給方法,類,js方法添加註釋(轉載)
templates ret 註釋 @class val confirm nts ide con IDEA添加Live Template: File->Setting->Editor->Live Templates Abbreviatio
IOS 可以連接 藍牙BLE設備,但是無法發現服務(原創)
支持 直接 flags 手機 ddr second color 一次 發現 註:轉載請標明文章來源,感謝支持作者勞動! 一、問題描述 用iphone手機上的nRF connect軟件調試藍牙通信。 1、nRF52藍牙demo電路板,燒錄一個SDK
js仿百度地圖拖拽、縮放、添加圖層功能(原創)
ets tle clas 火狐 相對 inner tlist posit css 最近項目中完成的需求,仿百度地圖中的功能: 要求:1.底層圖可以拖拽、縮放。 2.拖拽一個圖標,在底層圖上對應位置添加一個標註點,該標註點位置要隨底層圖移動。 3.添加的標註
給影象加噪聲(椒鹽噪聲)
原理:隨機的將影象某些畫素值改為0或255 新增椒鹽噪聲 def SaltAndPepper(src,percetage): SP_NoiseImg=src SP_NoiseNum=int(percetage*src.shape[0]*src.shape[1]) for i
通過獲取骨骼的Transform,給角色加配件(武器之類的。)
模型能攻擊,但手上沒武器,給角色加武器,通過程式碼實現用武器攻擊的效果 1.找到相應的武器模型,建立空物體weapon,把武器拖拽進去(之後最好放在角色的手的那層,之後比較好維護),在Scene中把武器位置調好。 原理:這裡主要是實現武器的Transform跟隨手關節的Transform
移動端tabbar按鈕滑動(給div加橫向滾動條)
手寫程式碼乾貨,已測試(請在移動端中開啟除錯) <!DOCTYPE html> <html> <head> <title>底部tabbar欄滑動</title> <script type="text/ja
給linnerLayout加邊框(可以只加底部)
先看圖: 很簡單給linnerlayout加邊框。border.xml 佈局如下: item 裡面上下左右的邊框可隨意更改。 <?xml version="1.0" encoding="utf-8"?> <layer-list xmlns:andro
6.5 使用CoreImage框架給圖片新增馬賽克效果 [原創iOS開發-Xcode教程]
1. 在歡迎視窗右側的歷史專案列表中,雙擊開啟之前建立的單檢視專案模板。 2. 本節課將為您演示,如何使用影象處理框架,給圖片新增畫素化濾鏡效果。首先在一個空白專案中,開啟檢視控制器的程式碼檔案。 3. 接著開始編寫程式碼,實現這項功能。 4. 首先匯入需要用到的框架。 5.
(原創)詳解Glide圖片載入庫常用方法
Glide作為安卓開發常用的圖片載入庫,有許多實用而且強大的功能,那麼,今天就來總結一番,這次把比較常見的都寫出來,但並不是全部哦。 在介紹之前,先來說說什麼是Glide吧: 在泰國舉行的谷歌開發
04-opencv移植-終極解決方案之buildroot檔案系統圖片測試(原創)
接前一篇《opencv移植–終極解決方案之buildroot編譯和核心配置(原創)》。 平臺:Exynos4412。 實驗平臺:iTOP-4412-精英版。 編譯平臺:Ubuntu12.04。 編譯器版本:arm-4.4.1,懶人直接用開發板自帶的。 buildroot版本:直接官網
iOS開發之靜態庫(三)—— 圖片、介面xib等資原始檔封裝到.a靜態庫
轉自:https://blog.csdn.net/mylizh/article/details/38707175編譯環境:Macbook Air + OS X 10.9.2 + XCode5.1 + iPhone5s(iOS7.0.3)一、首先將資原始檔打包成bundle新建
Windows下搭建git伺服器,簡潔版,伺服器端msysgit加copssh,客戶端msysgit(原創)
在看了網上各種攻略之後,自己在windows環境下還是遇到了各種各樣的問題,什麼permission deny啊等等,去網上找解決方案呢,尼瑪找不到一個適用的,在折騰了一天後,終於搞定,在這裡上傳一篇解決方案,為遇到同樣問題的人提供一個參考,願你看到後能少走一些

