SpringBoot中快速體驗快取(Cache)使用
一、基本專案搭建
測試專案是基於SpringBoot+Mybatis+Maven;
1、搭建基本環境,具體步驟如下:
(1)、新建資料庫,匯入資料庫檔案,創建出department和employee表;
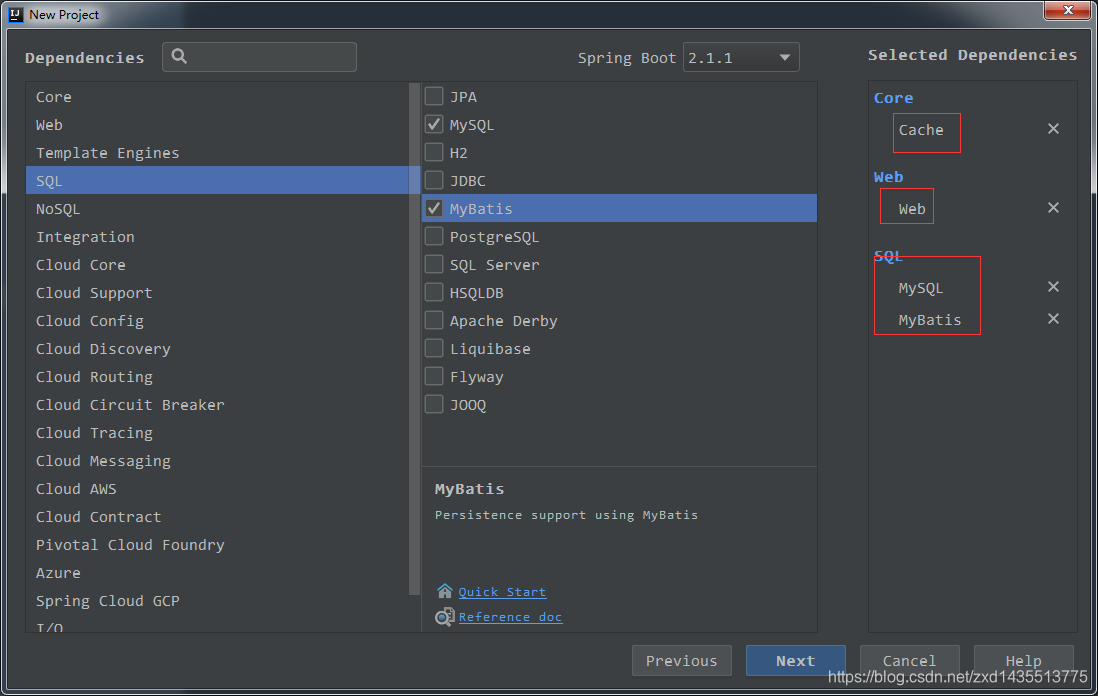
(2)、建立SpringBoot-cache工程,選擇具體模組,如下圖;

(3)、在pom.xml檔案中,加入cache依賴
<!-- https://mvnrepository.com/artifact/javax.cache/cache-api -->
<dependency>
<groupId>javax.cache</ (4)、建立JavaBean封裝資料,以Employee表為例;
public class Employee {
private Integer id;
private String lastName;
private String email;
private Integer gender; //性別 1男 0女
private Integer dId; (5)、在配置檔案中,配置資料庫;
//配置專案對外訪問路徑
server.servlet.context-path=/cache

//配置資料來源
spring.datasource.url=jdbc:mysql://192.168.1.106:3307/mybatis
spring.datasource.username=root
spring.datasource.password=123456
spring.datasource.driver-class-name=com.mysql.jdbc.Driver

//開啟駝峰命名
mybatis.configuration.map-underscore-to-camel-case=true

//開啟操作資料庫的日誌
logging.level.com.scorpios.cache.mapper=debug
(6)、整合Mybatis操作資料;
@Mapper
public interface EmployeeMapper {

    //查
    @Select("select * from employee where id = #{id}")
    public Employee getEmpById(Integer id);

    //增
    @Insert("insert into employee (lastName,email,gender,did) values ( #{lastName},#{email},#{gender},#{dId})")
   public void addEmp(Employee emp);

    //刪
    @Delete("delete from employee where id = #{id}")
    public void delEmpById(Integer id);

    //改
    @Update("update employee set lastName=#{lastName},email=#{email},gender=#{gender},did=#{dId} where id=#{id}")
    public void updateEmp(Employee emp);
}
(7)、配置掃描Mapper包;
@MapperScan("com.scorpios.cache.mapper")		//配置掃描mapper包
@SpringBootApplication
public class SpringbootCacheApplication {

    public static void main(String[] args) {
        SpringApplication.run(SpringbootCacheApplication.class, args);
    }

}
(8)、測試訪問:http://localhost:8080/cache/emp/1

多次訪問,控制檯輸出:

二、快速體驗Cache使用
1、想要使用Cache快取,首先了解關於Cache的註解,並需要開啟快取註解:@EnableCaching

開啟快取功能的註解
@EnableCaching //開啟快取註解
@MapperScan("com.scorpios.cache.mapper")
@SpringBootApplication
public class SpringbootCacheApplication {

    public static void main(String[] args) {
        SpringApplication.run(SpringbootCacheApplication.class, args);
    }
}
2、@Cacheable註解使用和說明
編寫Service層,呼叫Dao層,並在Service層,對操作Dao層的資料進行快取
@Service
public class EmployeeService {

    @Autowired
    EmployeeMapper employeeMapper;

    @Cacheable(cacheNames = "emp",key = "#root.args[0]")
    public Employee getEmpById(Integer id){
        System.out.println("查詢"+id+"號員工");
        Employee emp = employeeMapper.getEmpById(id);
        System.out.println(emp);
        return emp;
    }
}
(1)、測試結果
多次傳送請求,控制檯只顯示查詢了一次資料庫操作,快取成功。

(2)、@Cacheable引數具體說明
@Cacheable:將方法的執行結果快取,以後再要相同的資料,直接從快取中獲取,不用呼叫方法;
	cacheNames/value:指定快取元件的名字,將方法的返回結果放在哪個快取中,是陣列的方式,可以指定多個快取;
	例如:@Cacheable(cacheNames = {}"emp","dept"},key = "#root.args[0]")

	key:可以用它來指定快取資料使用的key,預設是使用方法引數的值;(也可以指定自己的生成策略)

	keyGenerator:key的生成器;可以自己指定key的生成器的元件id;key/keyGenerator:二選一使用;

	cacheManager:指定快取管理器;或者cacheResolver指定獲取解析器;

	condition:指定符合條件的情況下才快取;
	例如:@Cacheable(cacheNames = {}"emp","dept"},key = "#root.args[0]",condition="#root.args[0]>0")

	unless:否定快取;當unless指定的條件為true,方法的返回值就不會被快取;可以獲取到結果進行判斷;

	sync:是否使用非同步模式;
(3)、指定自己的key生成策略和key的SPEL表示式的說明:

@Cacheable(cacheNames = "emp",keyGenerator = "myKeyGenerator")
public Employee getEmpById(Integer id){
        System.out.println("查詢"+id+"號員工");
        Employee emp = employeeMapper.getEmpById(id);
        System.out.println(emp);
        return emp;
}
自定義自己的key生成策略
@Configuration
public class MyCacheConfig {

    @Bean("myKeyGenerator")
    public KeyGenerator keyGenerator(){

        return new KeyGenerator() {
            @Override
            public Object generate(Object target, Method method, Object... params) {

                return method.getName()+Arrays.asList(params).toString();
            }
        };

    }
}
(4)、@Cacheable執行流程
	1、方法執行之前,先去查詢Cache(快取元件),按照cacheNames指定的名字獲取;
		(CacheManager先獲取相應的快取),第一次獲取快取如果沒有Cache元件會自動建立。

	2、去Cache中查詢快取的內容,使用一個key,預設就是方法的引數;
		key是按照某種策略生成的;預設是使用keyGenerator生成的,預設使用SimpleKeyGenerator生成key;
			SimpleKeyGenerator生成key的預設策略:
				如果沒有引數:key=new SimpleKey();
				如果有一個引數:key=引數的值
				如果有多個引數:key=new SimpleKey(params);

	3、沒有查到快取就呼叫目標方法;

	4、將目標方法返回的結果,放進快取中;
3、@CachePut註解使用和說明
作用:在目標方法呼叫之後,將目標方法的執行結果放入快取,既呼叫方法,又更新快取資料;
(1)、測試程式碼:
     @CachePut(cacheNames = "emp",key = "#result.id")//key需要注意
    public Employee updateEmp(Employee employee){
        System.out.println("更新的員工資訊:"+employee);
        employeeMapper.updateEmp(employee);
        return employee;
    }
(2)、測試結果:
傳送更新使用者資訊請求:

控制檯輸出:

傳送查詢請求後,控制檯並沒有任何輸出,說明是從快取中拿的資料:

(3)、重要說明:
@CachePut(cacheNames = "emp",key = "#result.id")//key需要注意
如果我們在使用@CachePut註解時,不指定key,這會使用方法的預設引數,這樣的話,與@Cacheable註解的key不一致,導致,我們更新過後,再次查詢資訊時,並不會得到快取資訊。這主要是以為key不一致導致的,需要注意。
4、@CacheEvit註解使用和說明
作用:快取清除
(1)、測試程式碼:
    @CacheEvict(cacheNames = "emp",key ="#root.args[0]")
    public void deleteEmp(Integer id){

        //模擬刪除
        System.out.println("刪除資料,員工id為:" +id );

    }
(2)、測試結果:
第一次查詢id為1的員工,控制檯列印查詢資料庫請求,第二次查詢則不會去查詢資料庫;
然後傳送刪除id為1的員工請求,控制檯列印,刪除資訊;
最後再次傳送查詢id為1的員工,控制檯再次列印查詢資料庫的SQL。
表明之前的快取已清除

(3)、@CachePut引數說明:
key:指定要清除的資料;

allEntries=true;指定清除這個快取中所有的資料;

beforeInvocation=false;快取的清除是否在方法之前執行
	預設代表快取清除操作是在方法之後執行;如果出現異常快取就不會清除

beforeInvocation=true:
	代表清除快取操作是在方法執行之前執行,無論方法是否出現異常,快取都清除
4、@Caching註解使用和說明
可以指定多個快取規則,下面是@Caching的原始碼
@Target({ElementType.METHOD, ElementType.TYPE})
@Retention(RetentionPolicy.RUNTIME)
@Inherited
@Documented
public @interface Caching {

	Cacheable[] cacheable() default {};

	CachePut[] put() default {};

	CacheEvict[] evict() default {};

}
示例程式碼:
   @Caching(
            cacheable = {
                 @Cacheable(cacheNames = "emp",key = "#lastName")
            },

            put = {
                 @CachePut(cacheNames = "emp",key="#result.id"),
                 @CachePut(cacheNames = "emp",key="#result.email")
            }
    )
    public Employee getEmpByNames(String lastName){

    }
4、@CacheConfig註解使用和說明
可以在類上加上次註解,用於指定類級別的公共快取屬性,例如使用公共快取名字和id的生成策略
@CacheConfig(cacheNames = "emp")
@Service
public class EmployeeService {

}
三、SpringBoot整合Redis作為快取
在我們沒有配置使用其他快取中介軟體時,SpringBoot預設使用的是ConcurrentMapCacheManager,然後用這個Manager來建立ConcurrentMapCache,並將資料儲存在ConcurrentMap<Object,Object>中;下圖是SpringBoot支援的快取配置。

但在實際的開發中,我們經常會使用一些快取中介軟體,如:Redis、MemCached、eheache等;
1、安裝Redis:安裝Redis可以參考前面文章的RabbitMQ和ElasticSearch,用Docker安裝比較方便,啟動起來後,用客戶端連線上Redis,如下圖:

2、Redis整合步驟:
(1)、引入Redis的starter
<dependency>
    <groupId>org.springframework.boot</groupId>
    <artifactId>spring-boot-starter-data-redis</artifactId>
</dependency>
(2)、在application.properties檔案中配置Redis
spring.redis.host=192.168.1.106
(3)、啟動Redis,並用客戶端連線:

3、測試普通字串程式碼:
RunWith(SpringRunner.class)
@SpringBootTest
public class SpringbootCacheApplicationTests {

    @Autowired
    RedisTemplate redisTemplate;    //k-v都是物件

    @Autowired
    StringRedisTemplate stringRedisTemplate;    //操作k-v都是字串

    @Test
    public void testRedis(){
        //給Redis中儲存資料
        stringRedisTemplate.opsForValue().append("msg","helloworld");

		//從Redis中取資料
		String msg = stringRedisTemplate.opsForValue().get("msg");
       System.out.println("msg from redis:"+msg);
    }
}
(1)、測試結果:
往Redis中寫資料

從Redis中讀資料:

(2)、說明:
Redis常見的五大資料型別:String(字串)、list(列表)、set(集合)、hash(雜湊)、ZSet(有序集合)
stringRedisTemplate.opsForValue()		操作String字串
stringRedisTemplate.opsForList()		操作list列表
stringRedisTemplate.opsForSet()		操作Set集合
stringRedisTemplate.opsForHash()		操作Hash雜湊
stringRedisTemplate.opsForZSet		操作Zset有序集合
4、測試儲存物件:
@Test
public void testRedis(){
   //給Redis中儲存資料
    redisTemplate.opsForValue().set("emp",employeeMapper.getEmpById(1));
}
(1)、測試結果:
往Redis中寫資料,會發現是一堆位元組碼

(2)、自定義序列化器
@Configuration
public class MyRedisConfig {

    @Bean
    public RedisTemplate<Object, Employee> myRedisTemplate(
        RedisConnectionFactory redisConnectionFactory) throws UnknownHostException {
            RedisTemplate<Object, Employee> template = new RedisTemplate<>();
            template.setConnectionFactory(redisConnectionFactory);
        //設定自定義序列化器
        Jackson2JsonRedisSerializer serializer = new Jackson2JsonRedisSerializer<Employee>(Employee.class);

        template.setDefaultSerializer(serializer);
            return template;
        }
}
(3)、測試程式碼,需要自動注入自己的序列化器:
@RunWith(SpringRunner.class)
@SpringBootTest
public class SpringbootCacheApplicationTests {

    @Autowired
    EmployeeMapper employeeMapper;

    @Autowired
    RedisTemplate myRedisTemplate;  //自定義的序列化器

    @Test
    public void testRedis(){
        //給Redis中儲存資料
        myRedisTemplate.opsForValue().set("emp",employeeMapper.getEmpById(1));
    }
}
(4)、測試結果:

四、小結
1、想要使用快取,需要先開啟快取註解@EnableCaching;
2、熟練對@Cacheable、@CachePut、@CacheEvict、@Caching註解的使用,特別是屬性的使用;
3、SpringBoot整合Redis作為快取;
