
SpringMVC 深度解析@RequestMapping(一)
SpringMVC作為一個MVC框架,有控制層,當我們在瀏覽器發出了一個請求,SpringMVC是怎麼處理請求,而且通過請求找到對應的類的方法?我們今天帶著這麼問題來解析SpringMVC原始碼處理過程。
我們在實現SpringMVC控制層時,標示了請求路徑,並標示請求地址對應的哪個方法,原始碼如下:
@Controller
@RequestMapping(value="/test")
public class TestController2 {
	@Autowired
	private TestService testService;

	@RequestMapping(value="/index")
	public ModelAndView getIndex(Model model){
       ModelAndView mv = new ModelAndView();
		  return mv;
	}
}
註解@RequestMapping是處理方法的對映。我們在類上面註解和方法上註解這樣會更加的清晰,我們在類上標示更能清晰的知道這個路徑是請求這個類,並在方法上註解比較清楚的是請求哪個方法。例如:http://127.0.0.1:8080/test/index.jhtml。如圖所示:
我們先介紹兩個比較重要的元件HandlerMapping和HandlerAdapter是@Contoller和@RequestMapping註解的處理器, HandlerMapping是處理請求對映的處理器;HandlerAdapter介面卡處理器(動態呼叫方法和處理引數)。我們在XML配置檔案中進行配置這兩種處理器。程式碼如下:
 <bean class="org.springframework.web.servlet.mvc.method.annotation.RequestMappingHandlerMapping"/>
<bean class="org.springframework.web.servlet.mvc.method.annotation.RequestMappingHandlerAdapter">一:我們通過解析SpringMVC處理請求深度解析,並介紹HandlerMapping對映處理器
我們講到這個這個XML配置,找到@RequestMapping和@Controller
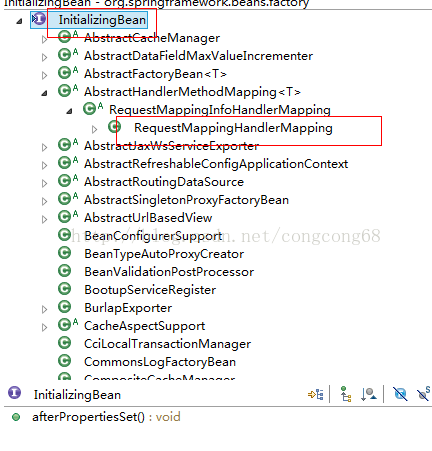
RequestMappingHandlerMapping間接實現了InitializingBean介面重寫了afterPropertiesSet方法,初始化RequestMappingHandlerMapping時,會呼叫afterPropertiesSet方法,跟 <bean class="" init-method=""/>屬性init-method處理一樣。afterPropertiesSet呼叫了RequestMappingHandlerMapping的initHandlerMethods實現的。處理@RequestMapping的,我們這邊來分析一下它是怎麼實現的。原始碼:
 protected void initHandlerMethods() {
		String[] beanNames = (this.detectHandlerMethodsInAncestorContexts ?
				BeanFactoryUtils.beanNamesForTypeIncludingAncestors(getApplicationContext(), Object.class) :
				getApplicationContext().getBeanNamesForType(Object.class));
		for (String beanName : beanNames) {
			if (isHandler(getApplicationContext().getType(beanName))){
				<span style="color:#cc0000;">detectHandlerMethods(beanName);</span>
			}
		}
		handlerMethodsInitialized(getHandlerMethods());
	}

	@Override
	protected boolean isHandler(Class<?> beanType) {
		return ((AnnotationUtils.findAnnotation(beanType, <span style="color:#cc0000;">Controller.class</span>) != null) ||
				(AnnotationUtils.findAnnotation(beanType, <span style="color:#cc0000;">RequestMapping.class</span>) != null));
	}
說明:
(1)isHandler這個方法是判斷是否被@Controller和@RequestMapping標記
(2)如果有被@Controller和@RequestMapping標記,然後生成RequestMappingInfo例項註冊到快取中,供我們在請求時通過URL能匹配找到。
我們來看怎麼生成RequestMappingInfo例項註冊到快取,由detectHandlerMethods這個方法實現的。原始碼如下:
	protected void detectHandlerMethods(final Object handler) {
		Class<?> handlerType =
				(handler instanceof String ? getApplicationContext().getType((String) handler) : handler.getClass());

		final Map<Method, T> mappings = new IdentityHashMap<Method, T>();
		final Class<?> userType = ClassUtils.getUserClass(handlerType);
		Set<Method> methods = HandlerMethodSelector.selectMethods(userType, new MethodFilter() {
			public boolean matches(Method method) {
				T mapping = <span style="color:#cc0000;">getMappingForMethod(method, userType);</span>
				if (mapping != null) {
					mappings.put(method, mapping);
					return true;
				}
				else {
					return false;
				}
			}
		});

		for (Method method : methods) {
                        //註冊到快取中
			<span style="color:#cc0000;">registerHandlerMethod(handler, method, mappings.get(method))</span>;
		}
	}


   @Override
	protected RequestMappingInfo getMappingForMethod(Method method, Class<?> handlerType) {
		RequestMappingInfo info = null;
               //查詢該類下註解的@RequestMapping的所有方法
		RequestMapping methodAnnotation = AnnotationUtils.findAnnotation(method, RequestMapping.class);
		if (methodAnnotation != null) {
			RequestCondition<?> methodCondition = getCustomMethodCondition(method);
                       //建立RequestMappingInfo
			info = createRequestMappingInfo(methodAnnotation, methodCondition);
                       //對類進行查詢有沒有標示@RequestMapping註解
			RequestMapping typeAnnotation = AnnotationUtils.findAnnotation(handlerType, RequestMapping.class);
			if (typeAnnotation != null) {
				RequestCondition<?> typeCondition = getCustomTypeCondition(handlerType);
                                //成成RequestMappingInfo。類別和方法級別的RequestMapping註解進行組合
				info = <span style="color:#ff0000;">createRequestMappingInfo(typeAnnotation, typeCondition).combine(info);</span>
			}
		}
		return info;
	}
   //設定RequestMappingInfo的屬性然後建立<span style="font-family: 宋體;">RequestMappingInfo</span>
  protected RequestMappingInfo createRequestMappingInfo(RequestMapping annotation, RequestCondition<?> customCondition) {
		String[] patterns = resolveEmbeddedValuesInPatterns(annotation.value());
		return new RequestMappingInfo(
				new PatternsRequestCondition(patterns, getUrlPathHelper(), getPathMatcher(),
						this.useSuffixPatternMatch, this.useTrailingSlashMatch, this.fileExtensions),
				new RequestMethodsRequestCondition(annotation.method()),
				new ParamsRequestCondition(annotation.params()),
				new HeadersRequestCondition(annotation.headers()),
				new ConsumesRequestCondition(annotation.consumes(), annotation.headers()),
				new ProducesRequestCondition(annotation.produces(), annotation.headers(), getContentNegotiationManager()),
				customCondition);
}當我們在瀏覽器傳送了http://127.0.0.1:8080/test/index.jhtml這樣的請求,SpringMVC註冊在web.xml中的前端轉發器DispatcherServlet接收,在這個之前,我們對initHandlerMappings和initHandlerAdapters初始化,這個在上一篇有介紹過。接下來我們開始分析DispatcherServlet處理請求。
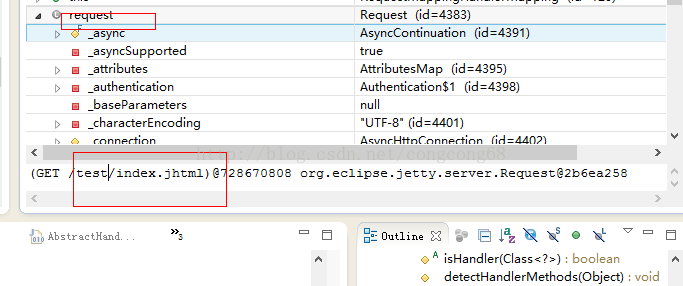
DispatcherServlet是間接的繼承了HttpSevlet,由父類FrameworkServlet實現了doPost和doGet方法,然後在呼叫子類,DispatcherServlet的doDispatch方法處理請求,實現了設計原則介面隔離原則。請求的包含了一些頭部的資訊等,如圖所示:
doDispatch方法的原始碼如下:
 protected void doDispatch(HttpServletRequest request, HttpServletResponse response) throws Exception {
		       HttpServletRequest processedRequest = request;
                               //判斷是否是檔案流請求
				processedRequest = checkMultipart(request);
                                //獲取了對映處理器,裡面是通過請求的URL獲取對應的類並獲取例項化的Bean,包裝成HandlerMethod
				mappedHandler = <span style="color:#990000;">getHandler(processedRequest, false);</span>
				if (mappedHandler == null || mappedHandler.getHandler() == null) {
					noHandlerFound(processedRequest, response);
					return;
				}
                               //獲取HandlerAdapter
				HandlerAdapter ha = getHandlerAdapter(mappedHandler.getHandler());
				String method = request.getMethod();
				boolean isGet = "GET".equals(method);
				if (isGet || "HEAD".equals(method)) {
					long lastModified = ha.getLastModified(request, mappedHandler.getHandler());
					if (logger.isDebugEnabled()) {
						String requestUri = urlPathHelper.getRequestUri(request);
						logger.debug("Last-Modified value for [" + requestUri + "] is: " + lastModified);
					}
					if (new ServletWebRequest(request, response).checkNotModified(lastModified) && isGet) {
						return;
					}
				}
				try {
				   mv = <span style="color:#cc0000;">ha.handle(processedRequest, response, mappedHandler.getHandler());</span>
				}
				applyDefaultViewName(request, mv);
				mappedHandler.applyPostHandle(processedRequest, response, mv);
			    processDispatchResult(processedRequest, response, mappedHandler, mv, dispatchException);
		}
	}


	protected HandlerExecutionChain getHandler(HttpServletRequest request) throws Exception {
		for (HandlerMapping hm : this.handlerMappings) {
			HandlerExecutionChain handler = <span style="color:#990000;">hm.getHandler(request);</span>
			if (handler != null) {
				return handler;
			}
		}
		return null;
	}
說明:
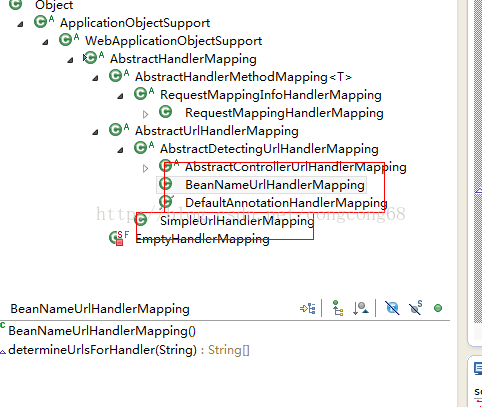
(1)Spring3.1開始的版本,建議使用RequestMappingHandlerMapping和RequestMappingHandlerAdapter,所以我們在XML配置了這個Bean元件。 List<HandlerMapping> handlerMappings裡面存放的是對映處理器,Spring內建了很多對映處理器,例如SimpleUrlHandlerMapping、BeanNameUrlHandlerMapping等,如圖所示:
(2)HandlerExecutionChain包含了處理該請求的處理器,還包含一系列可以攔截請求的攔截器。
RequestMappingHandlerMapping也是繼承了AbstractHandlerMapping,getHandler具體實現是由AbstractHandlerMapping來實現的,原始碼如下:
public final HandlerExecutionChain getHandler(HttpServletRequest request) throws Exception {
		Object handler = getHandlerInternal(request);
		if (handler == null) {
			handler = getDefaultHandler();
		}
		if (handler == null) {
			return null;
		}
		// Bean name or resolved handler?
		if (handler instanceof String) {
			String handlerName = (String) handler;
			handler = getApplicationContext().getBean(handlerName);
		}
		return <span style="color:#990000;">getHandlerExecutionChain(handler, request);</span>
	}
說明:
(1)getHandlerInternal方法是處理對映的,獲取request獲取了請求路徑,然後找到對應的RequestMappingInfo獲取了Controller類,並找到了對應的方法。
(2)HandlerExecutionChain帶了一系列的interceptors
第一:getHandlerInternal方法是通過URL找到對應的處理對映的,並找到對應的Bean例項,我們通過原始碼分析是怎麼處理的?
getHandlerInternal方法原始碼如下:
protected HandlerMethod getHandlerInternal(HttpServletRequest request) throws Exception {
               //通過UrlPathHelper獲取request獲取了請求路徑  例如:test/index.jhtml
		String lookupPath = getUrlPathHelper().getLookupPathForRequest(request);
		if (logger.isDebugEnabled()) {
			logger.debug("Looking up handler method for path " + lookupPath);
		}
                //
		HandlerMethod handlerMethod = lookupHandlerMethod(lookupPath, request);
		if (logger.isDebugEnabled()) {
			if (handlerMethod != null) {
				logger.debug("Returning handler method [" + handlerMethod + "]");
			}
			else {
				logger.debug("Did not find handler method for [" + lookupPath + "]");
			}
		}
               //返回對handlerMethod 進行設定已經初始化Bean並設定屬性的handlerMethod
		return (handlerMethod != null ? handlerMethod.<span style="color:#990000;">createWithResolvedBean</span>() : null);
	}
     //對bean進行初始化
   public HandlerMethod createWithResolvedBean() {
		Object handler = this.bean;
		if (this.bean instanceof String) {
			String beanName = (String) this.bean;
                         //獲取對應的Bean
			handler = this.beanFactory.getBean(beanName);
		}
		return new HandlerMethod(this, handler);
	}
 //設定bean、還有beanFactory 、method、parameters 等屬性
private HandlerMethod(HandlerMethod handlerMethod, Object handler) {
		Assert.notNull(handlerMethod, "HandlerMethod is required");
		Assert.notNull(handler, "Handler object is required");
		this.bean = handler;
		this.beanFactory = handlerMethod.beanFactory;
		this.method = handlerMethod.method;
		this.bridgedMethod = handlerMethod.bridgedMethod;
		this.parameters = handlerMethod.parameters;
	}
說明:
(1)UrlPathHelper是分析請求的URL,LookupPathForRequest(request)這個方法中有alwaysUseFullPath預設是false使用相對路徑。
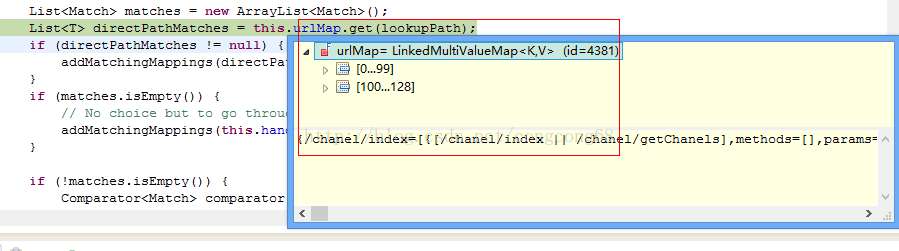
(2)lookupHandlerMethod通過URL檢視對映到哪個方法和類,MultiValueMap<String, T> urlMap 存放的key是url,value是RequestMappingInfo資訊(params等),通過lookupPath查詢對應的RequestMappingInfo,然後通過RequestMappingInfo到Map<T, HandlerMethod> handlerMethods查詢對應的HandlerMethod,並返回。MultiValueMap<String, T> urlMap這個快取中是我們在最開始時有介紹,處理@RequestMapping和@Controll 並封裝成RequestMappingInfo並放到快取,如圖所示:
如果查詢對應的方法時,放到Match,裡面有包含的HandlerMethod,如圖所示:
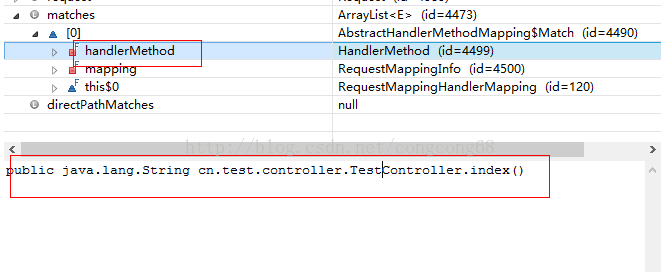
然後通過HandlerMethod的createWithResolvedBean方法實現了通過beanName獲取已經初始化的 Bean。然後重新初始化HandlerMethod物件,並設定bean、還有beanFactory 、method、parameters 等屬性。
第二:HandlerExecutionChain 包含了一系列攔截器。會在呼叫Controller類對應方法之前、處理完方法還沒返回檢視、返回檢視之後,這些動態加以攔截。
HandlerExecutionChain這個類屬性很很多新增一系列的攔截器,原始碼如下:
public class HandlerExecutionChain {
	private HandlerInterceptor[] interceptors;
	private List<HandlerInterceptor> interceptorList;
}getHandler具體實現是由AbstractHandlerMapping中,在這個 方法中實現了加入了攔截器,我們在看一下我們怎麼加入攔截器,原始碼如下:
protected HandlerExecutionChain getHandlerExecutionChain(Object handler, HttpServletRequest request) {
		HandlerExecutionChain chain =
			(handler instanceof HandlerExecutionChain) ?
				(HandlerExecutionChain) handler : new HandlerExecutionChain(handler);
                //新增攔截器
		<span style="color:#990000;">chain.addInterceptors(getAdaptedInterceptors());</span>
		String lookupPath = urlPathHelper.getLookupPathForRequest(request);
		for (MappedInterceptor mappedInterceptor : mappedInterceptors) {
			if (mappedInterceptor.matches(lookupPath, pathMatcher)) {
				chain.addInterceptor(mappedInterceptor.getInterceptor());
			}
		}

		return chain;
	}
}
說明:
我們在XML裡沒配置自己的攔截器,所以這邊都是為空的。
HandlerInterceptor攔截器介面,裡面有三個方法:
(1)preHandle方法:請求處理之前執行的這個方法,在Controller方法呼叫之前呼叫。例如:呼叫之前判斷是否有登陸。
(2)postHandle方法: 請求進行處理之後,在Controller 方法呼叫之後執行,會在DispatcherServlet 呼叫ModelView檢視之前呼叫。
(3)afterCompletion方法:是在DispatcherServlet 呼叫ModelView檢視之後呼叫。
既然HandlerInterceptor是介面,我們可以自己實現一個類實現這個介面,這樣我們就自己定義自己的攔截器,然後加到SpringMVC攔截中?當然可以。
我們自己定義了一個類實現了HandlerInterceptor 介面,例如:public class myInterceptor implements HandlerInterceptor 然後重寫了這個3個方法。我們在XML配置這個類,把自己定義的攔截器加到SpringMVC攔截中。在配置檔案加入了
<span style="color:#990000;"><beans xmlns:mvc="http://www.springframework.org/schema/mvc"
     xsi:schemaLocation="http://www.springframework.org/schema/mvc http://www.springframework.org/schema/mvc/spring-mvc-3.0.xsd"></span>
 <mvc:interceptors>
<mvc:interceptor>
  <!--攔截哪個包下的類例如:-->
      <mvc:mapping path="/test/*"/>
      <bean class="test.myInterceptor "></bean>
    </mvc:interceptor>
</mvc:interceptors>這樣就把我們定義好的攔截器加到SpringMVC的攔截器中。
到這裡,我們對HandlerMapping對映處理器介紹完了,
二:我們通過解析SpringMVC處理請求深度解析,並介紹HandlerAdapter介面卡處理器(動態呼叫方法和處理引數)
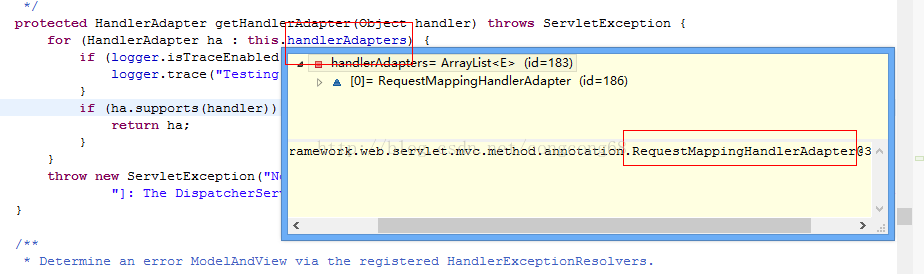
HandlerAdapter處理HandlerMethod對映並返回了檢視和資料的物件。getHandlerAdapter獲取了我們在配置檔案的如圖所示:
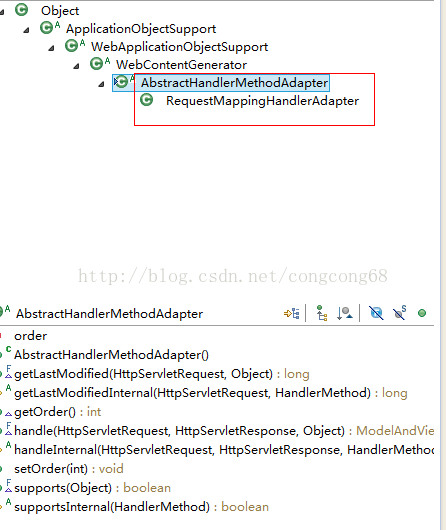
父類AbstractHandlerMethodAdapter實現的,我們先看一下 繼承關係,這種開封閉原則。如圖所示:
我們來看一下這個handle(processedRequest, response, mappedHandler.getHandler());動態的呼叫方法和處理引數的具體實現。原始碼如下:
public final ModelAndView handle(HttpServletRequest request, HttpServletResponse response, Object handler)
			throws Exception {
		return handleInternal(request, response, (HandlerMethod) handler);
	}

  @Override
	protected final ModelAndView handleInternal(HttpServletRequest request,
			HttpServletResponse response, HandlerMethod handlerMethod) throws Exception {

		if (getSessionAttributesHandler(handlerMethod).hasSessionAttributes()) {
			// Always prevent caching in case of session attribute management.
			checkAndPrepare(request, response, this.cacheSecondsForSessionAttributeHandlers, true);
		}
		else {
			// Uses configured default cacheSeconds setting.
			checkAndPrepare(request, response, true);
		}

		// Execute invokeHandlerMethod in synchronized block if required.
		if (this.synchronizeOnSession) {
			HttpSession session = request.getSession(false);
			if (session != null) {
				Object mutex = WebUtils.getSessionMutex(session);、
				synchronized (mutex) {
					return invokeHandleMethod(request, response, handlerMethod);
				}
			}
		}
         //動態的呼叫方法和處理引數
		return invokeHandleMethod(request, response, handlerMethod);
	}
說明:
通過HandlerAdapter動態的呼叫方法和處理引數,呼叫方法。我們這邊具體怎麼動態呼叫方法和處理引數,並返回檢視,等下一章在具體的介紹,這裡涉及也比較多。
總結:
(1) 當我們在瀏覽器傳送了http://127.0.0.1:8080/test/index.jhtml這樣的請求,SpringMVC註冊在web.xml中的前端轉發器DispatcherServlet接收時。
(2)通過URL檢視對映到哪個方法和類,MultiValueMap<String, T> urlMap 存放的key是url,value是RequestMappingInfo資訊(params等),RequestMappingInfo獲取了Controller類,並找到了對應的方法。幷包裝返回了HandlerMethod。
(3)通過BeanName,到工廠獲取已經初始化的Bean,然後重新初始化HandlerMethod物件,並設定bean、還有beanFactory 、method、parameters 等屬性。
(4)對HandlerExecutionChain新增攔截器和handler然後返回HandlerExecutionChain
(5)HandlerAdapter對HandlerExecutionChain進行動態的呼叫方法會返回ModelAndView。
瀏覽器請求已經獲取到了,也找到了對應的類和方法,那怎麼動態的請求方法和處理引數等,執行完方法並返回ModelAndView等?,帶著這些問題我們繼續前進。
相關推薦
SpringMVC 深度解析@RequestMapping(一)
SpringMVC作為一個MVC框架,有控制層,當我們在瀏覽器發出了一個請求,SpringMVC是怎麼處理請求,而且通過請求找到對應的類的方法?我們今天帶著這麼問題來解析SpringMVC原始碼處理過程。 我們在實現SpringMVC控制層時,標示了請求路徑,
Spring原始碼深度解析總結(3)—— 配置檔案的讀取和Bean的載入(一)
上一篇總結了Spring利用Resource介面對配置檔案的封裝,接下來我們要看看Spring對封裝好的資源是如何解析的,以及如何利用解析出的資訊載入Bean的。BeanFactory bf = new XmlBeanFactory(new ClassPathResoure(
(Spring原始碼解析)一步一步分析,springMVC專案啟動過程(一)
springMVC專案啟動過程,分析原始碼。1、環境搭建,這步我就省略細節,只把我的大概環境說下:windows 7 、jdk 8、maven-3.3.9、tomcat 8.5.11、IDEA 2017.1 x64版 具體環境安裝,我就略過,可自行google、baidu安
樹狀解析之深度優先演算法(一)
導讀:最近有一個解析樹的業務,之前參加過藍橋杯演算法比賽學過一些演算法。(還好沒有全部忘記哈哈)怕以後忘記這種思路特寫此博文。 一、深度優先,記得廣告中經常聽到過,抱著試試看的態度買了3個療程,效果不錯........ 也經常聽人說過什麼車到山前必有路,船到橋頭自然直。哈哈,這種思想就是回溯思
SpringMVC的流程分析(一)—— 整體流程概括
classes amp 不同 方法 restfu equals 類圖 strong .get SpringMVC的整體概括 之前也寫過springmvc的流程分析,只是當時理解的還不透徹所以那篇文章就放棄了,現在比之前好了些,想著寫下來分享下,也能增強記憶,也希望可以幫助到
springmvc參數傳遞(一)
har enc parameter tle log con println req tex 1.項目結構 2.UserController.java代碼 package com.spring; import javax.servlet.http.HttpServl
Android框架原始碼解析之(一)Volley
前幾天面試CVTE,HR面掛了。讓內部一個學長幫我查看了一下面試官評價,發現二面面試官的評價如下: 廣度OK,但缺乏深究能力,深度與實踐不足 原始碼:只能說流程,細節程式碼不清楚,retrofit和volley都是。 感覺自己一方面:自己面試技巧有待提高吧(框
Android 建立與解析XML(一)—— 概述
分享一下我老師大神的人工智慧教程!零基礎,通俗易懂!http://blog.csdn.net/jiangjunshow 也歡迎大家轉載本篇文章。分享知識,造福人民,實現我們中華民族偉大復興!
Fragment全解析系列(一):那些年踩過的坑
本篇主要介紹一些最常見的Fragment的坑以及官方Fragment庫的那些自身的BUG,並給出解決方案;這些BUG在你深度使用時會遇到,比如Fragment巢狀時或者單Activity+多Fragment架構時遇到的坑。 Fragment是可以讓你的app縱享絲滑的設計,如果你的app想在
優達學城-深度學習筆記(一)
優達學城-深度學習筆記(一) 標籤: 機器學習 優達學城-深度學習筆記一 一 神經網路簡介 最大似然概率 交叉熵Cross entropy
深度強化學習(一): Deep Q Network(DQN)
原文:https://blog.csdn.net/LagrangeSK/article/details/80321265 一、背景 DeepMind2013年的論文《Playing Atari with Deep Reinforcement Learning》指
19java原始碼解析-LinkedList(一)
其他 原始碼解析 https://blog.csdn.net/qq_32726809/article/category/8035214 通過大體瀏覽原始碼,可知,Linkedlist的儲存機構是一個連結串列 類的宣告 public class LinkedList
藍鯨DevOps深度解析系列(1):藍盾平臺總覽
關注嘉為科技,獲取運維新知 2018年10月,嘉為科技與騰訊雲、藍鯨智雲攜手,在北京、上海、廣州、深圳舉辦 “研運一體,資料驅動,讓運維走向運營”為主題的分享會,來自金融、電力、能源、製造等行業的數百家企業到場參加。 在這個分享會上,除了下一代的研發運營體系、基於藍鯨平臺實現企業IT自
實戰深度學習OpenCV(一):canny邊緣檢測
利用canny邊緣檢測,我們可以很好地得到哦一個影象的輪廓,下面是基於C++的,這是我們通過這段程式碼得到的結果: #include "pch.h" #include <iostream> #include <opencv2/core/core.hpp> #inc
深度學習實踐(一)—tensorflow之概述
內容預覽 1.1 深度學習與機器學習的區別 1.1.1 特徵提取方面 1.1.2 資料量和計算效能要求 1.1.3 演算法代表 1.2 深度學習的應用場景 1.2.1 影象識別 1.2
spring原始碼深度解析筆記(三)
之前提到在xmlBeanFactory建構函式中呼叫了XmlBeanDefinitionReader型別的reader屬性提供的方法this.reader.loadBeanDefinitions(resource),這就是載入整個資源載入的切入點。 當進入XmlBeanDe
spring原始碼深度解析筆記(四)
DTD與XSD的區別 DTD(Document Type Definition)即文件型別定義,是一種XML約束模式語言,是XML檔案的驗證機制,是屬於XML檔案組成的一部分。DTD是一種保證XML文件格式正確的有效方法,可以通過比較XML文件和DTD檔案來看
java解析json(一)json的基本格式
最近一直在和json字串交流,還是使用的java。對於一個以前一直使用python的人來說,使用java來解析json,真的是有十萬個不方便。因此也踩了不(很)少(多)坑,特來記載一下。一共分為兩篇,這篇介紹josn的基本格式。 json主要包括: “{” 括起來的物件,例如 {"nam
深度學習tricks(一)——shuffle——同時打亂兩個陣列,保持原先的對應關係仍然存在
自己做資料處理,因為資料比較複雜的關係(我自己也不太熟練),不太方便藉助框架封裝好了的包 在做到需要打亂資料這一步的時候,遇到了如何打亂陣列,使得原始輸入與label的對應關係仍然存在 以上是S
# 深度學習筆記(一)
從感知機到神經網路 感知機中:作為神經網路的起源演算法,感知機有若干輸入,而只有一個輸出 這裡以最簡單的一層感知機舉例: W1W2x1yx2 此時,x1對應的權重為W1,x2對應的權重為W2,而W1和W2權重的大小對應著x1與x2各自重要程度,而他們的乘積和共同