基於SpringBoot的通用裝置操作介面服務
需求分析
我們有一個應用平臺需要和某特殊伺服器對接,實現對特殊伺服器的一些操作以及狀態資訊的讀取。但是該伺服器由多個廠商完成,且每個廠商的實現方式不同,因此不能通過應用平臺逐一實現每個廠商的介面呼叫。我們考慮在特殊伺服器端部署一個通用操作介面服務,應用平臺僅僅與該介面通訊,而具體的命令下發則由該通用操作介面服務實施。此時,僅需在介面服務專案中實現不同廠商的命令實現即可。該介面服務的需求如下:
- 介面服務與應用平臺的通訊標準化並實施通訊加密。
- 應用無需考慮伺服器硬體情況,僅需與介面服務通訊即可完成所有功能對接。
- 介面服務前端接收應用平臺請求資料,後端向伺服器傳送命令並接收結果。
- 介面服務的後端應根據功能需求指定規範,並要求廠商實現這些規範功能。
- 介面服務的後端應支援根據不同伺服器型別靈活配置,實現模組化,並可以靈活配置和替換。
- 介面服務後端模組應與前端請求解耦,支援廠商自行開發後端實現模組。
- 介面服務在啟動時應該實現對裝置的認證,未通過認證的裝置不允許對外提供服務。
程式設計
總體實際
我們計劃將後端介面服務設計為REST風格的微服務,因此採用Spring boot作為框架基礎。同時考慮到前後解耦的需求,我們將專案拆分為前後端兩個模組。如下所示:
nmi為專案名:network management interface
--> nmi (父專案)
|-->nmi-front(前端模組)
|-->nmi-core(後端模組)
如上所示,整體專案由MAVEN管理,將專案拆分後,nmi-core以jar包形式引入nmi-front中。我們在nmi-core中制定好介面interface,不同廠商的則可以在該模組模板的基礎上開發各自對應的nmi-core.jar。這樣在最終部署時即可通過替換nmi-core.jar實現對不同裝置的定製。
MAVEN構建
nmi父專案
<project xmlns="http://maven.apache.org/POM/4.0.0" xmlns:xsi="http://www.w3.org/2001/XMLSchema-instance"
xsi:schemaLocation nmi-front模組
<?xml version="1.0"?>
<project xsi:schemaLocation="http://maven.apache.org/POM/4.0.0 http://maven.apache.org/xsd/maven-4.0.0.xsd" xmlns="http://maven.apache.org/POM/4.0.0"
    xmlns:xsi="http://www.w3.org/2001/XMLSchema-instance">
  <modelVersion>4.0.0</modelVersion>
  <parent>
    <groupId>org.wsy</groupId>
    <artifactId>nmi</artifactId>
    <version>0.0.1-SNAPSHOT</version>
  </parent>
  <artifactId>nmi-front</artifactId>
  <name>nmi-front</name>
  <url>http://maven.apache.org</url>
  <properties>
    <project.build.sourceEncoding>UTF-8</project.build.sourceEncoding>
  </properties>
  <dependencies>
        <dependency>
            <groupId>org.springframework.boot</groupId>
            <artifactId>spring-boot-starter-web</artifactId>
            <version>1.3.3.RELEASE</version>
        </dependency>
        <!-- nmi core -->
        <!-- <dependency>
            <groupId>com.rails</groupId>
            <artifactId>nmi-core</artifactId>
            <version>0.0.1-SNAPSHOT</version>
        </dependency> -->
        <dependency>
            <groupId>org.wsy</groupId>
            <artifactId>nmi-core</artifactId>
            <version>0.0.1-SNAPSHOT</version>
            <scope>system</scope>
            <systemPath>${project.basedir}/lib/nmi-core.jar</systemPath>
        </dependency>
        <!-- nmi core -->
    </dependencies>
    <build>
        <plugins>
            <plugin>
                <groupId>org.springframework.boot</groupId>
                <artifactId>spring-boot-maven-plugin</artifactId>
            </plugin>
        </plugins>
    </build>
</project>
nmi-core模組
<?xml version="1.0"?>
<project
    xsi:schemaLocation="http://maven.apache.org/POM/4.0.0 http://maven.apache.org/xsd/maven-4.0.0.xsd"
    xmlns="http://maven.apache.org/POM/4.0.0" xmlns:xsi="http://www.w3.org/2001/XMLSchema-instance">
    <modelVersion>4.0.0</modelVersion>
    <parent>
        <groupId>org.wsy</groupId>
        <artifactId>nmi</artifactId>
        <version>0.0.1-SNAPSHOT</version>
    </parent>
    <artifactId>nmi-core</artifactId>
    <name>nmi-core</name>
    <url>http://maven.apache.org</url>
    <packaging>jar</packaging>
    <properties>
        <project.build.sourceEncoding>UTF-8</project.build.sourceEncoding>
    </properties>
    <build>
        <finalName>nmi-core</finalName>
        <plugins>
            <plugin>
                <groupId>org.apache.maven.plugins</groupId>
                <artifactId>maven-compiler-plugin</artifactId>
            </plugin>
        </plugins>
    </build>

</project>
程式碼設計
模組結構
core
core僅需負責硬體命令的下發和裝置認證,如有需要新增日誌功能。因此包結構如下:
|>org.wsy.nmi.core
|--|>org.wsy.nmi.core.command
|--|--|>ICommand.java
|--|--|>ACommand.java
|--|>org.wsy.nmi.core.device
|--|--|>IDevice.java
|--|--|>ADevice.java
|--|>org.wsy.nmi.core.log
|--|--|>logger.java
其中ICommand.java 介面定義了所有裝置應該實現的操作。IDevice.java 介面定義了裝置認證相關的操作。
ACommand.java 以及 ADevice.java 為某廠商(如:A)的具體介面實現。
front
專案結構
nmi-front 模組帶有主要的Spring boot特性,有Application啟動器,controller等模組。結構如下
|>org.wsy.nmi.front
|--|>org.wsy.nmi.front.controllers
|--|--|>RequestController.java
|--|>org.wsy.nmi.front.module
|--|--|>org.wsy.nmi.front.module.config
|--|--|--|>Config.java
|--|--|>org.wsy.nmi.front.module.factory
|--|--|--|>CommandServiceFactory.java
|--|--|--|>DeviceAuthFactory.java
|--|--|>org.wsy.nmi.front.module.task
|--|--|--|>InitTask.java
|--|--|>org.wsy.nmi.front.module.cache
|--|--|--|>GlobalCache.java
|--|>Application.java
主要程式碼說明
Application.java(sping boot 啟動器)
@SpringBootApplication
//需要支援外部配置properties檔案
@EnableConfigurationProperties({ DeviceConfig.class })
public class App {
    public static void main(String[] args) {
        SpringApplication.run(App.class, args);
    }
}
Config.java(配置對映)
//讀取指定專案
@ConfigurationProperties(prefix="device")
public class DeviceConfig {
    private String mac;
    private String infname;
    private String deviceauth;
    private String commandservice;
    //....以下省略
InitTask.java(專案啟動後的動作)
附:其中的GlobalCache,DeviceAuthFactory,CommandServiceFactory的具體實現在後邊標出。
//這部分程式碼主要負責專案啟動完畢後的裝置認證等工作
@Component
public class PostTask {
    DeviceAuth auth = null;
    @Autowired
    DeviceConfig config;
    @PostConstruct
    public void init() {
        System.out.println("init finished");
        try {
            //從properties檔案讀取具體實現的Class路徑,在後邊通過反射載入
            String deviceAuthClass = config.getDeviceauth();
            String commandService = config.getCommandservice();
            //根據配置載入模組
            System.out.println("\n********  registering module  ********");

            try {
                //載入裝置認證模組
                auth = DeviceAuthFactory.getInstance().build(deviceAuthClass).getAuth();
                GlobalCache.getInstance().setDeviceAuthState(auth.deviceAuth());

                if (GlobalCache.getInstance().isDeviceAuthState()) {
                    //如果認證通過則繼續載入命令執行模組
                    System.out.println("device auth success!");
                    System.out.println("loading command service ...");
                    GlobalCache.getInstance().setCommandService(
                            CommandServiceFactory.getInstance().build(commandService).getCommandService());
                } else {
                    //如果認證過程失敗則標記為認證失敗
                    GlobalCache.getInstance().setDeviceAuthState(false);
                    System.out.println("device auth fail!");
                }

            } catch (Exception e) {
                //如果裝置認證模組載入失敗則標記為認證失敗
                System.out.println("init fail, error:"+e);
                GlobalCache.getInstance().setDeviceAuthState(false);
            }

        } catch (Exception e) {
            System.out.println("auth err");
        }
    }

}
CommandServiceFactory(命令實現載入器)
通過單例模式實現,僅需一次載入即可,DeviceAuthFactory的載入機制相同,這裡就不贅述了。
public class CommandServiceFactory {
    private volatile static CommandServiceFactory  instance;
    private String className;
    private CommandService service;
        public static CommandServiceFactory getInstance(){
        if (instance== null) {
            synchronized(CommandServiceFactory.class){
                if(instance == null){
                    instance = new CommandServiceFactory();
                }
            }
        }
        return instance;
    }
    private CommandServiceFactory(){ }
    //通過反射動態載入
    public CommandServiceFactory build(String className) throws Exception{
        this.className = className;
        service = (CommandService) Class.forName(className).newInstance();
        return this;
    }
    public CommandService getCommandService() {
        return service;
    }
    public String getClassName(){
        return className;
    }
}
GlobalCache.java(全域性變數)
同樣以單例形式實現,用於儲存認證結果,裝置資訊等。
具體實現略。
程式效果
配置截圖
以下均是假設配置
執行效果
模組存在並裝置認證成功
假設nmi-core.jar中確實包含配置檔案中的實現類,則順利載入模組並執行認證過程。
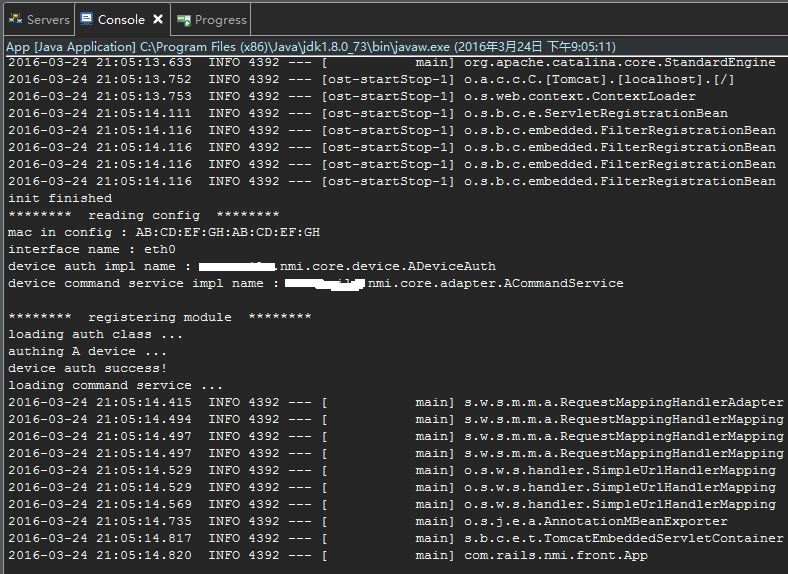
啟動、認證過程
以下為認證通過的啟動過程截圖:

可以看到模組順利載入,並認證成功。
介面呼叫
模組載入成功同時認證成功後,可以正常呼叫介面。其中返回的”this is a A command service”即為假設A裝置廠商的自定義服務返回的串。
模組存在但是認證失敗
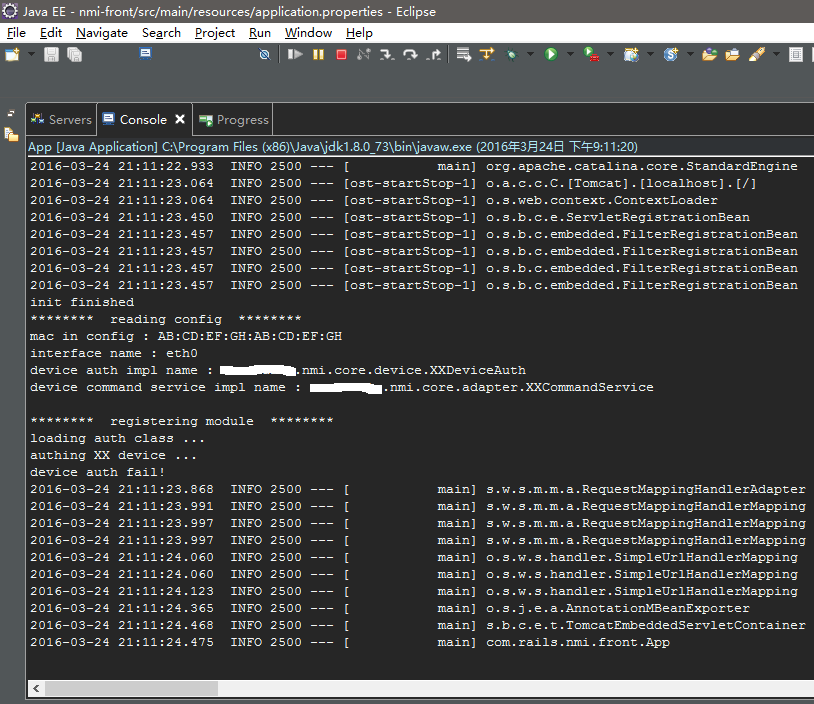
啟動、認證過程
圖上可以看出,已經順利載入模組(XXDevice),但是裝置認證失敗了。
介面呼叫
可以看到介面是不能順利呼叫的。
模組載入異常
比如配置檔案錯誤,廠商並未實現介面,則無法順利載入模組,也會造成認證失敗。
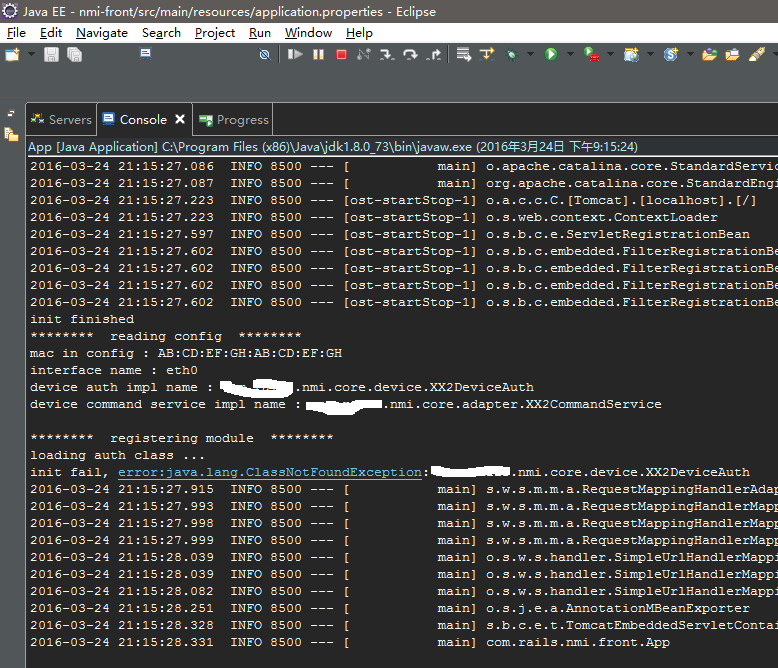
啟動、認證過程
可以看出,模組並未順利載入(class not found err),因此無法認證裝置。
介面呼叫
和上文的認證失敗是相同的,因此不在列舉。
總結
- Spring boot 實現REST風格的微服務
- 實現了介面微服務的前後分離解耦
- 通過反射機制按照配置動態載入介面實現
- 設計並實現了裝置認證流程
相關推薦
基於SpringBoot的通用裝置操作介面服務
需求分析 我們有一個應用平臺需要和某特殊伺服器對接,實現對特殊伺服器的一些操作以及狀態資訊的讀取。但是該伺服器由多個廠商完成,且每個廠商的實現方式不同,因此不能通過應用平臺逐一實現每個廠商的介面呼叫。我們考慮在特殊伺服器端部署一個通用操作介面服務,應用平臺僅僅
基於SpringBoot和SpringCloud實現微服務架構
Spring 頂級框架 spring IO platform 用於系統部署,是可整合的,構建現代化應用的版本平臺,具體來說當你使用maven dependency引入spring jar包時它就在工作了。 Spring Boot 旨在簡化建立產品級的 Spring 應
基於Linux通用GPIO介面的操作函式
#include <stdio.h> #include <stdlib.h> #include <unistd.h> #include <sys/types.h> #include <sys/stat.h> #inc
基於ASP.NET Core 3.x的端點路由(Endpoint Routing)實現控制器(Controller)和操作(Action)分離的介面服務
本文首發於 [碼友網][3] -- [《基於ASP.NET Core 3.x的端點路由(Endpoint Routing)實現控制器(Controller)和操作(Action)分離的介面服務》][4] ## 前言 如題,今天為大家分享一種基於ASP.NET Core 3.x的端點路由(Endpoint
基於Hystrix Dashboard和Turbine構建服務監控(SpringBoot 2.0.x)
前言 最近這段時間想把叢集的監控搭起來,總是不成功,最後發現是SpringBoot版本不相容導致的。本文將介紹基於SpringBoot 2.0.x的 Dashboard,Turbine構建服務監控中遇到的問題和經驗,並以對Zuul的監控為例搭建簡單的的服務監控。 服務搭建 版
大型電商基於Springboot+Springcloud微服務+Dubbo分散式,JVM虛擬機器,併發原理程式設計,實現微服務架構
大型電商基於Springboot+Springcloud微服務+Dubbo分散式,JVM虛擬機器,併發原理程式設計,實現微服務架構39套Java架構師,高併發,高效能,高可用,分散式,叢集,電商,快取,微服務,微信支付寶支付,公眾號開發,java8新特性,P2P金融專案,程式設計,功能設計,資料庫設
MongoDB聚合操作例項(基於SpringBoot 整合MongoDB)
轉載務必說明出處:https://blog.csdn.net/LiaoHongHB/article/details/83579030 spring boot整合mongdb,其中的mongodbTemplate只有一些簡單的方法對mongod
Nginx——配置vue前端靜態資源和SpringBoot介面服務
上一篇:Nginx——windows安裝 上面一篇記錄了Nginx的Windows環境安裝,本文基於此繼續記錄: 1、dos命令列輸入: start nginx 視窗閃爍一次之後,在瀏覽器輸入127.0.0.1會出現下面的頁面: 2、下面開啟nginx解壓目錄的c
springcloud Eureka 服務註冊與消費發現(基於springboot搭建)
1.首先加入Maven依賴 1.springboot的依賴 <!--Springboot--> <dependency> <groupId>org.springframework.boot</groupId> <
springboot~jpa個性化資料操作介面
jap是個全能倉儲 jap把很多資料庫訪問都封裝了,並且提交了預設的一切資料方法簽名的約定,大家按著約定走,可以不寫SQL語句,而如果比較複雜的情況,也需要寫SQL,這裡我們介紹一下查詢和修改的例項方法,有一點要注意,==倉儲的寫操作是沒有返回值==的。 商品倉儲個性介面 /** * 產品個性化介面.
基於django的rest api快速開發(只提供一個介面服務)
需求:目前我們有一個後臺的python指令碼和前臺的頁面,我們需要提供一個類似tomcat的服務,來使前臺的一個請求,通過我們搭建的服務去呼叫python模型,並最終將處理的結果返回給前臺。一:搭建django rest api 環境首先我們需要有python環境,這是基礎,
基於SpringBoot開發一個Restful服務,實現增刪改查功能
ner github上 epo column dex typealias odin 開發人員 java 在去年的時候,在各種渠道中略微的了解了SpringBoot,在開發web項目的時候是如何的方便、快捷。但是當時並沒有認真的去學習下,畢竟感覺自己在Struts和Spr
基於SpringBoot的微服務架構實踐
引言 微服務是近期火爆IT業界的新概念,在某種意義上這算是一個全新架構,微服務繼承了面向服務架構(SOA)的整體思路,強調將巨石型應用或服務拆分為由微小的服務應用。按照通常理解和定義,微服務是指開發一個單個小型的但有業務功能的服務,每個服務都有自己的處
第十八章:SpringBoot專案中使用SpringSecurity整合OAuth2設計專案API安全介面服務
OAuth是一個關於授權的開放網路標準,在全世界得到的廣泛的應用,目前是2.0的版本。OAuth2在“客戶端”與“服務提供商”之間,設定了一個授權層(authorization layer)。“客戶端”不能直接登入“服務提供商”,只能登入授權層,以此將使用者與客
idea基於maven搭建springBoot專案並實現介面呼叫
本來這篇部落格早就應該寫了但是最近找工作有些忙就落下了 今天閒來無事就來補上了,SpringBoot就是將SpringMVC替換成SpringBoot依舊是SSM框架 建立依舊由idea+maven來進行 好了接下來我們首先new一個新的project 然後直接next 依照我的習慣
基於springboot建立Spark應用的submit服務
目錄 背景 準備工作 主要流程 效果截圖 主要程式碼 外部引用 參考資料 背景 一直很好奇web後臺如何啟動Spark應用程式,查詢Api後發現可以使用org.apache.spark.launch
基於SDK的支付介面服務端——支付寶,微信
支付寶 準備: 1.建立應用,配置金鑰(詳見https://docs.open.alipay.com/291/105971); 2.jar包:alipay-sdk-java20170818173712.jar;commons-logging-1.1.
基於springboot+redis+bootstrap+mysql開發一套屬於自己的分散式springcloud雲許可權架構(十四)【許可權架構消費者(通用類編寫)】
許可權架構的消費者和許可權架構的生產者一樣可以高度抽象化我們的通用接口出來,因此本章我們將這些消費者介面高度抽象出來,理論上這些高度抽象出來的介面是可以作為一個獨立的module需要的時候使用maven引入,不過此處就不再解耦出來,而是直接寫在我們的許可權架構服
API管理-基於SpringBoot專案整合swagger實現介面文件自動生成
1. 為什麼要使用swagger? 上一次部落格(API管理-使用開源xxl-api專案管理介面)中我也提到過介面文件在整個生命
使用Redis為註冊中心的Dubbo微服務架構(基於SpringBoot)
title: 使用Redis為註冊中心的Dubbo微服務架構(基於SpringBoot) date: 2019-07-30 14:06:29 categories: 架構 author: mrzhou tags: SpringBoot redis Dubbo 微服務 RPC 前言 Dubbo作為一款高效


