
OpenTSDB-2.0.0安裝佈署
1、介紹
OpenTSDB是一個架構在Hbase系統之上的實時監控資訊收集和展示平臺。它支援秒級資料採集所有metrics,支援永久儲存,可以做容量規劃,並很容易的接入到現有的報警系統裡。OpenTSDB可以從大規模的叢集(包括叢集中的網路裝置、作業系統、應用程式)中獲取相應的metrics並進行儲存、索引以及服務,從而使得這些資料更容易讓人理解,如web化,圖形化等。
2、安裝
安裝Gnuplot
Gnuplot 是一個命令列的互動式繪圖工具(command-driven interactive function plotting program)。使用者通過輸入命令,可以逐步設定或修改繪圖環境,並以圖形描述資料或函式,使我們可以藉由圖形做更進一步的分析。
yum install gnuplot
如果是下載壓縮包壓縮包的話,解壓後進入目錄分別執行 ./configure; make; make check; make install
下載壓縮包安裝過程如下:
# based on a minimal installation, you need some packages in order to compile, I suggest
yum install gcc gcc-c++ make libX11 xauth
yum install cairo-devel pango-devel freetype-devel gd-devel
cd /usr/local/src/
wget http://sourceforge.net/projects/gnuplot/files/gnuplot/4.4.2/gnuplot-4.4.2.tar.gz/download
tar xzf gnuplot-4.4.2.tar.gz
cd gnuplot-4.4.2
less INSTALL
# start compiling. I usually install self-compiled stuff at /opt/[PKG-NAME]
./configure --prefix=/opt/gnuplot442
make
# make sure the shipped version of gnuplot is removed (this is probably not necessary but prevents version mix-up)
yum remove gnuplot
make install
# you might want to add a symlink
ln -s /opt/gnuplot442/bin/gnuplot /usr/bin/gnuplot
安裝完成後執行gnuplot,確認支援png :執行set terminal可以檢視
如果不支援則opentsdb在畫圖時會報錯
安裝完後可以驗證是否可以正常畫出png圖片,畫png圖片示例如下:
[[email protected]]#vim test.log
23:14 506.877
23:19 501.068
23:24 493.254
23:29 469.184
23:34 460.161
23:39 426.065
23:44 429.734
23:49 409.255
23:54 423.512
23:59 390.676
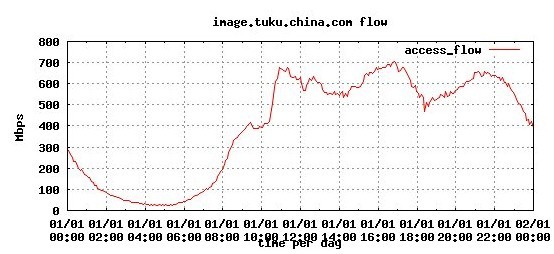
然後編寫gnuplot的配置檔案如下:
[[email protected]]#vim log.conf
set terminal png truecolor size 550,250 #指定輸出成png圖片,且圖片大小為550×250,需要ligpng支援,採用預設顏色設定
set output "log.png" #指定輸出png圖片的檔名
set autoscale #軸向標記自動控制
set xdata time #X軸資料格式為時間
set timefmt "%H:%M" #時間輸入格式為"小時:分鐘"
set style data lines #資料顯示方式為連線
set xlabel "time per day" #X軸標題
set ylabel "Mbps" #Y軸標題
set title "image.tuku.china.com flow" #圖片標題
set grid #顯示網格
plot "test.log" using 1:2 title"access_flow" #從test.log檔案中讀取第一列和第二列作為X軸和Y軸資料,示例名"log_flow"
最後執行catlog.conf | gnuplot命令,就生成了log.png檔案,如下:
畫png圖需要有arial字型支援,centos中arial字型安裝方法如下:
經常執行一些生物資訊軟體的時候,提示:Could not find/open font when opening font “arial”, using internalnon-scalable font等資訊。此時,表示CentOS系統缺乏相應的字型檔案。需要安裝,步驟如下:
1.widonws下載字型檔案到Linux
windows的字型比較多,其字型檔案位於 C:\WINDOWS\Fonts。從其中copy相應的字型到Linux系統的 /usr/share/font/下的資料夾中。以arial字型為例:
# mkdir/usr/share/fonts/arial
# cp arial*.ttf/usr/share/fonts/arial/
2. 為剛加入的字型設定快取使之有效
# cd/usr/share/font/arial
# mkfontscale
# mkfontdir
# fc-cache -fv
經過這樣的設定後,即可在Gnome介面的系統——首選項——外觀——字型中進行字型的選擇了。
3. 設定gunplot對arial的選擇路徑
本文首頁提示的錯誤是由於程式呼叫gunplot造成,必須讓gunplot識別arial字型所在的路徑才行。
$ exportGDFONTPATH=/usr/share/fonts/arial
$ exportGNUPLOT_DEFAULT_GDFONT="arial"
安裝autoconf
Autoconf是一個用於生成可以自動地配置軟體原始碼包以適應多種Unix類系統的 shell指令碼的工具。由Autoconf生成的配置指令碼在執行的時候與Autoconf是無關的, 就是說配置指令碼的使用者並不需要擁有Autoconf。
yum install autoconf
安裝git
yum -y install zlib-devel openssl-devel perl cpio expat-devel gettext-devel
yum install git
下載opentsdb2.0.0原始碼
//git clone git://github.com/stumbleupon/opentsdb.git
https://github.com/OpenTSDB/opentsdb/releases/tag/v2.0.0RC1
cd opentsdb
./build.sh
執行過程報錯,錯誤資訊如下
Can't exec "aclocal": No such file or directory at/usr/share/autoconf/Autom4te/FileUtils.pm line 326.
網上搜了一下,發現缺少automake工具
yum install automake
安裝完antomake後進入opentsdb目錄再次執行
./build.sh
3.設定&執行
先啟動hadoop和hbase叢集
配置環境變數,在shell中執行如下命令:
env COMPRESSION=none HBASE_HOME=/usr/hadoop/bbase0941
./opentsdb/src/create_table.sh
在hbase偽分佈環境下貌似要修改create_table.sh,否則建表會卡住:
exec"$hbh/bin/hbase" shell <<EOF
create'$UID_TABLE','id', 'name'
# {NAME => 'id', COMPRESSION =>'$COMPRESSION', BLOOMFILTER => '$BLOOMFILTER'},
# {NAME => 'name', COMPRESSION =>'$COMPRESSION', BLOOMFILTER => '$BLOOMFILTER'}
create'$TSDB_TABLE','t'
# {NAME => 't', VERSIONS => 1,COMPRESSION => '$COMPRESSION', BLOOMFILTER => '$BLOOMFILTER'}
create'$TREE_TABLE','t'
# {NAME => 't', VERSIONS => 1,COMPRESSION => '$COMPRESSION', BLOOMFILTER => '$BLOOMFILTER'}
create'$META_TABLE','name'
# {NAME => 'name', COMPRESSION =>'$COMPRESSION', BLOOMFILTER => '$BLOOMFILTER'}
tsd服務執行引數說明:
Usage: tsd --port=PORT --staticroot=PATH --cachedir=PATH
Starts the TSD, the Time Series Daemon
--async-io=true|false Use async NIO (default true) or traditionalblocking io
--auto-metric Automatically add metrics to tsdb as they are inserted. Warning:this may cause unexpected metrics to be tracked
--cachedir=PATH Directory underwhich to cache result of requests.
--flush-interval=MSEC Maximum time for which a new data point canbe buffered (default: 1000).
--port=NUM TCPport to listen on.
--staticroot=PATH Web root from which toserve static files (/s URLs).
--table=TABLE Nameof the HBase table where to store the time series (default: tsdb).
--uidtable=TABLE Name of theHBase table to use for Unique IDs (default: tsdb-uid).
--worker-threads=NUM Number for async io workers(default: cpu * 2).
--zkbasedir=PATH Path underwhich is the znode for the -ROOT- region (default: /hbase).
--zkquorum=SPEC Specificationof the ZooKeeper quorum to use (default: localhost).
以下是tsdb可執行的命令
usage: tsdb <command> [args]
Valid commands: fsck, import, mkmetric, query, tsd, scan, uid
4.測試
儲存標籤
./build/tsdb mkmetric proc.loadavg.1mproc.loadavg.5m
vimnohup.out 可能顯示-bash nc: not command found需要安裝nc
yuminstall nc
每隔15秒會輸出如下資訊到tsd
put proc.loadavg.1m 1288946927 0.36 host=foo
put proc.loadavg.5m 1288946927 0.62 host=foo
put proc.loadavg.1m 1288946942 0.43 host=foo
put proc.loadavg.5m 1288946942 0.62 host=foo
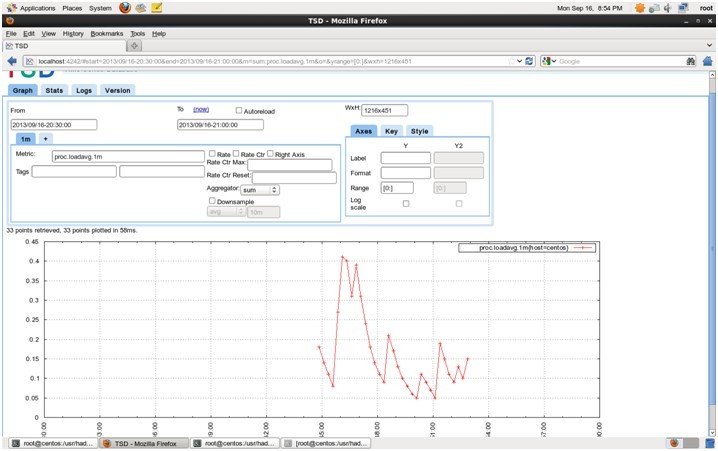
使用瀏覽器登陸 192.168.145.129:4242,在from、to中選擇好時間範圍,在metrics裡輸入 “proc.loadavg.1m”,就能在圖表中看到監控資訊,如下圖
5.總結opentsdb的表設計特點可以滿足時間序列的資料儲存在hbase中並能秒級相應。適合於以固定時間間隔的資料採集,例如系統軟體和硬體的監控。結合logstash可以監控應用log日誌資訊。
附1:centos安裝opentsdb
官方網站:http://opentsdb.net/getting-started.html(更新autoconf,automake到最新版)
1.安裝gnuplot-4.4.6:http://www.gnuplot.info/
wgethttp://nchc.dl.sourceforge.net/project/gnuplot/gnuplot/4.6.0/gnuplot-4.6.0.tar.gz
cd gnuplot-4.4.6
./configure
make
make install
2.安裝git:http://my.oschina.net/lgc/blog/5370
yum -y install zlib-devel openssl-devel perlcpio expat-devel gettext-devel
wgethttp://www.codemonkey.org.uk/projects/git-snapshots/git/git-latest.tar.gz
tar xzvf git-latest.tar.gz
cd git-{date}
autoconf
./configure --with-curl=/usr/local
make & make install
3.安裝opentsdb
git clonegit://github.com/stumbleupon/opentsdb.git
cd opentsdb
修改/usr/local/opentsdb/build/tsdb
vi /usr/local/opentsdb/build/tsdb
將
abs_srcdir=
abs_builddir=
修改為如下
abs_srcdir='/usr/local/opentsdb/build/..'(opentsdb安裝位置)
abs_builddir='/usr/local/opentsdb/build'(opentsdb安裝位置)
tsdtmp=${TMPDIR-'/tmp'}/tsd # Forbest performance, make sure
mkdir -p "$tsdtmp" # your temporary directory uses tmpfs
zkquorum表示zookeeper的位置
附2:OpenTsdb的eclipse配置
編譯期:
MainClass:com.google.gwt.dev.Compiler
Arguments:-war staticroot QueryUi,其中staticroot是編譯後的靜態檔案的存放目錄;
QueryUi是QueryUi.gwt.xml的名字,必須放在src目錄下。
Eclipse的debug configuration中的classpath中必須包括src目錄,因為compiler需要有原始碼。
QueryUi.gwt.xml的內容如下:
<?xml version="1.0" encoding="UTF-8"?>
<module>
<inherits name="com.google.gwt.user.User"/>
<inheritsname="com.google.gwt.user.theme.standard.Standard"/>
<inherits name="com.google.gwt.http.HTTP"/>
<inherits name="com.google.gwt.json.JSON"/>
<entry-point class="tsd.client.QueryUi"/>
<source path="tsd"/>
</module>
其中,tsd.client.QueryUi是類全名。類全名中必須有client。
開發期Eclipse執行:
MainClass:
net.opentsdb.tools.TSDMain
Arguments:
--port=4242
--staticroot=staticroot/QueryUi
--cachedir=cachedir
--zkquorum=192.168
相關推薦
OpenTSDB-2.0.0安裝佈署
1、介紹 OpenTSDB是一個架構在Hbase系統之上的實時監控資訊收集和展示平臺。它支援秒級資料採集所有metrics,支援永久儲存,可以做容量規劃,並很容易的接入到現有的報警系統裡。OpenTSDB可以從大規模的叢集(包括叢集中的網路裝置、作業系統、應用程式)中獲取相
微信小程式ssl安裝佈署
證書安裝指引 最近更新時間:2018-12-12 16:26:09 檢視pdf 1. Apache 2.x 證書部署 2. Nginx 證書部署 3. IIS 證書部署 4. Tomcat 證書部署 下載得到的 www.domai
PCB 帆軟FineReport安裝,佈署,配置
一.準備工作 應用環境:Windows7(X64) + Tomcat + FineReport , 將FineReport 佈署到Tomcat Web應用
CentOS7+Mono5.2.0.224 +Jexus5.8.3.0 佈署 Asp.Net MVC (vs2017)
背景: 比起大神我們只是差遠了,只知道一味的找找看,找的資料不少,但真不知道哪一個是正確的。 被自己坑了,但也沒辦法,最後在https://linuxdot.net/(Linux DotNET大本營)找到一個QQ群103810355,經群主指點(Mono/5.2.0.224,Jexus/5.8.3
opentsdb-2.0.1 RPM包的安裝以及測試
安裝命令:rpm -ivh opentsdb-2.0.1.noarch.rpm 檔案目錄 安裝完後,重要的目錄如下: /etc/opentsdb - Configuration files /tmp/opentsdb - Temporary cache files
單實例12.2.0.1安裝
rod ipv it is def pdb dba term cnblogs 0.10 1. 修改用戶的SHELL的限制,vi /etc/security/limits.conf 文件,文件末尾添加修改如下oracle soft nproc
centos7.0編譯安裝python3.6.2
python一、查看Linux系統版本信息[[email protected]/* */ ~]# cat /etc/redhat-release CentOS Linux release 7.0.1406 (Core) [[email protected]/* */ ~]# uname
k8s 1.9.0-手動安裝-2
none working ole pac value kill swap port sch 1 下載etcd新版 https://github.com/coreos/etcd/releases 直接下載k8s的二進制包 https://github.com/kubernet
Linux上安裝Hadoop集群(CentOS7+hadoop-2.8.0)
hup dem current 格式 default dmv framework server1 上進 1下載hadoop 2安裝3個虛擬機並實現ssh免密碼登錄 2.1安裝3個機器 2.2檢查機器名稱
Oracle GoldenGate 12.2.0.1 安裝、升級和刪除
OGG安裝 OGG升級 OGG刪除 OGG12.2 1、準備工作選擇正確的版本:OGG與數據庫廠商和數據庫版本對照表。 下載軟件:在Oracle Technology Network(OTN)或者使用CSI在 http://edelivery.oracle.com 中進行下載。 上傳軟件到服務
selenium-ide-2.3.0 組件在foxfire45.0無法安裝的問題
附件 rfi 頁面 成功 安裝 log install ins 瀏覽器 樓主在安裝selenium-ide組件時,嘗試了下面兩種方式都無法安裝: 1.在forfire瀏覽器進行拖拽安裝,頁面無任何跳轉。拖拽後回車安裝,也沒任何效果 2.附件組件-從文件安裝添加組件,添加了組
CentOS安裝python-2.7+安裝pip-10.0.0
files 預裝 path packages 編譯 onf block -s wget 註:以下所有操作均在CentOS 6.8 x86_64位系統下完成。 首先查看當前系統預裝的python版本: # whereis python python2: /usr
Django 2.0.3安裝-壓縮包方式
dmi 鏈接 script 否則 RM 兩種 建立 djang .py OS:Windows 10家庭中文版,CPU:Intel Core i5-8250U Python版本:Python 2.7,Python 3.6 Django版本:2.0.3(最新2.0.5) 解壓工
Apache-kylin-2.0.0-bin-hbase1x.tar.gz的下載與安裝(圖文詳解)
mas arch alt img div .net nsh 它的 content 首先,對於Apache Kylin的安裝,我有話要說。 由於Apache Kylin本身只是一個Server,所以安裝部署還是比較簡單的。但是它的前提要求是Hadoop、Hive、HBas
hadoop window下安裝 hadoop-2.6.0
all art ice dfs- win 技術 per atan 分享圖片 一、官網下載hadoop http://hadoop.apache.orghttps://archive.apache.org/dist/hadoop/common/hadoop-2.6.0 管理員
2.0 docker 安裝鏡像
centos ron PE code 獲取 p s d參數 如果 image 1.實例,安裝centos docker search -s 15 centos ,其中docker serach 代表搜索命令, 最後 centos代表要搜索的鏡像名稱
Linux上安裝Hadoop集群(CentOS7+hadoop-2.8.0)--------hadoop環境的搭建
html -a 總結 全分布式 .html oop details clas HR Linux上安裝Hadoop集群(CentOS7+hadoop-2.8.0)------https://blog.csdn.net/pucao_cug/article/details/716
linux安裝 redis(redis-3.0.2.tar.gz) 和 mongodb(mongodb-linux-x86_64-rhel62-4.0.0)
壓縮包 data 配置 查看 serve etc all linux sta 1:首先 要下載 這兩個 壓縮包 註意:liunx是否已經安裝過 gcc沒安裝的話 先安裝:yum install gcc-c++ 2:安裝 redis:redis-3.0.2.tar.gz
基於【CentOS-7+ Ambari 2.7.0 + HDP 3.0】搭建HAWQ數據倉庫之一 —— MariaDB 安裝配置
ola http iad com grant stop drive 數據庫 commit 一、安裝並使用MariaDB作為Ambari、Hive、Hue的存儲數據庫。 yum install mariadb-server mariadb 啟動、查看狀態,檢查mariad
Solr學習筆記(2)—— solr-7.0.0 安裝與目錄說明
導入 lms services pan conf nvi os x ins admin 一:Solr系統要求 您可以在任何系統中安裝 Solr,但是這些系統中必須有適用的 Java 運行時環境(JRE),具體介紹如下文所述。目前,這包括 Linux,Mac