
SpringBoot根據包名進行區分使用多資料來源
就是讓一個專案應用並使用多個數據庫,這裡採用的是SpringBoot2.0、MySql5.7,使用兩個兩個MySql資料庫
1、建立兩個資料庫

2、建立一個SpringBoot專案
3、Pom檔案
<?xml version="1.0" encoding="UTF-8"?>
<project xmlns="http://maven.apache.org/POM/4.0.0" xmlns:xsi="http://www.w3.org/2001/XMLSchema-instance"
	xsi:schemaLocation="http://maven.apache.org/POM/4.0.0 http://maven.apache.org/xsd/maven-4.0.0.xsd">
	<modelVersion>4.0.0</modelVersion>

	<groupId>czs</groupId>
	<artifactId>springboot-manyDatasource</artifactId>
	<version>0.0.1-SNAPSHOT</version>
	<packaging>jar</packaging>

	<name>springboot-manyDatasource</name>
	<description>springboot使用多個數據源(多個數據庫)</description>

	<parent>
		<groupId>org.springframework.boot</groupId>
		<artifactId>spring-boot-starter-parent</artifactId>
		<version>2.0.0.RELEASE</version>
		<relativePath/> <!-- lookup parent from repository -->
	</parent>

	<properties>
		<project.build.sourceEncoding>UTF-8</project.build.sourceEncoding>
		<project.reporting.outputEncoding>UTF-8</project.reporting.outputEncoding>
		<java.version>1.8</java.version>
	</properties>

	<dependencies>
		<dependency>
			<groupId>org.springframework.boot</groupId>
			<artifactId>spring-boot-starter-jdbc</artifactId>
		</dependency>
		<dependency>
			<groupId>org.springframework.boot</groupId>
			<artifactId>spring-boot-starter-web</artifactId>
		</dependency>
		<!-- https://mvnrepository.com/artifact/org.mybatis.spring.boot/mybatis-spring-boot-starter -->
		<dependency>
		    <groupId>org.mybatis.spring.boot</groupId>
		    <artifactId>mybatis-spring-boot-starter</artifactId>
		    <version>1.3.0</version><!-- 1.3.0以上的版本沒有@MapperScan以及@Select註解 -->
		</dependency>

		<dependency>
			<groupId>org.springframework.boot</groupId>
			<artifactId>spring-boot-devtools</artifactId>
			<scope>runtime</scope>
		</dependency>
		<dependency>
			<groupId>mysql</groupId>
			<artifactId>mysql-connector-java</artifactId>
			<scope>runtime</scope>
		</dependency>
		<dependency>
			<groupId>org.projectlombok</groupId>
			<artifactId>lombok</artifactId>
			<optional>true</optional>
			<version>1.18.2</version>
		</dependency>
		<dependency>
			<groupId>org.springframework.boot</groupId>
			<artifactId>spring-boot-starter-test</artifactId>
			<scope>test</scope>
		</dependency>
		<dependency>
			<groupId>org.springframework.boot</groupId>
			<artifactId>spring-boot-configuration-processor</artifactId>
			<optional>true</optional>
		</dependency>
	</dependencies>

	<build>
		<plugins>
			<plugin>
				<groupId>org.springframework.boot</groupId>
				<artifactId>spring-boot-maven-plugin</artifactId>
			</plugin>
		</plugins>
	</build>


</project>
4、書寫application.properties檔案,配置兩個資料庫連線
###datasource1
spring.datasource.test1.driver-class-name = com.mysql.jdbc.Driver
spring.datasource.test1.jdbc-url = jdbc:mysql://192.168.25.11:3306/18-08-12-manyDatasource1?useUnicode=true&characterEncoding=utf-8
spring.datasource.test1.username = root
spring.datasource.test1.password =
###datasource2
spring.datasource.test2.driver-class-name = com.mysql.jdbc.Driver
spring.datasource.test2.jdbc-url = jdbc:mysql://192.168.25.11:3306/18-08-12-manyDatasource2?useUnicode=true&characterEncoding=utf-8
spring.datasource.test2.username = root
spring.datasource.test2.password =
發現字首的不同沒有?
資料來源一是:spring.datasource.test1. 資料來源二是:spring.datasource.test2.
這裡記著配置檔案中配置資料來源是有字首的,第七步記得有這個字首
5、書寫對應資料庫的實體類檔案-------此處應用了lombok註解,不懂自行百度學習....
package czs.entity;

import lombok.Data;

/**
* @author czs
* @version 建立時間:2018年8月12日 下午2:30:46
*/
@Data
public class User {

	private String name;
	private long age;
}
6、書寫第一個Dao層的Mapper檔案以及Service層
Mapper
package czs.mapper1;

import org.apache.ibatis.annotations.Insert;
import org.apache.ibatis.annotations.Param;
import org.apache.ibatis.annotations.Select;
import czs.entity.User;

public interface UserMapper1 {
	// 查詢語句
	@Select("SELECT * FROM users WHERE NAME = #{name}")
	User findByName(@Param("name") String name);

	// 新增
	@Insert("INSERT INTO users(NAME, AGE) VALUES(#{name}, #{age})")
	int insert(@Param("name") String name, @Param("age") Integer age);
}
Service
package czs.mapper1;

import org.springframework.beans.factory.annotation.Autowired;
import org.springframework.stereotype.Service;

/**
* @author czs
* @version 建立時間:2018年8月12日 下午7:28:07
*/
@Service
public class ManyService1 {

	@Autowired
	private UserMapper1 userMapper1;

	public int insert(String name, Integer age) {
		return userMapper1.insert(name, age);
	}
}
6、書寫第二個Dao層的Mapper檔案--------------其實和上面那個想相比就是包名和類名以及Service層中的Mapper引用不同
Mapper
package czs.mapper2;

import org.apache.ibatis.annotations.Insert;
import org.apache.ibatis.annotations.Param;
import org.apache.ibatis.annotations.Select;
import czs.entity.User;

public interface UserMapper2 {
	// 查詢語句
	@Select("SELECT * FROM users WHERE NAME = #{name}")
	User findByName(@Param("name") String name);

	// 新增
	@Insert("INSERT INTO users(NAME, AGE) VALUES(#{name}, #{age})")
	int insert(@Param("name") String name, @Param("age") Integer age);
}
Service
package czs.mapper2;

import org.springframework.beans.factory.annotation.Autowired;
import org.springframework.stereotype.Service;

/**
* @author czs
* @version 建立時間:2018年8月12日 下午7:28:07
*/
@Service
public class ManyService2 {

	@Autowired
	private UserMapper2 userMapper2;

	public int insert(String name, Integer age) {
		return userMapper2.insert(name, age);
	}
}
7、配置資料來源、事務管理器。。。非常重要的一步,也是這個來分配資料來源給哪些類包的
注意類中@MapperScan註解中的basePackages的內容!
第4步說過注意字首,就是在下面的@ConfigurationProperties(prefix = "spring.datasource.test1")中,是根據這個來選擇資料來源的
package czs.datasource;

import javax.sql.DataSource;
import org.apache.ibatis.session.SqlSessionFactory;
import org.mybatis.spring.SqlSessionFactoryBean;
import org.mybatis.spring.SqlSessionTemplate;
import org.mybatis.spring.annotation.MapperScan;
import org.springframework.beans.factory.annotation.Qualifier;
import org.springframework.boot.context.properties.ConfigurationProperties;
import org.springframework.boot.jdbc.DataSourceBuilder;
import org.springframework.context.annotation.Bean;
import org.springframework.context.annotation.Configuration;
import org.springframework.jdbc.datasource.DataSourceTransactionManager;

/**
 * 讀取DataSource01資料來源<br>
 */
// DataSource01
@Configuration // 註冊到springboot容器中
@MapperScan(basePackages = "czs.mapper1", sqlSessionFactoryRef = "test1SqlSessionFactory")
public class DataSource1Config {

	/**
	 * @methodDesc: 功能描述:(配置test01資料庫)
	 */
	@Bean(name = "test1DataSource")
	@ConfigurationProperties(prefix = "spring.datasource.test1")
	public DataSource testDataSource() {
		return DataSourceBuilder.create().build();
	}

	/**
	 * @methodDesc: 功能描述:(test1 sql會話工廠)
	 */
	@Bean(name = "test1SqlSessionFactory")
	public SqlSessionFactory testSqlSessionFactory(@Qualifier("test1DataSource") DataSource dataSource)
			throws Exception {
		SqlSessionFactoryBean bean = new SqlSessionFactoryBean();
		bean.setDataSource(dataSource);
		// bean.setMapperLocations(
		// new
		// PathMatchingResourcePatternResolver().getResources("classpath:mybatis/mapper/test1/*.xml"));
		return bean.getObject();
	}

	/**
	 * @methodDesc: 功能描述:(test1 事物管理)
	 */
	@Bean(name = "test1TransactionManager")
	public DataSourceTransactionManager testTransactionManager(@Qualifier("test1DataSource") DataSource dataSource) {
		return new DataSourceTransactionManager(dataSource);
	}

	@Bean(name = "test1SqlSessionTemplate")
	public SqlSessionTemplate testSqlSessionTemplate(
			@Qualifier("test1SqlSessionFactory") SqlSessionFactory sqlSessionFactory) throws Exception {
		return new SqlSessionTemplate(sqlSessionFactory);
	}

}
8、還是非常重要的一步,也是這個來分配資料來源給哪些類包的
就是複製上面那步的類,將@MapperScan註解中的basePackages改為放另一個Mapper介面的包名就好!
以下是兩個類中不同的部分。。。。。。。。。。。
@MapperScan(basePackages = "czs.mapper1", sqlSessionFactoryRef = "test1SqlSessionFactory")
@ConfigurationProperties(prefix = "spring.datasource.test1")
@MapperScan(basePackages = "czs.mapper2", sqlSessionFactoryRef = "test1SqlSessionFactory")
@ConfigurationProperties(prefix = "spring.datasource.test2")
9、Controller層
package czs;
import javax.annotation.Resource;
import org.springframework.beans.factory.annotation.Autowired;
import org.springframework.web.bind.annotation.RequestMapping;
import org.springframework.web.bind.annotation.RestController;
import czs.mapper1.ManyService1;
import czs.mapper2.ManyService2;
/**
* @author czs
* @version 建立時間:2018年8月12日 下午9:03:02
*/
@RestController
public class ManyController {
@Autowired
private ManyService1 manyService1;
@Resource
private ManyService2 manyService2;
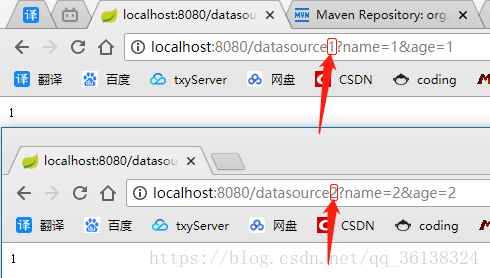
@RequestMapping(value = "datasource1")
public int datasource1(String name, Integer age) {
return manyService1.insert(name, age);
}
@RequestMapping(value = "datasource2")
public int datasource2(String name, Integer age) {
return manyService2.insert(name, age);
}
}
1 注意要注入兩個Service
2 注意有兩個@RequestMapping,裡面的對映路徑不一樣
10、嘗試訪問
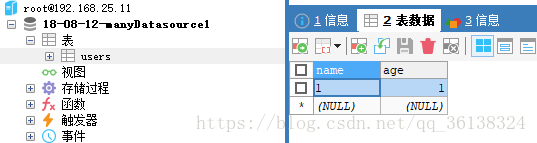
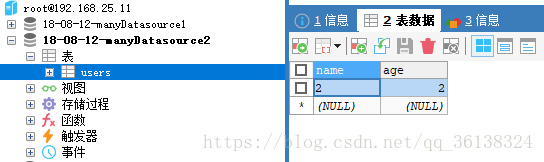
11、檢視資料庫
資料來源一插入成功!
資料來源二插入成功!
相關推薦
SpringBoot根據包名進行區分使用多資料來源
就是讓一個專案應用並使用多個數據庫,這裡採用的是SpringBoot2.0、MySql5.7,使用兩個兩個MySql資料庫 1、建立兩個資料庫 2、建立一個SpringBoot專案 3、Pom檔案 <?xml version="1.0" encoding="
根據包名,在指定空間中創建對象
targe 保留 bsp pre www min 包名 for nal 根據包名,在指定空間中創建對象 輸入描述: namespace({a: {test: 1, b: 2}}, ‘a.b.c.d‘) 輸出描述: {a: {test: 1, b: {c: {d:
Android 檢查手機上是否安裝了指定的軟件(根據包名檢測)
gem ++ info add 包名 boolean nta avi ray Android檢查手機上是否安裝了指定的軟件(根據包名檢測) /** * 檢查手機上是否安裝了指定的軟件 * @param context * @param packageName
Mybatis根據配置檔案獲取session(多資料來源)
1.config.xml <?xml version="1.0" encoding="UTF-8"?> <!DOCTYPE configuration PUBLIC "-//mybatis.org//DTD Config 3.0//EN" "http://mybatis.or
過載(Overload)和重寫(Override)的區別。過載的方法能否根據返回型別進行區分?
方法的過載和重寫都是實現多型的方式,區別在於前者實現的是編譯時的多型性,而後者實現的是執行時的多型性。過載發生在一個類中,同名的方法如果有不同的引數列表(引數型別不同、引數個數不同或者二者都不同)則視為過載;重寫發生在子類與父類之間,重寫要求子類被重寫方法與父類被重寫方法有相同的返回型別,比父類被重
springboot(八):整合多資料來源
資料來源是如何劃分: 按包名(業務)和註解劃分 ;例如:com.test.learn01----使用datasource1; com.test.learn02----使用datasource2。 專案目錄結構: 配置檔案中新增兩個資料來源 建立資料來源DataSource1
springboot+jpa 實現不同資料庫的多資料來源配置
廢話不多說,直接看配置! 1、application.yml # 多資料來源配置 #primary spring: primary: datasource: url: jdbc:mysql://xxx.xxx.xxx.xxx:3306/dico_d
根據包名取得應用全部資訊ResolveInfo
public static ResolveInfo findAppByPackageName(String mPackageName) { ResolveInfo newAppInfo = null; // 用於存放臨時應用程式 List<Resolv
springboot整合Mybatis、事務、多資料來源、分散式事務
springboot整合Mybatis、事務、多資料來源 文章目錄 springboot整合Mybatis、事務、多資料來源 一. 整合Mybatis 二. 事務 2.1 回顧事務
Android根據包名啟動或者銷燬activity
1.啟動 公司需要做一個快捷啟動,就是說在熄滅螢幕的情況下,長按音量-進入你設定的應用. 在自己的應用開發過程中,有可能需要在自己的應用中啟動其他應用,此時,如果應用對外公開了自己的啟動Intent方式,可以直接建立該Intent,然後通過startActi
springboot springjpa 從資料庫動態載入多資料來源 並隨意切換
背景:專案本來就是springboot+springJpa的框架,連線池用的德魯伊DruidDataSource。 想要在資料庫配置多資料來源,使用者可以隨便新增資料來源,根據請求帶的不同引數,controller層隨意切換資料來源,這樣就可以同一套部署的程式碼,操作不同的
Android逆向之路---改apk包名、達到多開效果
前言 最近在某乎上有人在問我如何將打好的包更改包名。瞭解我的同學大概都知道,我喜歡自己動手做實驗,再將自己的方式分享給大家,這次我選擇了一個閱讀型別app,隨機選的。先看效果 如何做到的呢,那就把我的思路分享給大家。 ps:侵刪!僅供個人學習使用,
shell中獲取某個目錄下全部的子檔名,java根據包名分批打包
需求 公司每次升級正式環境都是對著專案各個模組進行單獨打包。 現在公司希望使用shell指令碼來批量的自動打包,以減少人工出錯的情況。 思路 ①我會先對整個專案進行javac編譯,把編譯後的.clas
Gradle配置及同一應用不同版本配置不同資原始檔,不同簽名,包名進行打包
公司的專案,一個專案也就是同一套程式碼要針對多個客戶打出多個版本的apk,不同版本的apk中一些程式碼是不同的,比如伺服器的地址,app的名字,圖片資源以及簽名檔案等都是不同的。剛開始的時候,把這些相同的程式碼,資原始檔提取出來,打包的時候進行替換就可以了,隨著客戶越來越多
Springboot 2.1.5 配置JPA多資料來源
最近在學springboot,照著網上部落格想試著配一下Jpa的多資料來源,但發現因為springboot版本太高的問題,網上的d
springboot -- druid 多資料來源(根據mapp位置區分業務資料庫)
1.多資料來源切換:指專案所需要不止一個數據庫的連線資訊,eg:同一資料庫地址下的不同庫或者壓根連地址都不同。 專案中不同的業務需求儲存在不同的資料庫中。 如 會員資訊---會員資料庫中 訂單資訊-- 訂單資料庫中。 多資料來源彼此切換,要求不同的mybatis例項的
Android Studio:多包名打包
顯示 rri utf Coding schema style 市場 ret gravity 來自:http://m.blog.csdn.net/u011315960/article/details/73251196 前言 最近有點小忙,博客都落下了,今天趕緊寫點東西補上
springboot配置多資料來源之Spring Date JPA
多資料來源在專案開發中是經常遇到的,如果同一個專案的不同模組使用的是不同資料庫,就需要多資料來源的處理。現在先寫之前使用JPA的時候遇到多資料來源的配置,後續可能再來個關於mybatis的多資料來源配置。 現在有這樣的需求,專案中有兩個模組,分別是flow與imap,flow需要使用預設資料
springboot+mybatis+druid 多資料來源整合
前言:在上一篇文章裡面我們進行了spring boot 和 mybatis 的整合 《springboot整合mybatis使用druid資料來源》, 文中是使用的單資料來源,因為專案中有很多需要用到多資料來源的場景,比如主從同步(讀寫分離)
springboot整合Mybatis配置多資料來源
springboot配置多資料來源有好幾種方式 1.application.properties配置 ## 埠 server.port=8080 # 資料庫訪問配置 spring.datasource.type=com.alibaba.druid.pool.DruidDataSource spri