
SpringBoot 優雅的進行單元測試
隨著專案的功能不斷增多啟動專案需要的時間就越來越長,如果每個功能都從Controller入口進行測試,不僅費時而且費力。
那麼這時候單元測試就體現出非常大的優勢了,對所有的介面進行測試,可以非常快速的發現問題,而且方便除錯。而且通過編寫單元測試來發現程式碼結構的不合理性,通常來說程式碼結構越合理,單元測試寫的越方便。
假設有這個場景,我們的專案啟動需要30s,共有A、B、C、D這四個service,A依賴B、C這兩個service,D Service為需要自動注入屬性值的Service。這裡使用執行緒睡眠的方式模擬啟動延遲:
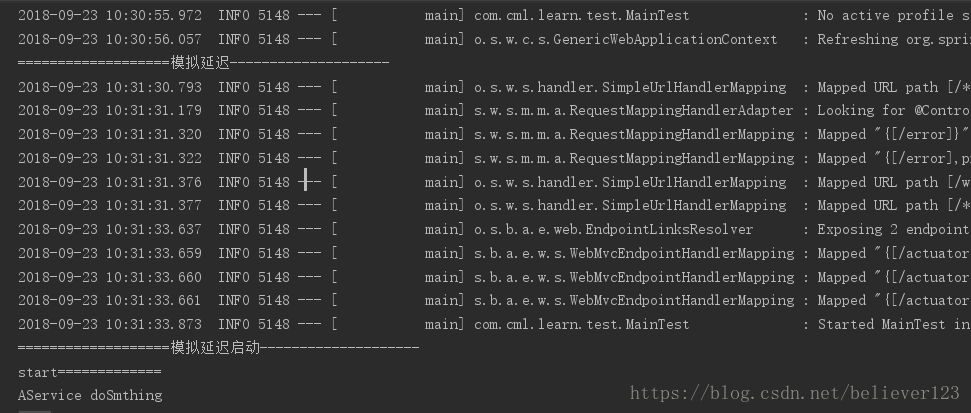
@SpringBootApplication
public class Main {
    public static void main(String[] args) {
        SpringApplication.run(Main.class, args);
    }

    @Bean
    public ApplicationRunner applicationRunner() throws InterruptedException {
        System.out.println("===================模擬延遲--------------------");
        Thread.sleep(30000);
        return args -> {
            System.out.println("===================模擬延遲啟動--------------------");
        };
    }
}
如果使用SpringBootTest,那麼得要等到專案啟動後才執行測試方法。
故此添加了MainTest單元測試:
@RunWith(SpringRunner.class)
@SpringBootTest(classes = Main.class)
public class MainTest {
    @Autowired
    private AService aService;

    @Before
    public void before() {
        System.out.println("start=============");
    }

    @Test
    public void testStartUp() {
        aService.doSmthing();
        System.out.println("--------------測試----------");
    }
}
從控制檯可以看出,要等到專案30s後才執行到我們的測試方法,要是有多個單元測試單單啟動就浪費了大量的時間:
拆分單元測試
例如我們只需要測試A服務,那麼可以使用ContextConfiguration指定需要啟動的類和依賴類,由於A依賴B、C兩個服務,因此ContextConfiguration注入了A、B、C三個類,如:
@RunWith(SpringRunner.class)
@ContextConfiguration(classes = {
        AService.class,
        BService.class,
        CService.class
})
public class AServiceTest {
    @Autowired
    private AService aService;


    @Test
    public void test() {
        aService.doSmthing();
    }

}
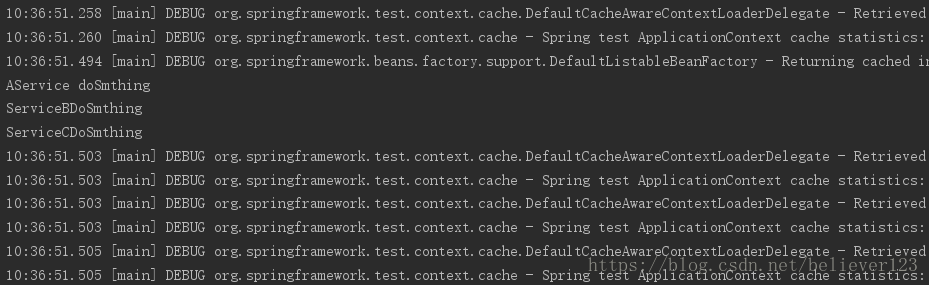
執行後如下,不到1s就執行完了。
使用Mock服務
比如我們需要測試A的服務方法,B、C服務並不是我們關注的重點,這個時候可以將BC服務mock出來。
@RunWith(SpringRunner.class)
@ContextConfiguration(classes = {
        AService.class
})
public class AServiceMockTest {
    @Autowired
    private AService aService;
    @MockBean
    private BService bService;
    @MockBean
    private CService cService;

    @Before
    public void setUp() {
        Mockito.when(bService.doSmthing()).thenReturn("mockBServce");
        Mockito.when(cService.doSmthing()).thenReturn("mockCServce");
    }

    @Test
    public void test() {
        aService.doSmthing();
    }

}
佔位符測試
通常我們有配置檔案,如果使用配置中的屬性可以使用@Value("${key}")進行注入,如D Service:
@Service
public class DService {
    @Value("${config.username}")
    private String username;

    public String doSmthing() {
        return username+" doSmthing";
    }
}
@RunWith(SpringRunner.class)
@ContextConfiguration(classes = {
        DService.class,
        PropertySourcesPlaceholderConfigurer.class
})
@TestPropertySource(properties = {"config.username=myUsername"})
public class DServiceTest {
    @Autowired
    private DService dService;

    @Test
    public void test() {
        String result = dService.doSmthing();
        System.out.println(result);
    }
}
執行後輸出如下:
myUsername doSmthing
如果屬性多,那麼使用註解注入就不太方便了,這時可以使用屬性檔案進行配置,
@TestPropertySource(“classpath:application.properties”)或者在ContextConfiguration中新增initializers=ConfigFileApplicationContextInitializer.class進行自動配置,預設會配置resoruces下的application.properties屬性檔案
@RunWith(SpringRunner.class)
@ContextConfiguration(classes = {
        DService.class,
        PropertySourcesPlaceholderConfigurer.class
}, initializers = ConfigFileApplicationContextInitializer.class)
public class DServicePropertiesTest {
    @Autowired
    private DService dService;

    @Test
    public void test() {
        String result = dService.doSmthing();
        System.out.println(result);
    }
}
總結
以上例子說明了@SpringBootTest、@TestPropertySource、PropertySourcesPlaceholderConfigurer、ConfigFileApplicationContextInitializer等使用。已經可以覆蓋到大部分常用的單元測試情況了,更多的使用方式可以參考Spring官網和SpringBoot中的單元測試這章節:
以上程式碼已經提交到工程:LearnTest
相關推薦
Springboot整合JUnit5優雅進行單元測試
## 為什麼使用JUnit5 + JUnit4被廣泛使用,但是許多場景下使用起來語法較為繁瑣,JUnit5中支援lambda表示式,語法簡單且程式碼不冗餘。 + JUnit5易擴充套件,包容性強,可以接入其他的測試引擎。 + 功能更強大提供了新的斷言機制、引數化測試、重複性測試等新功能。 + ps:開發人員
SpringBoot+Junit進行單元測試
在測試類上新增 @RunWith(SpringRunner.class) @SpringBootTest(classes=MyApplication.class) 這樣就可正常使用@autowi
SpringBoot 優雅的進行單元測試
隨著專案的功能不斷增多啟動專案需要的時間就越來越長,如果每個功能都從Controller入口進行測試,不僅費時而且費力。 那麼這時候單元測試就體現出非常大的優勢了,對所有的介面進行測試,可以非常快速的發現問題,而且方便除錯。而且通過編寫單元測試來發現程式碼結構的
springboot 對dao層介面進行單元測試-springboot(4)
前言 接著之前的springboot專案,來寫springboot對dao層介面測試。 正文 之前我的springboot專案在初始化就自動引入了測試依賴,所以無需再次引入其他。 新增函式 mybatis自動生成了6個基本函式,但是開發中這些函式遠遠不夠
記錄 呼叫service介面進行單元測試 SpringBoot
因為專案有時候會用到 所以去網上找了這些 寫了個暫時夠用的比較簡單的 網上資料還是蠻多的 有空可以繼續深入一下 呼叫service介面測試流程: 繼承TestUtil類 使用@Test(org.junit.Test)註解測試
springboot項目進行單元測試
for unit test art 單元 public ota framework 使用 auto 使用springboot開發項目時,通過簡單的註解可以方便地單元測試,方式如下: 一、引入springboot-test依賴 <!-- for test -->
使用Junit和Mockito對SpringBoot框架專案進行單元測試(一)
使用Junit和Mockito對SpringBoot框架專案進行單元測試看完這篇文章你就可以輕鬆的完成基本的單元測試,使得覆蓋率達到90%以上Mockito 是流行的 Java 單元測試 Mock 框架,免費開源。Mockito 擁有的非常少的 API,所以開始使用 Mock
SpringBoot介面使用MockMvc進行單元測試
/** * Created by Draven on 2017/11/28. * Email:[email protected] */ @SpringBootTest @RunWith(
springboot+mockmvc對controlle進行單元測試
依賴 原Controller 建立對應的ControllerTest Spring測試框架提供MockMvc物件,可以在不需要客戶端-服務端請求的情況下進行MVC測試,完全在服務端這邊就可以執行Controller的請求,跟啟動了測試伺服器一樣。 測試開始之前需
NUnit.Framework在VS2015中如何進行單元測試
開放 ron 微軟 strong 擴展 分享 方案 mar 項目 微軟在VS2015中加入了自動化生成測試功能, 在需要測試的源文件的公共方法中右鍵既可以創建單元測試。 不過需要註意的是,要在公共方法中創建,否則會提示這個錯誤 如下是自動化單元測試界面,可以發
在vue-cli生成的項目中使用karma+chrome進行單元測試
使用 設計實現 測試用例 runner 服務 進行 ui界面 包含 node 用vue-cli生成項目時,如果選擇了單元測試,那麽會采用karma+mocha作為單元測試框架,默認使用的瀏覽器是PhantomJs。 Karma是一個基於Node.js的JavaScri
springMVC整合Junit4進行單元測試
main方法 pri tail println test pan ati 測試的 tco 版權聲明:本文為博主原創文章,未經博主允許不得轉載。 用Junit做單元測試的好處多多,博主領悟到了兩點。一是不用在每個類裏面都寫main方法然後去測試;二是可以得到每個方法執行
Glib 對 C 函數進行單元測試
error ati 完成 structure 是否 pac str txt b- 1. Glib 單元測試框架 Glib 為單元測試提供了一套完整的測試框架,每個測試運行包括以下幾個部分 測試數據結構 測試 setup 與 teardown 函數 測試函數 2. 單元測
SpringBoot項目單元測試
feign service jpg log exceptio 方法 啟動項 context mailto 前一段時間,有朋友問到springboot運用如何進行單元測試,結合LZ公司的實際運用,這裏給大家描述一下三種單元測試的方式。 1.約定 單元測試代碼寫在src/tes
【轉載】IntelliJ IDEA配置JUnit進行單元測試
dbd ima pom.xml format height eight nsh 格式 oot 前提條件 安裝JDK,並配置好環境變量 工程已解決JUnit依賴關系(pom.xml) IDEA中JUnit配置 IDEA自帶一個JUnit插件,打開Settings窗口搜
Spring整合Junit4進行單元測試
CA spa dep pat unit ati 測試 ID sco 一. 添加依賴包(maven) <dependency> <groupId>junit</groupId> <artifactId>junit<
IDEA 自動生成Junit進行單元測試
沒有 src ner acc 路徑 name cep csdn ctr 1,從插件資源庫中搜索JunitGenerator V2.0版本,通過此工具自動完成test類的生成。Settings > Plugins 2,配置生成test類的路徑。Settings &
PHPstorm配置PHPunit對composer引入的php代碼進行單元測試
擴展方法 alt 安裝 load date 分享圖片 trap use str 1、 如何安裝PHPunit,這裏不展述(如需打斷點debug測試,安裝PHP的xdebug擴展方法也不展開說了 https://xdebug.org/) 2、如何進行配置 以 PHP設計
Android Studio中進行單元測試
term pack jsb java 測試的 dep create stat multi 在Android開發過程中,我們往往忽略了單元測試功能, 主要還能還是大家覺得 真機在手,運行調試特別直觀。 不過如果我們能夠養成單元測試的習慣,相信能更加提升我們應用開發的速度。
Spring Boot 項目在 IDEA 中 進行單元測試
res sin run ng- targe clas 單元測試 2.0 就會 Spring Boot提供了許多實用程序和註釋來幫助您測試應用程序。 測試由兩個模塊提供支持:spring-boot-test包含核心項,spring-boot-test-autoconfigur