1. 程式人生 > >Android中RecycleView的使用詳解

Android中RecycleView的使用詳解

轉載自:http://blog.csdn.net/lmj623565791/article/details/45059587

//*~*~*~*~*~*~*~*~*~*~*~*~**~*~*~*~*~**~*~*~*~*~*~*~*~*~*~*~*~*~*~*~*~*~*~*~*~*~*~*~*~*~*~*~*~*~*~*~//

概述

RecyclerView出現已經有一段時間了,相信大家肯定不陌生了,大家可以通過匯入support-v7對其進行使用。 
據官方的介紹,該控制元件用於在有限的視窗中展示大量資料集,其實這樣功能的控制元件我們並不陌生,例如:ListView、GridView。

那麼有了ListView、GridView為什麼還需要RecyclerView這樣的控制元件呢?整體上看RecyclerView架構,提供了一種插拔式的體驗,高度的解耦,異常的靈活,通過設定它提供的不同LayoutManager,ItemDecoration , ItemAnimator實現令人瞠目的效果。

  • 你想要控制其顯示的方式,請通過佈局管理器LayoutManager
  • 你想要控制Item間的間隔(可繪製),請通過ItemDecoration
  • 你想要控制Item增刪的動畫,請通過ItemAnimator
  • 你想要控制點選、長按事件,請自己寫(擦,這點尼瑪。)

基本使用

鑑於我們對於ListView的使用特別的熟悉,對比下RecyclerView的使用程式碼:

mRecyclerView = findView(R.id.id_recyclerview);
//設定佈局管理器
mRecyclerView.setLayoutManager(layout);
//設定adapter
mRecyclerView.setAdapter(adapter)
//設定Item增加、移除動畫
mRecyclerView.setItemAnimator(new DefaultItemAnimator());
//新增分割線
mRecyclerView.addItemDecoration(new DividerItemDecoration(
                getActivity(), DividerItemDecoration.HORIZONTAL_LIST));
  • 1
  • 2
  • 3
  • 4
  • 5
  • 6
  • 7
  • 8
  • 9
  • 10
  • 1
  • 2
  • 3
  • 4
  • 5
  • 6
  • 7
  • 8
  • 9
  • 10

ok,相比較於ListView的程式碼,ListView可能只需要去設定一個adapter就能正常使用了。而RecyclerView基本需要上面一系列的步驟,那麼為什麼會新增這麼多的步驟呢?

那麼就必須解釋下RecyclerView的這個名字了,從它類名上看,RecyclerView代表的意義是,我只管Recycler View,也就是說RecyclerView只管回收與複用View,其他的你可以自己去設定。可以看出其高度的解耦,給予你充分的定製自由(所以你才可以輕鬆的通過這個控制元件實現ListView,GirdView,瀑布流等效果)。

Just like ListView

  • Activity
package com.zhy.sample.demo_recyclerview;

import java.util.ArrayList;
import java.util.List;

import android.os.Bundle;
import android.support.v7.app.ActionBarActivity;
import android.support.v7.widget.LinearLayoutManager;
import android.support.v7.widget.RecyclerView;
import android.support.v7.widget.RecyclerView.ViewHolder;
import android.view.LayoutInflater;
import android.view.View;
import android.view.ViewGroup;
import android.widget.TextView;

public class HomeActivity extends ActionBarActivity
{

    private RecyclerView mRecyclerView;
    private List<String> mDatas;
    private HomeAdapter mAdapter;

    @Override
    protected void onCreate(Bundle savedInstanceState)
    {
        super.onCreate(savedInstanceState);
        setContentView(R.layout.activity_single_recyclerview);

        initData();
        mRecyclerView = (RecyclerView) findViewById(R.id.id_recyclerview);
        mRecyclerView.setLayoutManager(new LinearLayoutManager(this));
        mRecyclerView.setAdapter(mAdapter = new HomeAdapter());

    }

    protected void initData()
    {
        mDatas = new ArrayList<String>();
        for (int i = 'A'; i < 'z'; i++)
        {
            mDatas.add("" + (char) i);
        }
    }

    class HomeAdapter extends RecyclerView.Adapter<HomeAdapter.MyViewHolder>
    {

        @Override
        public MyViewHolder onCreateViewHolder(ViewGroup parent, int viewType)
        {
            MyViewHolder holder = new MyViewHolder(LayoutInflater.from(
                    HomeActivity.this).inflate(R.layout.item_home, parent,
                    false));
            return holder;
        }

        @Override
        public void onBindViewHolder(MyViewHolder holder, int position)
        {
            holder.tv.setText(mDatas.get(position));
        }

        @Override
        public int getItemCount()
        {
            return mDatas.size();
        }

        class MyViewHolder extends ViewHolder
        {

            TextView tv;

            public MyViewHolder(View view)
            {
                super(view);
                tv = (TextView) view.findViewById(R.id.id_num);
            }
        }
    }

}
  • 1
  • 2
  • 3
  • 4
  • 5
  • 6
  • 7
  • 8
  • 9
  • 10
  • 11
  • 12
  • 13
  • 14
  • 15
  • 16
  • 17
  • 18
  • 19
  • 20
  • 21
  • 22
  • 23
  • 24
  • 25
  • 26
  • 27
  • 28
  • 29
  • 30
  • 31
  • 32
  • 33
  • 34
  • 35
  • 36
  • 37
  • 38
  • 39
  • 40
  • 41
  • 42
  • 43
  • 44
  • 45
  • 46
  • 47
  • 48
  • 49
  • 50
  • 51
  • 52
  • 53
  • 54
  • 55
  • 56
  • 57
  • 58
  • 59
  • 60
  • 61
  • 62
  • 63
  • 64
  • 65
  • 66
  • 67
  • 68
  • 69
  • 70
  • 71
  • 72
  • 73
  • 74
  • 75
  • 76
  • 77
  • 78
  • 79
  • 80
  • 81
  • 82
  • Activity的佈局檔案
<RelativeLayout xmlns:android="http://schemas.android.com/apk/res/android"
    xmlns:tools="http://schemas.android.com/tools"
    android:layout_width="match_parent"
    android:layout_height="match_parent" >

    <android.support.v7.widget.RecyclerView
        android:id="@+id/id_recyclerview"
         android:divider="#ffff0000"
           android:dividerHeight="10dp"
        android:layout_width="match_parent"
        android:layout_height="match_parent" />

</RelativeLayout>
  • 1
  • 2
  • 3
  • 4
  • 5
  • 6
  • 7
  • 8
  • 9
  • 10
  • 11
  • 12
  • 13
  • 1
  • 2
  • 3
  • 4
  • 5
  • 6
  • 7
  • 8
  • 9
  • 10
  • 11
  • 12
  • 13
  • Item的佈局檔案
<?xml version="1.0" encoding="utf-8"?>
<FrameLayout xmlns:android="http://schemas.android.com/apk/res/android"
    android:layout_width="match_parent"
    android:background="#44ff0000"
    android:layout_height="wrap_content" >

    <TextView
        android:id="@+id/id_num"
        android:layout_width="match_parent"
        android:layout_height="50dp"
        android:gravity="center"
        android:text="1" />
</FrameLayout>
  • 1
  • 2
  • 3
  • 4
  • 5
  • 6
  • 7
  • 8
  • 9
  • 10
  • 11
  • 12
  • 13
  • 1
  • 2
  • 3
  • 4
  • 5
  • 6
  • 7
  • 8
  • 9
  • 10
  • 11
  • 12
  • 13

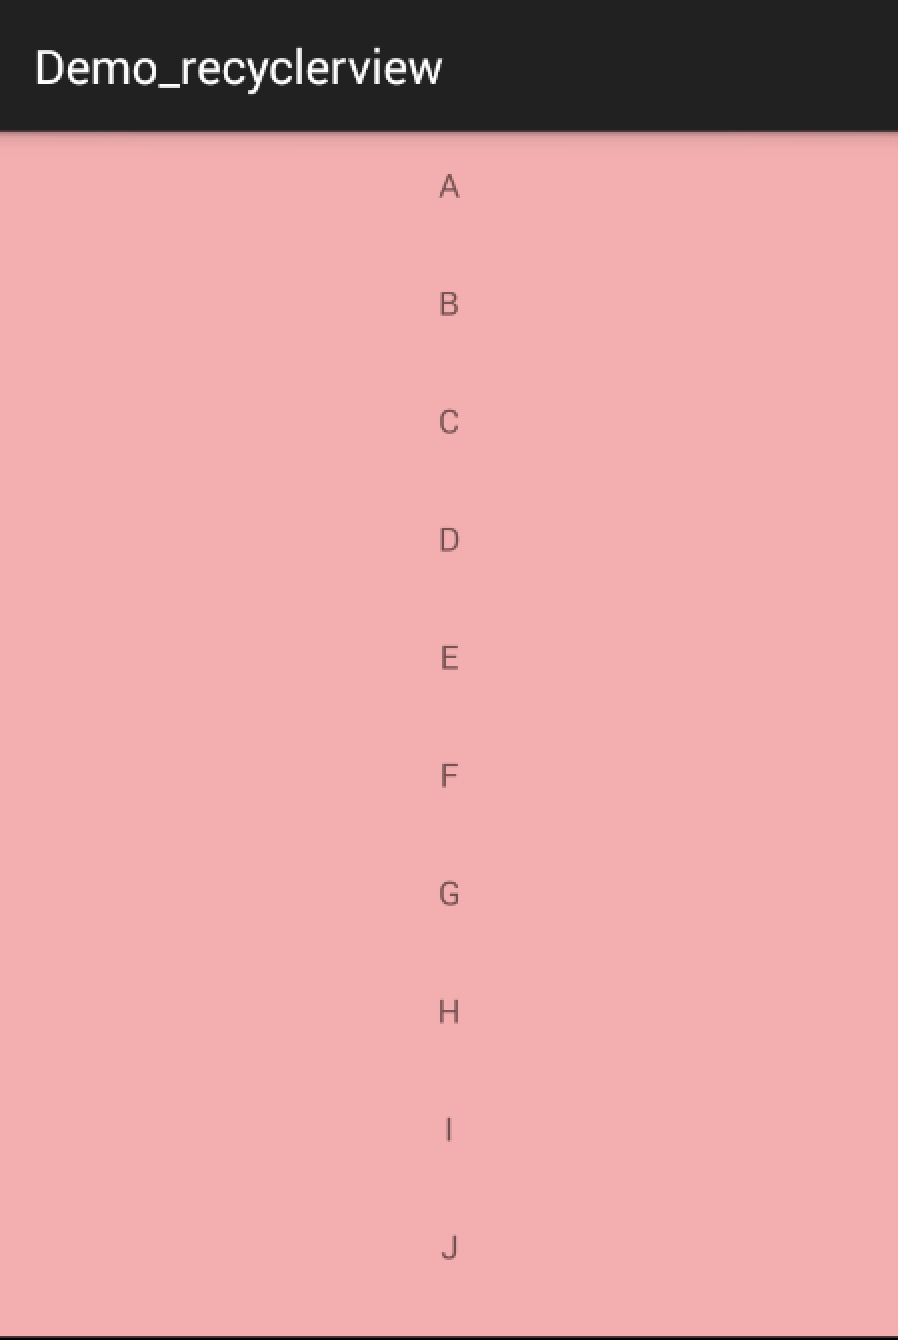
這麼看起來用法與ListView的程式碼基本一致哈~~ 
看下效果圖:

看起來好醜,Item間應該有個分割線,當你去找時,你會發現RecyclerView並沒有支援divider這樣的屬性。那麼怎麼辦,你可以給Item的佈局去設定margin,當然了這種方式不夠優雅,我們文章開始說了,我們可以自由的去定製它,當然我們的分割線也是可以定製的。

ItemDecoration

我們可以通過該方法新增分割線: 
mRecyclerView.addItemDecoration() 
該方法的引數為RecyclerView.ItemDecoration,該類為抽象類,官方目前並沒有提供預設的實現類(我覺得最好能提供幾個)。 
該類的原始碼:

public static abstract class ItemDecoration {

public void onDraw(Canvas c, RecyclerView parent, State state) {
            onDraw(c, parent);
 }


public void onDrawOver(Canvas c, RecyclerView parent, State state) {
            onDrawOver(c, parent);
 }

public void getItemOffsets(Rect outRect, View view, RecyclerView parent, State state) {
            getItemOffsets(outRect, ((LayoutParams) view.getLayoutParams()).getViewLayoutPosition(),
                    parent);
}

@Deprecated
public void getItemOffsets(Rect outRect, int itemPosition, RecyclerView parent) {
            outRect.set(0, 0, 0, 0);
 }
  • 1
  • 2
  • 3
  • 4
  • 5
  • 6
  • 7
  • 8
  • 9
  • 10
  • 11
  • 12
  • 13
  • 14
  • 15
  • 16
  • 17
  • 18
  • 19
  • 20
  • 21
  • 1
  • 2
  • 3
  • 4
  • 5
  • 6
  • 7
  • 8
  • 9
  • 10
  • 11
  • 12
  • 13
  • 14
  • 15
  • 16
  • 17
  • 18
  • 19
  • 20
  • 21

當我們呼叫mRecyclerView.addItemDecoration()方法新增decoration的時候,RecyclerView在繪製的時候,去會繪製decorator,即呼叫該類的onDraw和onDrawOver方法,

  • onDraw方法先於drawChildren
  • onDrawOver在drawChildren之後,一般我們選擇複寫其中一個即可。
  • getItemOffsets 可以通過outRect.set()為每個Item設定一定的偏移量,主要用於繪製Decorator。

接下來我們看一個RecyclerView.ItemDecoration的實現類,該類很好的實現了RecyclerView新增分割線(當使用LayoutManager為LinearLayoutManager時)。 
該類參考自:DividerItemDecoration


package com.zhy.sample.demo_recyclerview;

/*
 * Copyright (C) 2014 The Android Open Source Project
 *
 * Licensed under the Apache License, Version 2.0 (the "License");
 * limitations under the License.
 */

import android.content.Context;
import android.content.res.TypedArray;
import android.graphics.Canvas;
import android.graphics.Rect;
import android.graphics.drawable.Drawable;
import android.support.v7.widget.LinearLayoutManager;
import android.support.v7.widget.RecyclerView;
import android.support.v7.widget.RecyclerView.State;
import android.util.Log;
import android.view.View;


/**
 * This class is from the v7 samples of the Android SDK. It's not by me!
 * <p/>
 * See the license above for details.
 */
public class DividerItemDecoration extends RecyclerView.ItemDecoration {

    private static final int[] ATTRS = new int[]{
            android.R.attr.listDivider
    };

    public static final int HORIZONTAL_LIST = LinearLayoutManager.HORIZONTAL;

    public static final int VERTICAL_LIST = LinearLayoutManager.VERTICAL;

    private Drawable mDivider;

    private int mOrientation;

    public DividerItemDecoration(Context context, int orientation) {
        final TypedArray a = context.obtainStyledAttributes(ATTRS);
        mDivider = a.getDrawable(0);
        a.recycle();
        setOrientation(orientation);
    }

    public void setOrientation(int orientation) {
        if (orientation != HORIZONTAL_LIST && orientation != VERTICAL_LIST) {
            throw new IllegalArgumentException("invalid orientation");
        }
        mOrientation = orientation;
    }

    @Override
    public void onDraw(Canvas c, RecyclerView parent) {
        Log.v("recyclerview - itemdecoration", "onDraw()");

        if (mOrientation == VERTICAL_LIST) {
            drawVertical(c, parent);
        } else {
            drawHorizontal(c, parent);
        }

    }


    public void drawVertical(Canvas c, RecyclerView parent) {
        final int left = parent.getPaddingLeft();
        final int right = parent.getWidth() - parent.getPaddingRight();

        final int childCount = parent.getChildCount();
        for (int i = 0; i < childCount; i++) {
            final View child = parent.getChildAt(i);
            android.support.v7.widget.RecyclerView v = new android.support.v7.widget.RecyclerView(parent.getContext());
            final RecyclerView.LayoutParams params = (RecyclerView.LayoutParams) child
                    .getLayoutParams();
            final int top = child.getBottom() + params.bottomMargin;
            final int bottom = top + mDivider.getIntrinsicHeight();
            mDivider.setBounds(left, top, right, bottom);
            mDivider.draw(c);
        }
    }

    public void drawHorizontal(Canvas c, RecyclerView parent) {
        final int top = parent.getPaddingTop();
        final int bottom = parent.getHeight() - parent.getPaddingBottom();

        final int childCount = parent.getChildCount();
        for (int i = 0; i < childCount; i++) {
            final View child = parent.getChildAt(i);
            final RecyclerView.LayoutParams params = (RecyclerView.LayoutParams) child
                    .getLayoutParams();
            final int left = child.getRight() + params.rightMargin;
            final int right = left + mDivider.getIntrinsicHeight();
            mDivider.setBounds(left, top, right, bottom);
            mDivider.draw(c);
        }
    }

    @Override
    public void getItemOffsets(Rect outRect, int itemPosition, RecyclerView parent) {
        if (mOrientation == VERTICAL_LIST) {
            outRect.set(0, 0, 0, mDivider.getIntrinsicHeight());
        } else {
            outRect.set(0, 0, mDivider.getIntrinsicWidth(), 0);
        }
    }
}
  • 1
  • 2
  • 3
  • 4
  • 5
  • 6
  • 7
  • 8
  • 9
  • 10
  • 11
  • 12
  • 13
  • 14
  • 15
  • 16
  • 17
  • 18
  • 19
  • 20
  • 21
  • 22
  • 23
  • 24
  • 25
  • 26
  • 27
  • 28
  • 29
  • 30
  • 31
  • 32
  • 33
  • 34
  • 35
  • 36
  • 37
  • 38
  • 39
  • 40
  • 41
  • 42
  • 43
  • 44
  • 45
  • 46
  • 47
  • 48
  • 49
  • 50
  • 51
  • 52
  • 53
  • 54
  • 55
  • 56
  • 57
  • 58
  • 59
  • 60
  • 61
  • 62
  • 63
  • 相關推薦

    AndroidImageSwitcher(注意與圖片瀏覽器的區別)

    先看看繼承關係,ImageSwitcher和TextSwitcher的繼承關係是一樣的。兩個重要的父類:ViewSwitcher和ViewAnimator 繼承於ViewSwitcher,說明具備了切換功能 繼承於ViewAnimator,說明具備了動畫功能 Image

    AndroidAlarmManager以及利用PendingIntent設定鬧鐘

    AlarmManager是提供一種訪問系統鬧鐘服務的方式,允許你去設定在將來的某個時間點去執行你的應用程式。當你的鬧鐘響起(時間到)時,在它上面註冊的一個意圖(Intent)將會被系統以廣播發出,然後自動啟動目標程式,如果它沒有正在執行。註冊的鬧鐘會被保留即使裝置處於休眠中

    AndroidContext ---- 你所不知道的Context

                 前言:本文是我讀《Android核心剖析》第7章 後形成的讀書筆記 ,在此向欲瞭解Android框架的書籍推薦此書。         大家好,  今天給大家介紹下我們在應用開發中最熟悉而陌生的朋友-----Context類 ,說它熟

    AndroidWindowManager

    最近看到 關於 WindowManager的介紹,感到新奇下,瞭解了一下,並整理,以供備用: 一、WindowManager是什麼        WindowManager是Android中一個重要的

    AndroidIntent(二)之使用Intent廣播事件及Broadcast Receiver簡介

    通過第一篇的講解,我們已經看到了如何使用Intent來啟動新的應用程式元件,但是實際上他們也可以使用sendBroadcast方法來在元件間匿名的廣播訊息。 作為一個系統級別的訊息傳遞機制,Intent可以在程序之間傳送結構化的訊息。因此,通過實現Broadcast Rec

    AndroidRecycleView的使用

    轉載自:http://blog.csdn.net/lmj623565791/article/details/45059587 //*~*~*~*~*~*~*~*~*~*~*~*~**~*~*~*~*~**~*~*~*~*~*~*~*~*~*~*~*~*~*~*~*~

    Android 四大元件 android:exported 屬性

    當我們在用360等檢測軟體掃描應用漏洞時,掃描結果可能歸類為安全漏洞,涉及一個Android:exported屬性,這個屬性究竟是用來幹嘛的呢,詳情見下圖: 因此,查了官方API,學習了一下這個屬性! android:exported 是Android中的四大元件 Ac

    Android SDKtools

    Android SDK包含了各種各樣的定製工具,簡介如下: Android模擬器(Android Emulator) 它是在你的計算機上執行的一個虛擬移動裝置。你可以使用模擬器來在一個實際的Android執行環境下設計,除錯和測試你的應用程式。 Android除錯橋(A

    Android 7.1.1SystemProperties

    Android系統原始碼中,存在大量的SystemProperties.get或SystemProperties.set,通過這兩個介面可以對系統的屬性進行讀取/設定,看著挺簡單的就是呼叫get或set就能獲取或設定系統屬性,其實並不然。曾經也遇到過有關的坑,所以就總結了下

    JSJSON

    名稱 完全 rip json詳解 core 兼容 json字符串 之間 org JSON(JavaScript Object Notation) 是一種輕量級的數據交換格式,采用完全獨立於語言的文本格式,是理想的數據交換格式。同時,JSON是 JavaScript 原生格式

    nodeJsnpm

    commonjs -s license mon sem console 能力 效應 模塊安裝 npm 是 Node.js 的模塊依賴管理工具。作為開發者使用的工具,主要解決開發 node.js 時會遇到的問題。如同 RubyGems 對於 Ruby 開發者和 Maven 對

    006_netstatstate

    51cto time list osi lose 手動 請求 等待 沒有 TCP三次握手的過程如下: 主動連接端發送一個SYN包給被動連接端; 被動連接端收到SYN包後,發送一個帶ACK和SYN標誌的包給主動連接端; 主動連接

    aNDROID之MEDIapLaYER

    iap music media 詳解 list oid aid 5% layer %E8%BD%AC%E8%BD%BD%E4%B8%80%E4%B8%AA%E5%9B%BE%E7%89%87%E5%A4%84%E7%90%86%E5%B7%A5%E5%85%B7%E7%B1

    EditTextinputType

    trac extc isa share bsp input itl 浮點 ttext <EditText Android:layout_width="fill_parent" android:layout_height="wrap_content" android

    linuxtop

    linux查看進程之top詳解簡介top命令是Linux下常用的性能分析工具,能夠實時顯示系統中各個進程的資源占用狀況,類似於Windows的任務管理器。top顯示系統當前的進程和其他狀況,是一個動態顯示過程,即可以通過用戶按鍵來不斷刷新當前狀態.如果在前臺執行該命令,它將獨占前臺,直到用戶終止該程序為止.

    Android RxJava操作符系列: 變換操作符

    urn 原因 轉換 需要 生產 依賴 reat 入門 所有 Rxjava,由於其基於事件流的鏈式調用、邏輯簡潔 & 使用簡單的特點,深受各大 Android開發者的歡迎。Github截圖 如果還不了解 RxJava,請看文章:Android:這是一篇 清晰 &

    視覺SLAM相機

    目的 攝像頭 像素 一定的 原理 接收 計算 傳感 span 視覺SLAM中,通常是指使用相機來解決定位和建圖問題。 SLAM中使用的相機往往更加簡單,不攜帶昂貴的鏡頭,以一定的速率拍攝周圍的環境,形成一個連續的視頻流。 相機分類: 單目相機:只是用一個攝像頭進行SLAM的

    android:exported 屬性

    itl fas 默認 之前 綁定 四大 nbsp ring ins http://blog.csdn.net/watermusicyes/article/details/46460347 昨天在用360掃描應用漏洞時,掃描結果,出來一個android:exported屬性,

    04-LinuxDNS(一)

    訪問 舉例 dynamic linux下 目錄 col ofo 圖片 nslookup 零、關於配置Linux下的DNS中一些名詞的解釋請參見文章“03-關於配置Linux下的DNS中一些名詞的解釋(轉自網絡)”自行學習一、關於DNS配置文件查看DNS配置文件: rpm -

    05-LinuxDNS(二)

    相關 proc gen lin 四種方法 .... rate 我的網站 四種 接“04-Linux中DNS詳解(一)” 六、在Linux上測試域名解析1、先檢查DNS是否設置正確 cat /etc/resolv.conf [resolv.conf] # Generate