
Upstream Messages With Google Cloud Messaging
Google announced a new messaging model with Google Cloud Messaging on last years Google IO. This model allows for upstream messaging and for user specific notifications. This post is the first in a three-part series in which I am going to look into both these changes and to show you how to use them.
I had never written these posts if it weren't for the Dutch Android User Group meetup in Utrecht (January 2014), where I had the pleasure to talk about this topic. This event was well-attended and was packed with interesting talks about the changes in Android 4.4 and Google Play Services. If you have ever the chance to attend a meetup of our Dutch colleagues, I strongly suggest to do so. It has been a gorgeous evening and was well worth the two-hour drive. It was not just the talks but also the overall atmosphere as well as the conversations during the breaks and afterwards. A big thanks to the organizers for the awesome evening!
You can find my slides on the speakerdeck site. And a video of the talk should also be available pretty soon.
Sample App
I have published sample apps on github where you can see how to use this in context. For the Android client clone the gcm_sample project. For the server clone the gcm_server project
What's new
- You can send messages upstream from the user's device
- You have to use a permanent connection between your backend and Google's services
- You can use user specific notifications
In this post I will only cover upstream messaging. That is the flow of events and what to do on Android's side. In my next post I'm going to cover the server side - and in the third post I will write about user specific notifications. User notifications allow you to send user specific messages with the possibility to cancel notifications on other devices if they have been consumed already on one device.
Upstream messaging
With the new GCM release Google allows you to send messages directly back to Google's cloud. That's what they call upstream messaging. Have a look at the following diagrams. The first one is the traditional model of Google Cloud Messaging while the second one shows the new flow of events.
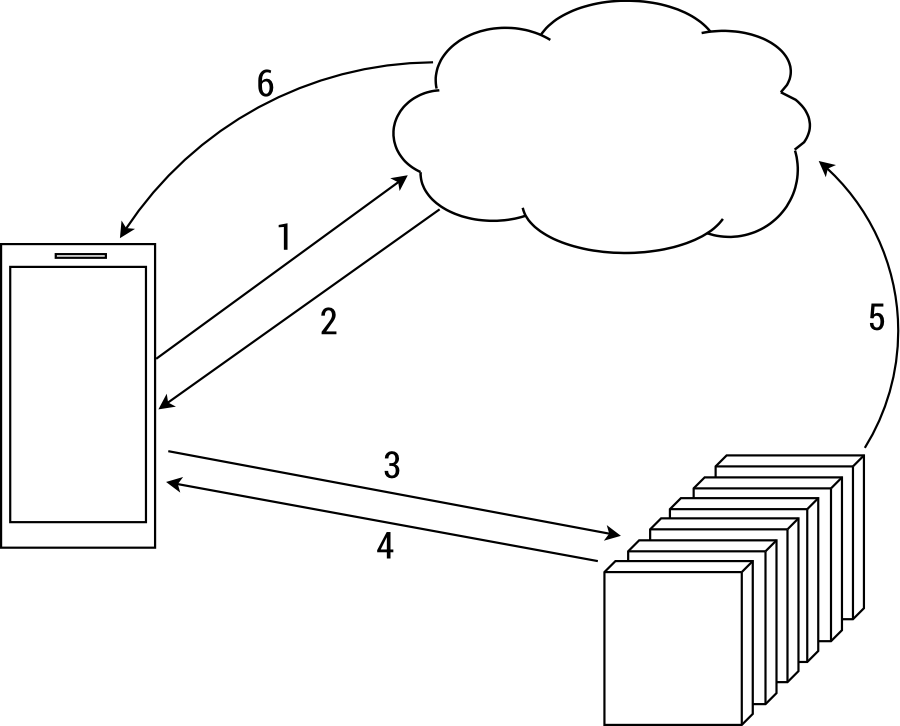
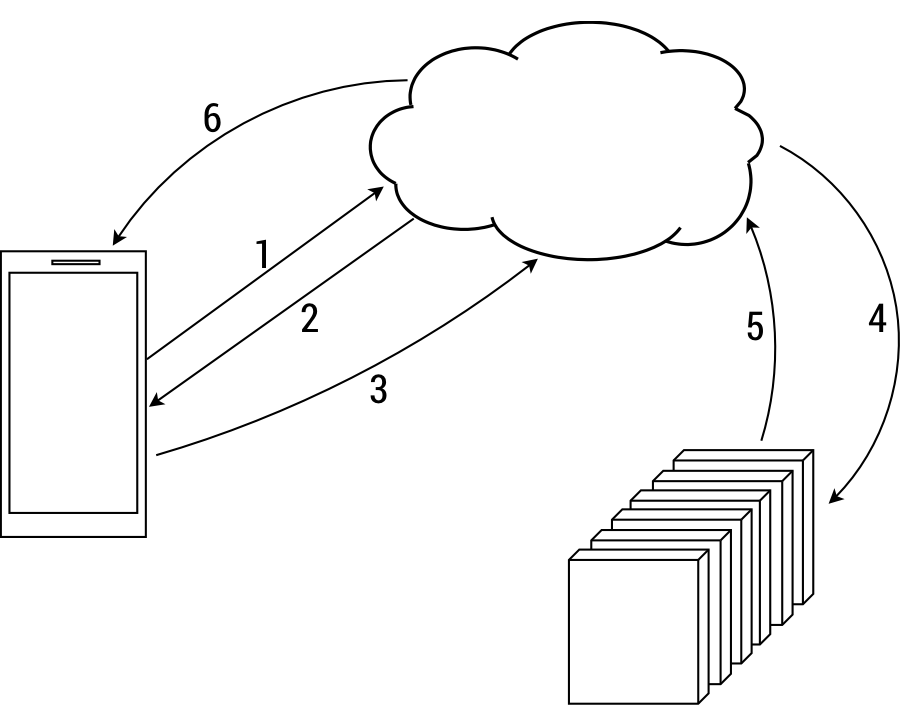
The first two steps in both diagrams are the same: You tell the Google Cloud Messaging API that you want to register a device (step 1). If the registration succeeds Google returns the registration id for this device (step 2).
Traditionally you would then send the registration id back to your server (step 3). The protocol was up to you but very likely HTTP. The server would (hopefully) respond with a success message (step 4).
From then on your server could send messages to Google's Cloud Messaging service (step 5) and the user's device would receive it, if it's registration id was part of the registration_ids parameter of the message (step 6).
With upstream messaging though your app would send the registration id (step 3) not directly to your server, but instead call a method of the Google Play Services API. Google Play Services would then send the message to Google's servers.
Google then processes the message and sends it to your backend. Obviously for this to work your backend must be connected in some way to Google's cloud. I will deal with this part in my next post. For now it's enough to know that there has to be a permanent connection between your backend and Google's cloud and that Google will deliver messages that way (step 4).
After the registration id has been transmitted successfully you can send messages to the device (step 5). But with the new way to use Google Cloud Messaging you would use the existing connection between your server and Google's servers and use a different protocol (with slightly different parameters).
Note that Google uses different names for its servers depending on which transmission model you want to use. Google uses the name "GCM HTTP Connection Server" for those servers receiving HTTP messages and it uses "GCM Cloud Connection Server" for those receiving XMPP messages via the permanent connection. The abbreviation CCS is very commonly used within GCM's documentation.
Create your credentials
If you already use Google Cloud Messaging you can skip this part and proceed to the next section.
If you're new to Google Cloud Messaging, you have to create an API key in Google's Cloud Console/Google Developer Console. Do not confuse it with the Google Play Developer Console. Both are unrelated.
After logging in to the Cloud Console you will see a list of projects. Simply create a new one and give it a name and a project id in the next dialog. Now this could be a source of confusion. The project id you use here is not the project id you have to use in your code later on. It's just a name which nevertheless has to be unique.
Afterwards creating the project the developer console will show you the project's page. Go to "APIs & Auth" in the menu and turn on "Google Cloud Messaging for Android" in the huge list of Google's services. Since Google displays all your active services at the top, the entry will move directly to the top after you enable it. Don't be irritated by that tiny UX glitch. Simply scroll to the top and you will see that it's status has changed to "On". That's great.
Switch to Credentials in the menu on the left. At the top of the new screen you can find a client id. It starts with a number followed by ".apps.googleusercontent.com". Select the number (only the number), copy it and paste it into your strings.xml - or a special gcm_strings.xml that only contains the project id. Name the string whatever you like - in the sample project I expect a string named gcm_project_id.
That's all you need for the Android part. But since you're logged in to the dev console anyway, let me show you how to create the API key for your server right away.
Go back to the dev console. On the Credentials page there are two sections. The OAuth section on the top is where you have found the project id. Below of it is the section called "Public API access". It's still empty. Click "Create New Key" and in the next dialog select "Server key". Afterwards you will see the API key for server applications together with some additional information. You will use the API key when following my post about the server side of GCM.
Sign up for using the new features
To be able to use all the shiny new features of Google Cloud Messaging, you have to sign up first. With the sign up form you "Sign up to be a trial partner". The new services are not yet finalized. It's a bit like it has been with Google Cloud to Device Messaging (C2DM) - the predecessor to GCM. You had to sign up as well, and when the service was finally made public, it had evolved to Google Cloud Messaging. So expect the API to change!
Using Google Play Services
You need to use Google Play Services from within your app for registering the device for as well as for sending upstream messages.
Setting up Google Play Services is easy, but requires too many steps to cover them in this post. And those steps also are different depending on whether you use Android Studio, Eclipse or something else. Have a look at the Play services documentation if it's the first time you use Google Play Services.
The very first step in your code when using Google Play Services is to make sure that Google Play Services are available at all. You can do so with the following snippet:
private boolean checkPlayServices() {
   int resultCode =
         GooglePlayServicesUtil
            .isGooglePlayServicesAvailable(getActivity());
   if (resultCode != ConnectionResult.SUCCESS) {
      if (GooglePlayServicesUtil.
            isUserRecoverableError(resultCode)) {
         GooglePlayServicesUtil.getErrorDialog(
               resultCode,
               getActivity(),
               RC_RES_REQUEST).show();
      } else {
         Log.i("grokkingandroid",
               "This device is not supported.");
      }
      return false;
   }
   return true;
}
What to do when the services are not available, depends on how important they are for your app. If Play Services are not essential, I suggest to let the user know - but in an unobtrusive way. After all the app is usable without it, so do not annoy your users with dialogs or other stuff that keeps them from doing what they actually installed the app for.
Registering the device for Google Cloud Messaging
The next step is to register the device. Google needs to know about your device before your app is allowed to receive or send messages.
In my sample app the user has to explicitly click the button register. Not a typical use case, but for the sample this makes sense. Now when to do this is in a real app is up to you. But when your app benefits from Google Cloud Messaging you usually want to register the device as soon as possible.
I also let the user select a Google account. Your app's users do not need one for Google Cloud Messaging. I solely request one to use this account for user specific notifications. I will cover those in the third post of this series.
Registering actually is very easy. First get hold of a GoogleCloudMessaging object and then simply call its method register() passing in the project id of the dev console (see "Create your credentials" above):
String projectId =
      getResources().getString(R.string.gcm_project_id);
GoogleCloudMessaging gcm =
      GoogleCloudMessaging.getInstance(this);
String regid = gcm.register(projectId);
Be careful though: Asking for the registration id is a blocking request. Hence, you should always use the call in a separate thread off the main thread (UI thread). In the sample project I am using an IntentService to achieve this.
Send messages upstream
As soon as the device is registered, it can send messages upstream - as well as receive messages. Probably the very first message to send upstream is the newly received registration id.
Sending messages is nearly as simple as registering. You create a Bundle with all the payload data you want to transmit and you also have to create a unique message id. In my sample code I simply increase a counter I keep within the SharedPreferences for the message id. Depending on your payload the code might look more or less like this:
try {
   Bundle data = new Bundle();
   // the account is used for keeping
   // track of user notifications
   data.putString("account", account);
   // the action is used to distinguish
   // different message types on the server
   data.putString("action", Constants.ACTION_REGISTER);
   String msgId = Integer.toString(getNextMsgId());
   gcm.send(projectId + "@gcm.googleapis.com", msgId,
         Constants.GCM_DEFAULT_TTL, data);
} catch (IOException e) {
   Log.e("grokkingandroid",
         "IOException while sending registration id", e);
}
As you can see you once again need a GoogleClientMessaging object and call its send() message.
This message takes as parameters the project id appended with the fixed string "@gcm.googleapis.com", a unique message id, a time to live value and the bundle with your payload.
You might notice that I do not include the registration id as part of the payload. That's because Google Play Services adds the registration id to every message to your backend anyway. You will see in the next post which parameter Google uses for the registration id. For now, just keep in mind that above code is all that is actually needed.
Those strings within the bundle are not even necessary. I use the account because I want to send user specific messages and I use the action to differentiate on my server between different message types.
As you can see there is no special message for sending the registration id back home. It's just a message like any other upstream message.
Benefits of Upstream messaging
Now that you know how to send upstream messages, you might wonder about why to use upstream messaging in the first place. Why not send your message back to your server as you always did (assuming you did contact your server)?
There are three reasons on the Android side for using the new model:
- The upstream messaging API is dead simple
- Upstream messages can reuse connections
- Upstream messages are needed for notification cancellation
The API is dead simple
You have seen how simple the Android code is. It's just some message calls to Google Play Services's GoogleCloudMessaging class. It's really just this one class, which with only six public methods is not too difficult to grasp 🙂
Contrast that with using HTTP instead: When talking back to your own servers directly you have to take care of checking if the network is available, send off the message, check for any error conditions and enqueue the message for later delivery if anything goes awry. All in all you're better of with upstream messaging - at least for as long as you only care about the Android code.
Upstream messages can reuse connections
Not only is the API easier to use, it can also save resources. The user's device has a connection to Google anyway so with upstream messaging Google Play Services can reuse this connection. The services take care of using the most power efficient way to send messages so you do not have to deal with that. This helps keeping the battery usage of your app to a minimum.
Of course if your app only sends messages every once in a while, your users won't notice any change in the battery usage. But if your app has to send many messages to your backend, this might make a difference to your users.
Upstream messages are needed for notification cancellation
The strongest argument for using upstream messaging though is notification cancellation. If you send messages from your server to specific users, you do not want them to see a notification on each and every device - even if it has long been read on another device. I will deal with user specific messages and notification cancellation in my third post about Google Cloud Messaging. So stay tuned 🙂
Permissions
To use Google Cloud Messaging you need quite a lot of permissions:
<uses-permission
   android:name="android.permission.INTERNET" />
<uses-permission
   android:name="android.permission.GET_ACCOUNTS" />
<uses-permission
   android:name="android.permission.WAKE_LOCK" />
<uses-permission
   android:name="com.google.android.c2dm.permission.RECEIVE" />
<permission
   android:name=
      "com.grokkingandroid.sampleapp.samples.notifications.gcm.permission.C2D_MESSAGE"
   android:protectionLevel="signature" />
<uses-permission
   android:name=
      "com.grokkingandroid.sampleapp.samples.notifications.gcm.permission.C2D_MESSAGE" />
The first three are predefined permissions. You might notice the account permission. Actually this one is only needed for API levels before Android 4.0.4. I added it for completeness.
The fourth is a bit of an oddity. It's the old Cloud to Device Messaging (C2DM) permission. For backwards compatibility it makes sense to not change it - otherwise existing apps had to ask for a new permission. But it looks weird about two years after C2DM was deprecated.
You also have to create a new permission of your own. That's the permission that ensures that no other app can receive messages intended for your app. It has to exactly follow this naming convention: Package name plus ".permission.C2D_MESSAGE". Otherwise your app won't receive the messages sent to it. Your app also must use this newly created permission.
Receiving messages
Of course the fun part of Google Cloud Messaging is to actually receive push messages from the cloud. Google transmits the messages to your app to a BroadcastReceiver.
/**
 * See http://developer.android.com/google/gcm/client.html
 */
public class GcmBroadcastReceiver
      extends WakefulBroadcastReceiver {
   @Override
   public void onReceive(Context context, Intent intent) {
      // Explicitly specify that
      // GcmIntentService will handle the intent.
      ComponentName comp =
            new ComponentName(
               context.getPackageName(),
               GcmIntentService.class.getName());
      // Start the service, keeping the
      // device awake while it is launching.
      startWakefulService(
            context,
            (intent.setComponent(comp)));
      setResultCode(Activity.RESULT_OK);
   }
}
The Broadcastreceiver gets the message - but since it runs on the UI thread it should immediately pass the message on to some background thread. I use the same IntentService you have already seen for registering the device.
Actually parsing the message and doing what has to be done is done in the service. Again The code is pretty much the same as on Google's documentation:
// handling of stuff as described on
// http://developer.android.com/google/gcm/client.html
try {
   Bundle extras = intent.getExtras();
   // The getMessageType() intent parameter
   // must be the intent you
   // received in your BroadcastReceiver.
   String messageType = gcm.getMessageType(intent);

   if (extras != null && !extras.isEmpty()) {
      /*
      * Filter messages based on message type.
      * Since it is likely that GCM will be
      * extended in the future with new
      * message types, just ignore any message
      * types you're not interested in, or that you
      * don't recognize.
      */
      if (GoogleCloudMessaging.MESSAGE_TYPE_SEND_ERROR
            .equals(messageType)) {
         sendNotification(
            "Send error: " + extras.toString());
      }
      else if (GoogleCloudMessaging.MESSAGE_TYPE_DELETED
            .equals(messageType)) {
         sendNotification("Deleted messages on server: "
            + extras.toString());
      } else if (GoogleCloudMessaging.MESSAGE_TYPE_MESSAGE
            .equals(messageType)) {
         // Post notification of received message.
         String msg = extras.getString("message");
         if (TextUtils.isEmpty(msg)) {
            msg = "empty message";
         }
         sendNotification(msg);
      }
   }
} finally {
   // Release the wake lock provided by the WakefulBroadcastReceiver.
   GcmBroadcastReceiver.completeWakefulIntent(intent);
}
As you can see GCM uses different message types. the last one is the one actually containing a new messages. The first one informs you about errors when sending messages and the second tells you that messages have been deleted. If for example you display incoming messages with a notification you would have to cancel the notification in this case.
What to do when receiving an actual message is very specific to your app. The sample app simply displays a notification.
Do not forget to release the wake lock. That's the line within the finally block. The finally block ensure that this call will always be done - even if any exception has been thrown in the code within the try block. Be sure to do it that way!
Lessons learned
In this post you have seen how the message flow has changed when using Google Cloud Messaging. With the previous model you had to contact your server directly from the device, now you only tell Google Play Services what to do with the new upstream messaging model. Google's services take care of actually delivering the message to your server.
You also have learned about how to set up the project in Google's developer console and that you have to sign in to use the new features.
Finally you have seen how easy the Android code actually is and what the benefits of upstream messages are.
In the next post you will learn more about the server side of upstream messaging - which is a tad more complex. And after that I'm going to show you how to use user notifications in the final post of this series.
相關推薦
Upstream Messages With Google Cloud Messaging
Google announced a new messaging model with Google Cloud Messaging on last years Google IO. This model allows for ups
Kickstart Terraform on GCP with Google Cloud Shell
too cts start sof branch str row pen shell OCT 24 2018?RILEY KARSON Riley Karson is a software engineer at Google, where he works as a co
Using Chrome Dev Tools with Google Cloud – Google Cloud Platform
Using Chrome Dev Tools with Google CloudSome Google Cloud customers have a very large amount of static content that they wish to serve to users. Typically,
Create Custom Machine Learning Models With Google Cloud ML Wimoxez
Google Cloud Machine Learning (ML) motors can be really just controlled services that make it possible for programmers and info boffins to successfully con
Create a multiregional http monitor in less than five minutes with google cloud function
Create a multiregional http monitor in less than five minutes with google cloud functionThese days, everybody is migrating his architectures to microservic
An XMPP Server for Google Cloud Messaging
In this post I am going to write about the server-side of upstream messages with Google Cloud Messaging. This is the
Building Microservices with Spring Cloud - Service discovery
mov 技術分享 com over self ref strong rem uil What is service discovery and why we use it? A way for service to register it self A way for a
Building Microservices with Spring Cloud - Configuration Server
build value rem ros spring enforce 技術 behavior for Prepare Understand "Twelve factor APP" - config Understand Spring boot configuration
Building Microservices with Spring Cloud - Intelligent Routing
pig nginx bsp img es2017 tel https pat sin ref : http://microservices.io/patterns/apigateway.html https://www.nginx.com/blog/building-
Building Microservices with Spring Cloud - Load balancing
com .com alt net ribbon build .cn ng- uil ref: https://cloud.spring.io/spring-cloud-netflix/single/spring-cloud-netflix.html#spring-cl
Building Microservices with Spring Cloud - Fault tolerance Circuit breaker
tps blog logs single pri ros ces nts bre ref: https://cloud.spring.io/spring-cloud-netflix/single/spring-cloud-netflix.html#_circuit_bre
3.11 - 3.12 A day with Google
strong 山東 紀念 ffi 一次 機會 天發 一個 真的 補了一番遊記。 找了一個本科學弟一起去上海遊玩。本來老板還要我周一過去討論寒假閱讀的論文,總算是把討論時間挪到周六了。 興沖沖地買好車票後就開始期待上海Google office的神秘之旅。 update:媽呀
Google Cloud 創建Ubuntu虛擬機
nbsp engine 啟動 完成 藍色 虛擬 項目 分享圖片 png 1. 在Google Cloue 菜單欄選中 Compute Engine ,點擊“創建實例” 。 2. 適當填寫虛擬機信息,在“啟動磁盤”項目點擊“更改”按鈕。 3 在彈出的菜單中,選擇OS
通過google cloud API 使用 WaveNet
targe size input ssm ioc LV tex ica amp Cloud Text-to-Speech 中使用了WaveNet,用於TTS,頁面上有Demo。目前是BETA版 使用方法 註冊及認證參考:Quickstart: Text-to-Spe
[轉]使用Google Cloud + cloudflare永久免費運行一個網站
sch 內存占用 oca 博客 spa 環境 讓我 ups 8.0 原文出處:https://www.jianshu.com/p/dc4c9996f4b9 除卻域名的年費,我的博客站點是運行在雲服務器上,如果沒有意外,維護的費用應該是零。 雲主機 雲服務器我使用的是
配置google cloud
自己的筆記本跑CNN感覺要炸了,於是想到配置個谷歌雲,還有300刀的免費額度,至少可以寫完論文了吧。 於是開始摸索,在網上找了一些教程,然後發現其實配置谷歌雲伺服器做深度學習,就是先在谷歌裡建立一個例項(可以理解為一個主機),然後裝一個Xshell讓自己的電腦可以遠端控制這臺主機,然後接下來的工作就像我們自己
google cloud storage托管靜態頁面
快速入門 main -m ons 靜態頁 project 命令 令行 git 初始步驟1、 域名 2、 google Cloud create project. the project name must match the domain name 3、cname 12NA
google cloud storage託管靜態頁面
初始步驟1、 域名 2、 google Cloud create project. the project name must match the domain name 3、cname 12NAME TYPE DATAwww.example.com CNAME c.storage.googleapis
使用Gardener在Google Cloud Platform上建立Kubernetes叢集
Gardener是一個開源專案,github地址: https://github.com/gardener/gardener/ 使用Gardener,我們可以在幾分鐘之內在GCP, AWS, Azure或者Openstack上輕鬆建立Kubernetes Cluster。
Google Cloud SSH 連線配置
設定當前使用者及root使用者的密碼 sudo passwd xx-user # 輸入新密碼 sudo passwd root # 輸入新密碼(建議保持一樣) 在本地生成私鑰和公鑰 cd ~/.ssh ssh-keygen -f myKey 。。。 # 此時會生成 公鑰 myKey.