
Adding ActionBar Items From Within Your Fragments
This tutorial shows you how to add action items to the ActionBar from within your Fragments and how to disable or enable action items depending on the state of your fragment. All code works with the stock Android ActionBar object as well as with ActionBarSherlock.
Why do you want to add action items?
In a previous post you have seen that Android makes it easy to provide responsive interfaces. And given the vast distribution of devices sizes that is something you should do.
This post continues with the app, you have developed in the first posts of this series. The user has a list of items, a detail screen and an edit screen.
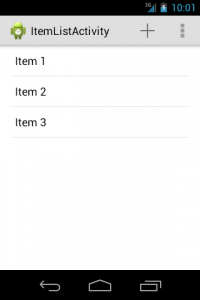
On a phone the startscreen simply shows a list of items. Here you have an action item to add a new item to the list:
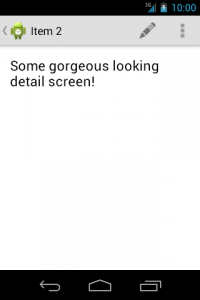
The detail screen shows all the relevant details of this item and offers you to edit the item:
Now here's what the tablet version looks like:
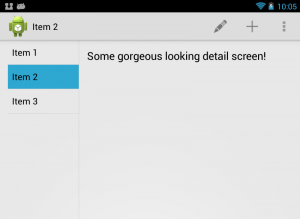
As you can see, it now sports both icons since it also presents both fragments. Now this app is pretty dull so far, and the detail screen even more so, so let me show you a real app. I take Timetable, an app that does this nicely.
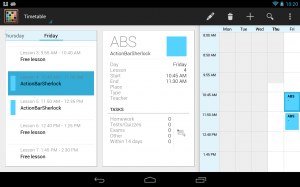
In this screen the edit and trash icon are from the selected element and are only added when a lecture has been selected. The plus and the search icon though are from the ListFragment.
Adding action items programatically
As the post title implies the additional action items are inserted by the fragment. In fact not much different from how you add the items within your Activities. You use the onCreateOptionsMenu() method for it:
@Override
public void onCreateOptionsMenu(
      Menu menu, MenuInflater inflater) {
   inflater.inflate(R.menu.activity_itemdetail, menu);
}
As you can see the signature of this method is different from the one of the Activity class. With fragments your method takes a MenuInflater as second parameter. And the fragment's onCreateOptionsMenu() method also doesn't return a boolean value.
Even with this method in place Android still doesn't display any additional menu items unless you explicitly tell it to call this method. To do so, you first have to call setHasOptionsMenu() within the fragment's onCreate() method:
setHasOptionsMenu(true);Now your fragments menu items will be displayed in the ActionBar.
Of course, if you do so, you have to stop using the same entries in your Activity. Otherwise it would look fine on any screen that makes use of your multi-pane layouts but you would end up with doubled icons on single-pane screens.
For the sample screen I have used a menu xml file containing only the about entry in the activity. And I use an xml file containing only the edit entry in the fragment. The about entry is not needed in the fragment, because it is added by the activity, no matter whether you are in single-pane or double-pane mode.
Changing the order of action items
By default Android displays the action items of your fragment behind those of the activity. If you use multiple fragments Android displays them in the order the fragments are created.
This default order is not necessarily what you want. For example it is very likely that you want to display an about item as the very last entry within your overflow-menu - no matter if fragments later on add more overflow-menu entries. Also some actions are more often used than others. You want to put them more to the left, so that, depending on the screen size, those are always visible. And which items are more important depends on which fragments are in use.
Tio help you achieve this you can make use of the android:orderInCategory attribute of the item elements.
The fragment_itemdetail.xml menu file:
<menu xmlns:android="http://schemas.android.com/apk/res/android" >
   <item
      android:id="@+id/edit_item"
      android:icon="@drawable/ic_action_edit"
      android:showAsAction="ifRoom"
      android:orderInCategory="10"
      android:title="@string/edit_item">
   </item>
</menu>
The activity_itemdetail.xml menu file:
<menu xmlns:android="http://schemas.android.com/apk/res/android" >
   <item
      android:id="@+id/about"
      android:icon="@drawable/ic_action_info"
      android:showAsAction="never"
      android:orderInCategory="9999"
      android:title="@string/about">
   </item>
</menu>
And finally the activity_itemlist.xml menu xml file:
<menu xmlns:android=
      "http://schemas.android.com/apk/res/android" >
   <item
      android:id="@+id/add_item"
      android:icon="@drawable/ic_action_add"
      android:orderInCategory="20"
      android:showAsAction="ifRoom"
      android:title="@string/add_item">
   </item>
   <item
      android:id="@+id/about"
      android:icon="@drawable/ic_action_info"
      android:showAsAction="never"
      android:orderInCategory="9999"
      android:title="@string/about">
   </item>
</menu>
The higher the number the later your action item is displayed. So use an absurdly high value for the about item. And order all other elements by importance.
Since all elements have an order value of zero by default, you have to use numbers for all action items as soon as you want to move one to the front.
android:orderInCategory="9999"Handling events
As usual you can handle menu item clicks in the onOptionsItemSelected() method:
@Override
public boolean onOptionsItemSelected(MenuItem item) {
   // handle item selection
   switch (item.getItemId()) {
      case R.id.edit_item:
         // do s.th.
         return true;
      default:
         return super.onOptionsItemSelected(item);
   }
}
But bear in mind that the Activity's onOptionsItemSelected() method is called first. Your fragment's method is called only, when the Activity didn't consume the event!
Adding and removing action items
So far I have only mentioned how to use action items, that are defined within an xml file. But that often is not sufficient.
See this screenshot of a German TV program app. Please ignore, that it's in German, I explain what is relevant to you.
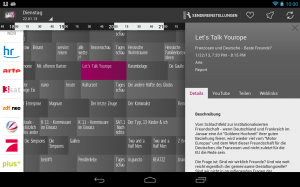
In this app you can select a program to get more information about it. If you select a program that hasn't started yet, you can bookmark it and set an alarm for it. If on the other hand the program either has already started or ended those actions are not displayed. It simply makes no sense to add an alarm for some program that has already started. But all other icons are visible in both cases.
So how to do that? You could either use different menu xml files for a static set of action items. Or you could add or remove menu actions programatically. Since the second approach is more flexible I deal with it in the next paragraphs.
First you need to get hold of a Menu object. You can do so in the onCreateOptionsMenu() method shown above.
Now you can use this Menu object to either change the visibility of action items or to remove them from the menu entirely.
You can change the visibility like this:
if (mMenu != null) {
   mMenu.findItem(R.id.edit_item).setVisible(false);
}
The null check in the code is necessary, because of the order in which the methods of your fragment are called. Of course Android executes the lifecycle methods before finally calling onCreateOptionsMenu(). Thus your Menu object is null in the onCreateView() method, which you probably use to create event handlers.
If you want to entirely remove the action item, you can do so easily as well:
if (mMenu != null) {
   mMenu.removeItem(R.id.edit_item);
}
As you will see in the next few paragraphs, adding a menu item is slightly more cumbersome than just making it visible again. Thus if you want to toggle action items depending on the state of your fragment, I suggest to change the visibility instead of removing and re-adding the items.
So far I have only shown you how to get rid of action items. Of course you also can add new items. You can use one of the several add() methods of the Menu class. For example the following code fragment would add the item in the same way, as with the xml code for inflating it:
MenuItem item =
      mMenu.add(Menu.NONE, R.id.edit_item, 10, R.string.edit_item);
item.setShowAsAction(MenuItem.SHOW_AS_ACTION_IF_ROOM);
item.setIcon(R.drawable.ic_action_edit);
The first parameter sets the group. If you have no groups, use Menu.NONE. The second parameter sets the id you want to use. It's the same one you later use in the onOptionsItemSelected() method to react to menu item clicks. The third parameter is the order value and the last one the title text you want to use. Remember, that Android uses the title text to display usage hints or to read out this value with a screenreader app. So never use null for this value.
As the code sample shows, you have to add the icon and the showAsAction attribute value with separate method calls later on.
I don't know why there is no way to add a complete MenuItem object directly. To me that would be better readable. But that's just a tiny detail 🙂
Wrapping up
In this post I have shown that you can use the onCreateOptionsMenu() method to add action items related to your fragment to the existing icons of the ActionBar.
Since the default order in which Android adds these items is often not the preferred one, you can change this easily by adding the android:orderInCategory attribute to your menu items in the xml files.
Finally you have seen how to change the visibility of menu items, how to remove them completely or how to add new menu items.
Please let me know in the comments, if any questions are left open and which way you prefer to remove action items from the ActionBar. And don't forget to plus one and share this post if you found it useful!
相關推薦
Adding ActionBar Items From Within Your Fragments
This tutorial shows you how to add action items to the ActionBar from within your Fragments and how to disable or ena
An unexpected error prevented the server from fulfilling your request. (HTTP 500)
PE you detail ref lin art err AR lock 轉自 https://blog.csdn.net/zw421152835/article/details/50992732 看日誌 tail -f /var/log/keystone/keys
Ask HN: How do you know when to switch teams within your company?
I'm wondering how folks here suss out when the right time to switch teams/projects might be. How do you identify when you've learned all you can from a eng
protecting your organisation from the cyber threat within
Inside jobs — protecting your organisation from the cyber threat withinWritten by Simon Whitburn, New Product and Services Commercial DirectorWhen it comes
Adding ActionViews to Your ActionBar
As you have seen in the previous tutorials about ActionBarSherlock and the ActionBar, you can add action items easily
Where are your from!!!!!!!!!!!! !Baby! {封裝}
是我 format 派生 不同的 private pre 復用 日期 int 在說Java 三個特性之前,我們先了解一下什麽是面向對象,以及為什麽Java是面向對象的語言。 面向對象是區別於面向過程的一種編程的思想。我們可以通過這個例子冰箱裝大象的例子來了解一下面向對象與面
centos7 安裝後,意外出現Please make your choice from above ['q' to quit | 'c' to continue | 'r' to refresh]
from str linu 安裝完成 ase 方案 clas acc lease 安裝完成centos7後出現如下提示: Initial setup of CentOS Linux 7 (core) 1) [x] Creat user 2) [!] License in
XML fragments parsed from previous mappers already
mybatisssm項目報錯: WARN [main] DefaultListableBeanFactory:1479-- Bean creation exception on FactoryBean type check: org.springframework.beans.factory.Bean
解決/usr/local/lib/libglog.so.0: error adding symbols: DSO missing from command line
轉自 https://blog.csdn.net/u010987458/article/details/72235408 第一步: // 檢視目錄 /usr/lib 或 /usr/local/lib的目錄下是否存在libglog.so.0 $ find libglog* libglog
Do not throw System.Exception, System.SystemException, System.NullReferenceException, or System.IndexOutOfRangeException intentionally from your own s
sonarqube的掃描結果提示 https://docs.microsoft.com/en-us/dotnet/csharp/programming-guide/exceptions/creating-and-throwing-exceptions https://stackoverflow.com/q
scrapy框架學習,理解不深得到的問題,我遇到的 from avimageitems.items import AvimageItem ModuleNotFoundError: No module named 'scrapy name'
心情複雜呀,這個問題之前找不到解決的思路,原因是沒有人會像我這麼粗心的,沒有認真去看書就寫,不過我是真的沒注意到這個框架名的是什麼,現在才發現setting中的BOT_NAME的作用,不過我是在之前的課程裡瞭解到的
Unable to load script from assets 'index.android.bundle'. Make sure your bundle is packaged correctl
第一種:使用bundle命令:(缺點:後續沒辦法reload,只能重複生成bundle檔案) 1.在Android/app/src/main目錄下建立一個空的assets資料夾 2: 在工程根目錄下資料bundle命令: react-native bundle --platform
Why LSTMs Stop Your Gradients From Vanishing: A View from the Backwards Pass
LSTMs: The Gentle Giants On their surface, LSTMs (and related architectures such as GRUs) seems like wonky, overly complex contraptions.
在ActionBar中,即便設定showAsAction="always",items仍然在overflow中顯示的問題
明明設定了android:showAsAction="always",但是所有的items全部都顯示在overflow中,然後在官網發現了答案。 如果你為了相容 Android 2.1 的版本使用了 Support 庫,在 android 名稱空間下showAsActio
Learning From Your Bugs
Bugs are great learning opportunities. So how do we make sure we learn as much as possible from the bugs we fix? A method I have used for more than 13
How to build your own Neural Network from scratch in Python
How to build your own Neural Network from scratch in PythonA beginner’s guide to understanding the inner workings of Deep LearningMotivation: As part of my
Adding new features to your dApp with “Features delivery network”
Adding new features to your dApp with “Features delivery network”A decentralized feature delivery network enables to extend apps with new features. Instead
Remove gender bias from your writing | Hacker News
I pasted in several of my more recent blog posts. I seem to be pretty consistently gender-neutral, though sometimes indulge in masculine
me drone takes commands from your Apple Watch | AITopics
Skydio's highly autonomous R1 drone is already mostly hands-free. Now, however, you might not need something in your hands even when you do take control. Y
Adding Twitter's Bootstrap CSS to your Rails app
Bootstrap in action, as demoed in Luca Pette's article Updated Feb 2012 for Bootstrap 2. Twitter’s new CSS toolkit, Bootstrap, is all the rage these