
Getting Started With Fragments and the Support Library
Fragments are modular building blocks for creating a responsive Android UI. They help you to target different devices and screen sizes while at the same time avoiding code duplication.
This post starts with the Android Developers Tools generating a project for you. I then explain some of the generated code and will show you how to make this code work on older devices. To do this kind of post was suggested by a user of a German forum. Let's see if this works well.
This project will grow over time. In the next post I will add the ActionBarSherlock library to the project - but this time it's all about understanding the basics.
This post is not taking the approach, Martin van Z or Sebastian Kaspari are taking with their respective series "Creating your own Android app
The basics of fragments
Fragments constitute a part of your Activity you present to the user. Most often they are used to display some section of the screen and to react to events that happen within this section. Fragments are modular, come with their own lifecycle and help you to avoid code duplication.
Fragments come in two varieties. Either the normal Fragment class within the android.app package that was introduced with API level 11 (Honeycomb). And the support library Fragment of the package android.support.v4.app. Both have subclasses like DialogFragment or ListFragment. You cannot use a mix of normal and support libary fragments.
If you want to target older devices in your project, always go for the classes of the support library. If you only care about newer Android releases, you can use the normal fragments.
In this post I specifically have a look at how to make fragments work with the support library. Given the vast amount of Android 2.2 and 2.3 devices currently out there I still recommend to always try to target these devices where possible. And since the differences in the Android framework between Android 2.1, 2.2 and 2.3 are not too big, I suggest to try with 2.1 and only increase the minimum API level if you have a need for this.
Fragments have a UI on their own. As usual you inflate your view, which you have defined in XML files. While Fragments without any UI are possible, I won't cover those in this post.
View creation is nothing special. Apart from one thing. If you use the android:onClick attribute for your view elements, you cannot implement the method in the fragment. You have to implement it in the activity. If you want to deal with click events in your fragment you have to add OnClickListeners for those view elements programmatically.
Fragments have a lifecycle of their own. It is a bit more complex than those of Activities, because Fragments can be attached to and detached from their enclosing activities. I will cover some of the lifecycle methods below.
So much for the background on fragments. If you want to learn more, head over to Google's documentation about Fragments after reading this post.
In the next section I start by creating the project using Android's Developer Tools.
Creating the project using the Android Developer Tools
To follow the steps outlined here you must have Eclipse together with the Android Developer Tools plugins installed. You can download complete bundles on Android's SDK page.
In Eclipse go to File -> New Project -> Android Application Project and click "Next". A wizard pops up:
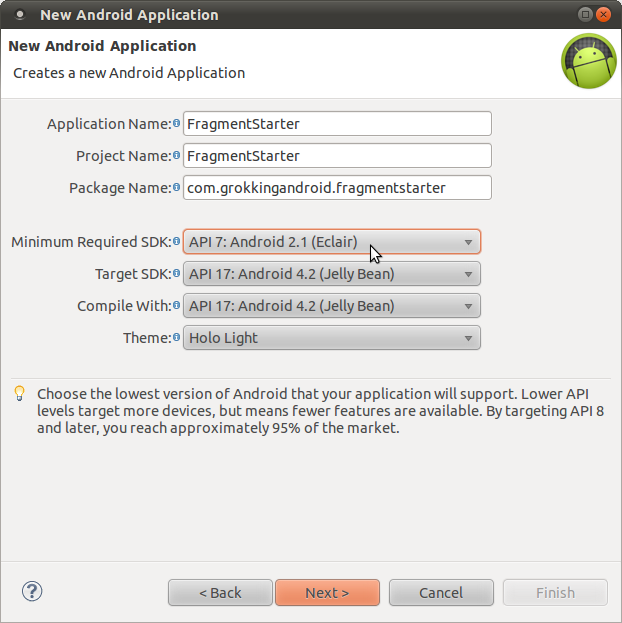
Fill in the required fields as shown above and click next until you come to the screen where you can select the type of project you want to create:
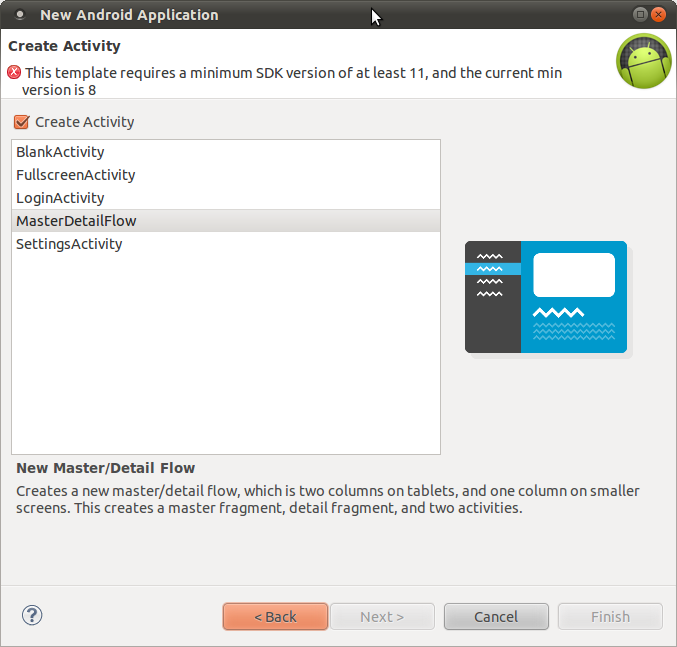
Select the master detail project type. That means that you have a list of elements on the left and a detail view on the right - if your screen is big enough.
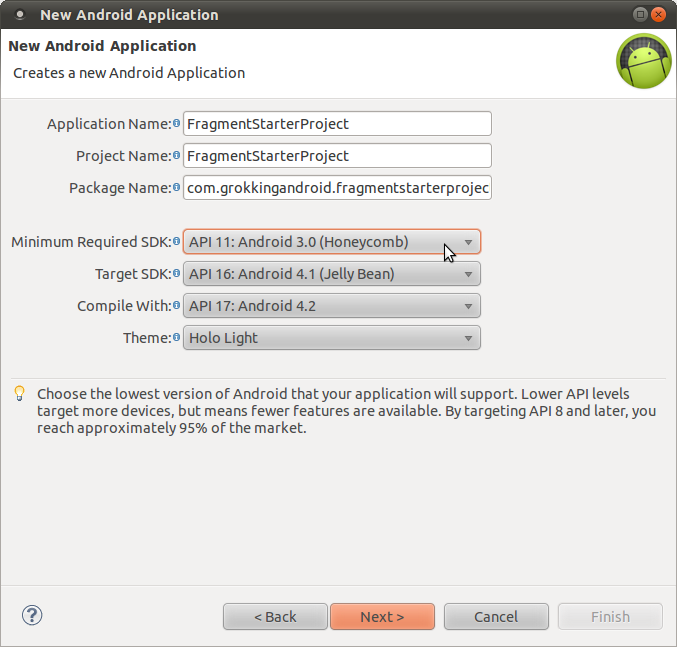
As you can see the API level we have chosen isn't supported. So go back to the beginning and switch to API level 11. You will correct this later on:
Now go on until you come to the screen showing the name for the entities you want to deal with:
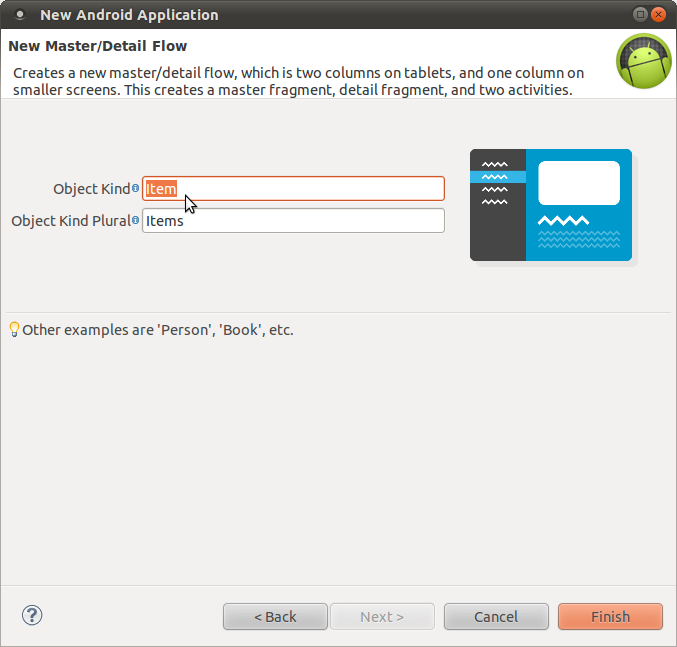
Item is the default here. I do not bother to change this, but you can change it to whatever your app is going to deal with - like Book, File and so on. Keep in mind that the wizard creates the names of the classes accordingly. So whenever I refer to Item, ItemListFragment and so on, substitute Item with the noun you have chosen in this dialog.
Now click Finish and the Eclipse generates the project for you.
If you never have downloaded the support library and do not use the adt bundle, the following dialog will pop up. It forces you to download the library and attaches it to your project:

Fragments lifecycle
I do not cover the entire lifycycle of Fragments. Much of it is comparable to the lifecycle of Activities. But by having a look at the code, I will show some common lifecycle methods you should know about.
First, have a look at ItemDetailFragment. This fragment inflates a view. But it does not do so in the onCreate() method like you would do in an activity, but within the onCreateView() method. Android passes the inflater you need to use for view inflation into the method, as well as the container for your view.
The inflation always looks like this:
View rootView = inflater.inflate(
      R.layout.fragment_item_detail,
      container, false);
The last parameter states that your view should not be attached to the container. It must always be false for fragment view inflation. Android adds your view to the container itself!
Since fragments can be attached or detached from an activity, there also exist onAttach() and onDetach() methods. After your fragment has been attached, you can use getActivity() within your fragment to get to the enclosing activity.
The ItemListFragment makes use of both methods to set a callback interface. I explain this interface in the next section.
Callback interface
Fragments and activities need to communicate with each other. But you do not want to couple them closely. Your fragment might end up in multiple activities, so it should never have a direct link back to the activity it belongs to. Instead it is common practice to use interfaces to deal with this. Your fragments define callback interfaces and your Activities must implement these interfaces.
Have a look at the ItemListFragment. It contains the interface named Callbacks. The fragment uses this interface to communicate to the activity that an item has been selected:
public interface Callbacks {
   /**
    * Callback for when an item has been selected.
    */
   public void onItemSelected(String id);
}
This interface is used in the onListItemClick() method:
@Override
public void onListItemClick(ListView listView, View view, int position,
      long id) {
   super.onListItemClick(listView, view, position, id);

   // Notify the active callbacks interface (the activity, if the
   // fragment is attached to one) that an item has been selected.
   mCallbacks.onItemSelected(DummyContent.ITEMS.get(position).id);
}
See also the methods onAttach() and onDetach(). That's where the internal member mCallbacks is set to the enclosing activity or to a dummy implementation, if this fragment is no longer part of an activity.
The ItemListActivity implements this interface. So look at the activity's onItemSelected() method. It first checks if you are in dual pane or single pane mode (see next section). And depending on the result it either starts another activity or replaces the second fragment.
When you have many callbacks and multiple fragments using interfaces for every fragment can become pretty unwieldy. In this case I recommend to use a bus based approach like EventBus or Otto. But that's a topic for another post. At the current state of the project the interface approach works fine.
Dual pane or not
The most important reason to use fragments is to make your app responsive. That means make it adapt nicely to a change in orientation and to different screen sizes and aspect ratios.
The generated project shows this by using two panes on tablets and a single pane on phones. It defines two layouts for the ItemListActivity in the layout folder: activity_item_list.xml and activity_item_twopane.xml.

Wait a moment. Two layouts for the same activity with different names and both in the default layout folder? What's up with that?
Well have a look at the values folders in the res directory:
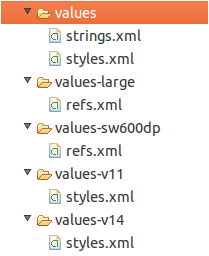
Of interest in this case are the values-large and the values-sw600dp folders. Both contain a file named refs.xml which references the activity_item_twopane.xml file:
<resources>
   <!--
   Layout alias to replace the single-pane version of the layout with a
   two-pane version on Large screens.

   For more on layout aliases, see:
   http://developer.android.com/training/multiscreen/screensizes.html#TaskUseAliasFilters
   -->
   <item name="activity_item_list" type="layout">@layout/activity_item_twopane</item>
</resources>
Note the name attribute of the reference. Its value is activity_item_list. This means that when you use R.layout.activity_item_list in your code, Android will replace this value with R.layout.activity_item_twopane. Of course only if one of the two qualifiers large or sw600dp applies. That way you have to declare the layout only once and can refer to it in multiple places.
You have to use the large qualifier even though a more specific qualifier is present, because the swXYZdp qualifier will only be recognized from API level 13 onwards. Prior to this only the screen qualifiers folders (small, normal, large and xlarge) have been recognized.
If you look at the activity_item_twopane.xml file, you will see that a fragment and a FrameLayout is declared.
You can declare fragments either directly in your layout files or you can use FragmentTransactions to add fragments programmatically. In this case one fragment is added using the xml file while the other is added using a transaction. The FrameLayout within this file is the container that you later add the fragment to in your transaction.
In the ItemListActivity you finally find this code snippet:
if (findViewById(R.id.item_detail_container) != null) {
   // The detail container view will be present only in the
   // large-screen layouts (res/values-large and
   // res/values-sw600dp). If this view is present, then the
   // activity should be in two-pane mode.
   mTwoPane = true;

   //...
}
So by either finding this container or not, the activity knows whether Android selected the two pane layout or not.
Depending on this, the activity handles a list item click differently in the onItemSelected() callback method.
There is also another approach used on some of Google's Android training pages and mentioned by Kiran Rao in the comment section. The other approach uses a boolean variable in xml files. Have a look at Kiran's comment to learn more about this approach.
You should really dig deeper into how to deal with multiple screen sizes. It is a very important concept for supporting multiple device sizes in Android. Thus I recommend you take the training about multiple screensizes on the Android site after reading this post. Do not write apps for phones only. As has just been published, the tablet market for Android is gaining serious traction. Don't miss out on this. And don't risk bad ratings just because you ignored bigger screens!
FragmentTransactions
FragmentTransactions are Android's way of adding, removing, hiding or replacing fragments to or from your activity. As the name transaction implies either all actions of the transaction are done or none. So you transfer from one valid state of your app to another one.
But you not only manage the fragments themself, you can also define custom animations to display for fragments being attached and detached.
And you can add a complete transaction to your backstack. In this case clicking back would do everything within the transaction in exactly the reverse order. If you do not use the addToBackStack() method to add your transaction to the backstack, this transaction will be ignored. You can see this in the sample app in two pane mode. Clicking on different list items starts a transaction and causes a replacement of fragments. But by clicking back you just leave the app. Which makes sense, since you do not want every list item click to be added to the back stack.
I have covered here just some basics of FragmentTransactions. To learn more about them, visit Daniel Lew's blog post about FragmentTransactions.
Make it run on older devices
The code was generated by the wizard for API level 11. But it uses the support library already - so shouldn't it run on older versions as well?
The heavy lifting already has been done. The wizard created both activities as subclasses of FragmentActivity. This is a class of the support library that allows you to access an FragmentManager using getSupportFragmentManager().
Two changes are needed to make it run on older versions.
First the generated class ItemListFragment contains a layout constant that has been introduced in API level 11: simple_list_item_activated_1. This specific layout highlights activated list items. Which is useful, if you have a multi-pane layout, because it shows the user which list item is selected and displayed in the details pane.
I ignore the highlighting for now and just try to get the code to run:
int layout = android.R.layout.simple_list_item_1;
if (Build.VERSION.SDK_INT >= Build.VERSION_CODES.HONEYCOMB) {
   layout = android.R.layout.simple_list_item_activated_1;
}
setListAdapter(new ArrayAdapter<DummyContent.DummyItem>(
      getActivity(),
      layout,
      android.R.id.text1,
      DummyContent.ITEMS));
The second problem is the ActionBar, which is not available on older devices without adding an additional library. Since this is the topic of my next post, I simply ignore the ActionBar on older devices for now. Change the line with getActionBar() to this in the ItemDetailActivity:
if (Build.VERSION.SDK_INT >= Build.VERSION_CODES.HONEYCOMB) {
   getActionBar().setDisplayHomeAsUpEnabled(true);
}
Now you get a Lint warning. That the call requires API level 11 but that your manifest file states API level 7 as a minimum. Add an annotation to suppress the new API warnings for the onCreate() method:
@SuppressLint("NewApi")Now change your AndroidManifest.xml file to support API level 7:
<uses-sdk
   android:minSdkVersion="7"
   android:targetSdkVersion="16" />
With these changes, you can now run the project on older devices.
Lessons learned
You have seen how to create a master detail project using the Android Developer Tools and how the generated project works.
I have given you details about what fragements are and what to use them for. And I have shown you some code snippets of the generated project and explained why it is done that way.
Also I have shown to you how to make this project backwards compatible. That way you can run the code on older devices as well.
Keep in mind: The Android Developer Tools project is evolving at a rapid pace. So if you read this post in a few months some of this probably has changed - though the basics should remain the same.
I strongly recommend to keep an eye on updates to the developer tools. Check for updates in Eclipse regularly.
And if you want to know of what's to come, visit the project page of the ADT team and especially their announcements of recent changes. The team announces preview versions there on a regular basis.
Next week you will add an ActionBar using the library ActionbarSherlock to your project. Until then have a good look at the code and jump to Android's training session about fragments to learn more. Fragments are very important and it is essential to fully understand them!
相關推薦
Getting Started With Fragments and the Support Library
Fragments are modular building blocks for creating a responsive Android UI. They help you to target different devices
Getting Started With the Slack API Using Python and Flask
The slick hosted chat application Slack is all the rage this year. The tool’s adoption isn’t empty hype - it’s incredibly useful for communicating with
Getting started with docker - 1.Orientation and setup
Get Started, Part 1: Orientation and setup Get Started, Part 1: Orientation and setup Docker concepts Images and cont
Getting started with the Zowe WebUi
Learning objectives This tutorial walks you through the process of adding new apps to the Zowe WebUi, and teaches you how to communic
Getting Started With Parcel JS and React
[Step 4 — Auto Install Modules Through Parcel]Okay, so here’s the cool part about Parcel! If possible I’d like you to have your terminal open (the Server R
LLVM每日談之十九 LLVM的第一本系統的書<Getting Started with LLVM Core Libraries>
關於 日本 簡單的 lvm 作者 普通 lan 最好 裏的 作者:史寧寧(snsn1984)LLVM最終有了一本系統的書了——《Getting Started with LLVM Core Libraries》。這本書號稱是LLVM的第一本書,可是據說日本早就有兩本日文的
Getting started with Kentico
sbo short conf doc body his learn cati site https://docs.kentico.com/k10tutorial https://docs.kentico.com/k10tutorial/getting-started
[原創]Getting Started with Skywalking
-c java word nta rec compress tar mbed already Getting Started with Skywalking Pre JDK 1.8+ Skywalking(v3.2.6) (All packages can
Getting Started with Processing 第四章總結
為什麼要使用變數: 我們使用變數的一個重要原因就是避免變成過程中的重複工作,如果你重複使用某一個數字超過了一次,就可以考慮使用一個變數來代替它,這樣你的程式會更加通用並且易於更新。 定義變數 定義變數的時候,要確定其變數名(name),資料型別(data type) 和變數值 value.在 Proce
Getting Started with Processing 第五章的easing問題
分析 使用 easing easing 的感官目的是為了 draw 的時候,畫的圖形不是即時 mouseX 的值,而是稍有落後一點。從演算法分析,就是讓所畫圖形的 x 座標 落後於 mouseX 的值,並且朝 mouseX 的方向進行運動。程式如下: float x; float easing =
Getting Started with Processing 第五章的easing問題(2)
上一個 第五章 RoCE mouse process 一次 成了 參數 二維 程序代碼清單如下: float x; float y; float px; float py; float easing = 0.05; void setup(){ size(480,120)
Getting Started with Processing 第五章的總結
Getting Started with Processing 第五章:響應 一次與永久 setup()函式 Processing 中,setup()函式只執行一次,用於設定一些初始的值,比如畫布的大小,還有填充和線條粗細,顏色的程式碼。第一行總是size(),接下啦是其他宣告。 draw()函式
Getting started with Processing 第七章總結
媒體 如何將檔案匯入 Processing 中 在 Processing 中,程式是通過應用 data 資料夾中的檔案來顯示的,這個資料夾可以通過選單欄中的 Sketch>show sketch folder(command+K),來顯示,可以通過兩個辦法新增檔案: 打卡data資料夾,向其
[2] Getting Started With Data Reflections
Getting Started With Data Reflections Why Data Reflections? 分析中通常涉及較大資料集和資源密集型的操作,資料分析和資料科學家需要較高效的互動式查詢來完成他們的分析工作,其中分析任務多是迭代關聯性的,每一
Getting Started with XlsxWriter
下面是一些關於使用XlsxWriter模組的簡單介紹。 安裝XlsxWriter 下面的是幾個安裝XlsxWriter模組的方法: 1、使用Pip 使用pip 方式是最推薦的從PyPi安裝Python模組的方法。 Python 安裝包索引: 2、使用 Easy_install
Getting Started with Processing 第十章——物件
不像原始資料型別boolean,int 和 float 只能存一個值,一個物件可以存很多值。但這也是我們講的一部分,物件也是用相關函式將變數編組的一種方式。 域和方法 在物件的上下文中,一個變數被叫做一個值域(field),一個函式被叫做一個方法(method)。值域和方法的工作原理與函式和變數一樣 類
Getting Started with Processing 第十章——對象
int oat ext get dom started 不返回 類定義 ole 不像原始數據類型boolean,int 和 float 只能存一個值,一個對象可以存很多值。但這也是我們講的一部分,對象也是用相關函數將變量編組的一種方式。 域和方法 在對象的上下文中,一個變量
Getting started with Processing 示例11-9 追隨鼠標移動
總結 數組 繼續 並且 隨機數 tar The get for 程序片段 int num = 60; int[] x = new int[num]; int[] y = new int[num]; void setup(){ size(240,120); noStrok
Getting started with Processing 示例11-9 追隨滑鼠移動
程式片段 int num = 60; int[] x = new int[num]; int[] y = new int[num]; void setup(){ size(240,120); noStroke(); } void draw(){ background(0); //from back
Getting started with Processing 第十一章——陣列
Getting started with Processing 第十一章——陣列 從變數到陣列: 使用陣列,無需為每一個變數建立一個新的名稱/這讓程式碼變得更短,更容易理解,更方便更新。 建立陣列的三個步驟 建立一個數組,需要經過三個步驟: 宣告陣列,定義資料型別。這裡的資料型別可以是任何型別