
RecyclerView詳解(基本使用+解決複用+新增HEAD和FOOT+上拉載入更多+下拉重新整理)以及ExpandableListView的簡單使用
一、RecyclerView的簡單使用
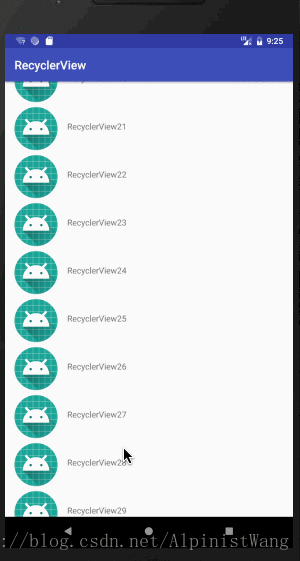
先看效果圖
程式碼實現
1.引入recyclerview包
implementation 'com.android.support:design:27.1.0'
2.佈局中新增RecyclerView
<?xml version="1.0" encoding="utf-8"?> <android.support.constraint.ConstraintLayout xmlns:android="http://schemas.android.com/apk/res/android" xmlns:app="http://schemas.android.com/apk/res-auto"xmlns:tools="http://schemas.android.com/tools" android:layout_width="match_parent" android:layout_height="match_parent" tools:context=".MainActivity"> <android.support.v7.widget.RecyclerView android:id="@+id/rv_apps" android:layout_width="match_parent" android:layout_height="match_parent" /></android.support.constraint.ConstraintLayout>
3.MainActivity中找到控制元件,設定LayoutManager
public class MainActivity extends AppCompatActivity { private RecyclerView rvApps; @Override protected void onCreate(Bundle savedInstanceState) { super.onCreate(savedInstanceState); setContentView(R.layout.activity_main); rvApps = findViewById(R.id.rv_apps); rvApps.setLayoutManager(new LinearLayoutManager(this)); } }
LayoutManager的作用是表明RecyclerView的展示方式,LinearLayoutManager表示是線性垂直垂直展示。
4.RecyclerView只需要設定兩個引數,一是LayoutManager,二是介面卡,介面卡是用來繫結資料的。RecyclerView最重要的就是設定介面卡。
先看一下最終的MainActivity程式碼:
public class MainActivity extends AppCompatActivity {

    private RecyclerView rvApps;
    private ArrayList<App> apps = new ArrayList<>();
@Override
protected void onCreate(Bundle savedInstanceState) {
        super.onCreate(savedInstanceState);
setContentView(R.layout.activity_main);
rvApps = findViewById(R.id.rv_apps);
rvApps.setLayoutManager(new LinearLayoutManager(this));
//初始化資料
for (int i = 0;i<50;i++){
            App app = new App();
app.setIcon(getResources().getDrawable(R.mipmap.ic_launcher));
app.setName(getString(R.string.app_name)+i);
apps.add(app);
}

        rvApps.setAdapter(new MyAdapter(apps));
}
}
再看一下最終的Adapter程式碼:
public class MyAdapter extends RecyclerView.Adapter<MyAdapter.mViewHolder>{

    private ArrayList<App> apps;
//構造方法,傳入資料
public MyAdapter(ArrayList<App> apps) {
        this.apps = apps;
}

    //初始化控制元件
public class mViewHolder extends RecyclerView.ViewHolder {
        private ImageView ivIcon;
        private TextView tvName;
        public mViewHolder(View itemView) {
            super(itemView);
ivIcon = itemView.findViewById(R.id.iv_icon);
tvName = itemView.findViewById(R.id.tv_name);
}
    }

    //繫結佈局
@NonNull
    @Override
public mViewHolder onCreateViewHolder(@NonNull ViewGroup parent, int viewType) {
        View view = LayoutInflater.from(parent.getContext()).inflate(R.layout.app_item,parent,false);
mViewHolder holder = new mViewHolder(view);
        return holder;
}

    //對應位置繫結資料,這裡可以新增點選事件
@Override
public void onBindViewHolder(@NonNull mViewHolder holder, int position) {
        holder.tvName.setText(apps.get(position).getName());
holder.ivIcon.setImageDrawable(apps.get(position).getIcon());
holder.itemView.setOnClickListener(new View.OnClickListener() {
            @Override
public void onClick(View v) {
                //這裡新增點選事件
}
        });
}

    //獲取列表長度
@Override
public int getItemCount() {
        return apps.size();
}
}
裡面用到了App類,貼出App類的程式碼:
public class App {
    private String name;//app名稱
private Drawable icon;//app圖示
public String getName() {
        return name;
}

    public void setName(String name) {
        this.name = name;
}

    public Drawable getIcon() {
        return icon;
}

    public void setIcon(Drawable icon) {
        this.icon = icon;
}
}
用到的app_item佈局:
<?xml version="1.0" encoding="utf-8"?>
<android.support.constraint.ConstraintLayout xmlns:android="http://schemas.android.com/apk/res/android"
android:layout_width="match_parent"
android:layout_height="wrap_content"
xmlns:app="http://schemas.android.com/apk/res-auto">
    <ImageView
android:id="@+id/iv_icon"
android:layout_width="wrap_content"
android:layout_height="wrap_content"
app:layout_constraintTop_toTopOf="parent"
app:layout_constraintLeft_toLeftOf="parent"
android:layout_marginTop="8dp"
android:layout_marginBottom="8dp"
android:layout_marginLeft="16dp"
android:layout_marginRight="16dp"
android:src="@mipmap/ic_launcher"/>
    <TextView
android:id="@+id/tv_name"
app:layout_constraintLeft_toRightOf="@+id/iv_icon"
app:layout_constraintTop_toTopOf="parent"
app:layout_constraintBottom_toBottomOf="parent"
android:layout_margin="16dp"
android:layout_width="wrap_content"
android:layout_height="wrap_content"
android:text="@string/app_name"/>
</android.support.constraint.ConstraintLayout>
到這裡就完成了RecyclerView的功能。需要修改什麼直接 複製+修改對應的函式 即可。如果不滿足於 複製+修改,後面講解一下從無到有的建立介面卡。
介面卡建立過程
定義自己的介面卡繼承RecyclerView的Adapter,並實現Adapter中相應的方法。
視訊中彈出程式碼提示選單的快捷鍵是:Alt+Enter。解釋一下這裡面的函式作用:
mViewHolder 用來初始化控制元件
onCreateViewHolder 用來繫結佈局
onBindViewHolder 用來對應位置繫結資料
getItemCount 用來獲取列表長度
5.本例中,列表中每一項表示一個app,那麼我們先宣告展示的app物件
public class App {
    private String name;//app名稱
private Drawable icon;//app圖示
public String getName() {
        return name;
}

    public void setName(String name) {
        this.name = name;
}

    public Drawable getIcon() {
        return icon;
}

    public void setIcon(Drawable icon) {
        this.icon = icon;
}
}
6.在MainActivity中生成一些初始的列表資料
//初始化資料
for (int i = 0;i<50;i++){
    App app = new App();
app.setIcon(getResources().getDrawable(R.mipmap.ic_launcher));
app.setName(getString(R.string.app_name)+i);
apps.add(app);
}
7.通過建構函式將資料傳入Adapter
private ArrayList<App> apps;
//構造方法,傳入資料
public MyAdapter(ArrayList<App> apps) {
    this.apps = apps;
}
MainActivity中,給RecyclerView新增Adapter:
rvApps.setAdapter(new MyAdapter(apps));
8.設定列表中每項資料的佈局
<?xml version="1.0" encoding="utf-8"?>
<android.support.constraint.ConstraintLayout xmlns:android="http://schemas.android.com/apk/res/android"
android:layout_width="match_parent"
android:layout_height="wrap_content"
xmlns:app="http://schemas.android.com/apk/res-auto">
    <ImageView
android:id="@+id/iv_icon"
android:layout_width="wrap_content"
android:layout_height="wrap_content"
app:layout_constraintTop_toTopOf="parent"
app:layout_constraintLeft_toLeftOf="parent"
android:layout_marginTop="8dp"
android:layout_marginBottom="8dp"
android:layout_marginLeft="16dp"
android:layout_marginRight="16dp"
android:src="@mipmap/ic_launcher"/>
    <TextView
android:id="@+id/tv_name"
app:layout_constraintLeft_toRightOf="@+id/iv_icon"
app:layout_constraintTop_toTopOf="parent"
app:layout_constraintBottom_toBottomOf="parent"
android:layout_margin="16dp"
android:layout_width="wrap_content"
android:layout_height="wrap_content"
android:text="@string/app_name"/>
</android.support.constraint.ConstraintLayout>
9.實現Adapter對應的方法,Adapter最終的程式碼為:
public class MyAdapter extends RecyclerView.Adapter<MyAdapter.mViewHolder>{

    private ArrayList<App> apps;
//構造方法,傳入資料
public MyAdapter(ArrayList<App> apps) {
        this.apps = apps;
}

    //初始化控制元件
public class mViewHolder extends RecyclerView.ViewHolder {
        private ImageView ivIcon;
        private TextView tvName;
        public mViewHolder(View itemView) {
            super(itemView);
ivIcon = itemView.findViewById(R.id.iv_icon);
tvName = itemView.findViewById(R.id.tv_name);
}
    }

    //繫結佈局
@NonNull
    @Override
public mViewHolder onCreateViewHolder(@NonNull ViewGroup parent, int viewType) {
        View view = LayoutInflater.from(parent.getContext()).inflate(R.layout.app_item,parent,false);
mViewHolder holder = new mViewHolder(view);
        return holder;
}

    //對應位置繫結資料,這裡可以新增點選事件
@Override
public void onBindViewHolder(@NonNull mViewHolder holder, int position) {
        holder.tvName.setText(apps.get(position).getName());
holder.ivIcon.setImageDrawable(apps.get(position).getIcon());
holder.itemView.setOnClickListener(new View.OnClickListener() {
            @Override
public void onClick(View v) {
                //這裡新增點選事件
}
        });
}

    //獲取列表長度
@Override
public int getItemCount() {
        return apps.size();
}
}
MainActivity中最終的程式碼為:
public class MainActivity extends AppCompatActivity {

    private RecyclerView rvApps;
    private ArrayList<App> apps = new ArrayList<>();
@Override
protected void onCreate(Bundle savedInstanceState) {
        super.onCreate(savedInstanceState);
setContentView(R.layout.activity_main);
rvApps = findViewById(R.id.rv_apps);
rvApps.setLayoutManager(new LinearLayoutManager(this));
//初始化資料
for (int i = 0;i<50;i++){
            App app = new App();
app.setIcon(getResources().getDrawable(R.mipmap.ic_launcher));
app.setName(getString(R.string.app_name)+i);
apps.add(app);
}

        rvApps.setAdapter(new MyAdapter(apps));
}
}
以上,便是RecyclerView的基本使用。
原始碼已上傳:
二、優雅的解決RecyclerView的Item複用問題
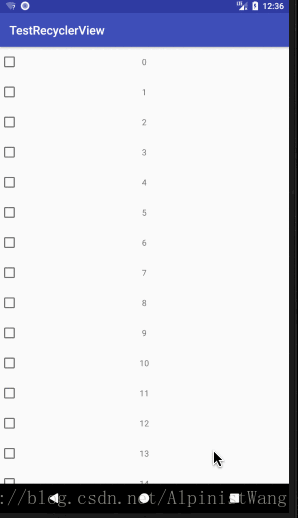
如果RecyclerView的Item中有Checkbox,或者其他的具有記錄狀態功能的控制元件。那麼很容易引發Item的複用問題
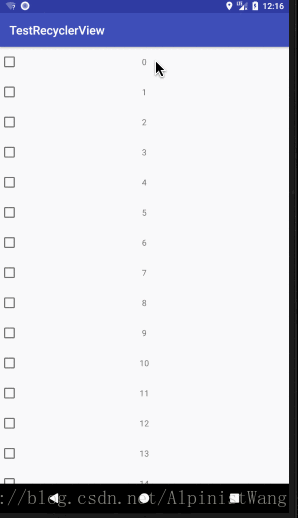
如上圖,本來一個很正常的列表,每個item都沒被選中,當我選中第一個Checkbox的時候,後面item的Checkbox也變成了選中狀態。這就是item的複用導致的錯誤。
這個問題是由於RecyclerView會自動回收移出螢幕的item,然後把回收回來的item讓新進入螢幕的item使用。所以導致了新進入的item保留了之前的選中狀態。
現在的程式碼如下:
佈局檔案:
<?xml version="1.0" encoding="utf-8"?>
<android.support.constraint.ConstraintLayout xmlns:android="http://schemas.android.com/apk/res/android"
xmlns:tools="http://schemas.android.com/tools"
android:layout_width="match_parent"
android:layout_height="match_parent"
tools:context=".MainActivity">
    <android.support.v7.widget.RecyclerView
android:id="@+id/rv_test"
android:layout_height="match_parent"
android:layout_width="match_parent"/>
</android.support.constraint.ConstraintLayout>
MainActivity:
public class MainActivity extends AppCompatActivity{
    private RecyclerView rvTest;
@Override
protected void onCreate(Bundle savedInstanceState) {
        super.onCreate(savedInstanceState);
setContentView(R.layout.activity_main);
rvTest = (RecyclerView) findViewById(R.id.rv_test);
List<String> datas = new ArrayList<>();
        for (int i = 0; i < 50; i++) {
            datas.add(String.valueOf(i));
}
        rvTest.setLayoutManager(new LinearLayoutManager(this));
rvTest.setAdapter(new MyAdapter(datas));
}
}
MyAdapter:
public class MyAdapter extends RecyclerView.Adapter<MyAdapter.mViewHolder>{

    private List<String> DataList;
//構造方法,傳入資料
public MyAdapter(List<String> DataList) {
        this.DataList = DataList;
}

    //初始化控制元件
public class mViewHolder extends RecyclerView.ViewHolder {
        private TextView text;
        private CheckBox checkbox;
        public mViewHolder(View itemView) {
            super(itemView);
text = itemView.findViewById(R.id.text);
checkbox = itemView.findViewById(R.id.checkbox);
}
    }

    //繫結佈局
@NonNull
    @Override
public mViewHolder onCreateViewHolder(@NonNull ViewGroup parent, int viewType) {
        View view = LayoutInflater.from(parent.getContext()).inflate(R.layout.item,parent,false);
mViewHolder holder = new mViewHolder(view);
        return holder;
}

    //對應位置繫結資料,這裡可以新增點選事件
@Override
public void onBindViewHolder(@NonNull final mViewHolder holder, int position) {
        holder.text.setText(DataList.get(position));
holder.itemView.setOnClickListener(new View.OnClickListener() {
            @Override
public void onClick(View v) {
                holder.checkbox.setChecked(!holder.checkbox.isChecked());
}
        });
}

    //獲取列表長度
@Override
public int getItemCount() {
        return null == DataList ? 0:DataList.size();
}
}
item佈局檔案:
<?xml version="1.0" encoding="utf-8"?>
<android.support.constraint.ConstraintLayout xmlns:android="http://schemas.android.com/apk/res/android"
android:layout_width="match_parent"
android:layout_height="50dp"
xmlns:app="http://schemas.android.com/apk/res-auto"
xmlns:tools="http://schemas.android.com/tools">
    <CheckBox
android:id="@+id/checkbox"
app:layout_constraintLeft_toLeftOf="parent"
app:layout_constraintTop_toTopOf="parent"
app:layout_constraintBottom_toBottomOf="parent"
android:layout_width="wrap_content"
android:layout_height="wrap_content" />
    <TextView
android:id="@+id/text"
tools:text="123"
app:layout_constraintTop_toTopOf="parent"
app:layout_constraintBottom_toBottomOf="parent"
app:layout_constraintStart_toStartOf="parent"
app:layout_constraintEnd_toEndOf="parent"
app:layout_constraintHorizontal_bias="0.5"
app:layout_constraintVertical_bias="0.5"
android:layout_width="wrap_content"
android:layout_height="wrap_content" />
</android.support.constraint.ConstraintLayout>
解決item複用問題的思路是:在滑動時雖然checkbox的狀態被複用了,但是資料卻沒有被複用,仍然是1,2,3,4......,所以我們可以通過一個checkStatus列表來儲存checkbox的狀態,每次選中checkbox時,把該位置加入checkStatus中,每次取消選中checkbox時,把該位置從checkStatus中移除。然後在每次設定checkbox狀態的時候根據列表來判斷是否選中。
將MyAdapter修改如下:
public class MyAdapter extends RecyclerView.Adapter<MyAdapter.mViewHolder>{

    private List<String> DataList;
//記錄checkbox狀態的列表
private List<Integer> checkStatus;
//構造方法,傳入資料
public MyAdapter(List<String> DataList) {
        this.DataList = DataList;
}

    //初始化控制元件
public class mViewHolder extends RecyclerView.ViewHolder {
        private TextView text;
        private CheckBox checkbox;
        public mViewHolder(View itemView) {
            super(itemView);
text = itemView.findViewById(R.id.text);
checkbox = itemView.findViewById(R.id.checkbox);
}
    }

    //繫結佈局
@NonNull
    @Override
public mViewHolder onCreateViewHolder(@NonNull ViewGroup parent, int viewType) {
        View view = LayoutInflater.from(parent.getContext()).inflate(R.layout.item,parent,false);
mViewHolder holder = new mViewHolder(view);
        return holder;
}

    //對應位置繫結資料,這裡可以新增點選事件
@Override
public void onBindViewHolder(@NonNull final mViewHolder holder, int position) {
        if(checkStatus == null){
            checkStatus = new ArrayList<>();
}
        holder.text.setText(DataList.get(position));
holder.checkbox.setOnCheckedChangeListener(new CompoundButton.OnCheckedChangeListener() {
            @Override
public void onCheckedChanged(CompoundButton buttonView, boolean isChecked) {
                Integer position = holder.getLayoutPosition();
                if(isChecked&&!checkStatus.contains(position)){
                    //如果checkbox選中了,而且checkStatus中不包含此位置,將該位置加入checkStatus中
checkStatus.add(position);
}else if(!isChecked&&checkStatus.contains(position)){
                    //如果checkbox未選中,而且checkStatus中包含此位置,將該位置從checkStatus移除
checkStatus.remove(position);
}
            }
        });
holder.itemView.setOnClickListener(new View.OnClickListener() {
            @Override
public void onClick(View v) {
                holder.checkbox.setChecked(!holder.checkbox.isChecked());
}
        });
//根據checkStatus中是否包含此位置來設定checkbox狀態
holder.checkbox.setChecked(checkStatus.contains(position));
}

    //獲取列表長度
@Override
public int getItemCount() {
        return null == DataList ? 0:DataList.size();
}
}
效果圖如下:
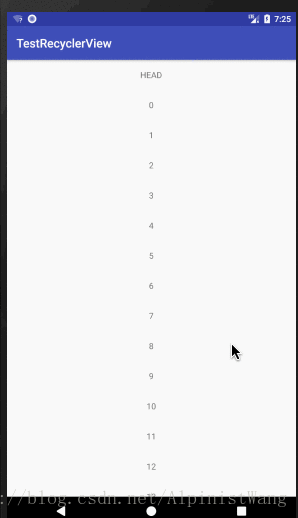
三、給RecyclerView新增Head和Foot
先看效果圖
看一個普通的RecyclerView的Adapter:
public class MyAdapter extends RecyclerView.Adapter<RecyclerView.ViewHolder>{
    private List<String> DataList;
//構造方法,傳入資料
public MyAdapter(List<String> DataList) {
        this.DataList = DataList;
}

    //初始化ItemView
public class ItemViewHolder extends RecyclerView.ViewHolder {
        private TextView text;
        public ItemViewHolder(View itemView) {
            super(itemView);
text = itemView.findViewById(R.id.text);
}
    }

    //繫結佈局
@NonNull
    @Override
public RecyclerView.ViewHolder onCreateViewHolder(@NonNull ViewGroup parent, int viewType) {
        View view;
RecyclerView.ViewHolder holder;
view = LayoutInflater.from(parent.getContext()).inflate(R.layout.item,parent,false);
holder = new ItemViewHolder(view);
        return holder;
}

    //對應位置繫結資料,這裡可以新增點選事件
@Override
public void onBindViewHolder(@NonNull RecyclerView.ViewHolder holder, int position) {
        ItemViewHolder itemViewHolder = (ItemViewHolder) holder;
itemViewHolder.text.setText(DataList.get(position-1));
}

    //獲取列表長度
@Override
public int getItemCount() {
        return null == DataList ? 0:DataList.size();
}
}
看一下添加了Head和Foot的RecyclerView的Adapter:
public class MyAdapter extends RecyclerView.Adapter<RecyclerView.ViewHolder>{
    private static final int ITEM = 0;
    private static final int HEAD = 1;
    private static final int FOOT = 2;
    private List<String> DataList;
//構造方法,傳入資料
public MyAdapter(List<String> DataList) {
        this.DataList = DataList;
}

    //初始化ItemView
public class ItemViewHolder extends RecyclerView.ViewHolder {
        private TextView text;
        public ItemViewHolder(View itemView) {
            super(itemView);
text = itemView.findViewById(R.id.text);
}
    }
    //初始化HeadView
public class HeadViewHolder extends RecyclerView.ViewHolder {
        private TextView text;
        public HeadViewHolder(View headView) {
            super(headView);
text = headView.findViewById(R.id.text);
}
    }
    //初始化FootView
public class FootViewHolder extends RecyclerView.ViewHolder {
        private TextView text;
        public FootViewHolder(View footView) {
            super(footView);
text = footView.findViewById(R.id.text);
}
    }

    //繫結佈局
@NonNull
    @Override
public RecyclerView.ViewHolder onCreateViewHolder(@NonNull ViewGroup parent, int viewType) {
        View view;
RecyclerView.ViewHolder holder;
        switch (viewType){
            case HEAD:
                view = LayoutInflater.from(parent.getContext()).inflate(R.layout.head,parent,false);
holder = new HeadViewHolder(view);
                break;
            case FOOT:
                view = LayoutInflater.from(parent.getContext()).inflate(R.layout.foot,parent,false);
holder = new FootViewHolder(view);
                break;
            default:
                view = LayoutInflater.from(parent.getContext()).inflate(R.layout.item,parent,false);
holder = new ItemViewHolder(view);
                break;
}
        return holder;
}

    //對應位置繫結資料,這裡可以新增點選事件
@Override
public void onBindViewHolder(@NonNull RecyclerView.ViewHolder holder, int position) {
        if(holder instanceof HeadViewHolder){
            HeadViewHolder headViewHolder = (HeadViewHolder) holder;
headViewHolder.text.setText("HEAD");
}else if(holder instanceof FootViewHolder){
            FootViewHolder footViewHolder = (FootViewHolder) holder;
footViewHolder.text.setText("FOOT");
}else if(holder instanceof ItemViewHolder){
            ItemViewHolder itemViewHolder = (ItemViewHolder) holder;
//比如有3條資料,0是head,1,2,3是item,4是foot。資料下標是0,1,2,所以item繫結position-1對應的資料
itemViewHolder.text.setText(DataList.get(position-1));
}
    }

    @Override
public int getItemViewType(int position) {
        if(position == 0){
            return HEAD;
} else if(position == getItemCount()-1){
            //比如有3條資料,0是head,1,2,3是item,4是foot。資料條數為3+2=5,所以用getItemCount-1
return FOOT;
}else{
            return ITEM;
}
    }

    //獲取列表長度
@Override
public int getItemCount() {
        return (null == DataList ? 0:DataList.size())+2;
}
}
新增HEAD和FOOT的原理是:在onCreateViewHolder的引數中,第二個引數ViewType代表View的型別。我們重寫Adapter的getViewType()方法,根據位置返回對應的ViewType。如果位置是0,返回H