一步一步學android之事件篇——單選按鈕監聽事件
在平常使用軟體的時候,我們經常會碰見一些選擇題,例如選擇性別的時候,在男和女之間選,前面說過這個情況要用RadioGroup元件,那麼點選了之後我們該怎麼獲取到選擇的那個值呢,這就是今天要說的OnCheckedChangeListener方法。這個方法定義如下:
public static interface RadioGroup.OnCheckedChangeListener{
	    public void onCheckedChanged(RadioGroup group, int checkedId){

	    }
	}
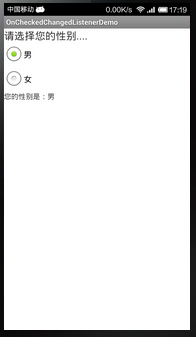
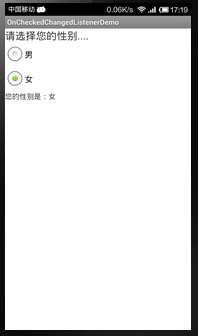
下面寫個例子來看看如何監聽單選按鈕,效果如下:
點選前:
點選後:
下面給出程式原始檔:
main.xml:
<LinearLayout xmlns:android="http://schemas.android.com/apk/res/android"
    xmlns:tools="http://schemas.android.com/tools"
    android:id="@+id/LinearLayout1"
    android:layout_width="match_parent"
    android:layout_height="match_parent"
    android:orientation="vertical" >
    <TextView
        android:id="@+id/title"
        android:layout_width="fill_parent"
        android:layout_height="wrap_content"
        android:textSize="20sp"
        android:text="請選擇您的性別...."/>
	<RadioGroup
	    android:id="@+id/sex"
	    android:layout_width="fill_parent"
	    android:layout_height="wrap_content"
	    android:orientation="vertical"
	    android:checkedButton="@+id/male">
	    <RadioButton
	        android:id="@+id/male"
	        android:text="男"/>
	    <RadioButton
	        android:id="@+id/female"
	        android:text="女"/>
	</RadioGroup>
	<TextView
	    android:id="@+id/showSex"
	    android:layout_width="fill_parent"
	    android:layout_height="wrap_content"
	    android:text="您的性別是:"/>
</LinearLayout>
MainActivity.java:
package com.example.oncheckedchangedlistenerdemo;

import android.app.Activity;
import android.os.Bundle;
import android.widget.RadioButton;
import android.widget.RadioGroup;
import android.widget.TextView;

public class MainActivity extends Activity {
	private TextView showSex = null;
	private RadioGroup sex = null;
	private RadioButton male = null;
	private RadioButton female = null;
	private String head = "";
	@Override
	protected void onCreate(Bundle savedInstanceState) {
		super.onCreate(savedInstanceState);
		setContentView(R.layout.activity_main);
		initView();
	}

	private void initView(){
		//初始化元件
		showSex = (TextView)super.findViewById(R.id.showSex);
		sex = (RadioGroup)super.findViewById(R.id.sex);
		male = (RadioButton)super.findViewById(R.id.male);
		female = (RadioButton)super.findViewById(R.id.female);
		//獲取顯示字首(即您的性別是:),以便顯示美觀
		head = showSex.getText().toString();
		//未呼叫監聽時顯示預設選擇內容
		if(male.getId() == sex.getCheckedRadioButtonId()){
			showSex.setText(head+male.getText().toString());
		}else if(female.getId() == sex.getCheckedRadioButtonId()){
			showSex.setText(head+female.getText().toString());
		}
		//為RadioGroup設定監聽事件
		sex.setOnCheckedChangeListener(new RadioGroup.OnCheckedChangeListener() {

			@Override
			public void onCheckedChanged(RadioGroup group, int checkedId) {
				// TODO Auto-generated method stub
				String sexTmp = "";
				if(checkedId == male.getId()){
					sexTmp = male.getText().toString();
				}else if(checkedId == female.getId()){
					sexTmp = female.getText().toString();
				}
				showSex.setText(head+sexTmp);
			}
		});
	}
}
今天就到這裡了。
相關推薦
一步一步學android之事件篇——單選按鈕監聽事件
在平常使用軟體的時候,我們經常會碰見一些選擇題,例如選擇性別的時候,在男和女之間選,前面說過這個情況要用RadioGroup元件,那麼點選了之後我們該怎麼獲取到選擇的那個值呢,這就是今天要說的OnCheckedChangeListener方法。這個方法定義如下: publ
egret之移除帶引數的監聽事件
this.selectBtn.addEventListener(egret.TouchEvent.TOUCH_TAP, this.onClickNewIndo.bind(this,this.data), this);//新增監聽事件 public onClickNewIndo
Android中自定義ScrollView的滑動監聽事件
專案結構: 1.LazyScrollView類(自定義ScrollView) package android.zhh.com.myapplicationscrollview; /** * Created by sky on 2017/3/19. */ impor
從零開始學 Web 之 HTML5(三)網路監聽,全屏,檔案讀取,地理定位介面,應用程式快取
一、網路監聽介面 ononline:網路連通時觸發 onoffline:網路斷開時觸發 window.addEventListener("online", function(){}); window.addEventListener("offline", function(){}); 二、全屏介面 全
android Button按下及擡起監聽事件
首先我們在 佈局中,寫入Button按鈕 <?xml version="1.0" encoding="utf-8"?> <LinearLayout xmlns:android
Android中自定義ScrollView的滑動監聽事件,並在滑動時漸變標題欄背景顏色
效果圖 滑動前: 滑動中: 滑動到底部: 專案結構 ObservableScrollView package com.jukopro.titlebarcolor; import android.content.Context; import android.u
Android屬性動畫欣賞——ObjectAnimator與動畫監聽事件
傳統動畫的侷限 傳統動畫(Animation)只是重繪動畫(就是不斷的呼叫相應的方法重繪,會耗費CPU資源),改變其顯示位置,但是真正能響應事件的位置還在原處。因此不適宜做具有互動的動畫效果,僅僅用來做一些顯示性的效果。(包括位移、旋轉、縮放、透明度四種動畫)
android--ListView(控制元件+二種介面卡+監聽事件)
介面卡就是大量資料來源顯示到檢視上 介面卡分為簡單介面卡和陣列介面卡 陣列介面卡:先在佈局檔案新建一個ListVi控制元件 1.新建一個數組介面卡 arrAdapter=new ArrAdapter<String>(this,android.layout.sim
<Java>按鈕監聽事件的實現方式
方式 log undle 必須 AC listen oncreate ava creat 一:事件處理機制要通過以下三個不同對象來實現: (1)事件源:事件發生的場所,通常為產生事件的組件。 (2)事件對象:封裝在組件上發生的特定事件。 (3)事件監聽對象:負責監聽事件源發
單選按鈕的onclick事件
<form name="form1" method="post" action=""> <input name="radiobutton" type="radio" value="0" checked onclick="form1.select1.sty
一步一步學android之事件篇——單擊事件
在使用軟體的時候單擊事件必不可少,比如我想確定、取消等都需要使用者的單擊,所有的單擊事件都是由View.OnClickListener介面來進行處理的,介面定義如下: public static interface View.OnClickListener{ publ
一步一步學android之事件篇——焦點事件
焦點事件其實就是當我們操作那個元件時獲取的事件,比如發簡訊,在我們點選輸入框輸入內容的時候就獲取了焦點,今天的例子也是用EditText來完成的,下面來看看焦點事件OnFocusChangeListener的使用,效果如下: 大概的效果就是:當第一個EditText獲取焦
一步一坑學android之禁用Appt2(andriod studio3.0)
唔,你的問題是什麼呢?1)上方提示R檔案缺失?2)Error:java.util.concurrent.ExecutionException: com.android.tools.aapt2.Aapt2Exception: AAPT2 error: check logs fo
一步一步學android之控制元件篇——ListView自定義顯示資料格式
上一篇部落格說了ListView的基本使用,這篇將是對ListView的使用進行一個提高,在日常生活中,如果單單給你看一些圖片,你可能都不知道這個圖片表達的什麼意思,但是要是在圖片旁邊寫的備註或者加個名字,我們就會很清楚的知道這張圖片是什麼,所以就要使用到SimpleAda
一步一步地實現選單欄(JMenuBar)工具欄(JPopupMenu)組合框(JComboBox)複選框(JCheckBox)單選按鈕(JRadioButton)文字域的綜合應用(三)
此程式是在前面程式的基礎上增加響應事件的完整程式,為了不讓程式太長,我想將快捷鍵(右鍵彈出選單)的事件專門放在一個類裡面,但遇到了一個問題,發現不好將原來類EditorJFrame3裡的popupmenu和text成員變數引數傳遞到專門的事件類中,於是想出了
8步教你開啟Android之門 NDK入門教程
第0步:下載工具好了,讓我們開始吧。你需要下載NDK。我們先開始下載,因為在下載的過程中你可以檢查一下確保你所需要用到的其餘工具的版本都正確。從Android網站下載適合你的作業系統的NDK。現在,對照下列檢查你的工具版本:如果在Windows下,Cygwin 1.7或更高版
java之事件監聽(一)按鈕監聽
package 第一版; import java.awt.*; import java.awt.event.ActionEvent; import java.awt.event.ActionListener; import javax.swing.*; public cl
一起學Android之Layout
本文簡述在Android開發中佈局的簡單應用,屬於基礎知識,僅供學習分享使用。 概述 在Android UI開發中,佈局型別主要有兩種:LinearLayout(線性佈局)和RelativeLayout(相對佈局),兩種佈局型別各有各的優勢與使用場景。 LinearLayout(線性佈局) 線性佈局允
一起學Android之Intent
本文簡述在Android開發中Intent的常見應用,僅供學習分享使用。 什麼是Intent? Intent負責對應用中一次操作的動作、動作涉及資料、附加資料進行描述,Android則根據此Intent的描述,負責找到對應的元件,將 Intent傳遞給呼叫的元件,並完成元件的呼叫。因此,Intent在
23、從頭學Android之ContentProvider
應用場景: 在Android官方指出的Android的資料儲存方式總共有五種,分別是:Shared Preferences、網路儲存、檔案儲存、外儲儲存、SQLite。但是我們知道一般這些儲存都只是在單獨的一個應用程式之中達到一個數據的共享,而且這些知識在前面我都有介紹,有


