OpenCV在影象上畫線、矩形、橢圓、多邊形、填充的多邊形、圓、顯示文字
OpenCV在影象上隨機畫直線、橢圓、多邊形、圓、顯示文字
程式碼如下:
/**
 * @file Drawing_2.cpp
 * @brief Simple sample code
 */

#include <opencv2/core.hpp>
#include <opencv2/imgproc.hpp>
#include <opencv2/highgui.hpp>
#include <iostream>
#include <stdio.h>

using namespace cv;

/// Global Variables
const int NUMBER = 100;
const int DELAY = 5;

const int window_width = 900;
const int window_height = 600;
int x_1 = -window_width/2;
int x_2 = window_width*3/2;
int y_1 = -window_width/2;
int y_2 = window_width*3/2;

/// Function headers
static Scalar randomColor( RNG& rng );
int Drawing_Random_Lines( Mat image, char* window_name, RNG rng );
int Drawing_Random_Rectangles( Mat image, char* window_name, RNG rng );
int Drawing_Random_Ellipses( Mat image, char* window_name, RNG rng );
int Drawing_Random_Polylines( Mat image, char* window_name, RNG rng );
int Drawing_Random_Filled_Polygons( Mat image, char* window_name, RNG rng );
int Drawing_Random_Circles( Mat image, char* window_name, RNG rng );
int Displaying_Random_Text( Mat image, char* window_name, RNG rng );
int Displaying_Big_End( Mat image, char* window_name, RNG rng );


/**
 * @function main
 */
int main( void )
{
  int c;

  /// Start creating a window
  char window_name[] = "Drawing_2 Tutorial";

  /// Also create a random object (RNG)
  RNG rng( 0xFFFFFFFF );

  /// Initialize a matrix filled with zeros
  Mat image = Mat::zeros( window_height, window_width, CV_8UC3 );
  /// Show it in a window during DELAY ms
  imshow( window_name, image );
  waitKey( DELAY );

  /// 畫線
  c = Drawing_Random_Lines(image, window_name, rng);
  if( c != 0 ) return 0;

  /// 矩形
  c = Drawing_Random_Rectangles(image, window_name, rng);
  if( c != 0 ) return 0;

  /// 橢圓
  c = Drawing_Random_Ellipses( image, window_name, rng );
  if( c != 0 ) return 0;

  /// 多邊形
  c = Drawing_Random_Polylines( image, window_name, rng );
  if( c != 0 ) return 0;

  /// 填充的多邊形
  c = Drawing_Random_Filled_Polygons( image, window_name, rng );
  if( c != 0 ) return 0;

  /// 圓
  c = Drawing_Random_Circles( image, window_name, rng );
  if( c != 0 ) return 0;

  /// 隨機位置顯示文字
  c = Displaying_Random_Text( image, window_name, rng );
  if( c != 0 ) return 0;

  /// 顯示文字
  c = Displaying_Big_End( image, window_name, rng );
  if( c != 0 ) return 0;

  waitKey(0);
  return 0;
}

/// Function definitions

/**
 * @function randomColor
 * @brief Produces a random color given a random object
 */
static Scalar randomColor( RNG& rng )
{
  int icolor = (unsigned) rng;
  return Scalar( icolor&255, (icolor>>8)&255, (icolor>>16)&255 );
}


/**
 * @function 隨機畫線
 */
int Drawing_Random_Lines( Mat image, char* window_name, RNG rng )
{
  Point pt1, pt2;

  for( int i = 0; i < NUMBER; i++ )
  {
    pt1.x = rng.uniform( x_1, x_2 );
    pt1.y = rng.uniform( y_1, y_2 );
    pt2.x = rng.uniform( x_1, x_2 );
    pt2.y = rng.uniform( y_1, y_2 );

    line( image, pt1, pt2, randomColor(rng), rng.uniform(1, 10), 8 );
    imshow( window_name, image );
    if( waitKey( DELAY ) >= 0 )
      { return -1; }
  }

  return 0;
}

/**
 * @function 畫矩形
 */
int Drawing_Random_Rectangles( Mat image, char* window_name, RNG rng )
{
  Point pt1, pt2;
  int lineType = 8;
  int thickness = rng.uniform( -3, 10 );

  for( int i = 0; i < NUMBER; i++ )
  {
    pt1.x = rng.uniform( x_1, x_2 );
    pt1.y = rng.uniform( y_1, y_2 );
    pt2.x = rng.uniform( x_1, x_2 );
    pt2.y = rng.uniform( y_1, y_2 );

    rectangle( image, pt1, pt2, randomColor(rng), MAX( thickness, -1 ), lineType );

    imshow( window_name, image );
    if( waitKey( DELAY ) >= 0 )
      { return -1; }
  }

  return 0;
}

/**
 * @function 隨機橢圓
 */
int Drawing_Random_Ellipses( Mat image, char* window_name, RNG rng )
{
  int lineType = 8;

  for ( int i = 0; i < NUMBER; i++ )
  {
    Point center;
    center.x = rng.uniform(x_1, x_2);
    center.y = rng.uniform(y_1, y_2);

    Size axes;
    axes.width = rng.uniform(0, 200);
    axes.height = rng.uniform(0, 200);

    double angle = rng.uniform(0, 180);

    ellipse( image, center, axes, angle, angle - 100, angle + 200,
             randomColor(rng), rng.uniform(-1,9), lineType );

    imshow( window_name, image );

    if( waitKey(DELAY) >= 0 )
      { return -1; }
  }

  return 0;
}

/**
 * @function 多邊形
 */
int Drawing_Random_Polylines( Mat image, char* window_name, RNG rng )
{
  int lineType = 8;

  for( int i = 0; i< NUMBER; i++ )
  {
    Point pt[2][3];
    pt[0][0].x = rng.uniform(x_1, x_2);
    pt[0][0].y = rng.uniform(y_1, y_2);
    pt[0][1].x = rng.uniform(x_1, x_2);
    pt[0][1].y = rng.uniform(y_1, y_2);
    pt[0][2].x = rng.uniform(x_1, x_2);
    pt[0][2].y = rng.uniform(y_1, y_2);
    pt[1][0].x = rng.uniform(x_1, x_2);
    pt[1][0].y = rng.uniform(y_1, y_2);
    pt[1][1].x = rng.uniform(x_1, x_2);
    pt[1][1].y = rng.uniform(y_1, y_2);
    pt[1][2].x = rng.uniform(x_1, x_2);
    pt[1][2].y = rng.uniform(y_1, y_2);

    const Point* ppt[2] = {pt[0], pt[1]};
    int npt[] = {3, 3};

    polylines(image, ppt, npt, 2, true, randomColor(rng), rng.uniform(1,10), lineType);

    imshow( window_name, image );
    if( waitKey(DELAY) >= 0 )
      { return -1; }
  }
  return 0;
}

/**
 * @function 填充的多邊形
 */
int Drawing_Random_Filled_Polygons( Mat image, char* window_name, RNG rng )
{
  int lineType = 8;

  for ( int i = 0; i < NUMBER; i++ )
  {
    Point pt[2][3];
    pt[0][0].x = rng.uniform(x_1, x_2);
    pt[0][0].y = rng.uniform(y_1, y_2);
    pt[0][1].x = rng.uniform(x_1, x_2);
    pt[0][1].y = rng.uniform(y_1, y_2);
    pt[0][2].x = rng.uniform(x_1, x_2);
    pt[0][2].y = rng.uniform(y_1, y_2);
    pt[1][0].x = rng.uniform(x_1, x_2);
    pt[1][0].y = rng.uniform(y_1, y_2);
    pt[1][1].x = rng.uniform(x_1, x_2);
    pt[1][1].y = rng.uniform(y_1, y_2);
    pt[1][2].x = rng.uniform(x_1, x_2);
    pt[1][2].y = rng.uniform(y_1, y_2);

    const Point* ppt[2] = {pt[0], pt[1]};
    int npt[] = {3, 3};

    fillPoly( image, ppt, npt, 2, randomColor(rng), lineType );

    imshow( window_name, image );
    if( waitKey(DELAY) >= 0 )
       { return -1; }
  }
  return 0;
}

/**
 * @function 圓
 */
int Drawing_Random_Circles( Mat image, char* window_name, RNG rng )
{
  int lineType = 8;

  for (int i = 0; i < NUMBER; i++)
  {
    Point center;
    center.x = rng.uniform(x_1, x_2);
    center.y = rng.uniform(y_1, y_2);

    circle( image, center, rng.uniform(0, 300), randomColor(rng),
            rng.uniform(-1, 9), lineType );

    imshow( window_name, image );
    if( waitKey(DELAY) >= 0 )
      { return -1; }
  }

  return 0;
}

/**
 * @function 顯示文字
 */
int Displaying_Random_Text( Mat image, char* window_name, RNG rng )
{
  int lineType = 8;

  for ( int i = 1; i < NUMBER; i++ )
  {
    Point org;
    org.x = rng.uniform(x_1, x_2);
    org.y = rng.uniform(y_1, y_2);

    putText( image, "Testing text rendering", org, rng.uniform(0,8),
             rng.uniform(0,100)*0.05+0.1, randomColor(rng), rng.uniform(1, 10), lineType);

    imshow( window_name, image );
    if( waitKey(DELAY) >= 0 )
      { return -1; }
  }

  return 0;
}顯示文字Displaying_Big_End
 */
int Displaying_Big_End( Mat image, char* window_name, RNG )
{
  Size textsize = getTextSize("OpenCV forever!", FONT_HERSHEY_COMPLEX, 3, 5, 0);
  Point org((window_width - textsize.width)/2, (window_height - textsize.height)/2);
  int lineType = 8;

  Mat image2;

  for( int i = 0; i < 255; i += 2 )
  {
    image2 = image - Scalar::all(i);
    putText( image2, "OpenCV forever!", org, FONT_HERSHEY_COMPLEX, 3,
             Scalar(i, i, 255), 5, lineType );

    imshow( window_name, image2 );
    if( waitKey(DELAY) >= 0 )
       { return -1; }
  }

  return 0;
}
結果:
-
隨機畫線:
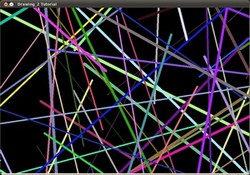
- 矩形和橢圓
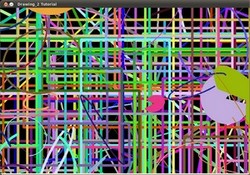
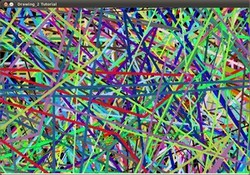
-
多邊形
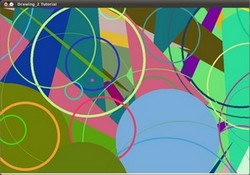
- 填充的多邊形(三角形)和圓
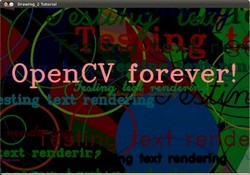
- 最後,"Testing Text Rendering"*將會以不同的字型,大小、顏色出現在不同的位置.最後,顯示”OpenCV forever!“
相關推薦
OpenCV在影象上畫線、矩形、橢圓、多邊形、填充的多邊形、圓、顯示文字
OpenCV在影象上隨機畫直線、橢圓、多邊形、圓、顯示文字 程式碼如下: /** * @file Drawing_2.cpp * @brief Simple sample code */ #include <opencv2/core.hpp> #inc
opencv在影象上畫矩形框
實現程式碼: #include "opencv2/opencv.hpp" using namespace cv; void main() { Mat src = imread("bird.jpg"); Rect re
opencv-視訊處理--畫線(越線、拌線)
視訊處理中,經常有做一些行人、車輛或者其它運動物體越線檢測,越界檢測。原視訊流:下面用opencv介紹兩種方式,畫直線(越線、拌線):第一種:固定第一幀,或者暫停視訊,在固定的一幀中完成畫直線的功能#include<iostream> using namespac
Opencv影象識別從零到精通(24)------漫水填充,種子填充,區域生長、孔洞填充
可以說從這篇文章開始,就結束了影象識別的入門基礎,來到了第二階段的學習。在平時處理二值影象的時候,除了要進行形態學的一些操作,還有有上一節講到的輪廓連通區域的面積周長標記等,還有一個最常見的就是孔洞的填充,opencv這裡成為漫水填充,其實也可以叫種子填
openCV 和GDI畫線效率對照
ref sca lan sign ng2 trac 放大 平臺 gpu 一、 因為項目須要,原來用GDI做的畫線的功能。新的項目中考慮到垮平臺的問題。打算用openCV來實現。故此做個效率對照。 二、 2點做一條線,來測試效率。 用了相同的畫板大小---256*256的
畫紙上畫線
佈局檔案 activity_main <?xml version="1.0" encoding="utf-8"?> <RelativeLayout xmlns:android="http://schemas.android.com/apk/res/an
C++ Opencv——影象處理(預處理+矩形物體分割)
影象預處理分割目標 // ROI提取 Mat Image_ROI(Mat frame) { Mat gray, bw, img, bkup; /*目標提取——預處理——Mat ROI*/ /*預處理很重要——直接找到目標*/ //預處理很重要——直接找到目標 // 灰度化
如何使用Graphics2D在一張圖片上畫線(包括箭頭)
有這樣一個需求,在一張圖片上畫幾條線並儲存,如圖所示: 已知各個點的x,y座標,座標範圍是[0.000,1],即將橫縱方向分成1000份。 我們可以使用java.awt.Graphics2D的庫來實現。 Graphics2D在Graphics類提供繪製各種基本的幾何圖形的基礎上進行
在MFC的Picture控制元件上畫線和框
CPen pen(PS_SOLID,5,RGB(255,0,0));//建立一個畫筆工具 //CBrush *pBrush=CBrush::FromHandle((HBRUSH)GetStockObject(NULL_BRUSH)); CWnd *pwnd=GetDlgItem(IDC_ShowImg)
qt 中畫線時如何設定筆的顏色和填充
在上一次介紹中已經實現了自定義控制元件,並把Widget 放入了主介面中,畫了一個圓,具體可參考“QT 自定義視窗” 下面我們介紹一下如何設定畫筆顏色和所畫圖形的填充顏色。 畫筆顏色: void CircleWidget::paintEvent(QPaintEvent *event) {
OpenCV畫線、矩形、圓形
程式碼位置:9-DrawingLineRectangleCircle.py import numpy as np import cv2 import matplotlib.pyplot as plt def show(image): plt.imshow(image)
PHP合成圖片、生成文字、居中對齊、畫線、矩形、三角形、多邊形、圖片抗鋸齒、不失真 高效能原始碼示例
function generateImg($source, $text1, $text2, $text3, $font = './msyhbd.ttf') { $date = '' . date ( 'Ymd' ) . '/'; $img = $date . md5 ( $source
【OpenCV影象處理】二十二、影象邊緣檢測(上)
→影象邊緣檢測的目的是檢測鄰域內灰度明顯變化的畫素,常用一階差分和二階差分來進行邊緣檢測 →數字影象中的邊緣是由鄰域內灰度值明顯變化的畫素構成,邊緣檢測主要是影象灰度的度量檢測和定位 →影象的邊緣有方向和幅值兩個屬性,沿邊緣方向畫素灰度值變化平緩或不發生變化,而垂直於邊緣方
opencv學習——畫線、圓、文字
import cv2 import numpy as np # creat a black image img = np.zeros((512,512,3), np.uint8) # draw a
OpenCV在影象上摳取指定區域平移、縮放的影象
#include "stdafx.h" #include <stdio.h> #include <stdlib.h> #include <iostream> #include <fstream> #include <
【OpenCV影象處理】十五、影象空域濾波(上)
1.空域濾波介紹 空域濾波是一種鄰域處理方法,通過直接在影象空間中對鄰域內畫素進行處理,達到平滑或銳化影象的作用。此外,在影象識別中,通過濾波還可以抽出影象的特徵作為影象識別的特徵模式。 空域濾波是影象處理領域中廣泛使用的主要工具。空域濾波主要可以分為線性濾波和非線性濾波,
Java 畫 線、矩形、橢圓、字串
<span style="font-size:18px;">import java.awt.Color; import java.awt.Frame; import java.awt.Graphics; import java.awt.Image; import
MFC畫圖(畫線、畫矩形、畫刷畫筆的使用)
繪製任意線條: 1、建立基於單文件工程:Draw CDrawView類中新增成員變數: CPoint m_ptOrigin; BOOL m_bDraw; 2、CDrawView()中初始化: m_ptOrigin = point; m_bDraw = false; 3、新增
python+opencv選出視頻中一幀再利用鼠標回調實現圖像上畫矩形框
open cap 圖像 ide http 這樣的 vedio lease 等待 最近因為要實現模板匹配,需要在視頻中選中一個目標,然後框出(即作為模板),對其利用模板匹配的方法進行檢測。於是需要首先選出視頻中的一幀,但是在利用攝像頭讀視頻的過程中我唯一能想到的方法就是:
【OpenCv】 如何把圖片的矩形、多邊形區域內容置零
#include <iostream> #include <opencv2/opencv.hpp> #include "opencv2/core/core.hpp" #include "opencv2/highgui/highgui.hpp" using namesp
