
Shiro 登錄認證源碼詳解
Shiro 登錄認證源碼詳解
Apache Shiro 是一個強大且靈活的 Java 開源安全框架,擁有登錄認證、授權管理、企業級會話管理和加密等功能,相比 Spring Security 來說要更加的簡單。
本文主要介紹 Shiro 的登錄認證(Authentication)功能,主要從 Shiro 設計的角度去看這個登錄認證的過程。
一、Shiro 總覽
首先,我們思考整個認證過程的業務邏輯:
- 獲取用戶輸入的用戶名,密碼;
- 從服務器數據源中獲取相應的用戶名和密碼;
- 判斷密碼是否匹配,決定是否登錄成功。
我們現在來看看 Shiro 是如何設計這個過程的:
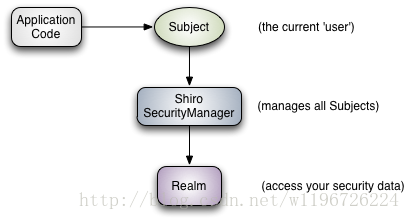
圖中包含三個重要的 Shiro 概念:Subject、SecurityManager、Realm。接下來,分別介紹這三者有何用:
- Subject:表示“用戶”,表示當前執行的用戶。
Subject實例全部都綁定到了一個SecurityManager上,當和Subject交互時,它是委托給SecurityManager去執行的。 - SecurityManager:Shiro 結構的心臟,協調它內部的安全組件(如登錄,授權,數據源等)。當整個應用配置好了以後,大多數時候都是直接和
Subject的 API 打交道。 - Realm:數據源,也就是抽象意義上的 DAO 層。它負責和安全數據交互(比如存儲在數據庫的賬號、密碼,權限等信息),包括獲取和驗證。Shiro 支持多個 Realm,但是至少也要有一個。Shiro 自帶了很多開箱即用的 Reams,比如支持 LDAP、關系數據庫(JDBC)、INI 和 properties 文件等。但是很多時候我們都需要實現自己的 Ream 去完成獲取數據和判斷的功能。
登錄驗證的過程就是:Subject 執行 login 方法,傳入登錄的「用戶名」和「密碼」,然後 SecurityManager 將這個 login 操作委托給內部的登錄模塊,登錄模塊就調用 Realm 去獲取安全的「用戶名」和「密碼」,然後對比,一致則登錄,不一致則登錄失敗。
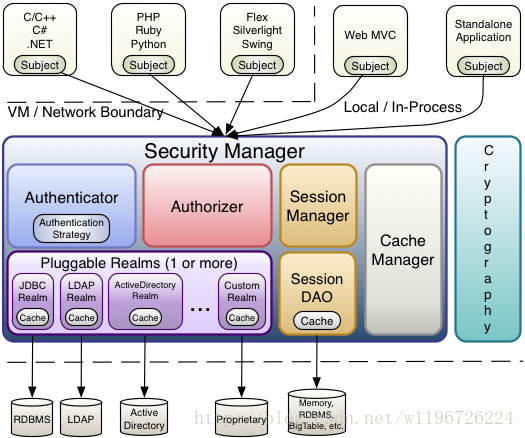
Shiro 詳細結構:
二、Shiro 登錄示例
代碼來自 Shiro 官網教程。Shiro 配置 INI 文件:
# ----------------------------------------------------------------------------
# Users and their (optional) assigned roles
# username = password, role1, role2, ..., roleN
# ----------------------------------------------------------------------------
[users]
wang=123
測試 main 方法:
public static void main(String[] args) {

    log.info("My First Apache Shiro Application");

    //1.從 Ini 配置文件中獲取 SecurityManager 工廠
    Factory<SecurityManager> factory = new IniSecurityManagerFactory("classpath:shiro.ini");

    //2.獲取 SecurityManager 實例
    SecurityManager securityManager = factory.getInstance();

    //3.將 SecurityManager 實例綁定給 SecurityUtils
    SecurityUtils.setSecurityManager(securityManager);

    //4.獲取當前登錄用戶
    Subject currentUser = SecurityUtils.getSubject();

    //5.判斷是否登錄,如果未登錄,則登錄
    if (!currentUser.isAuthenticated()) {
        //6.創建用戶名/密碼驗證Token(Web 應用中即為前臺獲取的用戶名/密碼)
        UsernamePasswordToken token = new UsernamePasswordToken("wang", "123");
        try {
            //7.執行登錄,如果登錄未成功,則捕獲相應的異常
            currentUser.login(token);
        } catch (UnknownAccountException uae) {
            log.info("There is no user with username of " + token.getPrincipal());
        } catch (IncorrectCredentialsException ice) {
            log.info("Password for account " + token.getPrincipal() + " was incorrect!");
        } catch (LockedAccountException lae) {
            log.info("The account for username " + token.getPrincipal() + " is locked.  " +
                    "Please contact your administrator to unlock it.");
        }
        // ... catch more exceptions here (maybe custom ones specific to your application?
        catch (AuthenticationException ae) {
            //unexpected condition?  error?
        }
    }

}
三、登錄邏輯詳解
Shiro 登錄過程主要涉及到 Subject.login 方法,接下來我們將通過查看源碼來分析整個登錄過程。
- 創建
AuthenticationToken接口的實例 token,比如例子中的UsernamePasswordToken,包含了登錄的用戶名和密碼; - 獲取當前用戶
Subject,然後調用Subject.login(AuthenticationToken)方法; Subject將login代理給SecurityManager的login()
3.1 創建AuthenticationToken
第一步是創建 AuthenticationToken 接口的身份 token,比如例子中的 UsernamePasswordToken。
package org.apache.shiro.authc;

public interface AuthenticationToken extends Serializable {
    // 獲取“用戶名”
    Object getPrincipal();
    // 獲取“密碼”
    Object getCredentials();
}
3.2 獲取當前用戶並執行登錄
獲取的 Subject 當前用戶是我們平時打交道最多的接口,有很多方法,但是這裏我們只分析 login 方法。
package org.apache.shiro.subject;

public interface Subject {

    void login(AuthenticationToken token) throws AuthenticationException;

}
login 方法接受一個 AuthenticationToken 參數,如果登錄失敗則拋出 AuthenticationException 異常,可通過判斷異常類型來知悉具體的錯誤類型。
接下來,分析 Subject 接口的實現類 DelegatingSubject 是如何實現 login 方法的:
public void login(AuthenticationToken token) throws AuthenticationException {
    clearRunAsIdentitiesInternal();
    // 代理給SecurityManager
    Subject subject = securityManager.login(this, token);
    ...
}
3.3 SecurityManager 接口
前面說過,整個 Shiro 安全框架的心臟就是 SecurityManager,我們看這個接口都有哪些方法:
package org.apache.shiro.mgt;

public interface SecurityManager extends Authenticator, Authorizer, SessionManager {

    Subject login(Subject subject, AuthenticationToken authenticationToken) throws AuthenticationException;

    void logout(Subject subject);

    Subject createSubject(SubjectContext context);
}
SecurityManager 包含很多內置的模塊來完成功能,比如登錄(Authenticator),權限驗證(Authorizer)等。這裏我們看到 SecurityManager 接口繼承了 Authenticator 登錄認證的接口:
package org.apache.shiro.authc;

public interface Authenticator {

    public AuthenticationInfo authenticate(AuthenticationToken authenticationToken)
            throws AuthenticationException;
}那麽,SecurityManager 的實現都是怎樣來實現 Authenticator 接口的呢?答案是:使用了組合。SecurityManager其中的一個實現類AuthenticatingSecurityManager中擁有一個 Authenticator 的屬性,這樣調用 authenticate 的時候,是委托給內部的 Authenticator 屬性去執行的。
3.4 SecurityManager.login 的實現
// DefaultSecurityManager.java
public Subject login(Subject subject, AuthenticationToken token) throws AuthenticationException {
    AuthenticationInfo info;
    try {
        info = authenticate(token);
    } catch (AuthenticationException ae) {
        try {
            onFailedLogin(token, ae, subject);
        } catch (Exception e) {
            if (log.isInfoEnabled()) {
                log.info("onFailedLogin method threw an " +
                        "exception.  Logging and propagating original AuthenticationException.", e);
            }
        }
        throw ae; //propagate
    }

    Subject loggedIn = createSubject(token, info, subject);

    onSuccessfulLogin(token, info, loggedIn);

    return loggedIn;
}

// AuthenticatingSecurityManager.java
/**
 * Delegates to the wrapped {@link org.apache.shiro.authc.Authenticator Authenticator} for authentication.
 */
public AuthenticationInfo authenticate(AuthenticationToken token) throws AuthenticationException {
    return this.authenticator.authenticate(token);
}- 調用AuthenticatingSecurityManager接口的
authenticate方法執行登錄; - 在
authenticate方法中代理給Authenticator接口類型的屬性去真正執行實現類中的authenticate(token)方法。
3.5 Authenticator 登錄模塊
Authenticator 接口如下:
package org.apache.shiro.authc;
public interface Authenticator {
public AuthenticationInfo authenticate(AuthenticationToken authenticationToken)
throws AuthenticationException;
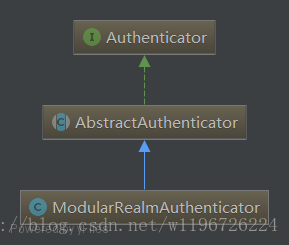
}其實現類有 AbstractAuthenticator 和 ModularRealmAuthenticator:
下面來看看如何實現的 authenticate 方法:
// AbstractAuthenticator.java
public final AuthenticationInfo authenticate(AuthenticationToken token) throws AuthenticationException {
    AuthenticationInfo info;
    try {
        // 調用doAuthenticate方法
        info = doAuthenticate(token);
        if (info == null) {
            ...
        }
    } catch (Throwable t) {
        ...
    }
    ...
}

// ModularRealmAuthenticator.java
protected AuthenticationInfo doAuthenticate(AuthenticationToken authenticationToken) throws AuthenticationException {
    assertRealmsConfigured();
    Collection<Realm> realms = getRealms();
    if (realms.size() == 1) {
        // Realm唯一時
        return doSingleRealmAuthentication(realms.iterator().next(), authenticationToken);
    } else {
        return doMultiRealmAuthentication(realms, authenticationToken);
    }
}

protected AuthenticationInfo doSingleRealmAuthentication(Realm realm, AuthenticationToken token) {
    if (!realm.supports(token)) {
        ...
    }
    // 調用Realm的getAuthenticationInfo方法獲取AuthenticationInfo信息
    AuthenticationInfo info = realm.getAuthenticationInfo(token);
    if (info == null) {
        ...
    }
    return info;
}
從源碼中可以看出,最後會調用 Realm 的 getAuthenticationInfo(AuthenticationToken) 方法。
3.6 Realm 接口
Realm 相當於數據源,功能是通過 AuthenticationToken 獲取數據源中的安全數據,這個過程中可以拋出異常,告訴 shiro 登錄失敗。
package org.apache.shiro.realm;
public interface Realm {
// 獲取 shiro 唯一的 realm 名稱
String getName();
// 是否支持給定的 AuthenticationToken 類型
boolean supports(AuthenticationToken token);
// 獲取 AuthenticationInfo
AuthenticationInfo getAuthenticationInfo(AuthenticationToken token) throws AuthenticationException;
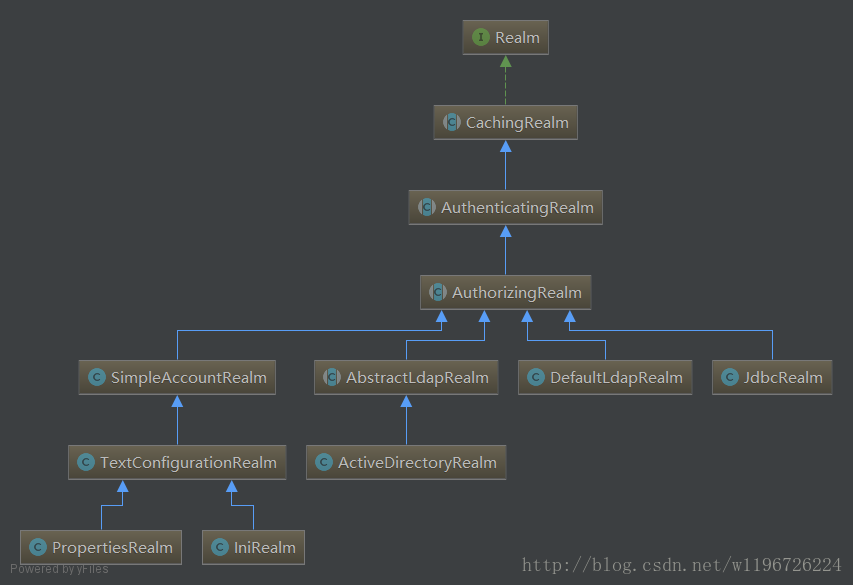
}Shiro 自帶了很多開箱即用的 Realm 實現,具體的類圖如下:
3.7 總結
到此,我們把整個 Shiro 的登錄認證流程分析了一遍。
- 創建
AuthenticationToken,然後調用Subject.login方法進行登錄認證; Subject委托給SecurityManager;SecurityManager委托給Authenticator接口;Authenticator接口調用Realm獲取登錄信息。
整個過程中,如果登錄失敗,就拋出異常,是使用異常來進行邏輯控制的。
四、登錄密碼的存儲
- 頁面使用 Https 協議;
- 頁面傳送密碼時要先加密後再傳輸,最好是不可逆的加密算法(MD5,SHA2);
- 後端存儲時要結合鹽(隨機數)一起加密存儲;
- 使用不可逆的加密算法,而且可以加密多次;
- 把加密後的密碼和鹽一起存儲到數據庫;
五、學習 Shiro 源碼感悟
- 從整體去思考框架的實現,帶著業務邏輯去看實現邏輯;
- 不要摳細節,要看抽象,學習其實現方法;
- 首先看官方文檔,官方文檔一般會從整體設計方面去說明,遇到具體的接口再去看Javadoc文檔;
- 結合類圖等工具方便理解;
Shiro 登錄認證源碼詳解