Weblogic 12c 負載均衡和session複製
(1)weblogic自帶的proxy代理 (2) nginx實現負載均衡
一、通過proxy實現負載均衡
1、建立proxy_server服務

建立完成後,proxy_server關聯計算機machine,這樣可以通過節點管理器啟動該服務.
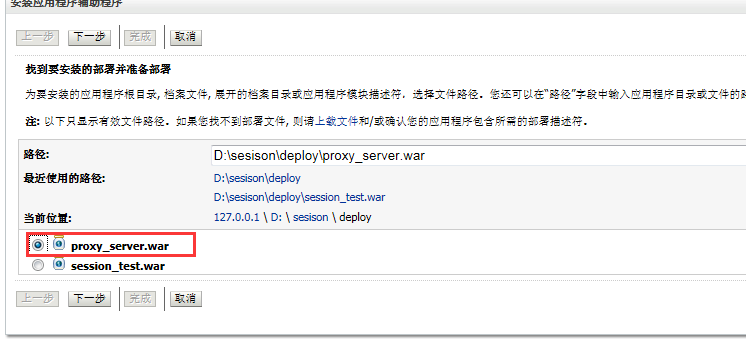
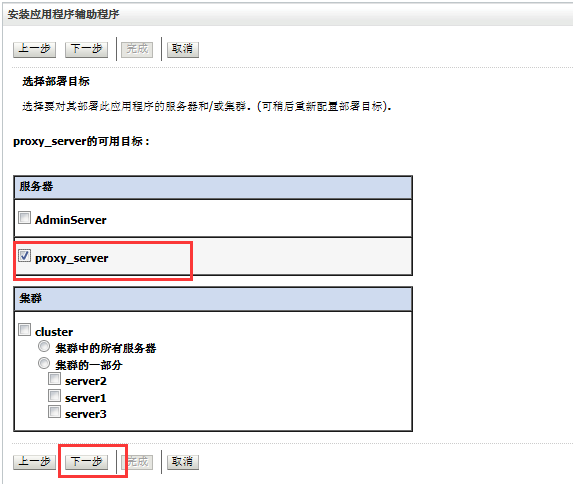
2、建立proxy_server應用
proxy_server應用很簡單,就一個web.xml和一個weblogic.xml web.xml HttpClusterServlet會將請求負載分發到127.0.0.1:47001|127.0.0.1:47002|127.0.0.1:47003上.-
<?xml version="1.0" encoding="UTF-8"?>
- <web-app xmlns:xsi="http://www.w3.org/2001/XMLSchema-instance" xmlns="http://java.sun.com/xml/ns/javaee" xsi:schemaLocation="http://java.sun.com/xml/ns/javaee http://java.sun.com/xml/ns/javaee/web-app_3_0.xsd" id="WebApp_ID" version="3.0">
- <display-name>proxy_server</display-name>
-
<servlet>
- <servlet-name>session_test</servlet-name>
- <servlet-class>weblogic.servlet.proxy.HttpClusterServlet</servlet-class>
- <init-param>
- <param-name>WebLogicCluster</param-name>
-
<param-value>127.0.0.1:47001|127.0.0.1:47002|127.0.0.1:47003</param-value>
- </init-param>
- </servlet>
- <servlet-mapping>
- <servlet-name>session_test</servlet-name>
- <url-pattern>/session_test</url-pattern>
- </servlet-mapping>
- <servlet-mapping>
- <servlet-name>session_test</servlet-name>
- <url-pattern>/</url-pattern>
- </servlet-mapping>
- <servlet-mapping>
- <servlet-name>session_test</servlet-name>
- <url-pattern>*.jsp</url-pattern>
- </servlet-mapping>
- <servlet-mapping>
- <servlet-name>session_test</servlet-name>
- <url-pattern>*.htm</url-pattern>
- </servlet-mapping>
- <servlet-mapping>
- <servlet-name>session_test</servlet-name>
- <url-pattern>*.html</url-pattern>
- </servlet-mapping>
- </web-app>
- <!DOCTYPE weblogic-web-app PUBLIC "-//BEA Systems, Inc.//DTD Web Application 8.1//EN" "http://www.bea.com/servers/wls810/dtd/weblogic
- 810-web-jar.dtd">
- <weblogic-web-app>
- <context-root>/</context-root>
- <charset-params>
- <input-charset>
- <resource-path>/*</resource-path>
- <java-charset-name>GBK</java-charset-name>
- </input-charset>
- </charset-params>
- </weblogic-web-app>


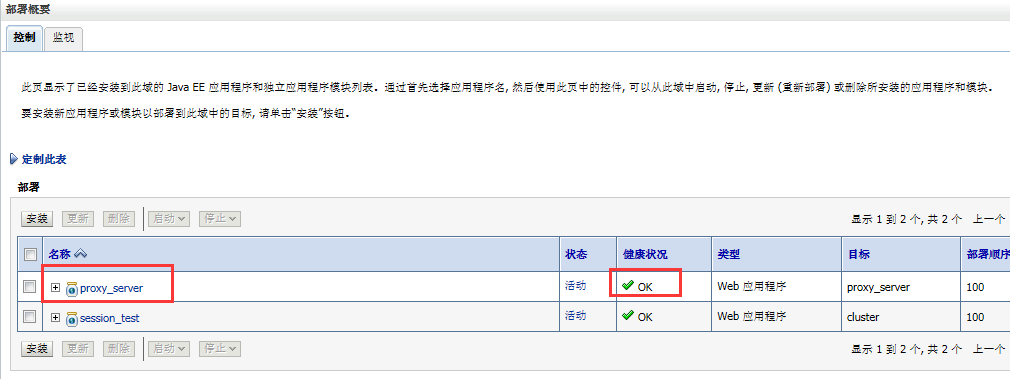
部署完成後如下所示:

3、 測試負載均衡 當服務都啟動之後,瀏覽器輸入http://127.0.0.1:47008/redis/

然後重新整理瀏覽器

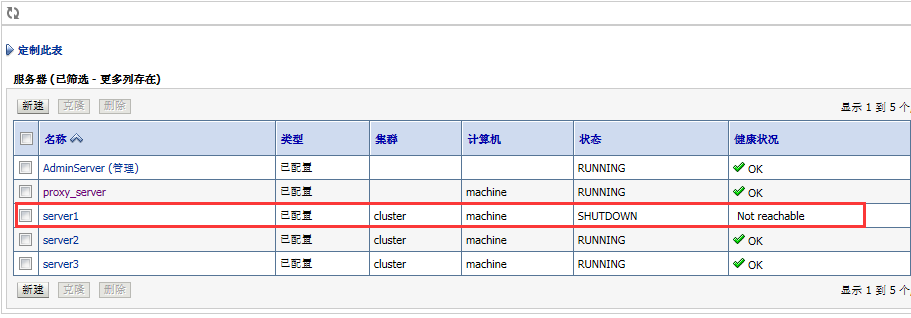
可以發現,session的建立時間和第一個感嘆號之前的值也沒有變化,說明:session得到了複製,每次請求被分發到其中的某一個server上,降低了伺服器的壓力. 當我們把託管服務server1關閉時

我們再次重新整理瀏覽器時,

由上圖可以發現,session並沒有發生變化(只是感嘆號之後的值變化了),而且後來每次重新整理時感嘆號之間的值506820286和68952051來回調換位置而已. 這也表示伺服器只有2個了. 由以上幾點,我們驗證了weblogic的負載均衡.
二、通過Nginx實現負載均衡
還記得我的另篇博文中寫的關於nginx+tomcat實現的負載均衡麼, nginx+tomcat負載均衡和session複製,原理其實差不多. 只需要更改下其中的IP地址就可以了.- #weblogic的三個服務
- upstream mysite {
- server 127.0.0.1:47001 weight=5;
- server 127.0.0.1:47002 weight=5;
- server 127.0.0.1:47003 weight=5;
- }
- #user nobody;
- worker_processes 1;
- #error_log logs/error.log;
- #error_log logs/error.log notice;
- #error_log logs/error.log info;
- #pid logs/nginx.pid;
- events {
- worker_connections 1024;
- }
- http {
- include mime.types;
- default_type application/octet-stream;
- #log_format main '$remote_addr - $remote_user [$time_local] "$request" '
- # '$status $body_bytes_sent "$http_referer" '
- # '"$http_user_agent" "$http_x_forwarded_for"';
- #access_log logs/access.log main;
- sendfile on;
- #tcp_nopush on;
- #keepalive_timeout 0;
- keepalive_timeout 10;
- #gzip on;
- #weblogic的三個服務
- upstream mysite {
- server 127.0.0.1:47001 weight=5;
- server 127.0.0.1:47002 weight=5;
- server 127.0.0.1:47003 weight=5;
- }
- server {
- listen 80;
- server_name localhost;
- #charset koi8-r;
- #access_log logs/host.access.log main;
- location / {
- root html;
- index index.html index.htm;
- proxy_pass http://mysite;
- #新增如下3個配置後,當一臺server宕機,切換速度會很快,此時配置是1秒
- proxy_connect_timeout 1;
- proxy_send_timeout 1;
- proxy_read_timeout 1;
- }
- #error_page 404 /404.html;
- # redirect server error pages to the static page /50x.html
- #
- error_page 500502503504 /50x.html;
- location = /50x.html {
- root html;
- }
- # proxy the PHP scripts to Apache listening on 127.0.0.1:80
- #
- #location ~ \.php$ {
- # proxy_pass http://127.0.0.1;
- #}
- # pass the PHP scripts to FastCGI server listening on 127.0.0.1:9000
- #
- #location ~ \.php$ {
- # root html;
- # fastcgi_pass 127.0.0.1:9000;
- # fastcgi_index index.php;
- # fastcgi_param SCRIPT_FILENAME /scripts$fastcgi_script_name;
- # include fastcgi_params;
- #}
- # deny access to .htaccess files, if Apache's document root
- # concurs with nginx's one
- #
- #location ~ /\.ht {
- # deny all;
- #}
- }
- # another virtual host using mix of IP-, name-, and port-based configuration
- #
- #server {
- # listen 8000;
- # listen somename:8080;
- # server_name somename alias another.alias;
- # location / {
- # root html;
- # index index.html index.htm;
- # }
- #}
- # HTTPS server
- #
- #server {
- # listen 443 ssl;
- # server_name localhost;
- # ssl_certificate cert.pem;
- # ssl_certificate_key cert.key;
- # ssl_session_cache shared:SSL:1m;
- # ssl_session_timeout 5m;
- # ssl_ciphers HIGH:!aNULL:!MD5;
- # ssl_prefer_server_ciphers on;
- # location / {
- # root html;
- # index index.html index.htm;
- # }
- #}
- }

相關推薦
Weblogic 12c 負載均衡和session複製
(1)weblogic自帶的proxy代理 (2) nginx實現負載均衡 一、通過proxy實現負載均衡 1、建立proxy_server服務 建立完成後,proxy_server關聯計算機machine,這樣可以通過節點管理器啟動該服務. 2、建
Nginx + Tomcat基於HTTP協議實現反代、動靜分離、負載均衡和session會話保持
1、演示環境: IP 作業系統 部署程式 192.168.1.143 CentOS 7.5 Nginx 192.168.1.144 CentOS 7.5 Tomcat
Apache + Tomcat基於HTTP協議實現反代、動靜分離、負載均衡和session會話保持
1、演示環境: IP 作業系統 部署程式 192.168.1.143 CentOS 7.6 Apache 192.168.1.144 CentOS 7.6 Tomcat
Apache + Tomcat基於AJP協議實現反代、動靜分離、負載均衡和session會話保持
1、演示環境: IP 作業系統 部署程式 192.168.1.143 CentOS 7.6 Apache 192.168.1.144 CentOS 7.6 Tomcat
nginx+tomcat+redis叢集實現負載均衡和session同步的步驟和問題處理方法
最近在研究nginx+tomcat的負載均衡功能, 因為需要實現failover時使用者無感知的效果,所以我考慮使用tomcat的session同步方式來實現。網上能查到的東西我就直接貼連結了,我把搭建這套系統的過程,與遇到的坑的處理方式說明一下。 我使用的系
apache負載均衡和tomcat6叢集和session複製
系統環境:Windows XP SP3 ,jdk1.5.0_05 軟體版本:apache_2.2.11-win32-x86-openssl-0.9.8i.msi apache-tomcat-6.0.16 apache-tomcat-6.0.18 備註:tomcat可以下載壓縮包
使用Mycat實現Mysql資料庫的主從複製、讀寫分離、分表分庫、負載均衡和高可用
Mysql叢集搭建 使用Mycat實現Mysql資料庫的主從複製、讀寫分離、分表分庫、負載均衡和高可用(Haproxy+keepalived),總體架構: 說明:資料庫的訪問通過keepalived的虛擬IP訪問HAProxy負載均衡器,實現HAProxy的高可用,HAProxy用於實
Windows+Nginx+Tomcat搭建負載均衡和叢集環境同時實現session共享(一)
摘要:隨著網站的訪問量越來越多,所以就考慮給網站增加伺服器了,現在比較流行的做法就是給網站做叢集環境,下面我把我做的過程記錄一下,方便日後檢視,同時也希望可以幫助到有需要的朋友! 一:首先是環境: 1.jdk 1.6.0_45 2.tomcat 6.0.44 3.nginx
Nginx和Tomcat負載均衡實現session共享
以前的專案使用Nginx作為反向代理實現了多個Tomcat的負載均衡,為了實現多個Tomcat之間的session共享,使用了開源的Memcached-Session-Manager框架。 此框架的優勢: 1、支援Tomcat6和Tomca
nginx+tomcat實現負載均衡以及session共享(linux centos7環境)
processes 解壓 smo eve cti 下載 gen cli -c 一、nginx的安裝 1.準備三份tomcat tomcat1 設置端口 8080 tomcat2 設置端口 8081 tomcat3 設置端口 8082 2. 下載nginx 3. 解壓到/ho
nginx之 nginx + tomcat + redis 負載均衡且session一致性
權限 gzip 通過 del 跳轉 home val zhang ctp 說明: 本文描述的是 nginx + tomcat + redis 實現應用負載均衡且滿足session一致性,從安裝到配置的全部過程,供大家學習!nginx 代理服務器ip: 10.219.24.2
Nginx做負載均衡時session共享問題詳解
壓縮 多臺 nts 獲得 hash 常見 hub img font 用nginx做負載均衡時,同一個IP訪問同一個頁面會被分配到不同的服務器上,如果session不同步的話,就會出現很多問題,比如說最常見的登錄狀態。 再者Nginx連接Memcached集群時,Nignx的
用haproxy結合keepalived實現基於LNMP的負載均衡和高可用
lnmp的負載均衡以及高可用今天我們講haproxy結合keepalived實現LNMP的負載均衡和高可用,現在的公司大部分都基於haproxy實現負載均衡。下面以一個事例去給大家詳細講解如何去實現:一、用haproxy結合keepalived實現基於lnmp的負載均衡和高可用服務,要求: (1)實現動
nginx負載均衡和mysql主主被動模式基礎架構綜合部署
nginx負載均衡 mysql主從(主主被動互備模式) 1.結構思路 準備用5個虛機,一個虛機安裝nginx來配置負載均衡,兩個虛機做web服務器,另外兩個虛機,安裝mysql,做主主被動配置,每次web只讀取一個mysql服務。 2.具體實施步驟 用vmware最小化安裝5個虛機,我用的是c
93.Nginx配置:負載均衡和SSL配置
Nginx配置:負載均衡和SSL配置一、負載均衡 負載均衡在服務端開發中算是一個比較重要的特性。因為Nginx除了作為常規的Web服務器外,還會被大規模的用於反向代理前端,因為Nginx的異步框架可以處理很大的並發請求,把這些並發請求hold住之後就可以分發給後臺服務端(backend servers,也叫做
使用nginx實現負載均衡和動靜分離
nginx實現負載均衡和動態分離使用nginx實現負載均衡和動靜分離 在192.168.221.10這臺機器上源碼編譯安裝nginx yum -y install gcc gcc-c++ autoconf automake zib zib-devel openssl openssl-devel pcre
nginx+tomcat+redis負載均衡,實現session共享
session共享實驗環境: 系統: centos 7.4 3.10.0-327.el7.x86_64 docker: 18.03.0-ce docker-compose:docker-compose version 1.21.0 redis: 4.0.9 nginx: 1.12.2 tomcat:8.5.
DR+keepalived實現web群集的負載均衡和高可用性
Lvs-DR keepalived 我們搭建好的Lvs-DR群集是有一臺lvs調度器的,生產環境中如果調度器出現故障,整個群集將癱瘓。通過keepalived做lvs調度器的雙機熱備就可以很好的解決這個問題。keepalived采用VRRP虛擬路由冗余協議,以軟件的方式實現Linux服務器的多機熱備功
Nginx負載均衡和反向代理
技術 建立 方法名 什麽 serve 參數 不知道 出現 off 1:反向代理 代理就是中介,那有反向代理就有正向代理,兩者的區別是什麽嘞? 正向代理隱藏真實客戶端,服務端不知道實際發起請求的客戶端.,proxy和client同屬一
Nginx負載均衡和防爬蟲策略
Nginx負載均衡和防爬蟲策略 nginx負載均衡設置 nginx設置 nginx Nginx負載均衡和防爬蟲策略 vim langba888.confupstream langba888 {#每60s進行一次健康檢
