Spring Boot學習記錄(二)--thymeleaf模板
Spring Boot學習記錄(二)–thymeleaf模板
標籤(空格分隔): spring-boot
自從來公司後都沒用過jsp當介面渲染了,因為前後端分離不是很好,反而模板引擎用的比較多,thymeleaf最大的優勢字尾為html,就是隻需要瀏覽器就可以展現頁面了,還有就是thymeleaf可以很好的和spring整合.下面開始學習.
1.引入依賴
maven中直接引入
<dependency>
<groupId>org.springframework.boot</groupId>
<artifactId 可以檢視依賴關係,發現spring-boot-starter-thymeleaf下面已經包括了spring-boot-starter-web,所以可以把spring-boot-starter-web的依賴去掉.
2.配置檢視解析器
spring-boot很多配置都有預設配置,比如預設頁面對映路徑為
classpath:/templates/*.html
同樣靜態檔案路徑為
classpath:/static/
在application.properties中可以配置thymeleaf模板解析器屬性.就像使用springMVC的JSP解析器配置一樣
#thymeleaf start
spring.thymeleaf.mode=HTML5
spring.thymeleaf.encoding=UTF-8
spring.thymeleaf.content-type=text/html
#開發時關閉快取,不然沒法看到實時頁面
spring.thymeleaf.cache=false
#thymeleaf end
具體可以配置的引數可以檢視
org.springframework.boot.autoconfigure.thymeleaf.ThymeleafProperties這個類,上面的配置實際上就是注入到該類中的屬性值.
3.編寫DEMO
1.控制器
    @Controller
    public class HelloController {

        private Logger logger = LoggerFactory.getLogger(HelloController.class);
        /**
         * 測試hello
         * @return
         */
        @RequestMapping(value = "/hello",method = RequestMethod.GET)
        public String hello(Model model) {
            model.addAttribute("name", "Dear");
            return "hello";
        }

    }
2.view(註釋為IDEA生成的索引,便於IDEA補全)
<!DOCTYPE HTML>
<html xmlns:th="http://www.thymeleaf.org">
<head>
    <title>hello</title>
    <meta http-equiv="Content-Type" content="text/html; charset=UTF-8" />
</head>
<body>
<!--/*@thymesVar id="name" type="java.lang.String"*/-->
<p th:text="'Hello!, ' + ${name} + '!'" >3333</p>
</body>
</html>
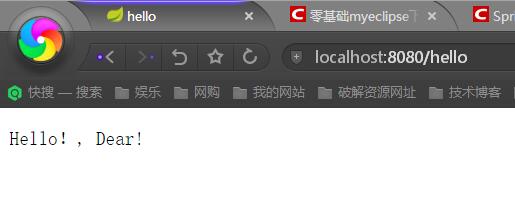
3.效果
4.基礎語法
回味上面的DEMO,可以看出來首先要在改寫html標籤
<html xmlns:th="http://www.thymeleaf.org">
這樣的話才可以在其他標籤裡面使用th:*這樣的語法.這是下面語法的前提.
1.獲取變數值
<p th:text="'Hello!, ' + ${name} + '!'" >3333</p>
可以看出獲取變數值用$符號,對於javaBean的話使用變數名.屬性名方式獲取,這點和EL表示式一樣.
另外$表示式只能寫在th標籤內部,不然不會生效,上面例子就是使用th:text標籤的值替換p標籤裡面的值,至於p裡面的原有的值只是為了給前端開發時做展示用的.這樣的話很好的做到了前後端分離.
2.引入URL
Thymeleaf對於URL的處理是通過語法@{…}來處理的
<a th:href="@{http://blog.csdn.net/u012706811}">絕對路徑</a>
<a th:href="@{/}">相對路徑</a>
<a th:href="@{css/bootstrap.min.css}">Content路徑,預設訪問static下的css資料夾</a>類似的標籤有:th:href和th:src
3.字串替換
很多時候可能我們只需要對一大段文字中的某一處地方進行替換,可以通過字串拼接操作完成:
<span th:text="'Welcome to our application, ' + ${user.name} + '!'">
一種更簡潔的方式是:
<span th:text="|Welcome to our application, ${user.name}!|">
當然這種形式限制比較多,|…|中只能包含變量表達式${…},不能包含其他常量、條件表示式等。
4.運算子
在表示式中可以使用各類算術運算子,例如+, -, *, /, %
th:with="isEven=(${prodStat.count} % 2 == 0)"
邏輯運算子>, <, <=,>=,==,!=都可以使用,唯一需要注意的是使用<,>時需要用它的HTML轉義符:
    th:if="${prodStat.count} > 1"
    th:text="'Execution mode is ' + ( (${execMode} == 'dev')? 'Development' : 'Production')"
5.條件
if/unless
Thymeleaf中使用th:if和th:unless屬性進行條件判斷,下面的例子中,標籤只有在th:if中條件成立時才顯示:
<a th:href="@{/login}" th:unless=${session.user != null}>Login</a>
th:unless於th:if恰好相反,只有表示式中的條件不成立,才會顯示其內容。
Switch
Thymeleaf同樣支援多路選擇Switch結構:
<div th:switch="${user.role}">
  <p th:case="'admin'">User is an administrator</p>
  <p th:case="#{roles.manager}">User is a manager</p>
</div>
預設屬性default可以用*表示:
<div th:switch="${user.role}">
  <p th:case="'admin'">User is an administrator</p>
  <p th:case="#{roles.manager}">User is a manager</p>
  <p th:case="*">User is some other thing</p>
</div>
6.迴圈
渲染列表資料是一種非常常見的場景,例如現在有n條記錄需要渲染成一個表格
,該資料集合必須是可以遍歷的,使用th:each標籤:<body>
<h1>Product list</h1>
<table>
<tr>
<th>NAME</th>
<th>PRICE</th>
<th>IN STOCK</th>
</tr>
<tr th:each="prod : ${prods}">
<td th:text="${prod.name}">Onions</td>
<td th:text="${prod.price}">2.41</td>
<td th:text="${prod.inStock}? #{true} : #{false}">yes</td>
</tr>
</table>
<p>
<a href="../home.html" th:href="@{/}">Return to home</a>
</p>
</body>可以看到,需要在被迴圈渲染的元素(這裡是)中加入th:each標籤,其中th:each=”prod : ${prods}”意味著對集合變數prods進行遍歷,迴圈變數是prod在迴圈體中可以通過表示式訪問。
7.Utilities
為了模板更加易用,Thymeleaf還提供了一系列Utility物件(內置於Context中),可以通過#直接訪問:
- #dates
- #calendars
- #numbers
- #strings
- arrays
- lists
- sets
- maps
- …
下面用一段程式碼來舉例一些常用的方法:
date
/*
 * Format date with the specified pattern
 * Also works with arrays, lists or sets
 */
${#dates.format(date, 'dd/MMM/yyyy HH:mm')}
${#dates.arrayFormat(datesArray, 'dd/MMM/yyyy HH:mm')}
${#dates.listFormat(datesList, 'dd/MMM/yyyy HH:mm')}
${#dates.setFormat(datesSet, 'dd/MMM/yyyy HH:mm')}

/*
 * Create a date (java.util.Date) object for the current date and time
 */
${#dates.createNow()}

/*
 * Create a date (java.util.Date) object for the current date (time set to 00:00)
 */
${#dates.createToday()}
string
/*
 * Check whether a String is empty (or null). Performs a trim() operation before check
 * Also works with arrays, lists or sets
 */
${#strings.isEmpty(name)}
${#strings.arrayIsEmpty(nameArr)}
${#strings.listIsEmpty(nameList)}
${#strings.setIsEmpty(nameSet)}

/*
 * Check whether a String starts or ends with a fragment
 * Also works with arrays, lists or sets
 */
${#strings.startsWith(name,'Don')}                  // also array*, list* and set*
${#strings.endsWith(name,endingFragment)}           // also array*, list* and set*

/*
 * Compute length
 * Also works with arrays, lists or sets
 */
${#strings.length(str)}

/*
 * Null-safe comparison and concatenation
 */
${#strings.equals(str)}
${#strings.equalsIgnoreCase(str)}
${#strings.concat(str)}
${#strings.concatReplaceNulls(str)}

/*
 * Random
 */
${#strings.randomAlphanumeric(count)}
快速的學習還是直接寫例子最快,後期寫Demo遇到問題再加上去
整合專案地址:
補充
在spring-boot1.4之後,支援thymeleaf3,可以更改版本號來進行修改支援.
3相比2極大的提高了效率,並且不需要標籤閉合,類似的link,img等都有了很好的支援,按照如下配置即可
  <properties>
    <project.build.sourceEncoding>UTF-8</project.build.sourceEncoding>
    <!-- set thymeleaf version -->
    <thymeleaf.version>3.0.0.RELEASE</thymeleaf.version>
    <thymeleaf-layout-dialect.version>2.0.0</thymeleaf-layout-dialect.version>
    <!--set java version-->
    <java.version>1.8</java.version>
  </properties>
相關推薦
Spring Boot學習記錄(二)--thymeleaf模板
Spring Boot學習記錄(二)–thymeleaf模板 標籤(空格分隔): spring-boot 自從來公司後都沒用過jsp當介面渲染了,因為前後端分離不是很好,反而模板引擎用的比較多,thymeleaf最大的優勢字尾為html,就是隻需要瀏覽器
Spring Boot學習(二)
div 自動 blog release width spring figure 學習 toc 基於Spring Boot創建的maven項目 1、application.properties或者application.yml:全局配置文件 作用:主要用來配置數據庫連接、日
spring boot 學習(十二)攔截器實現IP黑名單
ppi html .html 日期類 dpa asp tails 我們 req 攔截器實現IP黑名單 前言 最近一直在搞 Hexo+GithubPage 搭建個人博客,所以沒怎麽進行 SpringBoot 的學習。所以今天就將上次的”?秒防刷新”進行了一番修改。上次是采用註
Spring Boot 2.0 整合Thymeleaf 模板引擎
reporting 配置信息 name www. title 建模 type 引擎 suffix 本節將和大家一起實戰Spring Boot 2.0 和thymeleaf 模板引擎 1. 創建項目 2. 使用Spring Initlizr 快速創建Spring Boot
Spring Boot學習系列(五)------Thymeleaf
前言 在Web開發中,頁面是我們和使用者互動的主要方式,在以前SpringMVC的專案裡面,因為有tomcat容器的存在,我們可以使用jsp來返回頁面資料,現在我們使用了Spring Boot,它是預設不支援jsp的,所以我們可以選擇其他的模板引擎來使用,現在市
在spring boot 專案中使用thymeleaf模板,將後臺資料傳遞給前臺介面。
1、將後臺資料傳遞給前臺有很多種方式,可以將後臺要傳遞的資料轉換成json格式,去傳遞給前臺,也可以通過model形式去傳遞出去,這篇部落格主要是使用thymeleaf模板,將後臺資料傳遞給前臺。 2、首先要在spring boot 專案中新增如下依賴:
Spring Boot學習筆記(二二) - 與Mybatis整合
Mybatis整合 Spring Boot中的JPA部分預設是使用的hibernate,而如果想使用Mybatis的話就需要自己做一些配置。使用方式有兩種,第一種是Mybatis官方提供的 mybatis-spring-boot-starter ,第二種是類似&nb
Spring Boot學習(二):mybatis + druid + 多資料來源自動切換
一、簡介 閒言碎語不多說:專案中要用到多資料來源分別管理資料,主資料來源儲存正式資料,從資料來源儲存預載入的資料並完成預校驗。 二、環境準備 eclipse + maven + Spring Boot + mybatis + oracle 三、程式碼改造 pom
Spring Boot 學習(二)特點
一、SpringApplication banner,就是啟動時輸出的資訊,可以在classpath下新增 banner.txt,或者設定 banner.location 來指向特定的檔案。(預設編碼utf-8,或者通過banner.charset指定) 除了txt,你還可以使用 banner.gif (jp
Spring Boot學習(十二)之Spring Boot使用@Async實現非同步呼叫
什麼是“非同步呼叫”?“非同步呼叫”對應的是“同步呼叫”,同步呼叫指程式按照定義順序依次執行,每一行程式都必須等待上一行程式執行完成之後才能執行;非同步呼叫指程式在順序執行時,不等待非同步呼叫的語句返回
Spring Boot學習記錄(四)--問題記錄
記錄spring boot出現的一些奇奇怪怪的問題解決方案. 1.檔案上傳,臨時資料夾無效問題 異常資訊: Caused by: java.io.IOException: The temporary upload location [/tmp/tomc
spring boot 學習記錄
把ssm專案移植到springboot 上遇到了許多坑,記錄一下,方便以後產看。0、啟動類要放在所有要掃面的類的父類或者同級的目錄上,否則將訪問不到controller。(官方預設的方式)也可以自己指定掃面的路徑 @ComponentScan(" 這裡放掃面的包 "),好像
spring boot用ModelAndView向Thymeleaf模板傳引數
最近在除錯一個Spring Boot向Thymeleaf模板傳引數的例子,但踩了很多坑,這裡就把詳細過程記錄下來,以供大家參考。 先說下,這裡遇到哪些坑呢? 1 我用的是IDEA社群版,這不支援JSP,我本來向傳到JSP的,由
Spring Boot學習筆記-Thymeleaf模板引擎的配置
寫在前面 在開發過程中,使用模板引擎是很有必要的。我之前學習SSM框架,一直是使用Freemarker作為模板引擎,現在學習了Spring Boot之後,知道Spring Boot推薦使用的模板引擎是Thymeleaf,那麼,對於我這種有點輕微強迫症的人來
spring boot 學習筆記 (4)模板引擎 Thymeleaf
Thymeleaf 是⾯向 Web 和獨⽴環境的現代伺服器端 Java 模板引擎,能夠處理 HTML、XML、JavaScript、CSS 甚⾄純⽂本。 Thymeleaf 特點 簡單說,Thymeleaf 是一個跟 Velocity、FreeMarker 類似的模板引擎,它可以完全替代 J
elasticsearch6.3.2學習記錄二 《spring boot 搭建es開發環境,建立索引,新增資料,查詢檢索》
spring boot + maven + idea jdk1.8以上 搭建 一、 pom.xml檔案 ,如果不需要連線資料庫,可以不引入資料庫連線依賴,在程式入口類加上這句註解 @EnableAutoConfiguration(exclud
我的第一個spring boot程序(spring boot 學習筆記之二)
獲取json 了解 訪問 static 依賴 過程 public 獲取數據 gap 第一個spring boot程序 寫在前面:鑒於spring註解以及springMVC的配置有大量細節和知識點,在學習理解之後,我們將直接進入spring boot的學習,在後續學習中用到註
Spring Boot 學習筆記(二)
imp family framework ima pri spa cal bin ges 新建Srping Boot 項目 以下是項目結構 由於Srping Boot內置Tomcat,所以不需要配置Tomcat就可以直接運行。 HelloWorldAppli
Spring Boot 學習筆記(二)—— WEB相關配置
一、前言 上次我們快速搭建了一個Spring Boot專案,我們只需新增業務邏輯就能直接執行訪問了,說明Spring Boot已經自動為我們做完了配置工作,這次我們就來看看具體是哪些工作,如果我們想接管配置又該怎麼做。 二、WEB相關配置 檢視WebMvcAutoConfigur
Spring Boot 學習筆記(十二)——單元測試
依賴關係 <dependency> <groupId>org.springframework.boot</groupId> <artifactId>spring-boot-starter-test&

