
APICloud平臺的融雲2.0整合
融雲2.0的官方文件地址:http://docs.apicloud.com/端API/開放SDK/rongCloud2
專案需要IM模組,最後還是選擇了融雲.在iOS原生開發中,融雲sdk集成了聊天介面,給開發者提供了很大的便利,但是在apicloud平臺上,由於開發者應用IM的場景各異,需求不統一,所以官方沒有將聊天介面整合到模組中.
因此我選擇了AUI這套專門為apicloud提供的前端開發框架進行IM介面的搭建.AUI官方地址:http://www.auicss.com.
這套框架集成了很多手機端的UI,效果不錯,而且還在不斷的更新中,大家不妨嘗試一下.我用過其中的幾個,總體感覺還是不錯的!
接下來,就具體的說一說RongYun整合的步驟了(本文會不斷的更新,若發現不妥之處和需要改進的地方,可以給我留言,謝謝!)
一.準備工作
在整合融雲2.0之前,首先要到融雲官網上進行註冊,然後新增應用資訊,並且生成兩個測試用的targetId並記錄下對應的token(這種方法僅為測試使用) 融雲的官網:http://www.rongcloud.cn
之後在API除錯裡面 生成userID對應的token,這些資訊在初始化融雲時會用到,
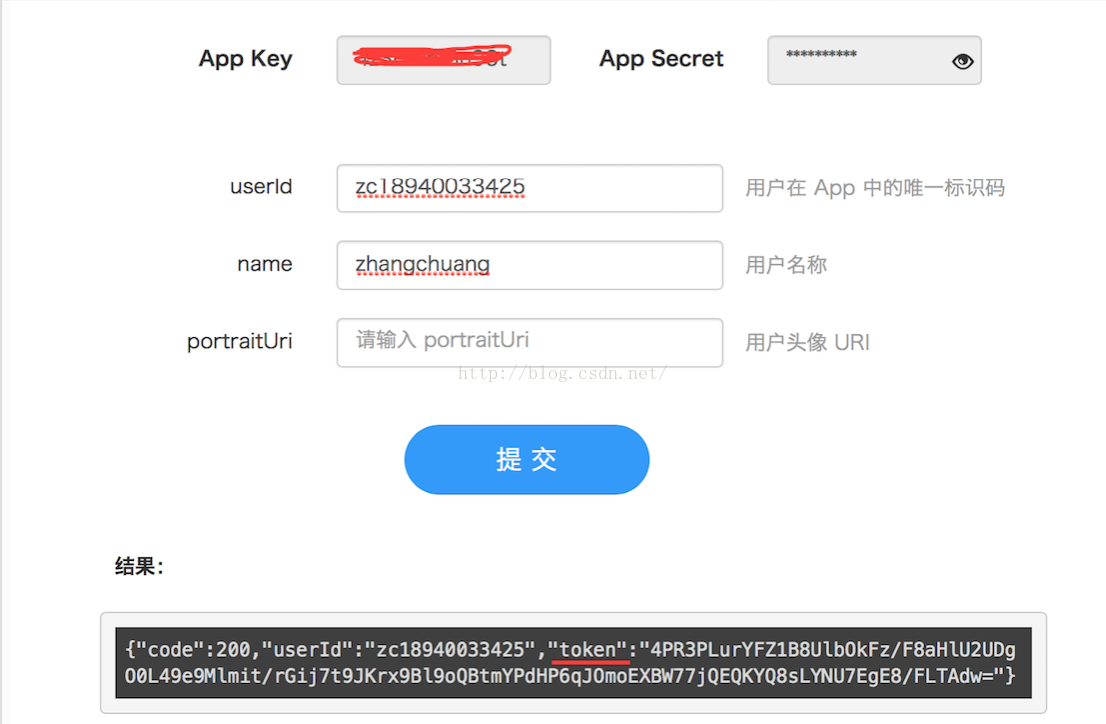
之後再次生成一個userID,並記錄對應的token.這樣,就相當於建立了兩個使用者,使用者A和使用者B,,之後便可實現使用者A與使用者B之間的通訊了.
上述內容準備完之後,就要在自己的apicloud應用中新增融雲2.0模組了. apicloud中的融雲集成之前的準備在此略過,可以參照官方文件.
二.融雲2.0的整合
在詳細的介紹之前,先要說一說這個聊天介面使用的框架和模板.
1.doT.js (不熟悉的小夥伴可以參照這篇部落格: http://www.cnblogs.com/kuikui/p/3505768.html)
2.AUI 前端UI框架(地址在上面給過了,很實用,小夥伴們可以看一看).
3.UIChatBox, 文件地址: http://docs.apicloud.com/端API/介面佈局/UIChatBox#m11
好了,有了這幾個,就可以輕鬆的完成一個簡單的聊天介面的集成了!
1.融雲2.0的初始化
首先要在config檔案裡填入一下程式碼
<feature name="rongCloud2">
    <param name="appKey" value="這裡填寫在融雲官網自己app對應的key" />
</feature>關於初始化,有一點一定要知道:融雲對於整個應用初始化只需要一次, 再次初始化或者 connect 就會出錯.
//1、RongY初始化
        var rong = api.require('rongCloud2');
        rong.init(function (ret, err) {
        });
        //2、進行監聽
        rong.setOnReceiveMessageListener(function (ret, err) {
        });
        //3、連結到RongY
        rong.connect({
                    token: $api.getStorage("RongToken")
                },
                function (ret, err) {
                    if (ret.status == 'success') {
                        //實時監聽收到的訊息
                    } else {
                    }
                });
上述程式碼是在進入聊天介面之前,對融雲sdk進行的init和connect方法.
2.聊天介面UI
聊天介面UI就用到了AUI和doT.js.以下是詳細的程式碼<span style="font-size:14px;"><body>
<!--//傳送語音提示框-->
<div class="aui-toast" style="display:none" id="loading">
<div class="aui-toast-loading"></div>
<div class="aui-toast-content"></div>
</div>
<!--聊天頁面-->
<div id="wrap" class="flex-wrap flex-vertical">
<div id="message-content2" style="margin-top: 10px"></div>
<div class="aui-content aui-content-padded" id="message-content">
<script id="message-content-template" type="text/x-dot-template">
{{for(var i=0;i<it.length ;i++){}}
{{? it[i].tag=== 'TxtMsg'}}
<div class="{{=it[i].firstSendType}}" style="margin-top: 20px">
{{? it[i].messageDirection=== 'SEND'}}
<div class="aui-text-center history-date">{{=it[i].sentTime}}</div>
{{?? it[i].messageDirection=== 'RECEIVE'}}
<div class="aui-text-center history-date">{{=it[i].receivedTime}}</div>
{{?}}
<div class="{{=it[i].secondSendType}}"><img src="../image/demo1.png"></div>
<div class="{{=it[i].thirdSendType}}">
<div class="{{=it[i].fourthSendType}}"></div>
<span id="txt">{{=it[i].content.text}}</span>
</div>
</div>
{{?}}
{{? it[i].tag === 'ImgMsg'}}
<div class="{{=it[i].firstSendType}}" style="margin-top: 20px">
{{? it[i].messageDirection=== 'SEND'}}
<div class="aui-text-center history-date">{{=it[i].sentTime}}</div>
{{?? it[i].messageDirection=== 'RECEIVE'}}
<div class="aui-text-center history-date">{{=it[i].receivedTime}}</div>
{{?}}
<div class="{{=it[i].secondSendType}}"><img src="../image/demo1.png"></div>
<div class="{{=it[i].thirdSendType}}">
<div class="{{=it[i].fourthSendType}}"></div>
<img class="lazy" id="image" style="width: 100px; height: 100px" ;
data-original="{{=it[i].content.imageUrl}}"
onclick="clickShowBigPic('{{=it[i].content.imageUrl}}')">
</div>
</div>
{{?}}
{{? it[i].tag === 'VcMsg'}}
<div class="{{=it[i].firstSendType}}" style="margin-top: 20px">
{{? it[i].messageDirection=== 'SEND'}}
<div class="aui-text-center history-date">{{=it[i].sentTime}}</div>
{{?? it[i].messageDirection=== 'RECEIVE'}}
<div class="aui-text-center history-date">{{=it[i].receivedTime}}</div>
{{?}}
<div class="{{=it[i].secondSendType}}"><img src="../image/demo1.png"></div>
<div class="{{=it[i].thirdSendType}}">
<div class="{{=it[i].fourthSendType}}"></div>
<div class="aui-chat-status"><i id="voice-length{{=it[i].messageId}}" class="">{{=it[i].content.duration}}"</i>
</div>
{{? it[i].content.duration <= '15'}}
<span style="width: {{=it[i].content.duration * 15}}px;height: 30px; border-radius: 5px; background: green"
onclick="playVoice('{{=it[i].messageId}}', '{{=it[i].</span><span style="font-family: Arial, Helvetica, sans-serif; font-size: 14px;">content</span><span style="font-family: Arial, Helvetica, sans-serif;">}}')"></span></span><span style="font-size:14px;">
{{??}}
<span style="width: 170px;height: 30px; border-radius: 5px; background: green"
onclick="playVoice('{{=it[i].messageId}}', '{{=it[i].content}}')"></span>
{{?}}
</div>
</div>
{{?}}
{{}}}
</script>
</div>
</div>
</body></span>3.JS部分
在JS部分,要寫的就是各種點選方法,資料的載入這些內容了,我們一個個的來看 到目前為止,我只集成了文字訊息,圖片訊息,語音訊息,定位訊息(獲取傳送者位置,通過文字訊息傳送). 3.1 文字訊息的傳送<span style="font-size: 18px;"> </span><span style="font-size:14px;">//傳送訊息
function sengTxtMsg(p) {
if (isConnetced) {
var para;
var rong = api.require('rongCloud2');
rong.sendTextMessage({
conversationType: 'PRIVATE',
targetId: '13644978865',
text: p.msg,
extra: ''
}, function (ret, err) {
// alert(JSON.stringify((ret)));
//這裡要判斷訊息型別,最後設定訊息標籤.
if (ret.status == 'prepare') {
var tag;
if (ret.result.message.objectName == "RC:TxtMsg") {
tag = "TxtMsg";
} else if (ret.result.message.objectName == "RC:ImgMsg") {
tag = "ImgMsg";
} else if (ret.result.message.objectName == "RC:VcMsg") {
tag = "VcMsg";
} else if (ret.result.message.objectName == "RC:LBSMsg") {
tag = "LBSMsg";
}
para = {
firstSendType: "aui-chat-sender",
secondSendType: "aui-chat-sender-avatar",
thirdSendType: "aui-chat-sender-cont",
fourthSendType: "aui-chat-right-triangle",
content: ret.result.message.content,
tag: tag,
//時間戳
sentTime: getTrueTime(ret.result.message.sentTime),
//傳送型別
messageDirection: "SEND"
};
//這裡我設定的每隔3分鐘才會生成一個時間戳,如果沒到三分鐘時間為空,就顯示不出來了
if (!timeTag) {
para.sentTime = "";
}
}
else if (ret.status == 'success') {
//doT.js的拼接
msgObj.push(para);
var interText = doT.template($("#message-content-template").text());
$("#message-content2").html(interText(msgObj));
$("img.lazy").lazyload();
document.getElementsByTagName('BODY')[0].scrollTop = document.getElementsByTagName('BODY')[0].scrollHeight;
//時間戳判斷為false 不再發送
timeTag = false;
}
else if (ret.status == 'error')
api.toast({msg: err.code});
}
);
} else {
api.alert({
msg: "未連線到伺服器"
});
}
}</span>ok,再簡單的說明一下:通過點選鍵盤傳送按鈕,獲取到輸入框的文字資訊,將其作為引數傳遞到該方法中,通過該方法將訊息傳送到使用者B.

可見iPhone模擬器上及時的收到了我傳送的文字訊息. 3.2 圖片訊息的傳送
//傳送圖片
    function sendPictures(index) {
        var type = "";
        if (index == "0") {
            type = 'album';
            getPicture(type);
        } else if (index == "1") {
            type = 'camera';
            getPicture(type);
        } else {
            getLocation();
        }
    }

    //獲取圖片
    function getPicture(type) {

        var para;
        api.getPicture({
            sourceType: type,
            encodingType: 'jpg',
            mediaValue: 'pic',
            destinationType: 'url',
            allowEdit: false,
            quality: 80,
//            targetWidth: 100,
//            targetHeight: 100,
            saveToPhotoAlbum: false
        }, function (ret, err) {
            if (ret) {

                var para;
                var rong = api.require('rongCloud2');
                rong.sendImageMessage({
                            conversationType: 'PRIVATE',
                            targetId: '13644978865',
                            imagePath: ret.data,
                            extra: ''
                        }, function (ret, err) {
//                            alert(JSON.stringify((ret)));
                            if (ret.status == 'prepare') {
                                var tag;
                                if (ret.result.message.objectName == "RC:TxtMsg") {
                                    tag = "TxtMsg";
                                } else if (ret.result.message.objectName == "RC:ImgMsg") {
                                    tag = "ImgMsg";
                                } else if (ret.result.message.objectName == "RC:VcMsg") {
                                    tag = "VcMsg";
                                } else if (ret.result.message.objectName == "RC:LBSMsg") {
                                    tag = "LBSMsg";
                                }

                                para = {
                                    firstSendType: "aui-chat-sender",
                                    secondSendType: "aui-chat-sender-avatar",
                                    thirdSendType: "aui-chat-sender-cont",
                                    fourthSendType: "aui-chat-right-triangle",
                                    content: ret.result.message.content,
                                    tag: tag,
                                    //時間戳
                                    sentTime: getTrueTime(ret.result.message.sentTime),
                                    //傳送型別
                                    messageDirection: "SEND"
                                };
                                //判斷時間
                                if (!timeTag) {
                                    para.sentTime = "";
                                }
                            }

                            else if (ret.status == 'progress') {

                            }
//                                api.toast({msg: ret.result.progress});
                            else if (ret.status == 'success') {

                                //時間戳判斷為false 不再發送
                                timeTag = false;
                                msgObj.push(para);

                                var interText = doT.template($("#message-content-template").text());
                                $("#message-content2").html(interText(msgObj));
                                $("img.lazy").lazyload();
                                document.getElementsByTagName('BODY')[0].scrollTop = document.getElementsByTagName('BODY')[0].scrollHeight;
                            }

                            else if (ret.status == 'error') {
                                api.toast({msg: "請檢查當前網路狀態"});
                            }
                        }
                );
            } else {
                alert(JSON.stringify(err));
            }
        });
} 在手機上拍了一張電腦的圖片傳送後,iPhone模擬器就會收到剛剛收到的圖片資訊了.
3.3 語音訊息傳送
在手機上拍了一張電腦的圖片傳送後,iPhone模擬器就會收到剛剛收到的圖片資訊了.
3.3 語音訊息傳送
//傳送語音訊息
    function sendVoiceMsg(para) {

        var param;
        var rong = api.require('rongCloud2');
        rong.sendVoiceMessage({
                    conversationType: 'PRIVATE',
                    targetId: '13644978865',
                    voicePath: para.path,
                    duration: para.duration,
                    extra: ''
                }, function (ret, err) {
//                    alert(JSON.stringify(ret));
                    if (ret.status == 'prepare') {
//                        api.toast({ msg: JSON.stringify(ret.result.message) });

                        var tag;
                        if (ret.result.message.objectName == "RC:TxtMsg") {
                            tag = "TxtMsg";
                        } else if (ret.result.message.objectName == "RC:ImgMsg") {
                            tag = "ImgMsg";
                        } else if (ret.result.message.objectName == "RC:VcMsg") {
                            tag = "VcMsg";
                        } else if (ret.result.message.objectName == "RC:LBSMsg") {
                            tag = "LBSMsg";
                        }

                        param = {
                            firstSendType: "aui-chat-sender",
                            secondSendType: "aui-chat-sender-avatar",
                            thirdSendType: "aui-chat-sender-cont",
                            fourthSendType: "aui-chat-right-triangle",
                            content: ret.result.message.content,
                            tag: tag,
                            //時間戳
                            sentTime: getTrueTime(ret.result.message.sentTime),
                            //傳送型別
                            messageDirection: "SEND"
                        };
                        //判斷時間
                        if (!timeTag) {
                            param.sentTime = "";
                        }

                    }

                    else if (ret.status == 'success') {
                        //改變時間戳狀態
                        timeTag = false;

                        msgObj.push(param);
////                        alert(JSON.stringify(msgObj));
                        alert(JSON.stringify(msgObj[msgObj.length - 1]));
                        var interText = doT.template($("#message-content-template").text());
                        $("#message-content2").html(interText(msgObj));
                        $("img.lazy").lazyload();
                        document.getElementsByTagName('BODY')[0].scrollTop = document.getElementsByTagName('BODY')[0].scrollHeight;
                    }
                    else if (ret.status == 'error') {
//                        api.toast({ msg: err.code });
                    }
                }
        );
    }
</span>
傳送語音訊息前要先呼叫 api.startRecord()方法記錄剛才的錄音,最後通過上述方法將語音傳送給對方.
上面就是我剛才傳送的一連串語音訊息了.
3.4 訊息的接收
訊息的接收,要用到 rong.setOnReceiveMessageListener這個方法.也就是這個方法會監聽你收到的訊息.具體程式碼如下
var rong = api.require('rongCloud2');
        rong.setOnReceiveMessageListener(function (ret, err) {
//            alert(JSON.stringify(ret));
            var tag;
            var para;
            if (ret.result.message.objectName == "RC:TxtMsg") {
                tag = "TxtMsg";
            } else if (ret.result.message.objectName == "RC:ImgMsg") {
                tag = "ImgMsg";
            } else if (ret.result.message.objectName == "RC:VcMsg") {
                tag = "VcMsg";
            } else if (ret.result.message.objectName == "RC:LBSMsg") {
                tag = "LBSMsg";
            }

            para = {
                firstSendType: "aui-chat-receiver",
                secondSendType: "aui-chat-receiver-avatar",
                thirdSendType: "aui-chat-receiver-cont",
                fourthSendType: "aui-chat-left-triangle",
                content: ret.result.message.content,
                tag: tag,
                receivedTime: getTrueTime(ret.result.message.receivedTime),
                messageDirection: "RECEIVE"
            };
            if (!timeTag) {
                para.receivedTime = "";
            }

            msgObj.push(para);
            var interText = doT.template($("#message-content-template").text());
            $("#message-content2").html(interText(msgObj));
            $("img.lazy").lazyload();
            document.getElementsByTagName('BODY')[0].scrollTop = document.getElementsByTagName('BODY')[0].scrollHeight;
            //時間戳狀態
            timeTag = false;

        });
上面就是三條通過iPhone模擬器傳送的訊息,一條語音訊息,一條圖片訊息,一天文字訊息.
3.4 獲取歷史訊息
獲取歷史訊息也用對應的方法.而且這些訊息是存在本地的,所以獲取很方便
//獲取最近聊天資訊
    function getRecentConverMsg() {

//        alert(num);
        var rong = api.require('rongCloud2');
        //先獲取之前的聊天記錄
        rong.getHistoryMessages({
            conversationType: 'PRIVATE',
            targetId: '13644978865',
            oldestMessageId: -1,
            count: 500
        }, function (ret, err) {


//            api.refreshHeaderLoadDone();
            var arr = [];
            arr = ret.result;
//            alert(JSON.stringify(arr));
            //記錄最早的時間戳
            $api.setStorage('time', arr[arr.length - 1].receivedTime);
            for (var i = arr.length - 1; i >= 0; i--) {
                if (arr[i].messageDirection == "SEND") {
                    arr[i].firstSendType = "aui-chat-sender";
                    arr[i].secondSendType = "aui-chat-sender-avatar";
                    arr[i].thirdSendType = "aui-chat-sender-cont";
                    arr[i].fourthSendType = "aui-chat-right-triangle";
                } else {
                    arr[i].firstSendType = "aui-chat-receiver";
                    arr[i].secondSendType = "aui-chat-receiver-avatar";
                    arr[i].thirdSendType = "aui-chat-receiver-cont";
                    arr[i].fourthSendType = "aui-chat-left-triangle";
                }

                if (arr[i].objectName == "RC:TxtMsg") {
                    arr[i].tag = "TxtMsg";
                } else if (arr[i].objectName == "RC:ImgMsg") {
                    arr[i].tag = "ImgMsg";
                } else if (arr[i].objectName == "RC:VcMsg") {
                    arr[i].tag = "VcMsg";
                } else if (arr[i].objectName == "RC:LBSMsg") {

                }

                //如果時間間隔大於五分鐘 加上時間戳
                if (arr[i].receivedTime - $api.getStorage("time") >= 180000) {
//                   alert("yes");
                    $api.setStorage('time', arr[i].receivedTime);
                    arr[i].receivedTime = getTrueTime(arr[i].receivedTime);
                    arr[i].sentTime = getTrueTime(arr[i].sentTime);
                } else {
                    arr[i].receivedTime = "";
                    arr[i].sentTime = "";
                }

                msgObj.push(arr[i]);
            }
            var interText = doT.template($("#message-content-template").text());
            $("#message-content2").prepend(interText(msgObj));
            $("img.lazy").lazyload();
            document.getElementsByTagName('BODY')[0].scrollTop = document.getElementsByTagName('BODY')[0].scrollHeight;

        });

    }
這樣,我可以獲取到之前3.31的聊天記錄.
到這裡,最基本的功能介紹完了,後續的功能還有很多,比如圖片的檢視,儲存圖片到本地,語音的播放等等,都是小問題了,這些程式碼就不放上來了.
本文會不斷更新,歡希望大家提出更多的意見,一起進步!我的微信656593047,可以加我一起交流!!
聊天頁面程式碼地址:https://github.com/ZCLegendary/APICloudRongYun
相關推薦
APICloud平臺的融雲2.0整合
融雲2.0的官方文件地址:http://docs.apicloud.com/端API/開放SDK/rongCloud2 專案需要IM模組,最後還是選擇了融雲.在iOS原生開發中,融雲sdk集成了聊天介面,給開發者提供了很大的便利,但是在apicloud平臺上,
APICloud平臺的融雲2.0優化
rong.setOnReceiveMessageListener(function (ret, err) { /****1.融雲的訊息以sendEvent的方式通訊到其他頁面****/ api.sendEvent({ name:
Yii 2.0整合七牛雲
背景知識: 七牛雲就是我們常說的圖床。什麼是圖床?可以簡單理解為是一種儲存圖片資源的伺服器。 本文基於Yii2簡單介紹七牛雲的使用 1.首先在七牛雲平臺建立賬戶:傳送門 2.登陸賬戶之後,點選頭部選單管理控制檯,進入之後,點選左側選單儲存物件: 3.點選新
重磅釋出:阿里雲物聯網開發平臺 Link Develop 2.0
諸位物聯網開發的極客們福音已到,阿里雲物聯網開發平臺 Link Develop 2.0 正式釋出了~ Link Develop 平臺以物聯網開發者為中心,覆蓋裝置端、資料上雲、資料分析、Web應用、移動應用、服務開發 等物聯網開發的全部鏈路,實現一個平臺解決全棧開發。新版 Link Develo
SpringBoot 2.0整合阿里雲OSS,實現動靜分離架構
前言 相信大部分開發者對下面這張架構圖並不陌生吧,現在很多網站/應用都採用了動靜分離的架構進行部署。博主的部落格也不例外,主機採用的是阿里雲的 ECS,使用 CDN 做靜態內容分發,不過靜態檔案還是儲存在 ECS,採用的是 Nginx 做動靜分離。今天我們來學習一下如何使用阿里雲 OSS 做動靜分離。
Android開發遇到的坑-----融雲2.8.+版本修改插件列表
rsa 圖片 項目需求 tex 顯示 根據 -- 移除 pre 簡介 融雲在2.8.+的時候,對輸入區域進行了重構,輸入區域整個為RongExtension,插件為RongExtension區域的Plugin模塊 List<IPluginModule&g
Spring Boot 2.0 整合Thymeleaf 模板引擎
reporting 配置信息 name www. title 建模 type 引擎 suffix 本節將和大家一起實戰Spring Boot 2.0 和thymeleaf 模板引擎 1. 創建項目 2. 使用Spring Initlizr 快速創建Spring Boot
從零實現 Spring Boot 2.0 整合 weixin-java-mp(weixin-java-tools) 獲取 openId,用於微信授權
步驟: 一、內網穿透申請二級域名(有伺服器和域名者可略過) 二、申請微信公眾平臺測試號(有已認證的微信服務號者可略過) 三、搭建 Spring Boot 2.0 專案實現獲取openId 一、內網穿透: 因為要直接用內網本機開發除錯,微信網頁授權在回撥時要訪問本機,所以直接
srpingboot 2.0 整合swagger2出現404 或500 的問題解決方案
版權宣告:轉載請註明出處。 原文作者:[email protected] 原文連結: https://blog.csdn.net/weixin_42389328/article/details/82620900 我用的是springboot2.0.3 版本 下面看一
pringboot 2.0 整合 mybaits-plus
1 新增依賴 <dependency> <groupId>com.baomidou</groupId> <artifactId>mybatis-plus-boot-starter<
spring-boot 2.0 整合 dubbo
spring-boot 2.0 整合 dubbo 新增如下依賴,需要執行 zookeeper <dependencies> <!-- Spring Boot Dubbo 依賴 --> <dependency> &
阿里雲朱照遠:視訊雲2.0,更大規模、更智慧、更清晰
在2018杭州雲棲大會19號下午的主論壇上,阿里雲視訊雲總經理朱照遠發表了《視訊雲2.0,智享未來視界》的主題演講,從超大規模、智慧化、實時連線、超高清8K這四個方面,闡述了視訊雲2.0的定義。 朱照遠表示,在這個超大規模的媒體處理、分發平臺上,每天連線著10億臺裝置
springboot 2.0整合activiti(1)
springboot 2.0整合activiti(1) 踩坑經歷 增加Maven依賴 生成activiti資料表 踩坑經歷 截止到現在activiti7只有beta版本,嘗試採用activiti6完成工作流任務。
Spring Boot 2.0 整合 Mybatis
Spring Boot 2.0 整合 Mybatis分為兩種模式。一種是XML配置,一種是註解。 一、XML配置方式整合 1.1 依賴檔案 <?xml version="1.0" encoding="UTF-8"?> <project xmlns="http:/
Spring Boot 2.0 整合攜程Apollo配置中心
Apollo(阿波羅)是攜程框架部門研發的分散式配置中心,能夠集中化管理應用不同環境、不同叢集的配置,配置修改後能夠實時推送到應用端,並且具備規範的許可權、流程治理等特性,適用於微服務配置管理場景。 服務端基於Spring Boot和Spring Cloud開發,打包後可以直接執行,不需
srpingboot 2.0 整合swagger出現404 或500 的問題解決方案
我用的是springboot2.0.3 版本 下面看一下具體是怎麼解決swagger不能訪問的問題的。 在springboot 中WebMvcConfigurerAdapter類廢棄不用了,可以通過繼承WebMvcConfigurationSupport類代替We
Spring Boot 2.0+整合Eureka+Ribbon+Config+Feign+Zuul+Hystrix+ActiveMq等
基於Spring Boot 2.0+ 簡介 一個簡單的Spring Cloud基礎框架,整合config/Eureka/Hystrix/ActiveMQ等元件 工程介紹 工程 埠 描述 cloud
springboot 2.0 整合 RestTemplate 與使用教程
首先匯入springboot 的 web 包 <dependency> <groupId>org.springframework.boot</groupId> <art
springboot 2.0 整合 Activiti5.22包括流程跟蹤和線上設計
spring boot 2.0 整合 Activiti 5.22 其實Github上的 Activiti 官方倉庫已經提供了相應的starter Activiti的starter倉庫地址:https://github.com/Activiti/Activiti/tree/5.x/mo
spring boot 2.0整合activemq時遇到的錯誤
雖然我在網上看到別人都是這麼寫的,也成功了。 但是我卻老是報錯,報注入jmsTemplate失敗,我就決定手動註冊jmsTemplate,發現我下的maven包裡竟然沒有ActiveMQConnectionFactory這個類。 於是,我只能新增apache包。