Spring Boot系列——Spring Boot如何啟動
Spring Boot啟動過程
上篇《Spring Boot系列——5分鐘構建一個應用》介紹瞭如何快速建立一個Spring Boot專案並執行。雖然步驟少流程簡單,為開發者省去了很多重複性的配置工作,但是其底層實現並沒有這麼簡單。
這篇,我們就通過入口類TutorialApplication看看Spring Boot是如何啟動的。
註解
寫過Spring Boot都知道需要有一個入口類,就是本例子中的TutorialApplication,而這個類上面必不可上的需要有一個@SpringBootApplication註解。
點選進入該註解,我們可以發現其是一個複合註解,包括@SpringBootConfiguration、@EnableAutoConfiguration和@ComponentScan。
/**
 * Indicates a {@link Configuration configuration} class that declares one or more
 * {@link Bean @Bean} methods and also triggers {@link EnableAutoConfiguration
 * auto-configuration} and {@link ComponentScan component scanning}. This is a convenience
 * annotation that is equivalent to declaring {@code @Configuration},
 * {@code @EnableAutoConfiguration} and {@code @ComponentScan}.
 *
 * @author Phillip Webb
 * @author Stephane Nicoll
 * @since 1.2.0
 */
@Target(ElementType.TYPE)
@Retention(RetentionPolicy.RUNTIME)
@Documented
@Inherited
@SpringBootConfiguration
@EnableAutoConfiguration
@ComponentScan(excludeFilters = {
      @Filter(type = FilterType.CUSTOM, classes = TypeExcludeFilter.class),
      @Filter(type = FilterType.CUSTOM, classes = AutoConfigurationExcludeFilter.class) })
public @interface SpringBootApplication {

   /**
    * Exclude specific auto-configuration classes such that they will never be applied.
    * @return the classes to exclude
    */
   @AliasFor(annotation = EnableAutoConfiguration.class)
   Class<?>[] exclude() default {};

   /**
    * Exclude specific auto-configuration class names such that they will never be
    * applied.
    * @return the class names to exclude
    * @since 1.3.0
    */
   @AliasFor(annotation = EnableAutoConfiguration.class)
   String[] excludeName() default {};

   /**
    * Base packages to scan for annotated components. Use {@link #scanBasePackageClasses}
    * for a type-safe alternative to String-based package names.
    * @return base packages to scan
    * @since 1.3.0
    */
   @AliasFor(annotation = ComponentScan.class, attribute = "basePackages")
   String[] scanBasePackages() default {};

   /**
    * Type-safe alternative to {@link #scanBasePackages} for specifying the packages to
    * scan for annotated components. The package of each class specified will be scanned.
    * <p>
    * Consider creating a special no-op marker class or interface in each package that
    * serves no purpose other than being referenced by this attribute.
    * @return base packages to scan
    * @since 1.3.0
    */
   @AliasFor(annotation = ComponentScan.class, attribute = "basePackageClasses")
   Class<?>[] scanBasePackageClasses() default {};

}
@SpringBootConfiguration
該註解底層其實就是@Configuration註解。熟悉Spring的發展里程碑就知道這是Java Config的配置形式。
通過該註解修飾,表示該類是一個配置類。
@EnableAutoConfiguration
該註解其實也是一個複合註解。
/**
 * Enable auto-configuration of the Spring Application Context, attempting to guess and
 * configure beans that you are likely to need. Auto-configuration classes are usually
 * applied based on your classpath and what beans you have defined. For example, if you
 * have {@code tomcat-embedded.jar} on your classpath you are likely to want a
 * {@link TomcatServletWebServerFactory} (unless you have defined your own
 * {@link ServletWebServerFactory} bean).
 * <p>
 * When using {@link SpringBootApplication}, the auto-configuration of the context is
 * automatically enabled and adding this annotation has therefore no additional effect.
 * <p>
 * Auto-configuration tries to be as intelligent as possible and will back-away as you
 * define more of your own configuration. You can always manually {@link #exclude()} any
 * configuration that you never want to apply (use {@link #excludeName()} if you don't
 * have access to them). You can also exclude them via the
 * {@code spring.autoconfigure.exclude} property. Auto-configuration is always applied
 * after user-defined beans have been registered.
 * <p>
 * The package of the class that is annotated with {@code @EnableAutoConfiguration},
 * usually via {@code @SpringBootApplication}, has specific significance and is often used
 * as a 'default'. For example, it will be used when scanning for {@code @Entity} classes.
 * It is generally recommended that you place {@code @EnableAutoConfiguration} (if you're
 * not using {@code @SpringBootApplication}) in a root package so that all sub-packages
 * and classes can be searched.
 * <p>
 * Auto-configuration classes are regular Spring {@link Configuration} beans. They are
 * located using the {@link SpringFactoriesLoader} mechanism (keyed against this class).
 * Generally auto-configuration beans are {@link Conditional @Conditional} beans (most
 * often using {@link ConditionalOnClass @ConditionalOnClass} and
 * {@link ConditionalOnMissingBean @ConditionalOnMissingBean} annotations).
 *
 * @author Phillip Webb
 * @author Stephane Nicoll
 * @see ConditionalOnBean
 * @see ConditionalOnMissingBean
 * @see ConditionalOnClass
 * @see AutoConfigureAfter
 * @see SpringBootApplication
 */
@Target(ElementType.TYPE)
@Retention(RetentionPolicy.RUNTIME)
@Documented
@Inherited
@AutoConfigurationPackage
@Import(AutoConfigurationImportSelector.class)
public @interface EnableAutoConfiguration {

   String ENABLED_OVERRIDE_PROPERTY = "spring.boot.enableautoconfiguration";

   /**
    * Exclude specific auto-configuration classes such that they will never be applied.
    * @return the classes to exclude
    */
   Class<?>[] exclude() default {};

   /**
    * Exclude specific auto-configuration class names such that they will never be
    * applied.
    * @return the class names to exclude
    * @since 1.3.0
    */
   String[] excludeName() default {};

}
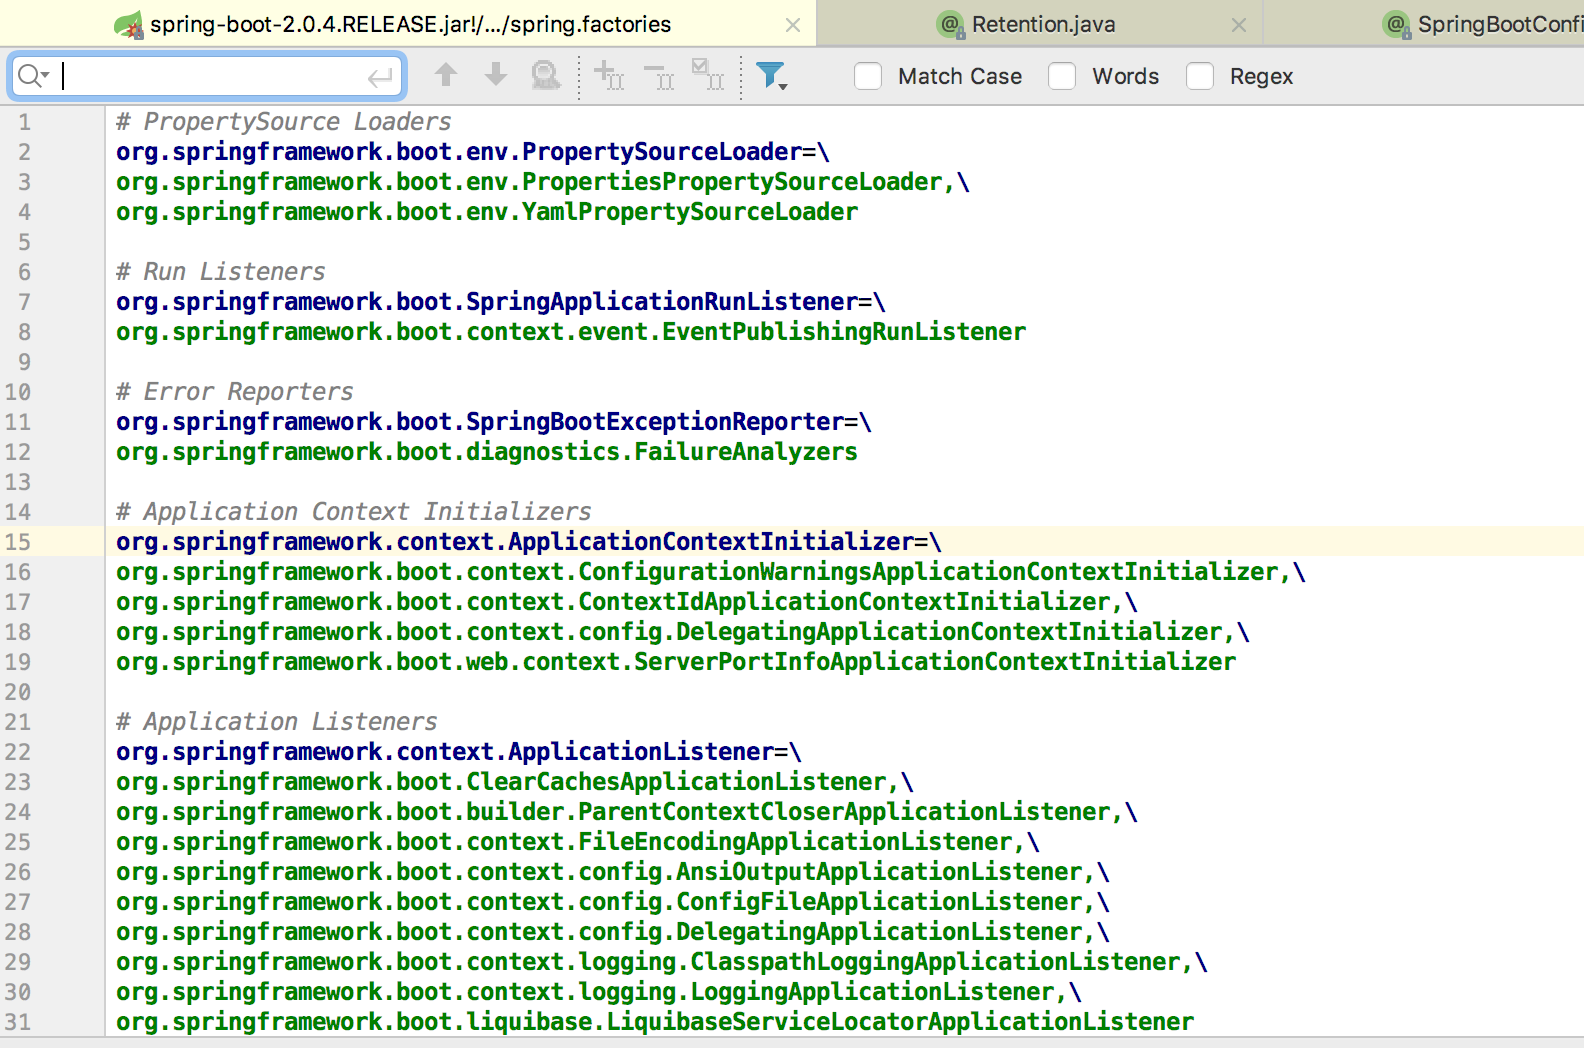
其實現也是通過類似@Import的方式注入AutoConfigurationImportSelector類,並藉助該類將所有符合條件的Configuration註解修飾的配置類載入到Spring Boot容器中。從classpath中搜索所有的META-INF/spring.factories配置檔案,將其中org.springframework.boot.autoconfigure.EnableAutoConfiguration對應配置項通過反射的形式例項化為標註了@Configuration和javaconfig形式的IOC容器配置類,然後彙總為一個並載入到ioc容器中。

@ComponentScan
這個註解就不需要多介紹了吧,其作用自動掃描載入符合條件的bean。
SpringApplication
從專案的入口第一個碰到的就是SpringApplication類。
@SpringBootApplication
public class TutorialApplication {

    public static void main(String[] args) {
        SpringApplication.run(TutorialApplication.class, args);
    }
}
進入該類的靜態方法run,可以看到其在構造SpringApplication物件
public static ConfigurableApplicationContext run(Class<?>[] primarySources,
      String[] args) {
   return new SpringApplication(primarySources).run(args);
}
進入SpringApplication構造方法,可以看到
public SpringApplication(ResourceLoader resourceLoader, Class<?>... primarySources) {
   this.resourceLoader = resourceLoader;
   Assert.notNull(primarySources, "PrimarySources must not be null");
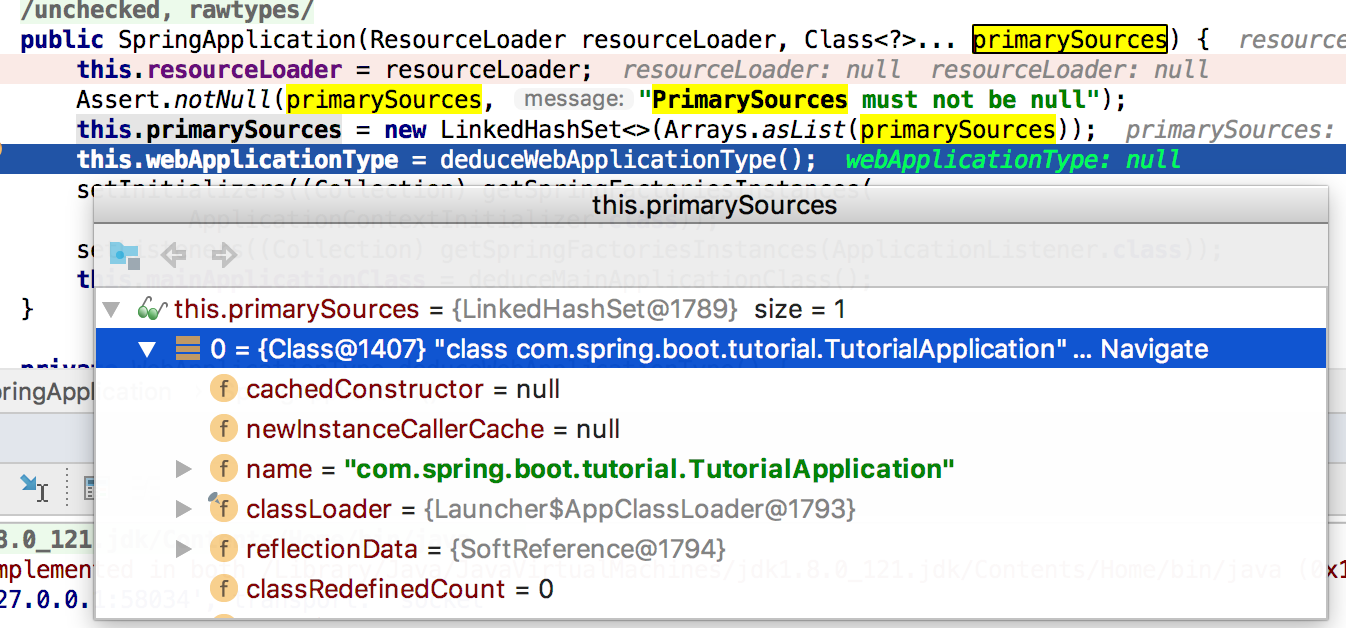
   this.primarySources = new LinkedHashSet<>(Arrays.asList(primarySources));
   this.webApplicationType = deduceWebApplicationType();
   setInitializers((Collection) getSpringFactoriesInstances(
         ApplicationContextInitializer.class));
   setListeners((Collection) getSpringFactoriesInstances(ApplicationListener.class));
   this.mainApplicationClass = deduceMainApplicationClass();
}
主要做了如下幾件事:
- 載入Source,這裡只有只有Application

推斷WebApplicationType,該列舉有三種類型NONE、SERVLET、REACTIVE。
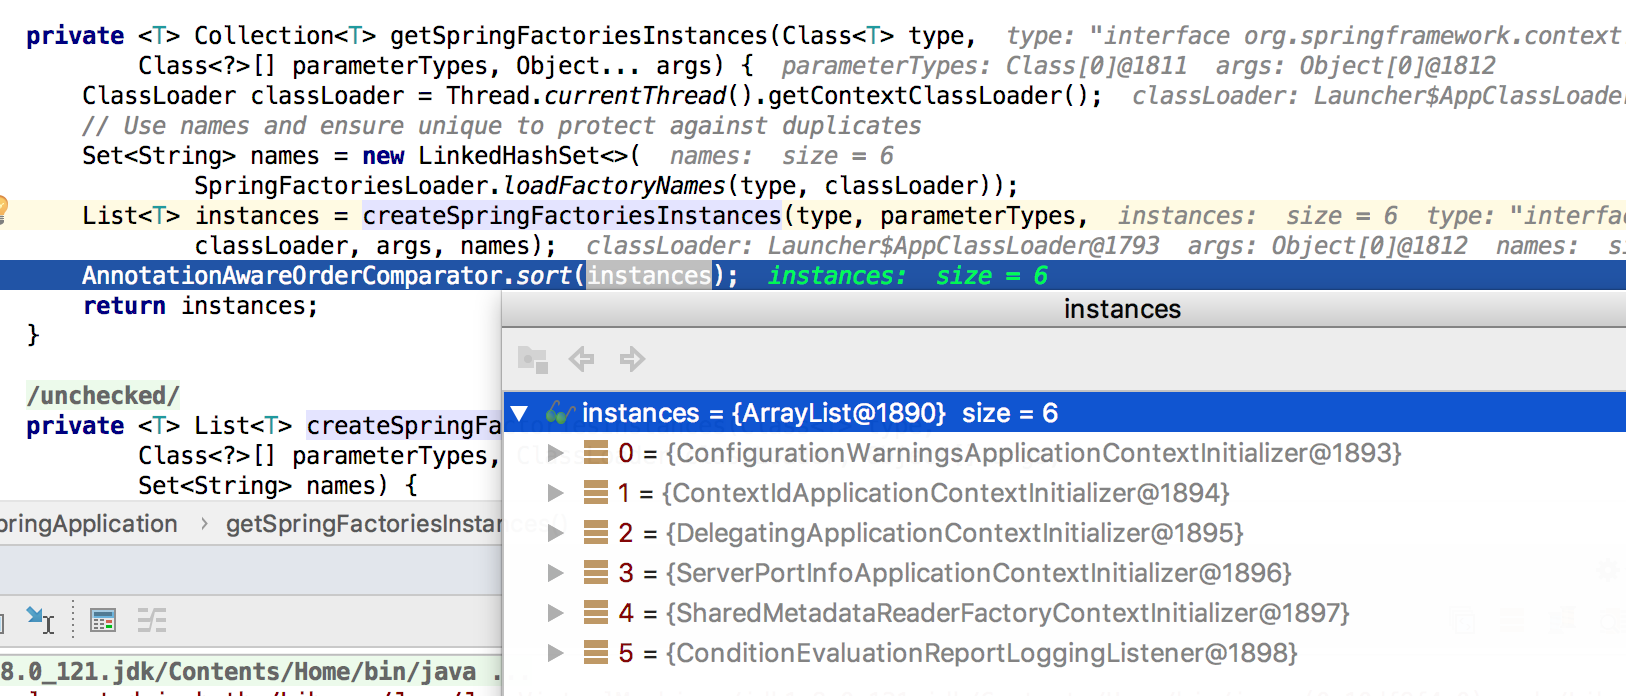
設定初始化器變數setInitializers,初始化後得到6個初始化變數,這些類在上面提到的spring.factories中可以找到

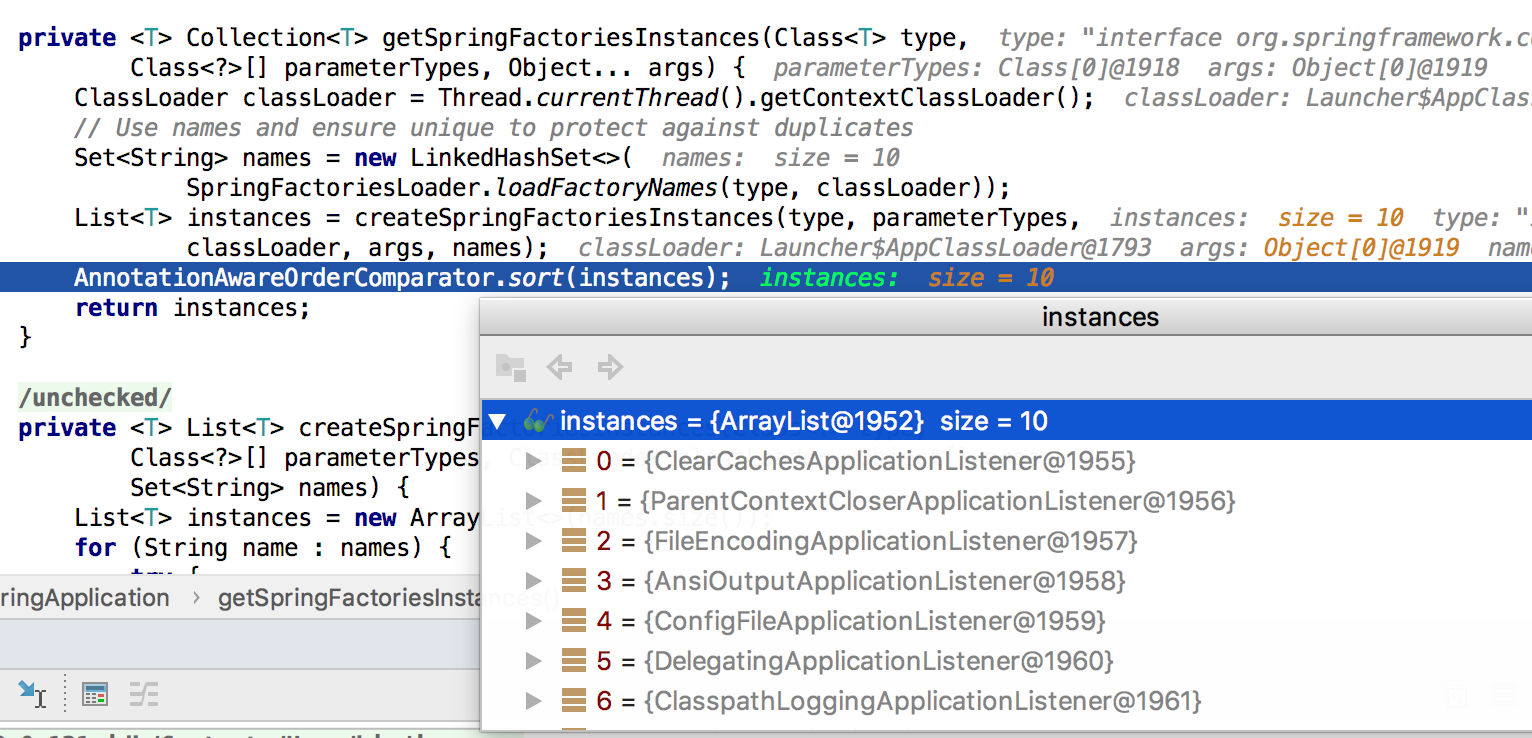
- 設定監聽器,與上面setInitializers實現類似,最終得到如下10個listeners

- 最後推斷帶有main函式的所在類,即入口類,這裡就是TutorialApplication
private Class<?> deduceMainApplicationClass() {
   try {
      StackTraceElement[] stackTrace = new RuntimeException().getStackTrace();
      for (StackTraceElement stackTraceElement : stackTrace) {
         if ("main".equals(stackTraceElement.getMethodName())) {
            return Class.forName(stackTraceElement.getClassName());
         }
      }
   }
   catch (ClassNotFoundException ex) {
      // Swallow and continue
   }
   return null;
}
run方法
看完SpringApplication是如何初始化後,我們來看下這個後面的run方法具體做了哪些事。
public ConfigurableApplicationContext run(String... args) {
   StopWatch stopWatch = new StopWatch();
   stopWatch.start();
   ConfigurableApplicationContext context = null;
   Collection<SpringBootExceptionReporter> exceptionReporters = new ArrayList<>();
   configureHeadlessProperty();
   SpringApplicationRunListeners listeners = getRunListeners(args);
   listeners.starting();
   try {
      ApplicationArguments applicationArguments = new DefaultApplicationArguments(
            args);
      ConfigurableEnvironment environment = prepareEnvironment(listeners,
            applicationArguments);
      configureIgnoreBeanInfo(environment);
      Banner printedBanner = printBanner(environment);
      context = createApplicationContext();
      exceptionReporters = getSpringFactoriesInstances(
            SpringBootExceptionReporter.class,
            new Class[] { ConfigurableApplicationContext.class }, context);
      prepareContext(context, environment, listeners, applicationArguments,
            printedBanner);
      refreshContext(context);
      afterRefresh(context, applicationArguments);
      stopWatch.stop();
      if (this.logStartupInfo) {
         new StartupInfoLogger(this.mainApplicationClass)
               .logStarted(getApplicationLog(), stopWatch);
      }
      listeners.started(context);
      callRunners(context, applicationArguments);
   }
   catch (Throwable ex) {
      handleRunFailure(context, ex, exceptionReporters, listeners);
      throw new IllegalStateException(ex);
   }

   try {
      listeners.running(context);
   }
   catch (Throwable ex) {
      handleRunFailure(context, ex, exceptionReporters, null);
      throw new IllegalStateException(ex);
   }
   return context;
}
StopWatch,這是一個spring-core中的工具類,用來給程式執行計時(對於經常遇到需要計算某方法或介面耗時的場景,這個比System.currentTimeMillis好用)
configureHeadlessProperty配置,設定系統屬性 java.awt.headless,這裡設定為 true,表示執行在伺服器端,在沒有顯示器和滑鼠鍵盤的模式下工作,模擬輸入輸出裝置功能。
遍歷listeners並啟動
封裝入參args為AppliationArguments物件
列印banner(就是我們啟動時看到的spring標識)
後面就是初始化上下文並載入上下文,具體實現就不進去看了
如果您覺得閱讀本文對您有幫助,請點一下“推薦”按鈕,您的“推薦”將是我最大的寫作動力!如果您想持續關注我的文章,請掃描二維碼,關注JackieZheng的微信公眾號,我會將我的文章推送給您,並和您一起分享我日常閱讀過的優質文章。

相關推薦
Spring Boot系列——Spring Boot如何啟動
Spring Boot啟動過程 上篇《Spring Boot系列——5分鐘構建一個應用》介紹瞭如何快速建立一個Spring Boot專案並執行。雖然步驟少流程簡單,為開發者省去了很多重複性的配置工作,但是其底層實現並沒有這麼簡單。 這篇,我們就通過入口類TutorialApplication看看Spring
spring boot系列--spring security (基於數據庫)登錄和權限控制
and check ember pos 函數 gem int ida 是否 先說一下AuthConfig.java Spring Security的主要配置文件之一 AuthConfig 1 @Configuration 2 @EnableWebSecur
Spring Boot系列 Spring @Value 屬性注入使用總結一
@Value注入 不通過配置檔案的注入屬性的情況 通過@Value將外部的值動態注入到Bean中,使用的情況有: 注入普通字串注入作業系統屬性注入表示式結果注入其他Bean屬性:注入beanInject物件的屬性another注入檔案資源 注入URL資源 詳細程式
Spring Boot 2.x 系列--spring 在啟動後執行某些特定程式碼
實現ApplicationRunner或CommandLineRunner介面。兩個介面以相同的方式工作並提供單個run方法 兩者的區別: ApplicationRunner使用了Applicati
Spring Boot系列教程四:配置文件詳解properties
date int ava ota axu return 端口 rand work 一.配置隨機數,使用隨機數 在application.properties文件添加配置信息 1 #32位隨機數 2 woniu.secret=${random.value} 3 #隨機整數
Spring Boot系列教程七:Spring boot集成MyBatis
override fill sql water sso avi size logs index 一.創建項目 項目名稱為 “springboot_mybatis_demo”,創建過程中勾選 “Web”,“MyBatis”,“MySQL”,第一次創建Maven
Spring Boot系列教程八: Mybatis使用分頁插件PageHelper
tid bind color clas owb 如何 cto 集成 使用 一.前言 上篇博客中介紹了spring boot集成mybatis的方法,基於上篇文章這裏主要介紹如何使用分頁插件PageHelper。在MyBatis中提供了攔截器接口,我們可以使用PageHelp
spring boot系列01--快速構建spring boot項目
註解 spring auto enc java ram fig 技術 configure 最近的項目用spring boot 框架 借此學習了一下 這裏做一下總結記錄 非常便利的一個框架 它的優缺點我就不在這背書了 想了解的可以自行度娘谷歌 說一下要寫什麽吧 其實還真不
spring boot 系列學習記錄
初步 jpa 系列 數據庫連接池 學習記錄 工程結構 json數據 ide json ——初始篇 結束了短學期的課程,初步學習了ssm框架,憑借這些學到的知識完成了短學期的任務-----點餐系統。 通過學長了解到了spring boot ,自己對spring cloud
Java微服務實踐—Spring Boot系列
springbootJava微服務實踐—Spring Boot系列網盤地址:https://pan.baidu.com/s/1aMqPO4pXLeXDHvRuze-JWw 密碼: j62z備用地址(騰訊微雲):https://share.weiyun.com/c74335d7e383158ee3c4aaf19
Spring Boot深入原理 - SpringApplication啟動原理
什麽 nal state int spring img erl prepare try Spring Boot深入原理 - SpringApplication啟動原理 我們知道,如果不需要特殊的配置,只需要在main方法裏調用SpringApplicatio.run()
spring boot 系列之三:spring boot 整合JdbcTemplate
closed com context boot pin pan url wired ace 前面兩篇文章我們講了兩件事情: 通過一個簡單實例進行spring boot 入門 修改spring boot 默認的服務端口號和默認context path 這篇文章我們來看下怎
spring boot 系列之四:spring boot 整合JPA
rom prop pos output UNC actor href ali div 上一篇我們講了spring boot 整合JdbcTemplate來進行數據的持久化, 這篇我們來說下怎麽通過spring boot 整合JPA來實現數據的持久化。 一、代碼實現 修改
Spring Boot系列二 Spring @Async異步線程池用法總結
provides obj feed exceptio tor his dex mount 重用 1. TaskExecutor Spring異步線程池的接口類,其實質是java.util.concurrent.Executor Spri
Spring Boot系列(二)Spring Initializer快速創建Spring Boot項目
com 項目 java 相關 xml文件 生成 刪除 pom.xml pan 1、點擊創建新工程 2、選擇Spring Initializer和jdk1.8 註意:項目名稱要小寫字母 3、現在只需要一個創建一個web,選擇一個就好 4、沒有用
Spring Boot以War包啟動
tom XML 現在 prot 使用 驗證過 servle cati ack 1.IDEA Spring Initializer自動構建的war包項目,自動生成的Initializer類,用於外部Tomcat容器啟動該項目時調用,如果仍然使用主類main函數方式啟動則與此類
Spring Boot系列-使用自定義註解校驗使用者是否登入
摘要: 記得今年年初剛開始面試的時候,被問的最多的就是你知道Spring的兩大核心嘛?那你說說什麼是AOP,什麼是IOC?我相信你可能也被問了很多次了。 1、到底是什麼是AOP? 所謂AOP也就是面向切面程式設計,能夠讓我們在不影響原有業務功能的前提下,橫切擴充套件新的功能。 記得今年
Spring Boot系列——死信佇列
在說死信佇列之前,我們先介紹下為什麼需要用死信佇列。 如果想直接瞭解死信對接,直接跳入下文的"死信佇列"部分即可。 ack機制和requeue-rejected屬性 我們還是基於上篇《Spring Boot系列——7步整合RabbitMQ》的demo程式碼來說。 在專案springb
spring boot設定方法一啟動就開始載入
package com.cloudtech.demo; import org.springframework.beans.factory.annotation.Autowired; import org.springframework.boot.CommandLineRunner; impor
spring boot系列教程一
1.spring boot簡介 Spring Boot 的優點快速開發,特別適合構建微服務系統,另外給我們封裝了各種經常使用的套件,比如mybatis、hibernate、redis、mongodb等。 2.spring Hello World(maven方式) <parent>
