
Eclipse+Maven+Spring+CXF 構建webservice 服務
一、 軟體準備
Eclipse 4.2.1
Maven 2.2.1
Spring 3.2.6
CXF 3.0.2
軟體下載和Eclipse 安裝 maven外掛等請參考其他文章。
二、 步驟
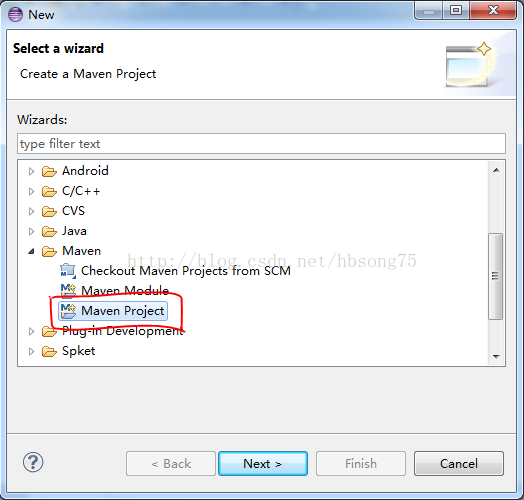
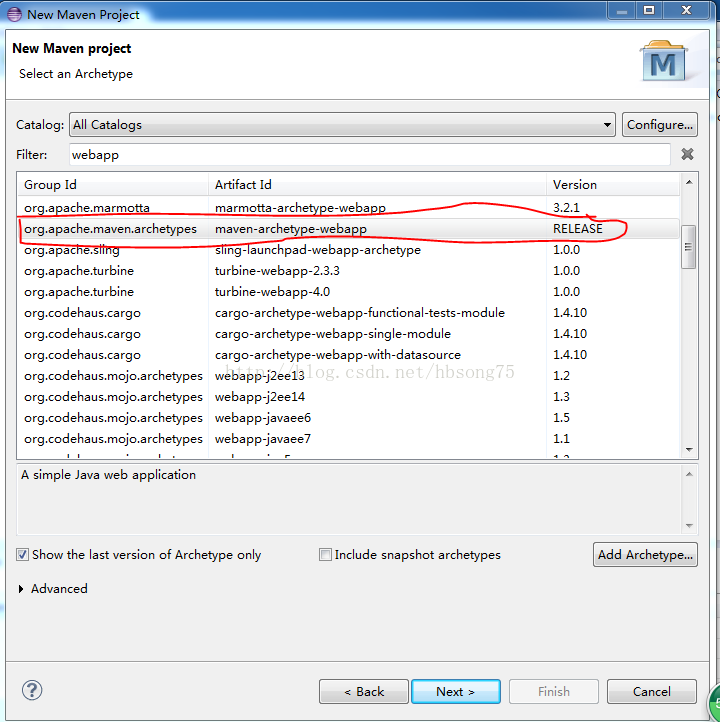
1. 新建web工程,利用maven管理,如下:
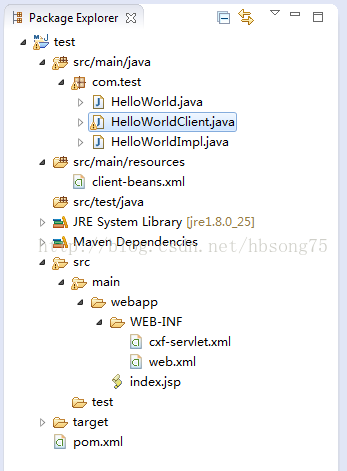
工程名為test,完成以後,專案結構如下圖:
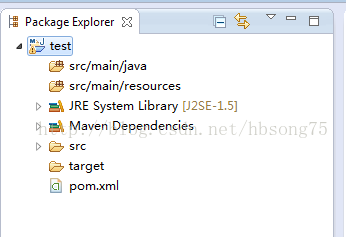
src/main/java 準備放 java 程式;
src/main/resources準備放各類資原始檔。
2. 新增程式碼
1) 定義服務介面
package com.test;

import javax.jws.WebService;

@WebService
public interface HelloWorld {
    public String sayHello();
}
因為只是一個webservice的實驗程式,所以非常簡單,只有一個服務方法: sayHello(),利用 @WebService註解來宣告這是一個webservice的介面。
2) 實現服務類
package com.test;
import javax.jws.WebService;
@WebService
public class HelloWorldImpl implements HelloWorld{
public String sayHello(){
return "Hello world!";
}
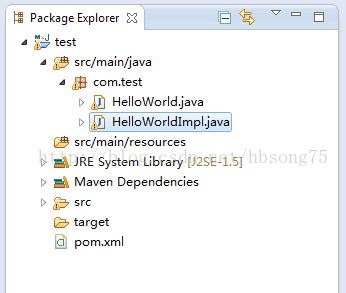
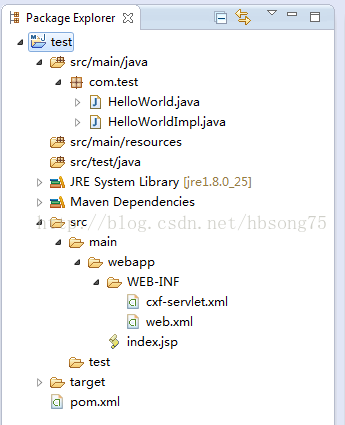
}完成java程式碼新增後的專案結構如下:
3. 新增Spring-CXF 配置
在專案 src/main/webapp/WEB-INF 目錄下新建XML定義:cxf-servlet.xml如下:
<?xml version="1.0" encoding="UTF-8"?>
<!--
        Licensed to the Apache Software Foundation (ASF) under one
        or more contributor license agreements. See the NOTICE file
        distributed with this work for additional information
        regarding copyright ownership. The ASF licenses this file
        to you under the Apache License, Version 2.0 (the
        "License"); you may not use this file except in compliance
        with the License. You may obtain a copy of the License at

        http://www.apache.org/licenses/LICENSE-2.0

        Unless required by applicable law or agreed to in writing,
        software distributed under the License is distributed on an
        "AS IS" BASIS, WITHOUT WARRANTIES OR CONDITIONS OF ANY
        KIND, either express or implied. See the License for the
        specific language governing permissions and limitations
        under the License.
-->
<!-- START SNIPPET: beans -->
<beans xmlns="http://www.springframework.org/schema/beans"
    xmlns:xsi="http://www.w3.org/2001/XMLSchema-instance"
    xmlns:jaxws="http://cxf.apache.org/jaxws"
    xsi:schemaLocation=" http://www.springframework.org/schema/beans
    http://www.springframework.org/schema/beans/spring-beans.xsd
    http://cxf.apache.org/jaxws http://cxf.apache.org/schemas/jaxws.xsd">
    <import resource="classpath:META-INF/cxf/cxf.xml"/>
    <import resource="classpath:META-INF/cxf/cxf-servlet.xml"/>
    <jaxws:endpoint id="helloWorld" implementor="com.test.HelloWorldImpl" address="/HelloWorld"/>
</beans>
<!-- END SNIPPET: beans -->
該定義檔案利用spring和CXF的功能,釋出一個ID為helloWorld,實現類為com.test.HelloWorldImpl,釋出相對路徑為 /HelloWorld(對應絕對目錄為: http://host:port/{WebAPPName}/HelloWorld)的 webservice。
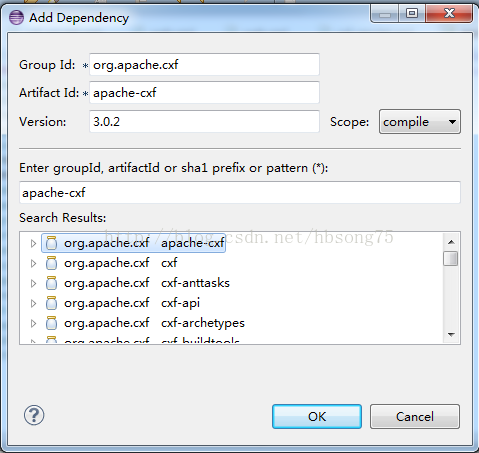
因為我們需要用到CXF來做webservice,右鍵點選專案中的POM.XML,新增apache-cxf依賴,如下圖:
4. Web應用配置
修改 src/main/webapp/WEB-INF 目錄下的web.xml檔案
<?xml version="1.0" encoding="UTF-8"?>
<!--
  Licensed to the Apache Software Foundation (ASF) under one
  or more contributor license agreements. See the NOTICE file
  distributed with this work for additional information
  regarding copyright ownership. The ASF licenses this file
  to you under the Apache License, Version 2.0 (the
  "License"); you may not use this file except in compliance
  with the License. You may obtain a copy of the License at

  http://www.apache.org/licenses/LICENSE-2.0

  Unless required by applicable law or agreed to in writing,
  software distributed under the License is distributed on an
  "AS IS" BASIS, WITHOUT WARRANTIES OR CONDITIONS OF ANY
  KIND, either express or implied. See the License for the
  specific language governing permissions and limitations
  under the License.
-->
<web-app xmlns="http://java.sun.com/xml/ns/javaee" xmlns:xsi="http://www.w3.org/2001/XMLSchema-instance" version="2.5" xsi:schemaLocation="http://java.sun.com/xml/ns/javaee           http://java.sun.com/xml/ns/javaee/web-app_2_5.xsd">
    <display-name>cxf</display-name>
    <servlet>
        <description>Apache CXF Endpoint</description>
        <display-name>cxf</display-name>
        <servlet-name>cxf</servlet-name>
        <servlet-class>org.apache.cxf.transport.servlet.CXFServlet</servlet-class>
        <load-on-startup>1</load-on-startup>
    </servlet>
    <servlet-mapping>
        <servlet-name>cxf</servlet-name>
        <url-pattern>/*</url-pattern>
    </servlet-mapping>
    <session-config>
        <session-timeout>60</session-timeout>
    </session-config>
</web-app>
該檔案實際上是定義了處理webservice的CXF Servlet的對映關係。
完成步驟3和4以後的工程目錄如下:
5. 編譯打包
利用maven(package -X)編譯打包成test.war
(在Eclipse上右擊工程名 Run as -> Maven build)
6. 將步驟5生成的test.war部署到tomcat伺服器上
7. 訪問測試:
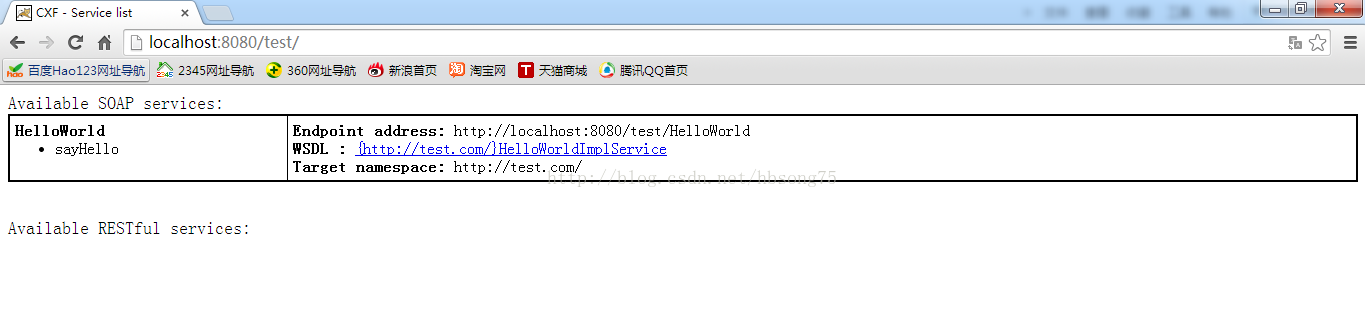
在瀏覽器上輸入:http://localhost:8080/test/,出現如下畫面就成功了:
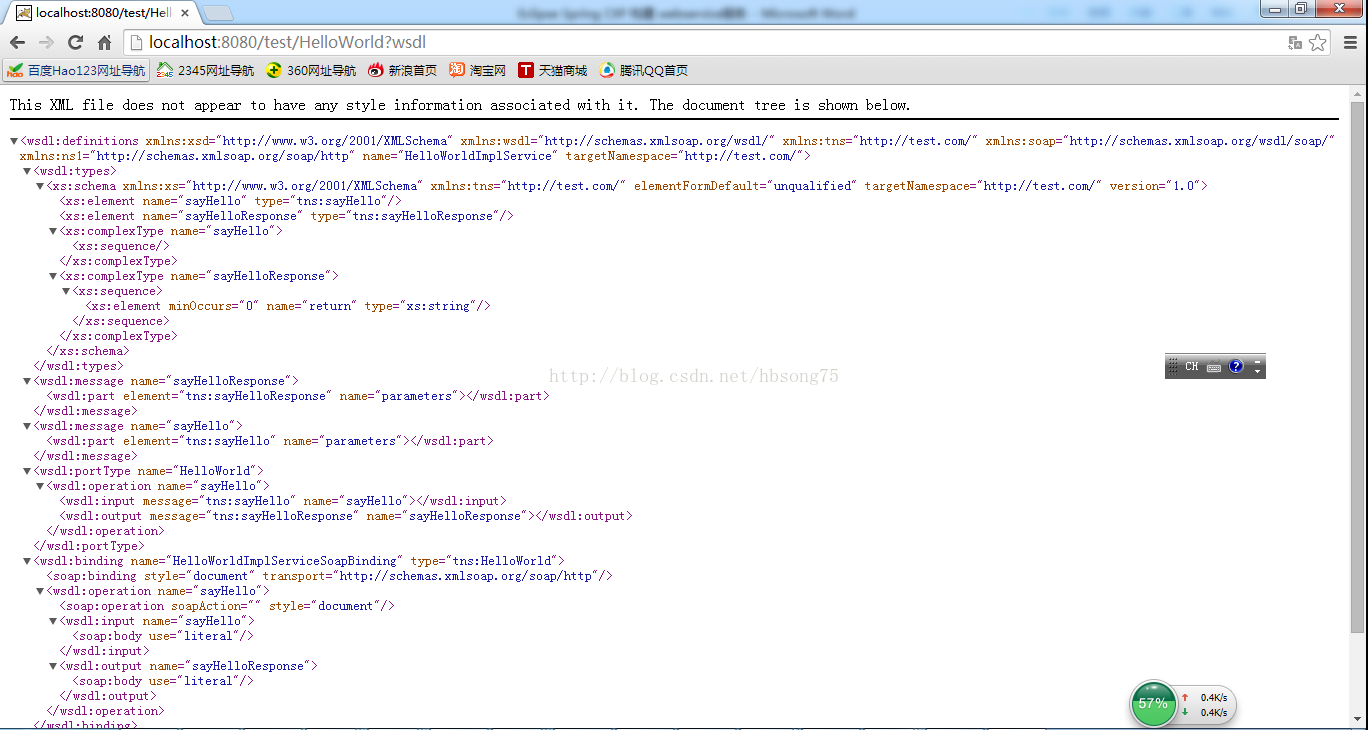
點選WSDL連結:
8. 編寫webservice client端程式碼
1) 首先通過 Spring 與 CXF 的配置來定義 Web Service 的客戶端 Bean,在 src\main\resources 目錄下建立client-beans.xml 配置檔案:
<?xml version="1.0" encoding="UTF-8"?>
<!--
        Licensed to the Apache Software Foundation (ASF) under one
        or more contributor license agreements. See the NOTICE file
        distributed with this work for additional information
        regarding copyright ownership. The ASF licenses this file
        to you under the Apache License, Version 2.0 (the
        "License"); you may not use this file except in compliance
        with the License. You may obtain a copy of the License at

        http://www.apache.org/licenses/LICENSE-2.0

        Unless required by applicable law or agreed to in writing,
        software distributed under the License is distributed on an
        "AS IS" BASIS, WITHOUT WARRANTIES OR CONDITIONS OF ANY
        KIND, either express or implied. See the License for the
        specific language governing permissions and limitations
        under the License.
-->
<!-- START SNIPPET: beans -->
<beans xmlns="http://www.springframework.org/schema/beans"
    xmlns:xsi="http://www.w3.org/2001/XMLSchema-instance"
    xmlns:jaxws="http://cxf.apache.org/jaxws"
    xsi:schemaLocation="
    http://www.springframework.org/schema/beans
    http://www.springframework.org/schema/beans/spring-beans.xsd
    http://cxf.apache.org/jaxws
     http://cxf.apache.org/schema/jaxws.xsd">
    <bean id="client" class="com.test.HelloWorld"
        factory-bean="clientFactory" factory-method="create"/>
    <bean id="clientFactory" class="org.apache.cxf.jaxws.JaxWsProxyFactoryBean">
        <property name="serviceClass" value="com.test.HelloWorld"/>
        <property name="address" value="http://localhost:8080/test/HelloWorld"/>
    </bean>
</beans>
<!-- END SNIPPET: beans -->
需要注意的是,該配置檔案中的 address需要寫成釋出服務的絕對路徑。
2) 編寫客戶端java程式碼: HelloWorldClient.java
package com.test;

import org.springframework.context.support.ClassPathXmlApplicationContext;

public final class HelloWorldClient {

    private HelloWorldClient() {
    }

    public static void main(String args[]) throws Exception {
        // START SNIPPET: client
        ClassPathXmlApplicationContext context
            = new ClassPathXmlApplicationContext(new String[] {"client-beans.xml"});

        HelloWorld client = (HelloWorld)context.getBean("client");

        String response = client.sayHello();
        System.out.println("Response: " + response);
        System.exit(0);
        // END SNIPPET: client
    }
}
注意,程式碼中HelloWorldclient = (HelloWorld)context.getBean("client"); 的client需要與"client-beans.xml"中的 bean id一致才能找到這個服務。
現在的專案結構如下:
3) 連線測試
在eclipse中直接按HelloWorldClient執行 Run as -> Java Application:
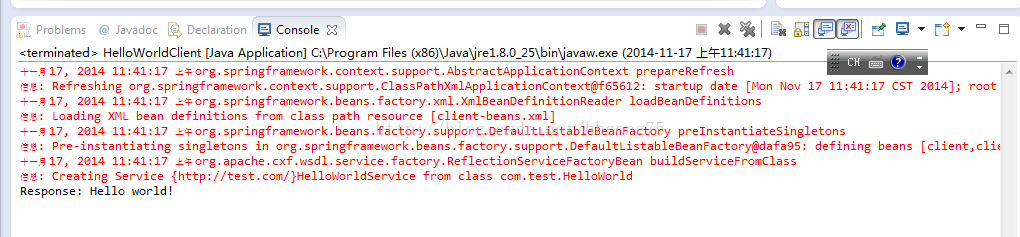
輸出的Hello world! 即是我們釋出的HelloWorld的方法 sayHello()的輸出!這說明從服務釋出到客戶端連線都成功了。
相關推薦
Eclipse+Maven+Spring+CXF 構建webservice 服務
一、 軟體準備 Eclipse 4.2.1 Maven 2.2.1 Spring 3.2.6 CXF 3.0.2 軟體下載和Eclipse 安裝 maven外掛等請參考其他文章。 二、 步驟 1. 新建web工程,利用maven管理,如下:
SpringBoot | 第三十四章:CXF構建WebService服務
前言 上一章節,講解了如何使用Spring-WS構建WebService服務。其實,建立WebService的方式有很多的,今天來看看如何使用apache cxf來構建及呼叫WebService服務。 一點知識 何為Apache-CXF Apache C
(原創)Maven+Spring+CXF+Tomcat7 簡單例子實現webservice
produces per back targe xsd lean listener ans 控制 這個例子需要建三個Maven項目,其中一個為父項目,另外兩個為子項目 首先,建立父項目testParent,選擇quickstart: 輸入項目名稱和模塊名稱,然後創建:
spring boot構建微服務-通過maven構建專案HelloWorld
1.訪問如下地址來構建基礎專案 地址:http://start.spring.io/ 2.具體操作選項如下 a.Generate a:建立一個什麼樣的工程,這裡選擇Maven Project b.with:通過什麼語言,這裡選擇Java c.and Spring Boot:這個是選擇sp
構建基於CXF的WebService服務(2)-- 利用CXF提供的wsdl2java工具建立客戶端
1、環境配置 將CXF_HOME/bin加入到環境變數path中,如我的是D:\Java\Jar\apache-cxf-2.7.7\bin 開啟cmd輸入 wsdl2java -v 出現如下資訊表示配
cxf CXF搭建webService服務器
pre port throw services tar style 客戶 3.1 factor http://observer.blog.51cto.com/4267416/1231205 手動發布: public class ServerMain { public
Spring-Boot:Spring Cloud構建微服務架構
xmlns art 超時 客戶 微服務架構 cover lns created 搭建 概述: 從上一篇博客《Spring-boot:5分鐘整合Dubbo構建分布式服務》 過度到Spring Cloud,我們將開始學習如何使用Spring Cloud 來搭建微服務。繼續采
Spring Cloud構建微服務架構分布式配置中心
post ast github 構造 clas mas files cli .class 在本文中,我們將學習如何構建一個基於Git存儲的分布式配置中心,並對客戶端進行改造,並讓其能夠從配置中心獲取配置信息並綁定到代碼中的整個過程。 準備配置倉庫 準備一個git倉庫,可
Spring Cloud構建微服務架構—創建“服務註冊中心”
springboot springcloud mybatis eureka config 創建一個基礎的Spring Boot工程,命名為eureka-server,並在pom.xml中引入需要的依賴內容: <parent> <groupId>org.springf
Spring Cloud構建微服務架構服務註冊與發現
springboot springcloud mybatis eureka config Spring Cloud簡介Spring Cloud是一個基於Spring Boot實現的雲應用開發工具,它為基於JVM的雲應用開發中涉及的配置管理、服務發現、斷路器、智能路由、微代理、控制總線、全局
Spring Cloud構建微服務架構-創建“服務提供方”
spring Spring Cloud Spring Boot config 下面我們創建提供服務的客戶端,並向服務註冊中心註冊自己。本文我們主要介紹服務的註冊與發現,所以我們不妨在服務提供方中嘗試著提供一個接口來獲取當前所有的服務信息。 首先,創建一個基本的Spring Boot應用。命名為
Spring Cloud構建微服務架構—服務網關過濾器
Spring Cloud Spring Boot mybatis 過濾器作用 我們的微服務應用提供的接口就可以通過統一的API網關入口被客戶端訪問到了。但是,每個客戶端用戶請求微服務應用提供的接口時,它們的訪問權限往往都需要有一定的限制,系統並不會將所有的微服務接口都對它們開放。然而,目前的服務路
Spring Cloud構建微服務架構Hystrix監控面板
Spring Cloud Spring Boot mybatis 在Spring Cloud中構建一個Hystrix Dashboard非常簡單,只需要下面四步: 創建一個標準的Spring Boot工程,命名為:hystrix-dashboard。編輯pom.xml,具體依賴內容如下: <
eclipse maven Spring
刪除 框架 分享 什麽 pri TE info spring mage 弄了一周,maven環境算是弄好了 使用eclipse開發SSM框架,即要下載maven和Spring插件,並導入到eclipse裏,這裏就不詳細介紹導入問題,有問題可百度或谷歌,上面實在是太多太多 m
Spring Cloud構建微服務架構—服務消費(Ribbon)
ble DG 沒有 客戶 BE pla cati str 主類 Spring Cloud RibbonSpring Cloud Ribbon是基於Netflix Ribbon實現的一套客戶端負載均衡的工具。它是一個基於HTTP和TCP的客戶端負載均衡器。它可以通過在客戶端中
Spring Cloud構建微服務架構:服務消費(基礎)
消費 ring str frame emp default class a template pom.xml 使用LoadBalancerClient在Spring Cloud Commons中提供了大量的與服務治理相關的抽象接口,包括DiscoveryClient、這裏我
Spring Cloud構建微服務架構—Hystrix斷路器
能夠 電路 處理 觸發 就會 熔斷器 邏輯 響應 保險絲 斷路器模式源於Martin Fowler的Circuit Breaker一文。“斷路器”本身是一種開關裝置,用於在電路上保護線路過載,當線路中有電器發生短路時,“斷路器”能夠及時的切斷故障電路,防止發生過載、發熱、甚
Spring Cloud構建微服務架構-Hystrix服務降級
static 原因 架構 一個個 policy 消費者 兩個 comm 以及 在微服務架構中,我們將系統拆分成了一個個的服務單元,各單元應用間通過服務註冊與訂閱的方式互相依賴。由於每個單元都在不同的進程中運行,依賴通過遠程調用的方式執行,這樣就有可能因為網絡原因或是依賴服務
使用CXF開發WebService服務器端接口
rip face urn col inf string 框架 發布服務 瀏覽器 CXF作為java領域主流的WebService實現框架,Java程序員有必要掌握它。 CXF主頁:http://cxf.apache.org/ 簡介:百度百科 今天的話
axis2+spring整合釋出webservice服務
1.環境搭建,準備相應環境jar包 axis2-1.6.0.0下載地址: http://axis.apache.org/axis2/java/core/download.cgi spring相關jar包下載地址