
Service+AIDL牛刀小試,實現應用間通訊
學習以及使用Android已經一年多了,卻覺得自己還是有些東西沒怎麼使用過,比如說Service,這個蠻重要的東西,之前只是隨意地使用過,也沒有好好學習。於是乎就花了大半天工作的時間學習了它的一些相關知識,在這個過程中,意外收穫了一些IPC的知識。
本文只作Service+AIDL實現程序間通訊的具體實現的步驟介紹,深入原始碼內容我還沒有仔細地學習(畢竟看C++程式碼還是有點點累,等過段時間,我把深入1第六章和深入2第二章讀透了會再來詳細補充一下Binder的知識以及原始碼的解釋)
廢話不多說了 下面就開始講講專案實現的步驟吧:
1.新建專案
2.定義AIDL介面
3.暴露服務介面
4.拷貝AIDL介面
5.呼叫服務
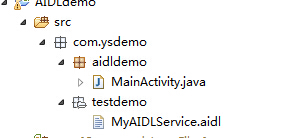
新建專案
既然是應用間通訊,就是說我們得新建兩個專案 專案1作為服務端server,專案2作為呼叫服務的客戶端client。
定義AIDL介面
在專案1中新建一個aidl檔案,內容如下
package com.ysdemo.testdemo;//包名

interface MyAIDLService {
    //需要實現的方法
    int plus(int a, int b);
    String toUpperCase(String str);
}
需要注意的一點是 aidl介面中方法的引數限定為以下幾類:
①int,char等基礎型別
②String,List,Map,CharSequence等型別
③繼承Parcelable的型別
④其他AIDL介面型別
儲存該檔案後,會在gen目錄中自動編譯出一個java檔案,
將格式稍微調整了一下之後是這樣的:
/*
* This file is auto-generated. DO NOT MODIFY.
* Original file: F:\\workspace\\TestDemo\\src\\com\\ysdemo\\testdemo\\MyAIDLService.aidl
*/
package com.ysdemo.testdemo;
public interface MyAIDLService extends android.os.IInterface {
/** Local-side IPC implementation stub class. */ AIDL介面定義好了,現在要對其進行實現,在自定義的Service中覆寫onBind方法:
    @Override
    public IBinder onBind(Intent intent) {
        // TODO Auto-generated method stub
        return new MyAIDLService.Stub() {

            @Override
            public int plus(int a, int b) throws RemoteException {
                // TODO Auto-generated method stub
                return a + b;
            }
            @Override
            public String toUpperCase(String str) throws RemoteException {
                if (str != null) {
                    return str.toUpperCase();
                }
                return null;
            }
        };
    }
暴露服務介面
在專案1的AndroidManifest.xml中為application註冊自定義服務並將其以隱式Intent方式暴露給其他應用:
        <service android:name="com.ysdemo.testdemo.MyService"
            android:process=":remote">
            <intent-filter>
                <action
                    android:name="com.ysdemo.testdemo.MyAIDLService"/>
            </intent-filter>
        </service>
拷貝AIDL介面
將專案1的aidl檔案拷貝到專案2,並放在相同的包下(新建一個名字相同的包亦可)。
儲存後,gen目錄中也會生成相同的java檔案。
呼叫服務
在專案2中的Activity呼叫該服務:
public class MainActivity extends Activity {

    private MyAIDLService myAIDLService;

    private ServiceConnection connection = new ServiceConnection() {

        @Override
        public void onServiceDisconnected(ComponentName name) {
        }

        @Override
        public void onServiceConnected(ComponentName name, IBinder service) {
            myAIDLService = MyAIDLService.Stub.asInterface(service);
            try {
                int result = myAIDLService.plus(50, 50);
                String upperStr = myAIDLService.toUpperCase("comes from ClientTest");
                Log.d("TAG", "result is " + result);
                Log.d("TAG", "upperStr is " + upperStr);
            } catch (RemoteException e) {
                e.printStackTrace();
            }
        }
    };

    @Override
    protected void onCreate(Bundle savedInstanceState) {
        super.onCreate(savedInstanceState);
        setContentView(R.layout.activity_main);
        Button bindService = (Button) findViewById(R.id.bind_service);
        bindService.setOnClickListener(new OnClickListener() {
            @Override
            public void onClick(View v) {
                Intent intent = new Intent("com.ysdemo.testdemo.MyAIDLService");
                bindService(intent, connection, BIND_AUTO_CREATE);
            }
        });
    }

}
相關推薦
Service+AIDL牛刀小試,實現應用間通訊
學習以及使用Android已經一年多了,卻覺得自己還是有些東西沒怎麼使用過,比如說Service,這個蠻重要的東西,之前只是隨意地使用過,也沒有好好學習。於是乎就花了大半天工作的時間學習了它的一些相關知識,在這個過程中,意外收穫了一些IPC的知識。 本文只作S
Android BroadcastReceiver使用,可實現程序間通訊
1、建立廣播接收器: /** * 作者:created by meixi * 郵箱:[email protected] * 日期:2018/11/1 09 */ public class MyBroadcastReceiver extends BroadcastReceiver
利用委託 實現窗體間通訊,非原創
copy自:https://www.cnblogs.com/hugoNB/p/7130562.html,這個作者寫的淺顯易懂,就複製下來自己看 實現過程: 這裡主要是用到委託實現,所以主要描述一下委託在這裡的應用。 我們要在主窗體(這裡的子父窗體都是自己假想)中獲取子窗體中的元素,所以首
Android AIDL實現程序間通訊
今天犯二了, 犯了個超級低階的錯誤, 真的是丟人丟大發了. 剛好順道反思下, 也對工作這幾年做一些簡單的總結. 不知道你們是不是和我一樣也總遇到各
android Aidl 實現程序間通訊
1,android 新建aidl 檔案 刪除void basicTypes(int anInt, long aLong, boolean aBoolean, float aFloat, double aDouble, String aString);這個方法沒用到 還需要實
第18天Service-Messager實現程序間通訊
第18天Service-Messager實現程序間通訊 Messager 一.Messager介紹 二.Messager的原理 特點: 三 .使用步驟 服務端moudle:messager
Android Studio使用AIDL 實現程序間通訊例項
參考:部落格:http://www.cnblogs.com/BeyondAnyTime/p/3204119.html, http://www.cnblogs.com/linlf03/p/3192025.html 視訊教程:http://www.imooc.com/l
android使用aidl實現程序間通訊的例項
//這一步啟動服務 this.bindService(new Intent("com.wyj.aidlservice"), this.serviceConnection, BIND_AUTO_CREATE); btn = (Button)findViewByI
android studio使用CMake和NDK,實現應用自身被卸載時打開某一網址
licensed 項目 右鍵 ava 開發工具 not per 2.0 idt 實現應用自身被卸載時打開某一網址的c代碼 MyActivity: public class MyActivity extends Activity { /** * Calle
思科單臂路由實驗配置,實現跨vlan通訊
單臂路由 思科單臂路由 配置參數如圖:PC1 vlan 20 20.1.1.1 網關20.1.1.254PC2 vlan 30 20.1.1.1 網關30.1.1.254PC3 vlan 40 40.1.1.1 網關40.1.1.254R1配置以下3個子接口地址:g0/0.1 20.1.1.254g0
iOS--CFMessagePort實現程序間通訊
CFMessagePort屬於CoreFoundation框架中的類。因此可以在http://opensource.apple.com/tarballs/CF/CF-855.17.tar.gz中在原始碼,如果感興趣可以去看看。 下面說下CFMessagePortRef的具體使用。 首先建立一
C#使用SendMessage實現程序間通訊的方法
本文例項講述了C#使用SendMessage實現程序間通訊的方法。分享給大家供大家參考。具體分析如下: 為了深入理解訊息機制,先來做一個測試專案 在新建專案的Form1的程式碼中,加入方法: ?
Linux 通過共享記憶體機制實現程序間通訊
問題背景 編寫程式 sender ,它建立一個共享記憶體,然後等待使用者通過終端輸入一串字元,並將這串字元通過共享記憶體傳送給 receiver;最後,它等待 receiver 的應答,收到應答訊息後,將接收到的應答資訊顯示在終端螢幕上,刪除共享記憶體,結束程式的執行。 編寫 receiver 程
說說在 Vue.js 中如何實現元件間通訊
1 用法 假設父元件的模板包含子元件,我們可以通過 props 來正向地把資料從父元件傳遞給子元件。props 可以是字串陣列,也可以是物件。 html: <div id="app"> <deniro-component message=""嫦娥四號"成功發射
linux 用命名管道實現程序間通訊
什麼是命名管道 命名管道和匿名管道一樣適用於程序之間的通訊linux匿名管道詳解,但是使用範圍不同,匿名管道要求必須是親緣程序,而命名管道卻沒有這個限制,它可以用於同一臺機器主機上的任意程序間通訊。
說說在 Vue.js 中如何實現元件間通訊(高階篇)
之前說過,可以使用 props 將資料從父元件傳遞給子元件。其實還有其它種的通訊方式,下面我們一一娓娓道來。 1 自定義事件 通過自定義事件,我們可以把資料從子元件傳輸回父元件。子元件通過 $emit() 來觸發事件,而父元件通過 $on() 來監聽事件,這是典型的觀察者模式。 htm
PipedInputStream,PipedOutputStream例項,執行緒間通訊
Java.io.PipedOutputStream and java.io.PipedInputStream has been introduced in JDK 1.0. PipedOutputStream and PipedInputStream both are con
ArcGIS中,實現兩點間連線
轉載:ArcGIS中,一個點集裡的點兩兩連線,比如有4個點,就連3+2+1=6條線 一、目標 一個點集裡的點兩兩連線,比如有4個點,則連3+2+1=6條線;有38個點,則連37+36+35+···+3+2+1=703條線,其原始座標資料及最終樣式類似於以下這種: →
使用三層交換機實現VLAN間通訊
實現PC0能與PC1、PC2、PC3通訊 1.先配置使得vlan內通訊,vlan間通訊隔離 對switch0 Switch>ena Switch#conf t Enter configuration commands, one per line. End with CNTL/Z
應用間通訊方式HTTP和RPC
一、HTTP和RPC 1、Dobbo RPC框架 2、Sping Cloud 微服務架構下的一站式解決方案。 微服務直接使用的是 Http restful方式 二、SpringCloud中服務間兩種restful RestTemplate Feign &nbs