swagger 與 springboot 的整合實戰
說明:這篇筆記參考了下面的部落格,感謝博主。
第 1 步: 引入相關的依賴。
<dependency>
<groupId>com.mangofactory</groupId>
<artifactId>swagger-springmvc</artifactId>
<version>1.0.2</version>
</dependency>
<dependency>
<groupId>org.codehaus.jackson</groupId> 附:springboot 相關程式碼
<parent>
<groupId>org.springframework.boot</groupId>
<artifactId>spring-boot-starter-parent</artifactId>
<version>1.3.1.RELEASE</version>
</parent>
<dependency>
<groupId>org.springframework.boot</groupId 第 2 步:在 springboot 的啟動類中加入相關的程式碼
/**
 * Hello world!
 */
@EnableSwagger
@SpringBootApplication
public class Application {

    public static void main(String[] args) {
        SpringApplication.run(Application.class,args);
    }


    private SpringSwaggerConfig springSwaggerConfig;

    /**
     * Required to autowire SpringSwaggerConfig
     */
    @Autowired
    public void setSpringSwaggerConfig(SpringSwaggerConfig springSwaggerConfig) {
        this.springSwaggerConfig = springSwaggerConfig;
    }


    /**
     * Every SwaggerSpringMvcPlugin bean is picked up by the swagger-mvc
     * framework - allowing for multiple swagger groups i.e. same code base
     * multiple swagger resource listings.
     */
    @Bean
    public SwaggerSpringMvcPlugin customImplementation() {
        return new SwaggerSpringMvcPlugin(this.springSwaggerConfig).apiInfo(apiInfo()).includePatterns(".*?");
    }

    private ApiInfo apiInfo() {
        ApiInfo apiInfo = new ApiInfo(
                "李威測試使用的頁面介面文件", // App Service API
                "副標題",
                "111111111111111111111111",
                "[email protected]",
                "2222222222222222222222222222",
                "3333333333333333333333333333");
        return apiInfo;
    }

}
第 3 步:在程式碼的控制類中加入相關的註解
@RestController
public class SampleController {


    @RequestMapping(value = "/hello")
    @ApiOperation(value = "新增使用者",httpMethod ="POST", response = UserBean.class,notes = "HelloWorld")
    public UserBean hello(@ApiParam(required = true,name = "paramData",value = "使用者資訊 json 資料") String paramData){
        UserBean userBean = new UserBean();
        userBean.setUsername("liwei");
        userBean.setPassword("123456");
        return userBean;
    }
}
說明:
其中@ApiOperation和@ApiParam為新增的API相關注解,各引數說明如下:
@ApiOperation(value = “介面說明”, httpMethod = “介面請求方式”, response = “介面返回引數型別”, notes = “介面釋出說明”;其他引數可參考原始碼;
@ApiParam(required = “是否必須引數”, name = “引數名稱”, value = “引數具體描述”
第 4 步:
在 GitHub 上下載 SwaggerUI
專案(https://github.com/swagger-api/swagger-ui),將dist下所有內容拷貝到本地專案webapp下面,結果目錄如下圖所示:
修改index.html
將index.html中
http://petstore.swagger.wordnik.com/v2/swagger.json修改為
http://localhost:8080/{projectname}/api-docs到此為止,所有配置完成,啟動你的專案,訪問
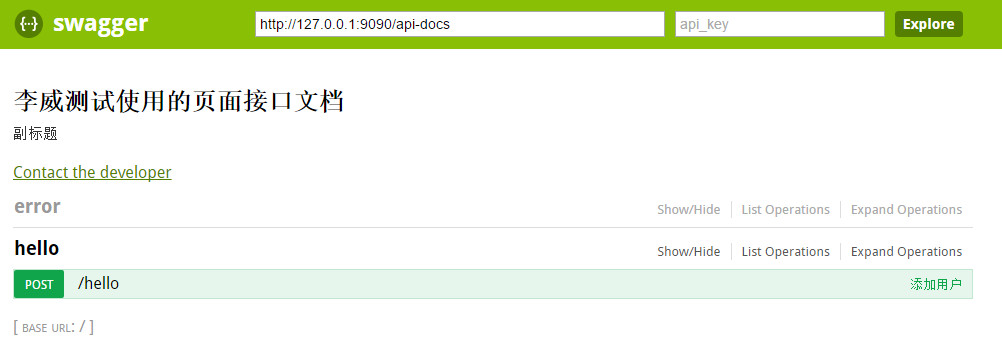
http://localhost:8086/swagger/index.html即可看到如下所示頁面:
公司內網內測專案
相關推薦
swagger 與 springboot 的整合實戰
說明:這篇筆記參考了下面的部落格,感謝博主。 第 1 步: 引入相關的依賴。 <dependency> <groupId>com.mangofactory</groupId> <artifactId&
dubbo實戰之二:與SpringBoot整合
### 歡迎訪問我的GitHub [https://github.com/zq2599/blog_demos](https://github.com/zq2599/blog_demos) 內容:所有原創文章分類彙總及配套原始碼,涉及Java、Docker、Kubernetes、DevOPS等; ###
【Activti與SpringBoot整合後相關核心Api的介紹】
使用編譯器:Eclipse(因為流程圖使用的是Eclipse的繪圖工具,所以程式碼也就直接在上面編輯,編碼Idea也是非常好用的工具,同學如果不習慣的話,可以畫完圖,複製到Idea上,編寫程式碼) 核心Api介紹: # 核心API介紹 ProcessEngine(最核心Api) &n
18.Shiro與Springboot整合下登陸驗證UserService未注入的問題
Shiro與Springboot整合下登陸驗證UserService未注入的問題 前言: 剛開始整合的情況下,UserService一執行,就會報空指標異常。 看了網上各位大神的講解,什麼不能用service層,直接用dao層獲取。。。。。。 然後跟著一路再坑。。。。。。。 最後的最後,才發現MyR
swagger教程-springboot整合swagger
一.swagger簡介 1.swagger是什麼? swagger是REST APIs介面文件生成工具,既然是REST介面那麼就和Sping Rest 搭上線了,swagger 可以生成一個具有互動性的API控制檯,開發者可以用來快
cas單點登入 (二) 客戶端與springboot整合
在springboot專案中實現cas單點登入統一認證,只需要在專案中配置 cas過濾器即可使用. 1. springboot專案pom.xml中 新增web支援依賴 、cas客戶端依賴包 <dependency> <groupId>org
shiro許可權框架-(二)與Springboot整合
首先引入shiro與Spring的依賴。 Shiro和Spring整合的依賴 <dependency> <groupId>org.apache.shiro<
FastDFS與Springboot整合
上一篇《FastDFS分佈檔案系統Java客戶端使用》基於官方提供的Java客戶端庫介紹了檔案上傳、下載和刪除的功能。淘寶在今年9月份在官方Java客戶端的基礎上進行了大量重構,且提供了更多豐富的api,主要新增的特性如下: 1> 對關鍵部分程式碼加入了單元測
Netty與SpringBoot整合
Netty與Spring Boot的整合 最近有朋友向我詢問一些Netty與SpringBoot整合的相關問題,這裡,我就總結了一下基本整合流程,也就是說,這篇文章 ,預設大家是對netty與Spring,SpringMVC的整合是沒有什麼問題的。現在,就進入正題吧。 Se
訊息中介軟體系列六,rabbit與spring整合實戰
本專案是rabbit和spring整合的實戰學習專案,模擬電商下單和庫存管理的過程,看過前面幾篇部落格的同學,相信這篇部落格對你不會再難了。一些和本章學習不太相關的內容不會做過多說明,需要的朋友可以下載原始碼自己檢視執行:rabbit與spring整合實戰原始
Docker入門實踐筆記(三)一篇文章搞懂Docker下安裝Redis,以及Redis與SpringBoot整合
@Configuration public class RedisConfig { /** * 注入 RedisConnectionFactory */ @Autowired RedisConnectionFactory redisConnectionFacto
tk-mybatis與springBoot整合使用兩個資料來源
根據專案功能需求,需要與第三方公共庫對接,需要對公共庫進行相關操作,由於不想使用原生jdbc,所以採用mybaits進行多資料配置。 單純的使用mybaits進行多資料配置網上資料很多,但由於前期為了方便開發,採用了tk-mybaits。關於tk-mybaits多資料來源配
RabbitMQ ——與SpringBoot整合並實現訊息確認機制
不囉嗦直接上程式碼 目錄結構如下: pom.xml <project xmlns="http://maven.apache.org/POM/4.0.0" xmlns:xsi="http://www.w3.org/2001/XMLSchema-instanc
redis叢集搭建並與springboot整合
redis叢集裡面的坑實在太多了,一步錯,步步錯,經過兩個不眠夜終於把這個坑給填上了,由於是在測試,所以以單機版叢集為例,下面就把搭建過程總結一下。 首先,有一個檔案大家必須要找好,就是redis-trib.rb,如圖: 大家網上自己找也好或者去這個地址下載夜行,需要一點資源分:https:
ActiveMQ訊息中介軟體 原理詳解 &&附demo實現、以及與springboot整合的demo
一、 訊息中介軟體概述1. 什麼是訊息中介軟體? 面向訊息的中介軟體(MessageOrlented MiddlewareMOM)較好的解決了以上問題。傳送者將訊息傳送給訊息伺服器, 訊息伺服器將消感
11、Logback日誌框架介紹和SpringBoot整合實戰 2節課
1、新日誌框架LogBack介紹 簡介:日誌介紹和新日誌框架Logback講解 1.常用處理java的日誌元件 slf4j,log4j,logback,common-logging 等 &
ElasticSearch與springboot整合
還是跟之前一樣,用gradle+springboot+ElasticSearchl來實現一個小例項 也有用到spring data 因為用到ElasticSearch,所以要安裝 啟動,linux下的安裝不做演示。window下啟動就是在bin資料夾下雙擊e
Swagger與SpringMVC整合(附原始碼!!!)
筆者是做系統開發的,主要工作內容是負責給apk端提供後臺介面。以前的時候每出一次版本都要整合一次介面文件,而且還時不時的給apk同事解說各個介面的作用和引數型別等。最近工作相對比較輕鬆,於是想做一個線上介面測試和生成介面文件的工具。百度後發現了swagger這個工具,看網上
Spring 與 Kafka整合實戰
首先下載解壓zookeeper,選擇合適的映象站點以加快下載速度。我們可以將zookeeper加到系統服務中, 增加一個/etc/init.d/zookeeper檔案。 cd /opt wget http://apache.fayea.com/apache-mirror/zookeeper/zookeep
swagger與springmvc整合異常記錄
這幾天在專案中加入swagger,專案用的是springmvc,spring用的4.1.1,和大家一樣,在網上找了個帖子,看了下步驟不復雜,就愉快的開始做了,但是,但是就是這樣華麗而順暢的入坑了,折騰好幾個小時,記錄下,希望能節省隊友時間。 問題一 描述:頁面提示Fail

