
自己第一個Android作品,Android計算器
寫此時為了記錄自己的開發歷程,方便以後的查詢。二則運算(能力有限,也沒有想往更深處寫),菜鳥級別,程式碼為參考慕課網上,聽課程式碼,並加上自己的理解和參考的一些部落格!有問題的地方歡迎指正,感激不盡!開發工具為Android studio。(第一次寫部落格,可讀性估計很差)

廢話不多說,程式碼輪上來(順序按慕課老師講解順序)
1.先是xml(UI吧)
效果圖:

xml裡面註釋不多,想必也不需太多解釋,都是很簡單佈局和控制元件。其中有個背景顏色的問題需要詳細說明<?xml version="1.0" encoding="utf-8"?> <LinearLayout xmlns:android="http://schemas.android.com/apk/res/android" xmlns:app="http://schemas.android.com/apk/res-auto" xmlns:tools="http://schemas.android.com/tools" android:layout_width="match_parent" android:layout_height="match_parent" android:orientation="vertical" android:paddingBottom="@dimen/activity_vertical_margin" android:paddingLeft="@dimen/activity_horizontal_margin" android:paddingRight="@dimen/activity_horizontal_margin" android:paddingTop="@dimen/activity_vertical_margin" app:layout_behavior="@string/appbar_scrolling_view_behavior" tools:context="com.sorgs.administrator.caclulatordemo.MainActivity" tools:showIn="@layout/activity_main" android:background="@color/bisque"> <EditText android:layout_width="fill_parent" android:layout_marginTop="20dp" android:layout_height="70dip" android:id="@+id/et_input" android:background="@color/white" android:editable="false" android:gravity="right|bottom" /> <LinearLayout android:layout_width="fill_parent" android:layout_height="wrap_content" android:layout_marginTop="20dp" android:orientation="horizontal" android:gravity="center_horizontal" > <Button android:layout_width="70dp" android:layout_height="70dp" android:text="C" android:paddingRight="10dp" android:paddingBottom="10dp" android:background="@drawable/white_select" android:textSize="20sp" android:gravity="right|bottom" android:id="@+id/btn_clear" /> <Button android:layout_width="70dp" android:layout_height="70dp" android:text="DEL" android:paddingRight="10dp" android:paddingBottom="10dp" android:background="@drawable/white_select" android:layout_marginLeft="10dp" android:textSize="20sp" android:gravity="right|bottom" android:id="@+id/btn_del" /> <Button android:layout_width="70dp" android:layout_height="70dp" android:text="÷" android:paddingRight="10dp" android:paddingBottom="10dp" android:background="@drawable/white_select" android:layout_marginLeft="10dp" android:textSize="20sp" android:gravity="right|bottom" android:id="@+id/btn_divide" /> <Button android:layout_width="70dp" android:layout_height="70dp" android:text="×" android:paddingRight="10dp" android:paddingBottom="10dp" android:background="@drawable/white_select" android:layout_marginLeft="10dp" android:textSize="20sp" android:gravity="right|bottom" android:id="@+id/btn_multiply" /> </LinearLayout> <LinearLayout android:layout_width="fill_parent" android:layout_height="wrap_content" android:layout_marginTop="10dp" android:orientation="horizontal" android:gravity="center_horizontal" > <Button android:layout_width="70dp" android:layout_height="70dp" android:text="7" android:paddingRight="10dp" android:paddingBottom="10dp" android:background="@drawable/white_select" android:textSize="20sp" android:gravity="right|bottom" android:id="@+id/btn_7" /> <Button android:layout_width="70dp" android:layout_height="70dp" android:text="8" android:paddingRight="10dp" android:paddingBottom="10dp" android:background="@drawable/white_select" android:layout_marginLeft="10dp" android:textSize="20sp" android:gravity="right|bottom" android:id="@+id/btn_8" /> <Button android:layout_width="70dp" android:layout_height="70dp" android:text="9" android:paddingRight="10dp" android:paddingBottom="10dp" android:background="@drawable/white_select" android:layout_marginLeft="10dp" android:textSize="20sp" android:gravity="right|bottom" android:id="@+id/btn_9" /> <Button android:layout_width="70dp" android:layout_height="70dp" android:text="-" android:paddingRight="10dp" android:paddingBottom="10dp" android:background="@drawable/white_select" android:layout_marginLeft="10dp" android:textSize="20sp" android:gravity="right|bottom" android:id="@+id/btn_minus" /> </LinearLayout> <LinearLayout android:layout_width="fill_parent" android:layout_height="wrap_content" android:layout_marginTop="10dp" android:orientation="horizontal" android:gravity="center_horizontal" > <Button android:layout_width="70dp" android:layout_height="70dp" android:text="4" android:paddingRight="10dp" android:paddingBottom="10dp" android:background="@drawable/white_select" android:textSize="20sp" android:gravity="right|bottom" android:id="@+id/btn_4" /> <Button android:layout_width="70dp" android:layout_height="70dp" android:text="5" android:paddingRight="10dp" android:paddingBottom="10dp" android:background="@drawable/white_select" android:layout_marginLeft="10dp" android:textSize="20sp" android:gravity="right|bottom" android:id="@+id/btn_5" /> <Button android:layout_width="70dp" android:layout_height="70dp" android:text="6" android:paddingRight="10dp" android:paddingBottom="10dp" android:background="@drawable/white_select" android:layout_marginLeft="10dp" android:textSize="20sp" android:gravity="right|bottom" android:id="@+id/btn_6" /> <Button android:layout_width="70dp" android:layout_height="70dp" android:text="+" android:paddingRight="10dp" android:paddingBottom="10dp" android:background="@drawable/white_select" android:layout_marginLeft="10dp" android:textSize="20sp" android:gravity="right|bottom" android:id="@+id/btn_plus" /> </LinearLayout> <LinearLayout android:layout_width="match_parent" android:layout_height="wrap_content" android:orientation="horizontal" android:gravity="center_horizontal" android:layout_marginTop="10dp"> <LinearLayout android:layout_width="wrap_content" android:layout_height="wrap_content" android:orientation="vertical"> <LinearLayout android:layout_width="match_parent" android:layout_height="wrap_content" android:orientation="horizontal"> <Button android:layout_width="70dp" android:layout_height="70dp" android:text="1" android:paddingRight="10dp" android:paddingBottom="10dp" android:background="@drawable/white_select" android:textSize="20sp" android:gravity="right|bottom" android:id="@+id/btn_1" /> <Button android:layout_width="70dp" android:layout_height="70dp" android:text="2" android:paddingRight="10dp" android:paddingBottom="10dp" android:background="@drawable/white_select" android:textSize="20sp" android:layout_marginLeft="10dp" android:gravity="right|bottom" android:id="@+id/btn_2" /> <Button android:layout_width="70dp" android:layout_height="70dp" android:text="3" android:paddingRight="10dp" android:paddingBottom="10dp" android:background="@drawable/white_select" android:textSize="20sp" android:gravity="right|bottom" android:layout_marginLeft="10dp" android:id="@+id/btn_3" /> </LinearLayout> <LinearLayout android:layout_width="match_parent" android:layout_height="wrap_content" android:orientation="horizontal" android:layout_marginTop="10dp"> <Button android:layout_width="150dp" android:layout_height="70dp" android:text="0" android:paddingRight="10dp" android:paddingBottom="10dp" android:background="@drawable/white_select" android:textSize="20sp" android:gravity="right|bottom" android:id="@+id/btn_0" /> <Button android:layout_width="70dp" android:layout_height="70dp" android:text="." android:paddingRight="10dp" android:paddingBottom="10dp" android:background="@drawable/white_select" android:textSize="20sp" android:layout_marginLeft="10dp" android:gravity="right|bottom" android:id="@+id/btn_point" /> </LinearLayout> </LinearLayout> <Button android:layout_width="70dp" android:layout_height="150dp" android:text="=" android:background="@drawable/orange_select" android:layout_marginLeft="10dp" android:paddingRight="10dp" android:paddingBottom="10dp" android:textSize="20sp" android:gravity="right|bottom" android:id="@+id/btn_equal"/> </LinearLayout> <TextView android:layout_width="wrap_content" android:layout_height="wrap_content" android:layout_gravity="bottom|center" android:editable="false" android:text="能力有限,只能進行二則運算——by sorgs" android:textSize="16dp" android:textColor="@color/black" android:layout_marginTop="30dp" android:background="@color/sandybrown" android:id="@+id/textureView" /> </LinearLayout >
1.首先我們需要一個在value/下新增一個colors.xml檔案用來存放我們需要的顏色
2.為了在方便我們佈局和顏色的搭配,也是在慕課老師那裡學了一招。可以在res/drawable下面建立xml。

我們來依次看看這些檔案都是怎麼做的。
(1).ashend_bg.xml(幾個_bg都是顏色不一樣,意義差不多)
目的是提供背景顏色,其實也可以不要顏色。直接在xml中新增顏色,這個主要是提供圓角
<?xml version="1.0" encoding="utf-8"?>
<shape xmlns:android="http://schemas.android.com/apk/res/android">
    <corners android:radius="5dp"/>
    <solid
        android:color="@color/beige"
        />
</shape>此處使用shape。(這裡有更加完美的解釋 http://www.cnblogs.com/cyanfei/archive/2012/07/27/2612023.html
(2).orange_select.xml(select也是顏色不一樣,內容差不多)
目的是為了按鈕提供顏色和點選時會有另外一種顏色
<span style="font-size:18px;"><?xml version="1.0" encoding="utf-8"?>
<selector xmlns:android="http://schemas.android.com/apk/res/android">
    <item android:drawable="@drawable/ashend_bg"
        android:state_pressed="true"/>
    <item android:drawable="@drawable/orange_bg"/>
</selector></span>2.然後是我們的Activity(程式碼都很簡單,認真學了java都不會看不懂,而且註釋很詳細。只有幾處需要解釋下下的)
package com.sorgs.administrator.caclulatordemo;
import android.app.Activity;
import android.os.Bundle;
import android.view.View;
import android.view.View.OnClickListener;
import android.widget.Button;
import android.widget.EditText;
import android.widget.Toast;
public class MainActivity extends Activity implements OnClickListener{
Button btn_0;//0數字按鈕
Button btn_1;//1數字按鈕
Button btn_2;//2數字按鈕
Button btn_3;//3數字按鈕
Button btn_4;//4數字按鈕
Button btn_5;//5數字按鈕
Button btn_6;//6數字按鈕
Button btn_7;//7數字按鈕
Button btn_8;//8數字按鈕
Button btn_9;//9數字按鈕
Button btn_point;//小數點按鈕
Button btn_clear;//清除按鈕
Button btn_del;//刪除按鈕
Button btn_plus;//加好按鈕
Button btn_minus;//減號按鈕
Button btn_divide;//除號按鈕
Button btn_multiply;//乘號按鈕
Button btn_equle;//等於按鈕
//以上建立按鈕
EditText et_input;//顯示輸出內容的顯示屏
boolean clear_flag;//清空標識,用於等號之後清空
@Override
protected void onCreate(Bundle savedInstanceState){
super.onCreate(savedInstanceState);
setContentView(R.layout.content_main);//控制xml為content_main
btn_0 = (Button) findViewById(R.id.btn_0);
btn_1 = (Button) findViewById(R.id.btn_1);
btn_2 = (Button) findViewById(R.id.btn_2);
btn_3 = (Button) findViewById(R.id.btn_3);
btn_4 = (Button) findViewById(R.id.btn_4);
btn_5 = (Button) findViewById(R.id.btn_5);
btn_6 = (Button) findViewById(R.id.btn_6);
btn_7 = (Button) findViewById(R.id.btn_7);
btn_8 = (Button) findViewById(R.id.btn_8);
btn_9 = (Button) findViewById(R.id.btn_9);
btn_point = (Button) findViewById(R.id.btn_point);
btn_del = (Button) findViewById(R.id.btn_del);
btn_plus = (Button) findViewById(R.id.btn_plus);
btn_clear = (Button) findViewById(R.id.btn_clear);
btn_minus = (Button) findViewById(R.id.btn_minus);
btn_multiply = (Button) findViewById(R.id.btn_multiply);
btn_divide = (Button) findViewById(R.id.btn_divide);
btn_equle = (Button) findViewById(R.id.btn_equal);
//以上是例項化按鈕
et_input = (EditText) findViewById(R.id.et_input);//例項化顯示屏
btn_0.setOnClickListener(this);
btn_1.setOnClickListener(this);
btn_2.setOnClickListener(this);
btn_3.setOnClickListener(this);
btn_4.setOnClickListener(this);
btn_5.setOnClickListener(this);
btn_6.setOnClickListener(this);
btn_7.setOnClickListener(this);
btn_8.setOnClickListener(this);
btn_9.setOnClickListener(this);
btn_point.setOnClickListener(this);
btn_del.setOnClickListener(this);
btn_plus.setOnClickListener(this);
btn_clear.setOnClickListener(this);
btn_minus.setOnClickListener(this);
btn_multiply.setOnClickListener(this);
btn_divide.setOnClickListener(this);
btn_equle.setOnClickListener(this);
//以上設定按鈕的點選事件
}
@Override
public void onClick(View v) {
String str = et_input.getText().toString(); //取出顯示屏內容
switch (v.getId()){ //判斷點的是那個按鈕
case R.id.btn_0: //建立數字0—9和.
case R.id.btn_1:
case R.id.btn_2:
case R.id.btn_3:
case R.id.btn_4:
case R.id.btn_5:
case R.id.btn_6:
case R.id.btn_7:
case R.id.btn_8:
case R.id.btn_9:
case R.id.btn_point:
if(clear_flag){ //
clear_flag =false;
str = ""; //計算下一個時候,應將原來的設定為空
et_input.setText("");
}
et_input.setText(str+((Button)v).getText()); //將點選的文字新增到輸入框裡面(str原來輸入框中內容)
break;
case R.id.btn_plus: //建立+-×÷
case R.id.btn_minus:
case R.id.btn_multiply:
case R.id.btn_divide:
if(clear_flag){
clear_flag =false;
str = ""; //計算下一個時候,應將原來的設定為空
et_input.setText("");
}
et_input.setText(str+" "+((Button)v).getText()+" ");//將點選的運算子新增到輸入框前後有“ ”用於區別
break;
case R.id.btn_del: //建立刪除
if(clear_flag){
clear_flag= false;
str = ""; //計算下一個時候,應將原來的設定為空
et_input.setText("");
}else if (str != null &&!str.equals("")) { //如果顯示屏裡面不是NULL也不是空
et_input.setText(str.substring(0,str.length()-1)); //從後面長度減一
}
break;
case R.id.btn_clear: //建立清除
clear_flag = false;
str = ""; //計算下一個時候,應將原來的設定為空
et_input.setText(""); //將顯示屏內容置空
break;
case R.id.btn_equal: //建立等於
getResult(); //獲取結算結果
break;
}
}
//進行計算
private void getResult(){
String exp = et_input.getText().toString(); //取出顯示屏內容並轉化為String
if (exp == null||exp.equals("")){//如果內容為null和空,直接返回
return;
}
if(!exp.contains(" ")){//如果不包含空格(運算子前面有空格),直接返回(比如點了數字,沒有運算子)
return;
}
if(clear_flag){
clear_flag = false;
return;
}
clear_flag = true;
double result = 0; //定義一個double的result=0
String s1 = exp.substring(0,exp.indexOf(' '));//擷取運算子前面的字元
String op = exp.substring(exp.indexOf(' ')+1,exp.indexOf(' ')+2);//擷取運算子
String s2 = exp.substring(exp.indexOf(' ')+3);//擷取運算子後面的字元
if(!s1.equals("")&&!s2.equals("")){ //如果S1或者S2不為空
double d1 = Double.parseDouble(s1); //強制將S1轉換為double型別
double d2 = Double.parseDouble(s2); //強制將S2轉換為double型別
if(op.equals("+")){ //如果op為四中情況的方案
result = d1+d2;
}else if(op.equals("-")){
result = d1-d2;
}else if(op.equals("×")){
result = d1*d2;
}else if(op.equals("÷")){
if(d2==0){
Toast.makeText(MainActivity.this, "除數不能為0!!!",Toast.LENGTH_LONG).show();
et_input.setText("0");
}else{
result = d1/d2;
}
}
if(!s1.contains(".")&&!s2.contains(".")&&!op.equals("÷")){ //如果沒有小數點則為int型別且op不為÷
int r = (int)result; //強制轉換為int型別
et_input.setText(r+"");
}else{ //其中含有小數點,則輸出double型別
et_input.setText(result+"");
}
}else if(!s1.equals("")&&s2.equals("")){ //S1不為空,S2為空
double d1 = Double.parseDouble(s1);
result = d1;
Toast.makeText(MainActivity.this, "不具備運算",Toast.LENGTH_LONG).show();
et_input.setText(result+""); //不進行計算,返回S1
}else if(s1.equals("")&&!s2.equals("")){ //S1為空,S2不為空
double d2 = Double.parseDouble(s2);
if(op.equals("+")){
result = 0+d2;
}else if(op.equals("-")){
result = 0-d2;
}else if(op.equals("×")){
result = 0;
}else if(op.equals("÷")){
result = 0;
}
if(!s2.contains(".")){
int r = (int)result;
et_input.setText(r+"");
}else{
et_input.setText(result+"");
}
}else{
et_input.setText("");
}
}
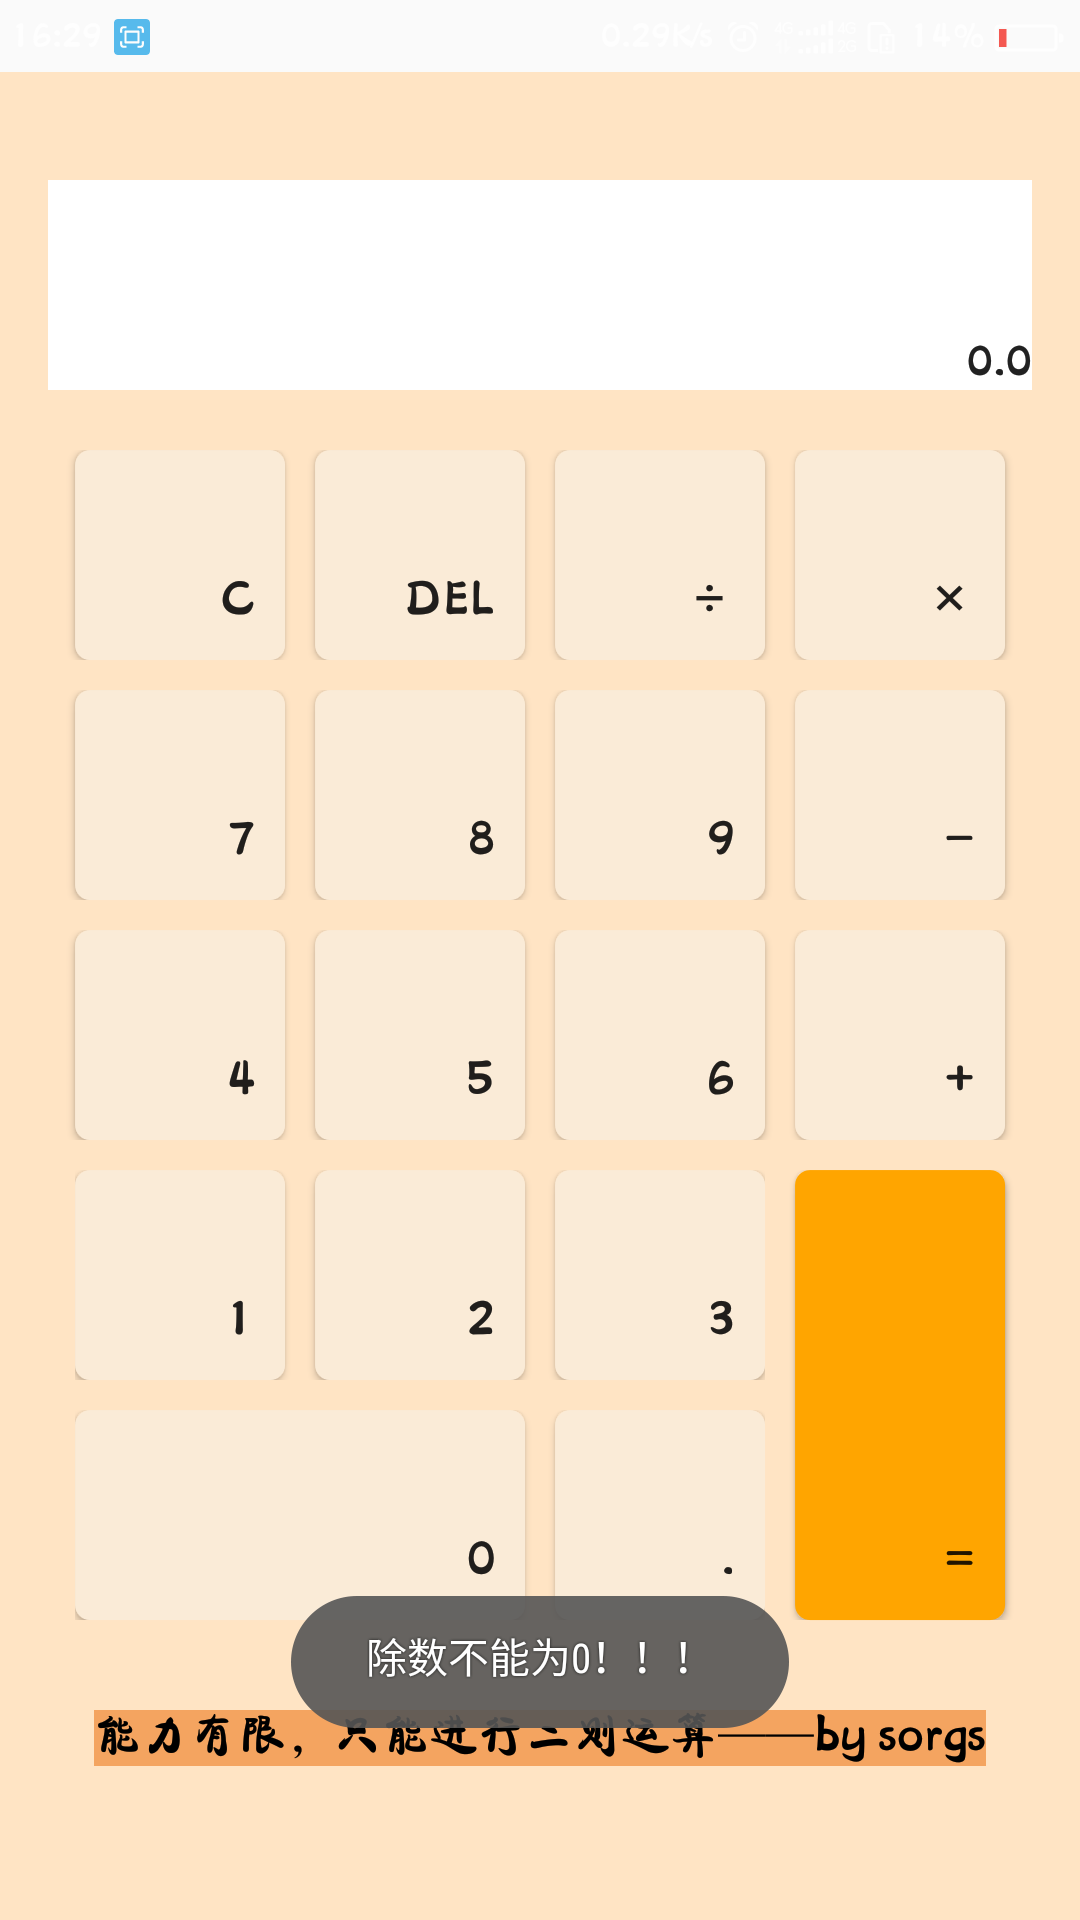
} Toast.makeText(MainActivity.this, "除數不能為0!!!",Toast.LENGTH_LONG).show();效果圖:
Toast.makeText的方法也不在贅述了,因為很多部落格都有寫(http://www.cnblogs.com/ycxyyzw/archive/2013/03/12/2955845.html)相關推薦
自己第一個Android作品,Android計算器
寫此時為了記錄自己的開發歷程,方便以後的查詢。二則運算(能力有限,也沒有想往更深處寫),菜鳥級別,程式碼為參考慕課網上,聽課程式碼,並加上自己的理解和參考的一些部落格!有問題的地方歡迎指正,感激不盡!開發工具為Android studio。(第一次寫部落格,可讀性估計很差)
iOS開發:第一個iOS程式,加法計算器
相信很多學習程式設計的人,不管是學習C,C++,JAVA,還是iOS開發用的Objective-C,入門不久就迫切地想寫點看得見的介面玩玩。當然瞭解諸如iOS架構,系統層次這些是非常必要的,但是作為入門案例,我們不妨從最直觀的地方入手!! 下面開始編寫我們的第一個iOS程式: 1.使用的
當年第一個Java作品,Java坦克大戰,寫於2016年2月9日,放著給初學者~
圖片 備註:當年初學的時候寫的,很多寫得不好,見諒~haha 給初學者看看咯,要是覺得不好也不要噴。 Main.java /** * @author Notzuonotdied * @version1.0 起始時間:2016年
初次安裝Android studio,並建立自己第一個hello world!
Window10+64位+Android studio2.2.2版本,具體教程網上搜索的,由於是去年安裝的軟體,所以已經找不到連結地址。可以自行搜尋。hello world建立很簡單,可網上任意找一版本學習即可。自己用的真機執行。模擬機好久都是黑屏,不顯示。具體原因網上很多,
第3章、第一個“Hello,world!”之Android App(從零開始學Android)
幾乎所有中、英、法、德、美等版本的程式設計教材中,“hello,world!”程式總是作為開篇之作,可謂經典之中的經典!我本打算用“Hello,android!”替代它,但網上有240種語言都在寫這個“Hello,world!“,所以我想想之後,還是保留吧! 良好的
第一個JAVA程序,Hello World
hello world 第一個 第一部分 JDK的安裝 JAVA_HOME的配置 PATH 配置 bin ClassPath配置 第二部分 第三部分附: java 註釋 /**/ //本文出自 “13089009” 博客,請務必保留此出處http:/
2。創建第一個angular應用,已經開發前的一些配置
規範 編輯 com alt 基本 web ebs local 新的 現在我們開始新建一個angular5的腳手架 。 到想要建項目的目錄下。比如我的 在 D:\JsProjects 進入cmd或者powershell cd 進入該文件夾下 然後開始新建,ng
08 集合[11,22,33,44,55,66,77,88,99],將所有<66的值保存至字典的第一個key中,將所有>=66的值保存至字典的第二個key中。即:{'k1':<66的所有值,'k2':>=66的所有值}
pen nbsp print bsp [] dict 集合 key app li = [11,22,33,44,55,66,77,88,99]dict = {‘k1‘:[],‘k2‘:[]}for i in li: if i < 66: dict[
Python中自己寫一個計時器,計算一個過程所需秒數
import time import sys import numpy as np i = np.arange(1, 5000) def k_timer(bool_start_end, start_time): if bool_start_end: return tim
第一個Hibernate示例,使用Maven來管理jar包
注意:不同版本好像會有點不一樣,特別是在後續跟spring整合時要注意版本問題。這裡用的是Hibernate 3 版本的。。。 1.SQL指令碼 //SQL指令碼 CREATE TABLE USER ( USER_ID INT PRIMARY KEY AUTO_IN
C++ 第一個demo練習,map會排序
定義簡單結構體Plane 獲取控制檯輸入的內容 new一個Plane存入map。 將map裡所有的Plane的name輸出 typedef struct { string name; int id; double longtitude; double latitude; doubl
第一個AndroidStudio外掛,一鍵建立Activity
前言 之前寫過一個建立Activity的Gradle外掛CreateActivityPlugin,但是使用起來並非像使用AndroidStudio自帶的功能new Activity一樣方便。 而且我也做了一些思考,覺得建立Activity這個過程,其實和Grad
使用postman傳送第一個api請求,可以使用這個api進行測試!!
使用postman傳送第一個api請求? https://www.v2ex.com/p/7v9TEc53 v2ex是個論壇,技術人員經常會去看的一個論壇 是一個彙集各類奇妙好玩的話題和流行動向的網站。V2EX 提供了特別有用的小工具 [ ZEN ],幫助你掌握自己的時
如何寫第一個Python程式,30萬年薪Python工程師經驗之談
在正式編寫第一個Python程式前,我們先複習一下什麼是命令列模式和Python互動模式。 命令列模式 在Windows開始選單選擇“命令提示符”,就進入到命令列模式,它的提示符類似C:>: ┌───────────────────────────────
建立第一個fabric網路,合約部署
以下文章中以$ 開頭的皆是終端命令。以下終端命令不報錯,出現ERROR就繼續。 $ cd cd first-network 1、關閉相關網路服務 $ ./byfn.sh -m down ,輸入y繼續。不用關Warin
JavaScript封裝自己的一個彈窗,是雙按鈕的,比較簡單一些 ,其中引用了jQuery來寫的方法,最後暴露出去,有更好的建議歡迎評論 。。。。
$(function(){ // 設定自執行函式 (function(jQuery){ // 定義建構函式 var Popup = function (title,text,fn) { this.title = title || '
USTCOJ程式碼檢視功能的實現(我的第一個Chrome外掛,UstcOjSourceView)
因工作需要,會不時的在USTCOJ上產看程式原始碼。檢視原始碼的流程通常是這樣的: 1,根據指定題號、賬號,或許相關的RunID。 3,在如下所示的輸入框中輸入RunID號,點選View按鈕檢視程式碼。 (圖片一) 採用這種方式檢視原始碼是相當痛苦的,因為judge.p
我的第一個requirejs例子,簡單的demo
看介紹是很簡單的,但是我做這個簡單的demo,過程還是很曲折的。引進jquery,老是沒引到,後來加上shim好了,再後來,去掉shim也是好的,我崩潰了。。。 二話不說上程式碼,給初學者看看。因為我在網上沒找到一個完整的程式碼。要是有一個簡單的demo就好了
第一個Jsp程式,Hello World
1、安裝Tomcat伺服器,具體參考這裡 2、開啟Tomcat安裝目錄,開啟webapps目錄,在裡面新建一個專案資料夾,比如myHome,然後在myHome裡新建一個index.jsp和WEB-INF資料夾 3、在index.jsp新增如下程式碼 &
C#中關閉第一個Form視窗,開啟另一個新視窗方法
C#程式設計時,經常會遇到處理兩個或多個視窗的問題。以登入視窗為例,當登入視窗登入驗證成功後,要進入主視窗,此時需要關閉登入視窗,這時候用this.close()是不可以的。因為Program.cs中 static void Main() { App