Never use an absolute path to your APIs again
Recent advances in web apps architecture showed that decoupled frontend provides more flexibility for development and operations:
- Lets you work on one end without depending on the other
- Lets you build and deploy separately
- Makes it easy to use different tools on each end


Problem
When an app is developed with this architecture in mind, frontend needs to communicate to backend via APIs, generally REST. It often occurs that the URL/port of the backend server differs from the frontend’s one (given separate deployment paths). For example, the URL to the frontend app is https://www.appfocused.com
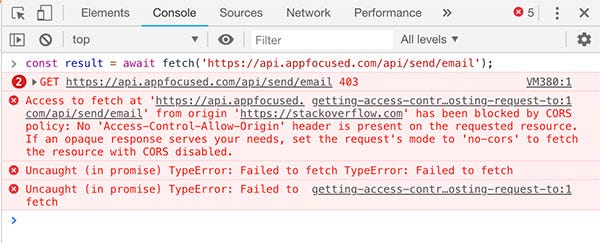
If we try to make an HTTP request from the frontend app to the backend server, it will fail as it violates Same Origin Policy. In Chrome’s console it will look like this:


Browsers, for security reasons, restrict requests which are not from the same origin. This prevents attackers from injecting code into our app and stealing our sensitive information. Browsers append header on cross-origin requests to let the server know of a potential threat. The server then has the authority to either allow or reject these origins by providing specific response headers which are parsed by the browsers.
There are 2 solutions to fix this small problem:
- Hardcode absolute API URLs on the client and configure CORS headers on the server
- Use relative API URLs on the client and use a reverse-proxy approach
In this post, I will talk about why the former approach with CORS headers should be considered an anti-pattern for production-ready code and how to configure the reverse-proxy approach on various setups:
- local devserver
- web server / app server
- serverless (Cloudfront / S3 / Lambda)
Rationale
CORS headers scenario sounds like less pain to implement (and it is). However, there are a few concerns to consider that made me preach for the reverse proxy approach under almost any circumstances.
First and foremost, the backend might not be owned by you and it might be impossible to make the change to the CORS headers.
If you are lucky enough to control the backend and can configure CORS headers, for multiple web clients accessing the API server you will need to maintain a whitelist in order to give them access. Of course, wildcard is also an option, but it would be unreasonable to whitelist all the origins by setting access-control-allow-origin to * unless it is a public server.
Another common pattern, during development, is to run our UI application at localhost:$port , but whitelisting localhost to facilitate API calls is an anti-pattern and should be avoided for security reasons.
Last but not least, I like my build to conform to Build Once, Deploy Many principle. It is one of the fundamental principles of Continuous Delivery. Binary (in our case static files for the web client) is built only once and subsequent deployments, testing and releases should never attempt to build the binary artifacts again, instead reusing the already built binary.
Practically that means that hardcoded absolute URLs like https://api.appfocused.com/email/send in our client code will stop us from having a single artifact, because on development environment I want my web client to hit, say, https://api-dev.appfocused.com/email/send. “Never hardcode an absolute API URL in your client code” - became a powerful mantra for me and helped me to overcome some challenges on the way.
Solution
Relative URL /email/send can solve it once and for all on the client, making “Build Once, Deploy Many” possible. It is proxy’s work to orchestrate the request further. It also deals with the restrictions imposed by the browser. The proxy server, in this case, takes the onus of handling our requests, responses, and making the modifications necessary to facilitate cross-origin communication.
Reverse proxy with webpack-devserver
When you are developing on your local machine you want the same treatment for your API as on other environments. Webpack can be configured to proxy requests.
module.exports = {
  //...
  devServer: {
    proxy: {
      '/api': 'http://localhost:9000'
    }
  }
};
webpack.config.js
A request from client to relative path /api/users will now proxy the request to http://localhost:9000/api/users. Please check webpack documentation if you want to configure URL rewrite scenarios or add secure protocol.
Proxy can also be configured for projects built on Webpack like create-react-app or Gatsby.
Reverse proxy with NGINX
NGINX is a common component in production environment architecture and has a number of advanced load balancing, security, and acceleration features that most specialized applications lack. Using NGINX as a reverse proxy enables you to add these features to any application.
The simplest reverse proxy config on NGINX will look like this
server {
  listen 80;
  listen [::]:80;
server_name appfocused.com; location /api {
proxy_pass http://api.appfocused.com/;
}
}/etc/nginx/conf.d/app.conf
The proxy_pass directive is what makes this configuration a reverse proxy. It specifies that all requests which match the location block (in this case /api path) should be forwarded to http://api.appfocused.com, where our backend is running.
Check the full doc for some more elaborate scenarios.
Reverse proxy with serverless
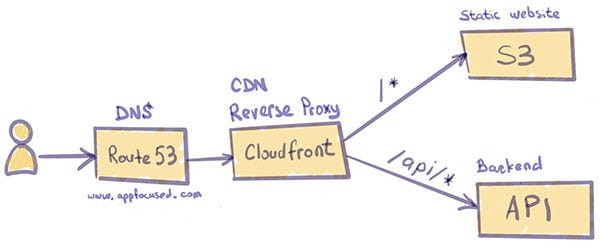
We will look at AWS platform for serverless scenario. In one of my previous posts I explained how we use serverless architecture to host our website. AWS Cloudfront is playing one of the key roles in it acting as CDN and providing security at the edge for our static files stored on S3.
The first API that we had to integrate into this setup was a contact form. The brief for implementation was the following:
When client posts tohttps://www.appfocused.com/api/send/email, under the covers request needs to be routed tohttps://api.appfocused.com/api/send/emailwhere our backend API is deployed in the form of Lambda function.
It turns out that CloudFront supports multiple origin servers, and uses path patterns to determine which origin server to forward requests to. Multiple independent servers, even systems that aren’t inside AWS, can all “own” one or more paths under a single hostname, with one of them being the default and owning all the paths not explicitly configured.
The concept is very similar to reverse proxies in Nginx or Apache, but the request routing is done by CloudFront, which connects to the appropriate back-end, sends the request, and returns (and possibly caches) the response. It does not redirect the request, so the URL address never changes for the consumer.
Cloudfront configuration
Configure a new CloudFront distribution. Use the main site’s hostname (e.g. www.appfocused.com) as the origin. Configure the site’s domain name as an alternate domain name in CloudFront.
Next, add a second origin, with the destination being the hostname where the WP deployment can be reached. Create a behavior with a path pattern that matches /blog* and uses the second origin.
Our existing Cloudfront distribution was setup to point to our static S3 bucket content generated by the great Gatsby. Remember to not use autosuggestion from AWS when creating a new distribution with integration to S3. Manually enter website endpoints similar to this format ).
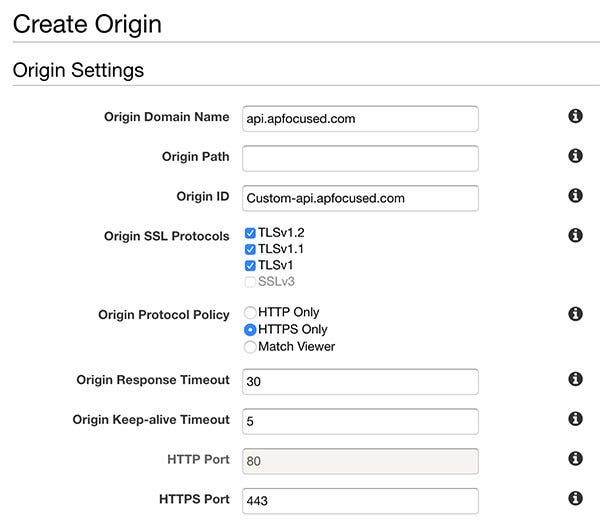
Next we’ll add our second origin to serve REST requests from API Gateway. From the ”Origins” tab select ”Create Origin”. Enter the domain name and leave origin path empty, make sure to select “HTTPS only” for ”Origin Protocol Policy“.


Next go to the ”Behaviors” tab and click ”Create Behavior” to configure the path.


For ”Path Pattern” we’ll use api/* which will catch any request starting with /api such as
In the ”Origin” dropdown select the Origin we just created. This will ensure that the request will be routed to
For ”Viewer Protocol Policy” select HTTPS only.
For ”Allowed HTTP methods” select GET, HEAD, OPTIONS, PUT, POST, PATCH, DELETE
For ”Cache Based on Selected Request Headers” select “Whitelist” and add required headers. We need to do this to prevent the Host Header from being passed through to the origin.
For ”Object Caching” select “Use Origin Cache Headers”.
For ”Forward Cookies” select “All”.
For ”Compress Objects Automatically” select “Yes” (this will gzip responses).
CloudFront forwards very few headers to the origin by default. You can configure it to forward what you need, but every header you forward will reduce your cache hit ratio. Personally I’m passing through “Referer”, “Accept”, “Content-Type” and “Authorization”.
There are some caveats though to the serveless proxy on AWS. CloudFront won’t strip paths.
If request is sent to https://www.appfocused.com/api/* it will be routed to https://api.appfocused.comwith /api prefix, not to the root of the site.
This can become an issue if you don’t own backend APIs or for some reasons they cannot be changed. If that’s the case, [email protected] comes to the rescue. This service allows you to rewrite paths on the fly, as requests are processed. To configure [email protected] go to Cloudfront Behaviour item and choose “Lambda Function Associations”.
Conclusion
By implementing reverse proxy across environments we achieve:
- Secure client-server communication
identity of your backend servers remains unknown (useful in case of DDoS attacks) - Build Once, Deploy Many
with relative paths to APIs you can build once, deploy the same artifact to multiple environments - Same Origin
CORS headers configuration on the server is not required
My personal advice is — never hardcode absolute paths to your APIs again, unless it is a prototype. Spend a bit more time to configure a reverse proxy layer to make it right.
相關推薦
Never use an absolute path to your APIs again
Recent advances in web apps architecture showed that decoupled frontend provides more flexibility for development and operations:Lets you work on one end w
ionic3 自定義外掛安裝失敗問題解決 Error: Failed to get absolute path to installed module
問題闡述 在開發自定義外掛時可能會出現多次安裝外掛的情況,如果不幸的話可能會出現如下報錯: Error: Failed to get absolute path to installed module [ERROR] An error occurred
解決ROR 1064 (42000): You have an error in your SQL syntax; check the manual that corresponds to your MySQL server version for the right syntax to use n
之前一直用的好好的,突然就出現了這個錯誤: ERROR 1064 (42000): You have an error in your SQL syntax; check the manual that corresponds to your MySQL server version for the rig
1064 - You have an error in your SQL syntax; check the manual that corresponds to your MySQL server version for the right syntax to use near 'grou
mysql8.0版本 在已存在的表裡插入一條資料 insert INTO api_user(id,username,email,groups)VALUES('1','hh','[email protected]','Boss'); 執行報錯:1064 - You have an e
myBatis查詢報錯 You have an error in your SQL syntax; check the manual that corresponds to your MySQL server version for the right syntax to use near
myBatis查詢報錯 You have an error in your SQL syntax; check the manual that corresponds to your MySQL server version for the right syntax to use near
關於check the manual that corresponds to your MySQL server version for the right syntax to use near
mysql今天在更新表的時候一直提示check the manual that corresponds to your MySQL server version for the right syntax to use near問題排查很久,數據庫版本沒有問題,語法也沒有問題,卻一直報錯最後排查發現是關鍵詞沖突
Error Code : 1064 You have an error in your SQL syntax; check the manual that corresponds to your My
轉自:https://blog.csdn.net/haha_66666/article/details/78444457 Query : select * from order LIMIT 0, 1000 Error Code : 1064 You have an error in your
linux mysql----You have an error in your SQL syntax; check the manual that corresponds to your MySQL
Mysql 語句毛病 (1064, "You have an error in your SQL syntax; check the manual that corresponds to your MySQL server version for the right syntax to use
You have an error in your SQL syntax; check the manual that corresponds to your MySQL server
You have an error in your SQL syntax; check the manual that corresponds to your MySQL server version for the right syntax to use near MyBatis中踩到
How to Use an Ethernet Switch?
For many household use, it is common to see just a modem and a router. That’s enough for most family network requirements. However, if you have too ma
check the manual that corresponds to your MySQL server version for the right syntax to use near ###
報錯如下: pymysql.err.ProgrammingError: (1064, "You have an error in your SQL syntax; check the manual that corresponds to your MySQL server version
凜冬之翼---You have an error in your SQL syntax; check the manual that corresponds to your
今天在寫網頁與資料庫互動的程式碼的時候遇到了一個問題You have an error in your SQL syntax; check the manual that corresponds to your 問題分析:從英文翻譯過來的字面上意思是你的資料庫MySQL出現問題,也就是M
mysql建立資料庫報錯You have an error in your SQL syntax; check the manual that corresponds to your MySQL se
在使用xshell遠端連線我的伺服器時想建立一個數據庫 結果執行不對,sql語句如下 mysql> create database 'wechatmall'; 結果出現mysql報錯,這個提示很明顯是sql語句有問題 You have an e
Add an awesome glitch effect to your webpage elements
Where to next? ?In this I glitched the background image, you can go further by applying the glitch to your favorite elements of your web-page. What about d
Ask HN: An employee at a competitor signs up to your site. What do you do?
Just keep moving. Worry about releasing your features and being a better solution not that they are looking at what you already have done.I had a mentor t
Ask HN: How to break out the loop of being an employee to your own business?
I'm doing exactly that right now. Hired for a decent salary - but quiting.I don't know what ill be doing in 6 months. I don't have a financial buffer. This
:“You have an error in your SQL syntax; check the manual that corresponds to your MySQL server versi
今天用C#連線資料庫的時候,想把欄位名改成中文,結果就報這個錯誤了,:“You have an error in your SQL syntax; check the manual that corresponds to your MySQL server version for the
check the manual that corresponds to your MySQL server version for the right syntax to use near 'TYP
建立QUARTZ表時出現如下的問題 CREATE TABLE QRTZ_JOB_DETAILS( JOB_NAME VARCHAR(80) NOT NULL, JOB_GROUP VARCHAR(80) NOT NULL, DESCRIPTION VAR
You have an error in your SQL syntax; check the manual that corresponds to your MySQL server versio
Caused by: com.mysql.jdbc.exceptions.jdbc4.MySQLSyntaxErrorException: You have an error in your SQL syntax; check the manual that corresponds to you
Configure a Load Balancer in an Elastic Beanstalk Environment to Use an SSL Certificate
Before you configure your Elastic Beanstalk environment to use HTTPS, you need an SSL certificate. AWS Elastic Beanstalk is integrated with AWS
