伺服器檔案自動備份工具
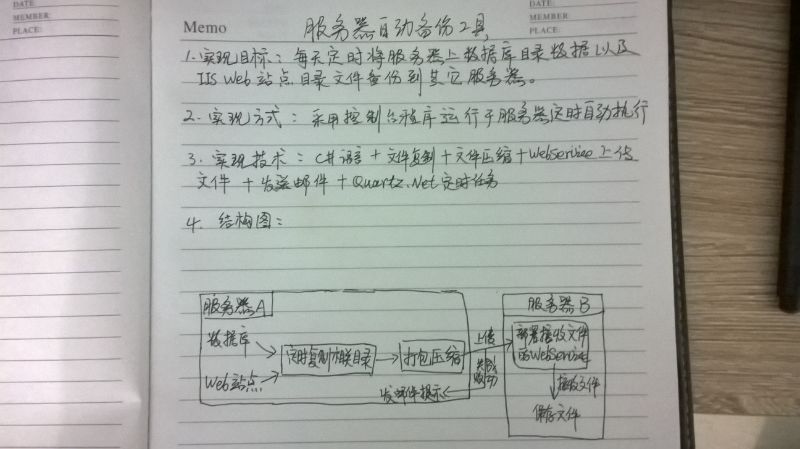
網站經常需要定期備份檔案,天天折騰累死人 ,索性寫了個自動備份 的工具,讓它執行在伺服器上,每天凌晨自動將需要備份的資料打包成壓縮檔案並傳到另外的伺服器。
1、定時執行任務,用到開源框架Quartz.net
使用方法:
引用Quartz.dll
IScheduler scheduler = StdSchedulerFactory.GetDefaultScheduler();
scheduler.Start();
IJobDetail job = JobBuilder.Create<HelloJob>()
.WithIdentity 其中 runtime 變數是 定義執行的時間:
<add key="runtime" value="0 3 19 * * ?"/>
說明: 0 3 19 分別為 秒,分,時
其中的 HelloJob 是需要實現IJob介面的類,在其中寫備份檔案的一系列方法。
class HelloJob : IJob
{
    public void Execute(IJobExecutionContext context)
    {
//…這裡寫實現的方法
}
}
2、實現檔案的備份
整個過程包括:檔案複製、壓縮檔案、上傳壓縮檔案到制定伺服器、傳送通知郵件
直接複製資料夾:
static bool DirectoryCopy(string sourceDir, string targetDir)
{
bool back = false;
if (Directory.Exists(sourceDir) && Directory.Exists(targetDir))
{
string 對複製產生的新檔案目錄進行打包(不能對原使用中的檔案進行打包操作,因為被佔用的資源在打包時會出錯)
打包技術採用 SharpZipLib元件
打包壓縮檔案方法類:
引用 ICSharpCode.SharpZipLib.dll
    /// <summary>
    /// ZipFloClass 的摘要說明
    /// </summary>
    public class ZipFloClass
    {
        public void ZipFile(string strFile, string strZip)
        {
            if (strFile[strFile.Length - 1] != Path.DirectorySeparatorChar)
                strFile += Path.DirectorySeparatorChar;
            ZipOutputStream s = new ZipOutputStream(File.Create(strZip));
            s.SetLevel(6); // 0 - store only to 9 - means best compression
            zip(strFile, s, strFile);
            s.Finish();
            s.Close();
        }


        private void zip(string strFile, ZipOutputStream s, string staticFile)
        {
            if (strFile[strFile.Length - 1] != Path.DirectorySeparatorChar) strFile += Path.DirectorySeparatorChar;
            Crc32 crc = new Crc32();
            string[] filenames = Directory.GetFileSystemEntries(strFile);
            foreach (string file in filenames)
            {

                if (Directory.Exists(file))
                {
                    zip(file, s, staticFile);
                }

                else // 否則直接壓縮檔案
                {
                    //開啟壓縮檔案
                    FileStream fs = File.OpenRead(file);

                    byte[] buffer = new byte[fs.Length];
                    fs.Read(buffer, 0, buffer.Length);
                    string tempfile = file.Substring(staticFile.LastIndexOf("\\") + 1);
                    ZipEntry entry = new ZipEntry(tempfile);

                    entry.DateTime = DateTime.Now;
                    entry.Size = fs.Length;
                    fs.Close();
                    crc.Reset();
                    crc.Update(buffer);
                    entry.Crc = crc.Value;
                    s.PutNextEntry(entry);

                    s.Write(buffer, 0, buffer.Length);
                }
            }
        }

    }
外層呼叫上面類裡面方法進行壓縮檔案
        static bool yasuoFile(string yasuoPath, string savePath, string name)
        {

            bool back = false;
            string[] FileProperties = new string[2];

            FileProperties[0] = yasuoPath;//待壓縮檔案目錄
            FileProperties[1] = savePath + name+ ".zip";  //壓縮後的目標檔案
            ZipFloClass Zc = new ZipFloClass();

            Zc.ZipFile(FileProperties[0], FileProperties[1]);

            back = true;

            return back;
        }
上傳檔案
上傳檔案客戶端:
        /// <summary>
        /// 上傳檔案 到 WebService介面
        /// </summary>
        /// <param name="path"></param>
        static string uploadfile(string path)
        {
            try {

            webservice.WebServiceSoapClient upload = new webservice.WebServiceSoapClient();

            byte[] b = GetBytesByPath(path);
            string name = Path.GetFileName(path);
            string back = upload.SaveFile(b, name);
            return back;

            }
            catch(Exception ex){
                return "上傳資料失敗!"+ex.ToString();
            }

        }
檔案接收端WebService:
        [WebMethod]
        public string SaveFile(byte [] file,string filename)
        {
            string back = "";
            string FileDir =Server.MapPath( System.Configuration.ConfigurationManager.AppSettings["FileDir"] ) + filename;
            try {

                FileStream fs = new FileStream(FileDir,FileMode.OpenOrCreate,FileAccess.Write);
                fs.Write(file, 0, file.Length);
                fs.Close();
                back = "1";
            }
            catch(Exception ex){
                back = ex.ToString();
            }

            return back;
        }
注意:配置檔案中配置上傳檔案大小
<httpRuntime executionTimeout="300" maxRequestLength="40960" useFullyQualifiedRedirectUrl="false"/>傳送郵件方法:
        static bool SendEmailAction(string Subject, string ToWho, string SendContent, string mailServer, int mailSerPort, string myAccount, string myPwd)
        {
            try
            {

                MailMessage myMail = new MailMessage();
                myMail.From = new MailAddress(myAccount);
                myMail.To.Add(new MailAddress(ToWho));
                myMail.Subject = Subject;
                myMail.SubjectEncoding = Encoding.UTF8;
                myMail.Body = SendContent;
                myMail.BodyEncoding = Encoding.UTF8;
                myMail.IsBodyHtml = true;
                SmtpClient smtp = new SmtpClient();
                smtp.Host = mailServer;
                smtp.Port = mailSerPort;

                //smtp.UseDefaultCredentials = true;
                smtp.Credentials = new NetworkCredential(myAccount, myPwd);
                smtp.EnableSsl = true; //要求SSL連線
                smtp.DeliveryMethod = SmtpDeliveryMethod.Network; //Gmail的傳送方式是通過網路的方式,需要指定
                smtp.Send(myMail);
            }
            catch (Exception ex)
            {
                return false;
            }

            return true;
        }
至此,關鍵的程式碼完成,拼湊去吧!!需要備份工具的可以聯絡我!
相關推薦
伺服器檔案自動備份工具
網站經常需要定期備份檔案,天天折騰累死人 ,索性寫了個自動備份 的工具,讓它執行在伺服器上,每天凌晨自動將需要備份的資料打包成壓縮檔案並傳到另外的伺服器。 1、定時執行任務,用到開源框架Quartz.net 使用方法: 引用Quartz.dll
伺服器檔案自動打包備份到電腦,可以通過flashfxp及電腦的計劃任務實現
利用flashfxp的佇列功能.及電腦的計劃任務功能.實現自動下載遠端伺服器上的檔案到本地. 假如,我們要把檔案下載到D:\phpStudy\WWW\auto_beifen 1、首先開啟flashfxp,連線遠端伺服器,然後選擇遠端,以及本地的,將要下載的資料夾或檔案,
技本功丨web伺服器日誌自動解析工具不是唯一的工具,但卻承包了我最深沉的愛!
曾經有個web伺服器日誌自動解析工具擺在我面前,我沒有珍惜。等我失去的時候我才追悔莫及,人世間最痛苦的事莫過於此。 事情就是這樣發生的—— 當前web伺服器的多樣化使得訪問日誌的資料清洗變得越來越複雜,企業需要投入專業的資料清洗人員編寫資料清洗規則(解析規則或者解析正則),或者需要關心
Maven庫中.lastUpdated檔案自動清除工具
最近開發過程中,在更新maven庫時,如果網路問不定或者是一些自己手動安裝到本地maven庫的jar包,在中心庫找不到對應的jar,會生成一些.lastUpdated檔案,會導致m2e工具無法找到依賴的jar包,從而提示編譯錯誤。 對於該問題,
伺服器定時自動備份MySQL資料庫
本文記錄了伺服器資料庫備份、壓縮、加密、傳送記錄郵件的一套流程。 需求:伺服器的資料庫自動在增長,但是難保某個時候發生意外導致資料庫崩潰。所以需要做定時備份。 使用要點:利用MySQL中提供的mysqldump功能匯出資料庫,利用gzip進行壓縮,利用gpg進行對稱
用批處理檔案自動備份檔案及資料夾,並自動刪除n天前的檔案_DOS/BAT
下是備份的批處理,新增到”計劃任務”中,設定時間自動執行 程式碼如下: @echo off rem 格式化日期 rem date出來的日期是"2006-02-22 星期三",不能直接拿來使用,所以應該先格式化一下 rem 變成我們想要的。date
檔案自動備份和同步bypy和syncthing
Linux定時備份資料到百度雲盤sudo pip3 install requestssudo pip3 install bypy備份指令碼示例#!/bin/sh# File: ~/bysync.sh# Author: pipi# Email: [email
帳套自動備份工具
我按這樣如下所示設定了自動備份, 今天一天故意讓備份工具備份了兩次,結果如下 因為後面的備份並不會覆蓋前面的備份,而是在這個資料夾裡直接新增,那麼這個資料夾要是哪一天非常龐大,把整個磁碟空間佔用滿了,那怎麼辦?會出現什麼情況? 答案:當客戶需要固定的我是說客戶需要
Linux系統下的檔案自動備份到Windows系統
Linux系統下的檔案自動備份到Windows下 1 linux伺服器上安裝ftp服務端軟體 #wget http://mirror.centos.org/centos-6/6.3/os/x86_64/Packages/vsftpd-2.2.2-11.el6.x86_64.
WINDOWS 伺服器下自動備份oracle資料庫
一、window下自動備份資料庫的步驟 1、建立自動備份資料庫bat檔案 2、在window下建立定時器任務,定時執行1中的bat檔案 二、自動備份資料庫bat檔案 1、建立備份檔案及日誌檔案的資料夾(路徑) 建立資料夾的命令:md <路徑名> 因為是在bat檔
linux自動備份檔案 並上傳到遠端伺服器 指令碼實現
(1)在伺服器上建立備份目錄,並賦予許可權 mkdir -p /backup/bakdata #新建資料備份目錄 (2)完成備份指令碼操作 新建指令碼檔案 vi bakdata.sh 新增以下內容: #!/bin/sh dateTime=`dat
有關SQL 資料庫自動備份,ftp 定期執行自動上傳bak檔案到遠端伺服器記錄
2017年病毒爆發嚴重,我們公司幾個外建專案都受到了不同程度的攻擊,最為嚴重的是其中一個系統的應用伺服器和資料庫伺服器都被攻陷,所有的檔案系統不可使用,導致系統崩潰並無法恢復; 系統設計:應用伺服器和資料庫伺服器使用雙機互備,定期備份系統的資料庫檔案;一般能應付其中一臺
MySQL學習筆記(七)使用AutoMySQLBackup工具自動備份MySQL資料庫
首先到官網檢視開源軟體AutoMySQLBackup下載地址。 2 輸入“cd /tmp”切換到/tm
【MyBatis Generator】程式碼自動生成工具 generatorConfig.xml配置檔案詳解
MyBatis Generator官網地址:http://www.mybatis.org/generator/index.html MyBaris Generator中文地址:http://mbg.cndocs.ml/ 在MBG中,最主要也最重要的,就是generatorConfig.xml
用WinRAR自動備份檔案
my_bak.bat檔案: @echo off set RARCMD=c:/progra~1/winrar/winrar.exe a -ep1 -m0 -ag /r /k /s /ibck set files=D:/backup/rar if not exist "D
PostgreSQL 自動備份,並刪除10天前的備份檔案的windows指令碼
第一步,建立指令碼,命名back.bat檔案 @ECHO OFF @setlocal enableextensions @cd /d "%~dp0" set PGPASSWORD=password SET PGPATH=D:\postgresql\bin\ SET
自動備份firefox 配置檔案到本地
原理: 通過git和windows計劃任務每天備份本地gogs伺服器 配置路徑,在firefox中輸出about:support可開啟配置資料夾 C:\Users\xxx\AppData\Roaming\Mozilla\Firefox\Profiles\3rh6
Shell程式檔案上傳以及自動備份部署指令碼
DMZ機器程式檔案上傳到伺服器指定目錄指令碼 #!/bin/bash #author Pine Chown #任務分發指令碼 #2017-08-25 instance1=gcharging1-inside deploy_file=gcharging.zip TIME=`date +%F
Python實現騰訊雲CDB備份檔案自動上傳到COS
一、背景 需求:目前遇到的客戶需求為將騰訊雲CDB備份檔案自動上傳到騰訊雲COS內,在此拋磚引玉,還有很多類似的需求均可以採用此類方法解決,線下IDC資料檔案備份至雲端COS內,或根據檔案下載地址url將檔案上傳至COS內。 思路:首先獲取到CDB的備份下載u
TypeScript 型別定義檔案(*.d.ts)自動生成工具
在開發ts時,有時會遇到沒有d.ts檔案的庫,同時在老專案遷移到ts專案時也會遇到一些檔案需要自己編寫宣告檔案,但是在需要的宣告檔案比較多的情況,就需要自動生產宣告檔案。用過幾個庫。今天簡單記錄一下。自己怎麼編寫有很多教程和文件,那裡就不介紹了。 1、為整個包新增宣告檔案 使用微軟的dt

