編譯安裝nginx並修改版本頭資訊
今天做實驗的時候,想起我那臺yum安裝的nginx+php-fpm+mysql伺服器上的nginx版本有點低了,並且還要加兩個第3方模組,就去nginx官網下載了最新穩定版nginx-1.0.6,好了,廢話不多說看教程吧.
系統版本: centos 5.6
ip: 192.168.1.200
需要的軟體包:nginx-1.0.6.tar.gz Nginx-accesskey-2.0.3.tar.gz ngx_cache_purge-1.3.tar.gz(這3個包可以自己去下載,我就不提供了)
1.解壓並修改nginx核心
tar zxf nginx-1.0.6.tar.gz && tar zxf Nginx-accesskey-2.0.3.tar.gz && tar zxf Nginx-accesskey-2.0.3.tar.gz
cd nginx-1.0.6
vi src/http/ngx_http_header_filter_module.c
修改ngx_http_header_filter_module.c裡的
static char ngx_http_server_string[] = "Server: nginx" CRLF;
static char ngx_http_server_full_string[] = "Server: " NGINX_VER CRLF;
改成:
static char ngx_http_server_string[] = "Server: tws" CRLF;
static char ngx_http_server_full_string[] = "Server: " NGINX_VER CRLF; (這行不要去改,不然後面編譯會報錯,我不知道網上其他人是怎麼處理的,也不知道他們到底有沒有親手試過)
再來
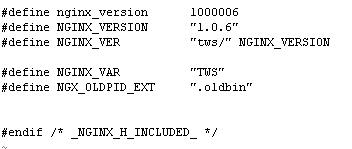
vi src/core/nginx.h
改為
2.開始編譯安裝nginx和第3方模組
./configure --user=nginx --group=nginx --add-module=../ngx_cache_purge-1.3 --add-module=../nginx-accesskey-2.0.3 --prefix=/usr/share/nginx --sbin-path=/usr/sbin/nginx --conf-path=/etc/nginx/nginx.conf --error-log-path=/var/log/nginx/error.log --http-log-path=/var/log/nginx/access.log --http-client-body-temp-path=/var/lib/nginx/tmp/client_body --http-proxy-temp-path=/var/lib/nginx/tmp/proxy --http-fastcgi-temp-path=/var/lib/nginx/tmp/fastcgi --pid-path=/var/run/nginx.pid --lock-path=/var/lock/subsys/nginx --with-http_secure_link_module --with-http_random_index_module --with-http_ssl_module --with-http_realip_module --with-http_addition_module --with-http_sub_module --with-http_dav_module --with-http_flv_module --with-http_gzip_static_module --with-http_stub_status_module --with-http_perl_module --with-http_geoip_module --with-mail --with-mail_ssl_module
這是我的編譯引數,當然你可以根據自己的需要來修改.
如果編譯安裝出現錯誤提示,那就你要執行下面的語句
yum -y install pcre-devel GeoIP* openssl-devel
configure完後如果沒有報錯,就執行
make && meke install
安裝完後檢視nginx的版本號和編譯引數
我這裡沒有把下面編譯引數截圖,這個你懂的
3.讓nginx隨系統啟動
cd /etc/rc.d/init.d
vi nginx
nginx的內容:
#!/bin/sh
#
# nginx - this script starts and stops the nginx daemon
#
# chkconfig: - 85 15
# description: Nginx is an HTTP(S) server, HTTP(S) reverse \
# proxy and IMAP/POP3 proxy server
# processname: nginx
# config: /etc/nginx/nginx.conf
# config: /etc/sysconfig/nginx
# pidfile: /var/run/nginx.pid
# Source function library.
. /etc/rc.d/init.d/functions
# Source networking configuration.
. /etc/sysconfig/network
# Check that networking is up.
[ "$NETWORKING" = "no" ] && exit 0
nginx="/usr/sbin/nginx"
prog=$(basename $nginx)
NGINX_CONF_FILE="/etc/nginx/nginx.conf"
[ -f /etc/sysconfig/nginx ] && . /etc/sysconfig/nginx
lockfile=/var/lock/subsys/nginx
start() {
[ -x $nginx ] || exit 5
[ -f $NGINX_CONF_FILE ] || exit 6
echo -n $"Starting $prog: "
daemon $nginx -c $NGINX_CONF_FILE
retval=$?
echo
[ $retval -eq 0 ] && touch $lockfile
return $retval
}
stop() {
echo -n $"Stopping $prog: "
killproc $prog -TERM
retval=$?
if [ $retval -eq 0 ]; then
if [ "$CONSOLETYPE" != "serial" ]; then
echo -en "\\033[16G"
fi
while rh_status_q
do
sleep 1
echo -n $"."
done
rm -f $lockfile
fi
echo
return $retval
}
restart() {
configtest || return $?
stop
start
}
reload() {
configtest || return $?
echo -n $"Reloading $prog: "
killproc $nginx -HUP
sleep 1
RETVAL=$?
echo
}
configtest() {
$nginx -t -c $NGINX_CONF_FILE
}
rh_status() {
status $prog
}
rh_status_q() {
rh_status >/dev/null 2>&1
}
# Upgrade the binary with no downtime.
upgrade() {
local pidfile="/var/run/${prog}.pid"
local oldbin_pidfile="${pidfile}.oldbin"
configtest || return $?
echo -n $"Staring new master $prog: "
killproc $nginx -USR2
sleep 1
retval=$?
echo
if [[ -f ${oldbin_pidfile} && -f ${pidfile} ]]; then
echo -n $"Graceful shutdown of old $prog: "
killproc -p ${oldbin_pidfile} -TERM
sleep 1
retval=$?
echo
return 0
else
echo $"Something bad happened, manual intervention required, maybe restart?"
return 1
fi
}
case "$1" in
start)
rh_status_q && exit 0
$1
;;
stop)
rh_status_q || exit 0
$1
;;
restart|configtest)
$1
;;
force-reload|upgrade)
rh_status_q || exit 7
upgrade
;;
reload)
rh_status_q || exit 7
$1
;;
status|status_q)
rh_$1
;;
condrestart|try-restart)
rh_status_q || exit 7
restart
;;
*)
echo $"Usage: $0 {start|stop|reload|configtest|status|force-reload|upgrade|restart}"
exit 2
esac
然後執行
chmod a+x nginx
chkconfig --add nginx
chkconfig nginx on
service nginx start
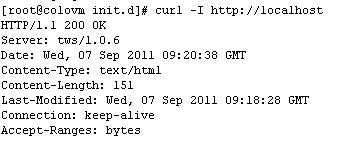
最後執行
curl -I http://localhost
相關推薦
編譯安裝nginx並修改版本頭資訊
今天做實驗的時候,想起我那臺yum安裝的nginx+php-fpm+mysql伺服器上的nginx版本有點低了,並且還要加兩個第3方模組,就去nginx官網下載了最新穩定版nginx-1.0.6,好了,廢話不多說看教程吧. 系統版本: centos 5.6 ip:
編譯安裝nginx並實現反向代理負載均衡和快取功能
一、編譯安裝nginx 1、下載 [[email protected] ~]# wget http://nginx.org/download/nginx-1.10.0.tar.gz 2、解壓 [[email protected] ~]#&
開發人員學Linux(5):CentOS7編譯安裝Nginx並搭建Tomcat負載均衡環境
1.前言在上一篇講述了JMeter的使用,在本篇就可以應用得上了。本篇將講述如何編譯安裝Nginx並利用前面的介紹搭建一個負載均衡測試環境。2.軟體準備Nginx-1.12.0,下載地址:https://nginx.org/download/nginx-1.12.0.tar.
centos中編譯安裝nginx並支援ssl
安裝編譯環境和必要的庫 [root@localhost ~]# yum -y install gcc gcc-c++ autoconf automake libtool make cmake [root@localhost ~]# yum -y install
Linux之Nginx原始碼編譯安裝,並實現Nginx版本升級,秒級切換和Nginx版本回滾,秒級回退
Linux之Nginx原始碼編譯安裝,並實現Nginx版本升級,秒級切換和Nginx版本回滾,秒級回退 1、先檢查Nginx依賴庫(主要4個gcc、pcre、zlib、openssl,通過yum安裝) 2、GCC——GNU編譯器集合(GCC可以使用預設包管理器的倉庫(reposito
CentOS 7 安裝 Nginx 與修改伺服器版本資訊
開發十年,就只剩下這套架構體系了! >>>
RedHat 7 編譯安裝Nginx 1.12並配置WEB站點
nginx WEB 一、安裝環境1、操作系統版本:Red Hat Enterprise Linux Server release 7.2 (Maipo)2、Nginx版本:nginx-1.12.2.tar.gz3、pcre版本:pcre-8.42.tar.gz4、zlib版本:zlib-1.2.11.
編譯安裝Nginx
linux nginx1.查看系統環境:[[email protected]/* */ html]#cat /etc/redhat-releaseCentOS Linux release 7.2.1511 (Core) [[email protected]/* */ html]# u
編譯安裝nginx卻requires the PCRE library
http erro con pat with class -- configure rom 編譯安裝nginx需要pcre包,未安裝會有如下提示: ./configure: error: the HTTP rewrite module requires the PCRE
centos中編譯安裝nginx+mysql +php(未完)
net conf ftw tar 解壓 ocs org sql nbsp 參考地址:http://www.cnblogs.com/htian/p/5728599.html 去官網找到PCRE,並下載http://www.pcre.org/wget ftp://ftp.csx
php5.4編譯安裝--nginx
啟動腳本 創建用戶 php5 開啟 安裝目錄 art oot php-fpm 文件 1、下載源碼包 wget 網址/源碼包2、解壓源碼包 tar -zxvf 源碼包3、創建一個安裝目錄 mkdir /usr/local/php4、進入解壓後的目錄中
centos6.5編譯安裝nginx
php 相關 oca module eve tar 瀏覽器 reat nss 一、下載nginx安裝包,官網下載中心http://nginx.org/download [[email protected] software]# wget http://nginx
在centos6上編譯安裝httpd-2.4版本
手動編譯 httpd-2.4 前言:APR(Apache portable Run-time libraries,Apache可移植 運行庫) 主要為上層的應用程序提供一個可以跨越多操作系統 平臺使用的底層支持接口庫。在早期的Apache版本中,應用 程序本身必須能夠處理各種具體操作系統平臺的細節,並
在CentOS 7.2上編譯安裝Nginx 1.13.6
創建 ont uname group with pen 還需 www stub 第一個裏程碑 --- 檢查軟件安裝的系統環境 [root@rainjin ~]# cat /etc/redhat-release CentOS Linux release 7.2.1511 (
Linux 編譯安裝Nginx
nginx 編譯安裝Linux編譯安裝nginx 背景: 學習nginx之前需要先會安裝nginx,這裏記錄下如何編譯安裝nginx,為以後復習使用。 PS:沒有特殊的需求,最好使用yum安裝,yum安裝需要配epel的yum源。 官方yum源地址: http://ngi
centos7.4編譯安裝nginx
編譯 nginx前言 nginx作為後起之秀,最然目前市場份額現在遠不足apache,但是從增長速度和發展前景來看,nginx是未來的趨勢。具體數據可以參考https://www.netcraft.com/。截至到寫博客的時間,全球的web server的占用率參考下圖,可以看出明顯的趨勢。nginx的
linux環境手動編譯安裝Nginx實踐過程 附異常解決
ima 根據 目錄結構 key -a text 參數 文件中 修改 1、下載nginx源碼包並解壓 可在http://nginx.org/en/download.html下載.tar.gz的源碼包,如(nginx-1.4.7.tar.gz) 或者使用雲盤下載
編譯安裝 nginx的http_stub_status_module監控其運行狀態
訪問量 tle bak 8.0 soft -h 數據說明 lnmp pts 編譯安裝 nginx的http_stub_status_module監控其運行狀態 從nginx升級(平滑升級)開始說起: 1)# rm -rf nginx-1.8.0 //刪掉原來的n
docker 安裝nginx並掛載配置文件和www目錄以及日誌目錄
gin bsp 恢復 容器 名稱 內容 文件 etc dock ---恢復內容開始--- 一 首先 docker pull nginx 二 docker run --name myNginx -d -p 80:80 -v e:/docker/nginx/www
在centos 7中安裝nginx並配置nginx反向代理
nginx linux proxy 反向代理 Nginx是一款輕量級的Web 服務器/反向代理服務器及電子郵件(IMAP/POP3)代理服務器,並在一個BSD-like 協議下發行。其特點是占有內存少,並發能力強,事實上nginx的並發能力確實在同類型的網頁服務器中表現較好,中國大陸使用ngi


