
mybatis入門及環境搭建
一、mybatis概述
1、mybatis是什麼
(1)MyBatis 本是apache的一個開源專案iBatis, 2010年這個專案由apache software foundation 遷移到了google code,並且改名為MyBatis,實質上Mybatis對ibatis進行一些改進
(2)MyBatis是一個優秀的持久層框架,它對jdbc的操作資料庫的過程進行封裝,使開發者只需要關注 SQL 本身,而不需要花費精力去處理例如註冊驅動、建立connection、建立statement、手動設定引數、結果集檢索等jdbc繁雜的過程程式碼
(3)Mybatis通過xml或註解的方式將要執行的各種statement(statement、preparedStatemnt、CallableStatement)配置起來,並通過java物件和statement中的sql進行對映生成最終執行的sql語句,最後由mybatis框架執行sql並將結果對映成java物件並返回
2、mybatis框架原理
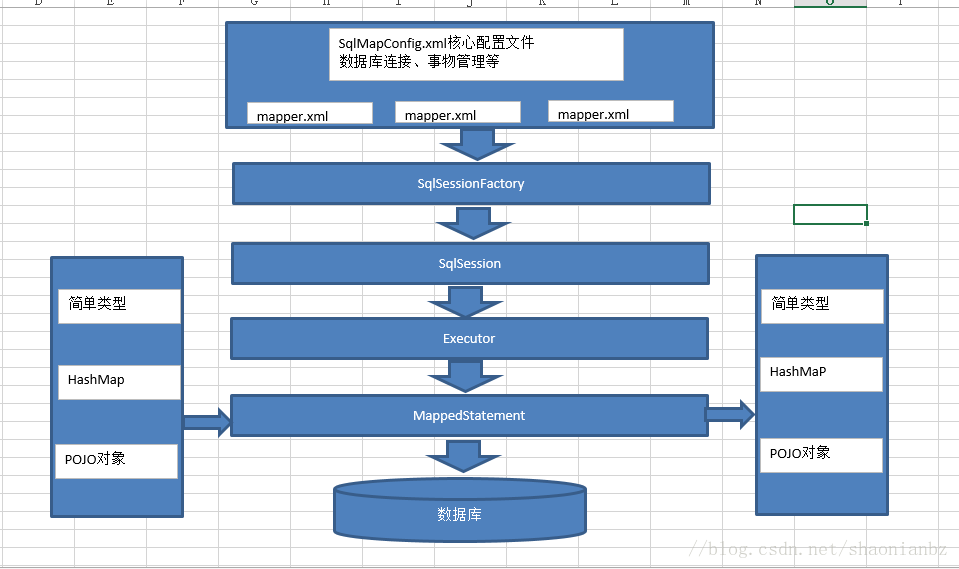
(1)圖解:
3、mybatis框架原理分析
(1)mybatis配置檔案,包括Mybatis全域性配置檔案和Mybatis對映檔案,其中全域性配置檔案配置了資料來源、事務等資訊;對映檔案配置了SQL執行相關的 資訊
(2)mybatis通過讀取配置檔案資訊(全域性配置檔案和對映檔案),構造出SqlSessionFactory,即會話工廠
(3)通過SqlSessionFactory,可以建立SqlSession即會話。Mybatis是通過SqlSession來操作資料庫的
(4)SqlSession本身不能直接操作資料庫,它是通過底層的Executor執行器介面來操作資料庫的。Executor介面有兩個實現類,一個是普通執行器,一個是快取執行器(預設)
(5)Executor執行器要處理的SQL資訊是封裝到一個底層物件MappedStatement中。該物件包括:SQL語句、輸入引數對映資訊、輸出結果集對映資訊。其中輸入引數和輸出結果的對映型別包括java的簡單型別、HashMap集合物件、POJO物件型別
二、mybatis環境搭建
1、下載mybatis
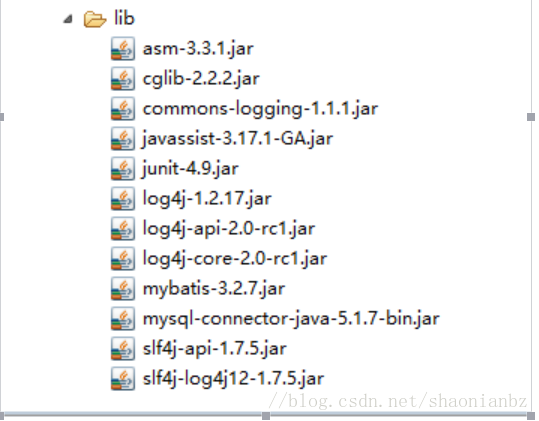
2、匯入jar包
(1)mybatis的核心包和依賴包;mysql的驅動包;Junit(非必須)
三、mybatis入門案例
1、編寫PO類
public class User {
    private int id;
    private String username;
    private String sex;
    private Date birthday;
    private String address;
}
2、編寫全域性配置檔案
(1)位置:src下(classpath),檔名一般:SqlMapConfig.xml
(2)程式碼如下:
<?xml version="1.0" encoding="UTF-8"?>
<!DOCTYPE configuration PUBLIC "-//mybatis.org//DTD Config 3.0//EN"
"http://mybatis.org/dtd/mybatis-3-config.dtd">
<configuration>
<!-- 配置mybatis的環境資訊,與spring整合是,該資訊由spring來配置 -->
<environments default="development">
<environment id="development">
<!-- 配置JDBC事務控制,由mybatis進行管理 -->
<transactionManager type="JDBC"></transactionManager>
<!-- 配置資料來源,採用mybatis連線池 -->
<dataSource type="POOLED">
<property name="driver" value="com.mysql.jdbc.Driver"/>
<property name="url"
value="jdbc:mysql://localhost:3306/mybatis?useUnicode=true&characterEncoding=utf8"/>
<property name="username" value="root"/>
<property name="password" value="root"/>
</dataSource>
</environment>
</environments>
<!-- 載入外部配置檔案 -->
<mappers>
<mapper resource="User.xml"></mapper>
</mappers>
</configuration>
3、查詢使用者
(1)查詢使用者配置檔案程式碼:
<?xml version="1.0" encoding="UTF-8"?>
<!DOCTYPE mapper
PUBLIC "-//mybatis.org//DTD Mapper 3.0//EN"
"http://mybatis.org/dtd/mybatis-3-mapper.dtd">
<!-- namespace:名稱空間,對statement的資訊進行管理 -->
<!-- 注意:在mapper代理時,它具有特殊及其重要的作用 -->
<mapper namespace="test">
    <!-- 根據使用者ID查詢使用者資訊 -->
    <!-- select:表示一個MappedStatement物件 -->
    <!-- id:statement的唯一標識 -->
    <!-- #{}:表示一個佔位符 ? -->
    <!-- #{id}:裡面的id表示輸入引數的引數名稱,如果該引數是簡單型別,那麼#{}裡面的引數名稱可以任意 -->
    <!-- parameterType:輸入引數的java型別 -->
    <!-- resultType:輸出結果的所對映的java型別(單條結果所對應的java型別) -->
    <select id="findUserById" parameterType="int" resultType="com.san.model.User">
        select * from user where id=#{id}
    </select>
</mapper>
(2)測試程式碼:
//根據id查詢使用者
    @Test
    public void Test1() throws IOException{
        //全域性配置檔案的位置
        String resource="SqlMapConfig.xml";

        //載入全域性配置檔案
        InputStream inputStream = Resources.getResourceAsStream(resource);

        //建立SqlSessionFactory
        SqlSessionFactory sqlSessionFactory = new SqlSessionFactoryBuilder().build(inputStream);

        //建立Sqlsession
        SqlSession sqlSession = sqlSessionFactory.openSession();

        //呼叫SqlSession的增刪改查方法
        User user=sqlSession.selectOne("test.findUserById",1);
        System.out.println(user);

        //關閉資源
        sqlSession.close();
    }
4、模糊查詢
(1)模糊查詢配置檔案程式碼:
<!-- ${}:表示一個sql的連線符 -->
    <!-- ${value}:裡面的value表示輸入引數的引數名稱,如果該引數是簡單型別,那麼${}裡面的引數名稱必須是value -->
    <!-- ${}這種寫法存在sql注入的風險,所以要慎用!!但是在一些場景下,必須使用${},
    比如排序時,動態傳入排序的列名,${}會原樣輸出,不加解釋 -->
    <!-- 根據使用者名稱模糊查詢 -->
    <select id="findUserByName" parameterType="java.lang.String" resultType="com.san.model.User">
        select * from user where username like '%${value}%'
    </select>
(2)測試程式碼:
//呼叫SqlSession的增刪改查方法
        List<User> list=sqlSession.selectList("test.findUserByName","小明");
        System.out.println(list);
5、新增使用者
(1)新增使用者配置檔案程式碼:
<!-- 新增使用者 -->
    <!-- selectKey:查詢主鍵,在標籤內需要輸入查詢主鍵的sql -->
    <!-- order:指定查詢主鍵的sql和insert語句的執行順序,相當於insert語句來說 -->
    <!-- LAST_INSERT_ID:該函式是mysql的函式,獲取自增主鍵的ID,它必須配合insert語句一起使用 -->
    <insert id="insertUser" parameterType="com.san.model.User">
        <selectKey keyProperty="id" resultType="int" order="BEFORE">
            SELECT LAST_INSERT_ID()
        </selectKey>
        insert into user (username,birthday,sex,address)
        values(#{username},#{birthday},#{sex},#{address})
    </insert>

    <!-- 自增主鍵(UUID) -->
    <!-- UUID時,order的值要選擇為before -->
    <insert id="insertUser2" parameterType="com.san.model.User">
        <selectKey keyProperty="id" resultType="string" order="BEFORE">
            SELECT UUID()
        </selectKey>
        insert into user (id,username,birthday,sex,address)
        values(#{id},#{username},#{birthday},#{sex},#{address})
    </insert>
(2)測試:
//獲得sqlSession
        SqlSession sqlSession = sessionFactory.openSession();
        User user=new User();
        user.setUsername("zhangsan");
        user.setAddress("北京");
        user.setSex("1");
        sqlSession.insert("test.insertUser",user);

        //提交事務,不提交不會將事務提交到資料庫,但是自增id還是會佔用
        sqlSession.commit();
6、更新使用者
(1)更新使用者配置檔案程式碼:
<!-- 更新使用者資訊 -->
    <update id="updateUser" parameterType="com.san.model.User">
        update user set username=#{username},sex=#{sex} where id=#{id}
    </update>
(2)測試:
        User user=new User();
        user.setUsername("李四");
        user.setId(1);
        user.setSex("男");
        sqlSession.update("test.updateUser",user);

        //增刪改都要提交事務
        sqlSession.commit();
7、刪除使用者
(1)刪除使用者配置檔案程式碼:
<!-- 刪除使用者 -->
    <delete id="deleteUser" parameterType="int">
        delete from user where id=#{id}
    </delete>
(2)測試:
        sqlSession.delete("test.deleteUser",8);

        //增刪改都要提交事務
        sqlSession.commit();