
iOS常見控制元件的基本使用
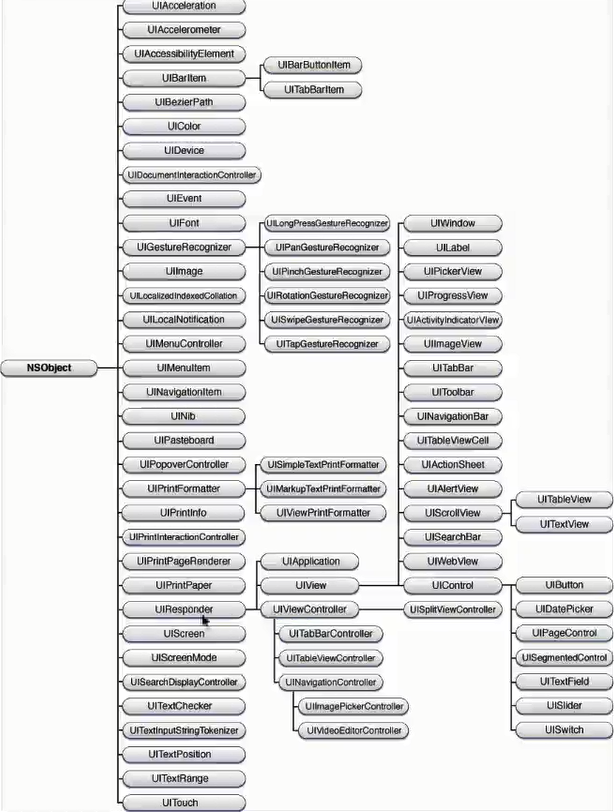
UI相關類繼承關係
UIView 常見屬性和方法
1. UIView屬性
Controller的viewDidLoad方法:當所有控制元件載入完畢後呼叫,相當於Android中View的onFinishInflate方法;
UIView superview 獲得自己的父控制元件物件;
NSArray subview 獲得自己的子控制元件物件,用陣列NSArray儲存;
NSInteger tag 控制元件的ID標示,父控制元件可以通過tag來找到對應的子控制元件;
CGRect fram 控制元件所在矩形框的位置和尺寸(以父控制元件的左上角為座標原點);
CGRect bounds
CGPoint center 控制元件中點的位置(以父控制元件 的左上角為座標原點); CGAffineTransform transform 控制元件的形變屬性(可以設定旋轉角度、比例縮放、平移等屬性); UIColor backgroundColor 背景顏色 BOOL hidden 設定是否隱藏 CGFloat alpha 透明度(0~1) CGFloat opaque 不透明度(0~1) BOOL userInteractionEnabled 預設YES,是否可以和使用者互動(相當於android enable) UIViewContentMode contentMode另外UIView中有很多擴充套件協議,用來處理控制元件的屬性
修改UIView的尺寸(寬高):frame、bounds
修改UIView的位置:frame(左上角的位置)、center(中點的位置)
2. UIView方法
addSubview 新增子控制元件,被新增到最上面(subviews中的最後面)
removeFromSuperview 將自己從父控制元件中移除
viewWithTag 父控制元件可以根據這個tag標示找到對應的子控制元件(遍歷所有的子控制元件)findViewById
insertSubview:atIndext 新增子控制元件到指定的位置 beginAnimations: context: 執行動畫 /…需要執行動畫的程式碼…/
commitAnimations 利用程式碼塊block執行動畫
/*
 *duration 動畫持續時間
 *animations 存放需要執行動畫的程式碼
 *completion 存放動畫執行完畢後需要執行的程式碼
 */
 + (void)animateWithDuration:(NSTimeInterval) duration animations:(void (^)(void))animations completion:(void (^)(BOOL finished))completion
3. UIControl
只要繼承了UIControl就能簡單處理一些事件(點選事件、值改變事件);
繼承了UIControl的子類有:UIButton、UISlider、UISwitch、UIDatePicker等等;
當需要監聽一個子控制元件的事件的時候,先要看它是否繼承自UIControl,再看它內部是否有delegate屬性(代理);
常用屬性:
enable 是否處理事
contentVerticalAlignment 內容在垂直方向上的排布方式
contentHorizontalAlignment 內容在水平方向上的排布方式
常用方法:
addTarget 新增事件監聽器(引數:監聽器物件、事件觸發回撥方法、事件型別)
removeTarget 刪除事件監聽器
allTargets 獲取所有的監聽器物件集合
常用控制元件
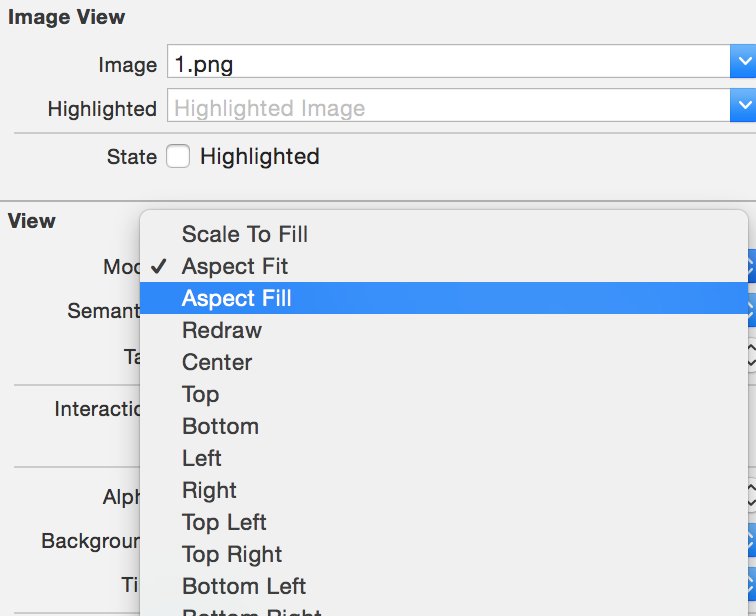
1. UIImageView 圖片顯示控制元件(android ImageView)
@property (weak, nonatomic) IBOutlet UIImageView *imageView;
self.imageView.image = [UIImage imageNamed:@“icon.png"];
設定圖片展示模式(android ImageView 的scaleType屬性):
2. UISlider可拖動的進度條 (android SeekBar
@property (weak, nonatomic) IBOutlet UISlider *slider;
//設定最大值
self.slider.maximumValue = self.imageDate.count;
//設定最小值
self.slider.minimumValue = 1;
//設定當前值
self.slider.value = 1;
3. UIButton按鈕
常用屬性:
titleLable 獲取內部的UILabel物件
imageView 獲取內部的UIImageView物件
常見方法:
setTitle:forState: 設定背部UILable顯示的文字內容(不能寫btn.titleLabel.text = @"123")
setTileColor:forState 設定內部UILabel文字顏色
setTileShaowColor:forState 設定內部UILabel文字的陰影顏色
setImage:forState 設定內部UIImageView的圖片(不能寫btn.iamgeView.image =[ UIImage imagedName:@"0.png"])
setTileShaowColor:forState 設定內部UILabel文字的陰影顏色
setBackgroundImage:forState 設定背景圖片
下面方法可以獲取不同狀態下的一些屬性值:
titleForState 獲取某個狀態下顯示文字
titleColorForState 獲取某個狀態下文字顏色
titleShadowColorForState 獲取某個狀態下文字陰影顏色
imageForState 獲取某個狀態下圖片
backgroundImageForState 獲取某個狀態下背景圖片
下面兩個方法需要交給子類重寫(繼承UIButton):
titleRectForContentRect 返回內部UILabel的frame(位置和尺寸)
imageRectForContentRect 返回內部UIImageView的frame(位置和尺寸)
示例程式碼
普通按鈕custom
//建立按鈕
UIButton*orangeBtn = [[UIButtonalloc]init];
orangeBtn.tag=kOrangeTag;
//設定按鈕的frame(位置和尺寸)
orangeBtn.frame=CGRectMake(100,100,100,100);
//設定背景色
orangeBtn.backgroundColor= [UIColororangeColor];
//設定按鈕文字
[orangeBtnsetTitle:@"普通"forState:UIControlStateNormal];
[orangeBtnsetTitle:@"按下"forState:UIControlStateHighlighted];
//設定按鈕按下時文字顏色
[orangeBtnsetTitleColor:[UIColorredColor]forState:UIControlStateHighlighted];
UIButton*btn = [[UIButtonalloc]init];
//新增按鈕的唯一標示
btn.tag = 1;
//根據圖片名稱去項檔案系統中載入圖片物件
UIImage*imageNormal = [UIImageimageNamed:@"sub_black_prev.png"]];
UIImage*imagePress = [UIImageimageNamed:@"sub_blue_prev.png"]];
//設定按鈕背景圖片
[btnsetBackgroundImage:imageNormalforState:UIControlStateNormal];
[btnsetBackgroundImage:imagePressforState:UIControlStateHighlighted];
//設定按鈕的frame(位置和尺寸)//btn.frame = CGRectMake(point.x, point.y, imageNormal.size.width, imageNormal.size.height);
   /*
     struct CGRect {
     CGPoint origin;
     CGSize size;
     };
    */
btn.frame = (CGRect){point, imageNormal.size};
//繫結監聽
[btn addTarget:self action:@selector(directionBtnClick:) forControlEvents:UIControlEventTouchUpInside];
//根據按鈕的tag獲取子控制元件
UIButton*orangeBtn = [self.viewviewWithTag:kOrangeTag];
CGPoint center = orangeBtn.center;
staticCGFloatDELETE =50;
center.y += DELETE;
//重新賦值按鈕的中點
orangeBtn.center= center;
根據系統自帶樣式型別建立
//建立一個加號的按鈕
UIButton *btn = [UIButton buttonWithType:UIButtonTypeContactAdd];
btn.center = CGPointMake(100, 100);
4. UILable 文字 (android TextView)
常用屬性:
text 顯示文字內容
textColor 文字顏色
font 字型
shadowColor 文字的陰影顏色
shadowOffset 陰影的偏差距離(width水平方向的偏差距離,整數右邊;height垂直方向上的偏差距離,正數下邊)
textAlignment 設定文字的排列方式(偏左、偏右、居中)
numberOfLines 允許文字最多幾行(預設1,如果是0,自動換行)
5. UIText 文字輸入框(android EditText)
6. UISwitch 開關
#pragma mark 開關值改變監聽
-(IBAction)switchChanged:(UISwitch *)sender {
    NSLog(@"開關值%d", sender.isOn);
    self.view.backgroundColor = sender.isOn?[UIColor darkGrayColor]:[UIColor whiteColor];
}
7. UIDatePicker日期控制元件
-(void) viewDidLoad{
    [super viewDidLoad];

    UIDatePicker *picker = [[UIDatePicker alloc] init];
    //設定區域
    picker.locale = [[NSLocale alloc] initWithLocaleIdentifier:@"zh_CN"];
    //設定模式(顯示日期還是時間)
    picker.datePickerMode = UIDatePickerModeDate;

}
#pragma mark 拖動時間改變後監聽
-(IBAction)dateChanged:(UIDatePicker *) dataPicker{
    //獲取日期值
    NSDate * date = dataPicker.date;
    //格式化日期
    NSDateFormatter *formatter = [[NSDateFormatter alloc] init];
    formatter.dateFormat = @"yyyy/MM/bb";

    self.label.text = [formatter stringFromDate:date];
}
8. UIPickerView 跟android Spinner相似
設定資料來源和代理(監聽)為控制器,控制器遵循資料來源河代理的協議,重寫協議的方法:
- 簡單使用
#pragma mark 控制器充當UIPickerView的資料來源和代理,必須遵循兩個協議
@interface ViewController : UIViewController <UIPickerViewDataSource, UIPickerViewDelegate>
@property (weak, nonatomic) IBOutlet UIPickerView *pickerView;
@end

#import "ViewController.h"
@interface ViewController()
@property (nonatomic,strong) NSArray *oneCol;
@property (nonatomic,strong) NSArray *towCol;
@end

@implementation ViewController
-(void) viewDidLoad{
    self.oneCol = @[@"00", @"01", @"02", @"03"];
    self.towCol = @[@"000", @"001", @"002", @"003", @"004"];
}
#pragma mark - UIPickerView的資料來源方法(返回第component列的行數)
-(NSInteger)pickerView:(UIPickerView *)pickerView numberOfRowsInComponent:(NSInteger)component{

    return component == 0?self.oneCol.count:self.towCol.count;
}
#pragma mark - UIPickerView的資料來源方法(返回列數)
-(NSInteger)numberOfComponentsInPickerView:(UIPickerView *)pickerView{
    return 2;
}
#pragma mark - UIPickerView的代理方法(返回第component列第row航顯示的字串資料-設定資料)
-(NSString *)pickerView:(UIPickerView *)pickerView titleForRow:(NSInteger)row forComponent:(NSInteger)component{
    if(component==0){
        return self.oneCol[row];
    }else{
        return self.towCol[row];
    }
}
#pragma mark - UIPickerView的代理方法(選中了某一行呼叫)
-(void)pickerView:(UIPickerView *)pickerView didSelectRow:(NSInteger)row inComponent:(NSInteger)component{
    if(component==0){
        NSString *leftRow = self.oneCol[row];
        //獲取第二列當前停留的行數
        int towRow = [pickerView selectedRowInComponent:1];
        NSString *rightRow = self.towCol[towRow];
        NSLog(@"第%d列:%@-----第%d列:%@", component, leftRow, 1, rightRow);
    }else{
        NSString *rightRow = self.towCol[row];
        int oneRow = [pickerView selectedRowInComponent:0];
        NSString *leftRow = self.oneCol[oneRow];
        NSLog(@"第%d列:%@-----第%d列:%@", 0, leftRow, 1, rightRow);
    }
}
@end- 顯示自定義條目
#pragma mark 修改每一行的高度
-(CGFloat)pickerView:(UIPickerView *)pickerView rowHeightForComponent:(NSInteger)component{
    return 70;
}
#pragma mark 返回地component列第row行需要顯示的控制元件
-(UIView *)pickerView:(UIPickerView *)pickerView viewForRow:(NSInteger)row forComponent:(NSInteger)component reusingView:(UIView *)view{
    UIView *rowView = [[UIView alloc] init];
    CGFloat rowViewH = 40;
    CGFloat rowViewW = 200;
    rowView.bounds = CGRectMake(0, 0, 200, rowViewH);

    //國家名稱
    UILabel *nameLable = [[UILabel alloc] init];
    CGFloat nameW = 70;
    nameLable.frame = CGRectMake(0, 0, nameW, rowViewH);
    nameLable.textAlignment = NSTextAlignmentCenter;
    nameLable.text = @"asdfsd";
    [rowView addSubview:nameLable];
    //國旗
    UIImageView *imageView = [[UIImageView alloc] init];
    imageView.frame = CGRectMake(nameW, 0, rowViewW-nameW, rowViewH);
    imageView.image = [UIImage imageNamed:@"zhongguo.jpg"];
    [rowView addSubview:imageView];

    return rowView;
}
9. UIScollView (android ScollView)
UIPageControl 請見:分頁顯示
當子控制元件內容太多或者子控制元件太大顯示不全時,用UIScrollView實現滾動
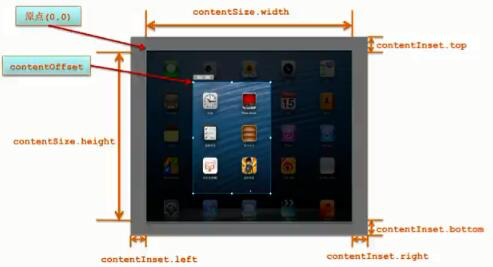
常用屬性
CGPoint contentOffsetUIScrollView當前滾動到哪個位置了(相對於內容左上角的座標)
CGSize contentSizeUIScrollView的滾動範圍(內容的尺寸)
UIEdgeInsets contentInset這個屬性可以在四周增加滾動範圍
BOOL bounces; 是否有彈簧效果
BOOL scrollEnabled; 是否能滾動
BOOL showsHorizontalScrollIndicator是否顯示水平方向的滾動條
BOOL showsVerticalScrollIndicator是否顯示垂直方向的滾動條
UIScrollViewIndicatorStyle indicatorStyle設定滾動條的樣式
BOOL tracking是否正在被拖拽
BOOL dragging當touch後還沒有拖動的時候值是YES,否則是NO
BOOL decelerating是否正在減速使用示例:
UIImage *image = [UIImage imageNamed:@"1.png"];
//通過圖片初始化UIImageview,這樣ImageView的寬高就跟圖片寬高一樣了
UIImageView *imageView = [[UIImageView alloc] initWithImage:image];
[self.scroll addSubview:imageView];
//self.scroll.frame.size  UIScrollView控制元件的大小(可視範圍)
//設定內容的寬高(可滾動範圍)
self.scroll.contentSize = image.size;
//為UIScrollView設定上下左右額外的可拖動範圍(空隙)
self.scroll.contentInset = UIEdgeInsetsMake(10, 20, 30, 40);
self.scroll.backgroundColor = [UIColor lightGrayColor];
   //self.scroll.contentOffset.x += 10;//不能直接修改物件的結構體屬性的成員
//修改UIScrollView當前拖動的位置(相對於內容左上角的座標)
CGPoint offset = self.scroll.contentOffset;
//向左移動(檢視右邊的內容)
offset.x += 50;
//執行動畫
[UIView animateWithDuration:0.3 animations:^{
    self.scroll.contentOffset = offset;
}];- 手勢識別縮放
@property(nullable,nonatomic,weak) id<UIScrollViewDelegate> delegate;iOS中的UIScrollView已經封裝了手勢識別,不需要我們分析手指位置以及滑動方向,只需要設定上面的代理屬性即可(代理可以理解為回撥介面),這個代理需要遵守UIScrollViewDelegate協議;然後選擇性的實現裡面的回撥方法。
而android中如果要實現此功能,需要我們分析多點觸控以及手指位置和滑動方向來判斷縮放還是放大。</br>
步驟:
①、設定UIScrollView的代理delegate為控制器,控制器遵守UIScrollViewDelegate協議
②、設定最大和最小縮放比例maximumZoomScale,minimumZoomScale
③、讓代理物件實現方法,返回需要縮放的子控制元件
//設定最大縮放比例
self.scroll.maximumZoomScale = 2;
//設定最小縮放比例
self.scroll.minimumZoomScale = 0.5;
 #pragma mark -UIScrollView的代理方法:返回需要進行縮放的空間(必須是UIScrollVIew的子控制元件)
(nullable UIView *)viewForZoomingInScrollView:(UIScrollView *)scrollView{
    return self.imageView;
}- 代理中其他方法:
- (void)scrollViewDidScroll:(UIScrollView *)scrollView;    // any offset changes offset屬性變化時呼叫(在被拖動)
// 將要開始拖拽時呼叫
- (void)scrollViewWillBeginDragging:(UIScrollView *)scrollView;
// 拖拽將要結束時呼叫
- (void)scrollViewWillEndDragging:(UIScrollView *)scrollView withVelocity:(CGPoint)velocity targetContentOffset:(inout CGPoint *)targetContentOffset NS_AVAILABLE_IOS(5_0);
// 拖拽結束時呼叫
- (void)scrollViewDidEndDragging:(UIScrollView *)scrollView willDecelerate:(BOOL)decelerate;
- (void)scrollViewWillBeginDecelerating:(UIScrollView *)scrollView;   // called on finger up as we are moving
- (void)scrollViewDidEndDecelerating:(UIScrollView *)scrollView;      // ScrollView減速完畢後呼叫
- (void)scrollViewDidEndScrollingAnimation:(UIScrollView *)scrollView; // called when setContentOffset/scrollRectVisible:animated: finishes. not called if not animating

- (nullable UIView *)viewForZoomingInScrollView:(UIScrollView *)scrollView;     // 返回需要進行縮放的子控制元件
- (void)scrollViewWillBeginZooming:(UIScrollView *)scrollView withView:(nullable UIView *)view NS_AVAILABLE_IOS(3_2); // 將要縮放之前呼叫
- (void)scrollViewDidZoom:(UIScrollView *)scrollView NS_AVAILABLE_IOS(3_2); // any zoom scale changes 縮放時呼叫
- (void)scrollViewDidEndZooming:(UIScrollView *)scrollView withView:(nullable UIView *)view atScale:(CGFloat)scale; // 縮放完畢後呼叫
- (BOOL)scrollViewShouldScrollToTop:(UIScrollView *)scrollView;   // return a yes if you want to scroll to the top. if not defined, assumes YES
- (void)scrollViewDidScrollToTop:(UIScrollView *)scrollView; // called when scrolling animation finished. may be called immediately if already at top- 分頁顯示(android ViewPager)
#define kCount 5
@interface ViewController ()
@property (nonatomic, weak) UIPageControl *_pageControl;
@property (nonatomic, weak) UIScrollView *_scrollView;
@end

@implementation ViewController
- (void)viewDidLoad {
   [super viewDidLoad];
   for(int i = 0; i<self.view.subviews.count; i++){
        [self.view.subviews[i] removeFromSuperview];
    }
    //分頁顯示
    //1、新增UIScrollView
    UIScrollView *scrollView = [[UIScrollView alloc] init];

    //設定填充父窗體
    scrollView.frame = self.view.bounds;
    [self.view addSubview:scrollView];
    self._scrollView = scrollView;

    CGFloat scrollWdith = scrollView.frame.size.width;
    CGFloat scrollHight = scrollView.frame.size.height;

    // 2、新增所有的ImageView
    for(int i = 0;i<=kCount;i++){
        //載入圖片
        NSString *imageName = [NSString stringWithFormat:@"pages.bundle/%d.jpg", i];
        UIImage *image = [UIImage imageNamed:imageName];
        UIImageView *imageView = [[UIImageView alloc] init];
        imageView.image = image;
        imageView.frame = CGRectMake((i-1)*scrollWdith, 0, scrollWdith, scrollHight);
        [scrollView addSubview:imageView];

    }

    //3、設定滾動範圍
    scrollView.contentSize = CGSizeMake(kCount*scrollWdith, 0);
    //隱藏滾動條
    scrollView.showsHorizontalScrollIndicator = NO;
    //4、開啟分頁功能(按照ScrollView的寬度將內容分為若干頁,正好ImageView的寬度相等,就實現了分頁)
    scrollView.pagingEnabled = YES;

    //5、新增PageControl
    UIPageControl *pageControl = [[UIPageControl alloc] init];
    pageControl.bounds = CGRectMake(0, 0, 150, 50);
    pageControl.center = CGPointMake(scrollWdith * 0.5, scrollHight - 50);
    //設定頁數
    pageControl.numberOfPages = kCount;
    //當前選中頁碼對應控制器的顏色
    pageControl.currentPageIndicatorTintColor = [UIColor redColor];
    //其他控制器的顏色
    pageControl.pageIndicatorTintColor = [UIColor blackColor];
    //監聽pageControl事件
    [pageControl addTarget:self action:@selector(pageChanged:) forControlEvents:UIControlEventValueChanged];

    //新增控制器
    [self.view addSubview: pageControl];

    self._pageControl = pageControl;

    //設定代理
    scrollView.delegate = self;
    //不需要彈簧效果
    scrollView.bounces = NO;

}
#pragma mark -滾動代理:減速完畢後呼叫(停止了)
- (void)scrollViewDidEndDecelerating:(UIScrollView *)scrollView{
    CGFloat offset = scrollView.contentOffset.x;   //當前x軸方向上滾動了多少
    int pageNum = offset/scrollView.frame.size.width;
    //設定頁碼
    self._pageControl.currentPage = pageNum;
}
#pragma mark pageControl值變化時呼叫
-(void) pageChanged{
    CGFloat offsetX = self._pageControl.currentPage * self.view.frame.size.width;
    [UIView beginAnimations:nil context:nil];
    self._scrollView.contentOffset = CGPointMake(offsetX, 0);
    [UIView commitAnimations];
}
@end
10. UITableView( android ListView GridView ExpandListView)
10.1 資料來源方法
TableView相當於ListView,設定資料來源需要遵循UITableViewDataSource協議,相當於BaseAdapter,下面是協議的所有介面:
@protocol UITableViewDataSource<NSObject>
@required   必須實現的
- (NSInteger)tableView:(UITableView *)tableView numberOfRowsInSection:(NSInteger)section;   // 第section組有多少行資料
// 返回每一行顯示的具體資料View(相當於getView()方法)
- (UITableViewCell *)tableView:(UITableView *)tableView cellForRowAtIndexPath:(NSIndexPath *)indexPath;
@optional  選擇實現的
- (NSInteger)numberOfSectionsInTableView:(UITableView *)tableView;  // 一共有多少組資料(如果沒有實現,預設為1)
- (nullable NSString *)tableView:(UITableView *)tableView titleForHeaderInSection:(NSInteger)section; // 分組頭部標題
- (nullable NSString *)tableView:(UITableView *)tableView titleForFooterInSection:(NSInteger)section; // 分組尾部標題
// Individual rows can opt out of having the -editing property set for them. If not implemented, all rows are assumed to be editable.
- (BOOL)tableView:(UITableView *)tableView canEditRowAtIndexPath:(NSIndexPath *)indexPath;
// Moving/reordering
// Allows the reorder accessory view to optionally be shown for a particular row. By default, the reorder control will be shown only if the datasource implements -tableView:moveRowAtIndexPath:toIndexPath:
- (BOOL)tableView:(UITableView *)tableView canMoveRowAtIndexPath:(NSIndexPath *)indexPath;
//索引(e.g. "ABCD...Z#")
- (nullable NSArray<NSString *> *)sectionIndexTitlesForTableView:(UITableView *)tableView __TVOS_PROHIBITED;
- (NSInteger)tableView:(UITableView *)tableView sectionForSectionIndexTitle:(NSString *)title atIndex:(NSInteger)index __TVOS_PROHIBITED;  // tell table which section corresponds to section title/index (e.g. "B",1))
// Data manipulation - insert and delete support
// After a row has the minus or plus button invoked (based on the UITableViewCellEditingStyle for the cell), the dataSource must commit the change
// Not called for edit actions using UITableViewRowAction - the action's handler will be invoked instead
- (void)tableView:(UITableView *)tableView commitEditingStyle:(UITableViewCellEditingStyle)editingStyle forRowAtIndexPath:(NSIndexPath *)indexPath;
// Data manipulation - reorder / moving support
- (void)tableView:(UITableView *)tableView moveRowAtIndexPath:(NSIndexPath *)sourceIndexPath toIndexPath:(NSIndexPath *)destinationIndexPath;
@end
10.2 代理 UITableViewDelegate
// 返回條目高度(可以根據不同的行號返回不同的高度)
- (CGFloat)tableView:(UITableView *)tableView heightForRowAtIndexPath:(NSIndexPath *)indexPath;
- (CGFloat)tableView:(UITableView *)tableView heightForHeaderInSection:(NSInteger)section;
- (CGFloat)tableView:(UITableView *)tableView heightForFooterInSection:(NSInteger)section;
//  選中某一行的時候呼叫(點選)
-(void)tableView:(UITableView *)tableView didSelectRowAtIndexPath:(NSIndexPath *)indexPath
// 取消選中某一行
-(void)tableView:(UITableView *)tableView didDeselectRowAtIndexPath:(NSIndexPath *)indexPath
10.3 常用屬性和方法
10.4 多組資料
@interface ViewController ()
@property (nonatomic, strong) NSArray *gd;
@property (nonatomic, strong) NSArray *hn;
@end
@implementation ViewController
- (void)viewDidLoad {
[super viewDidLoad];
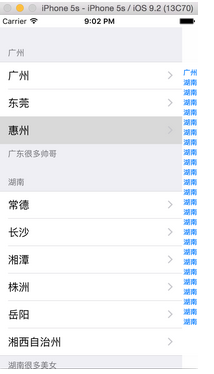
self.gd = @[@"廣州", @"東莞", @"惠州"];
self.hn = @[@"常德", @"長沙", @"湘潭", @"株洲", @"岳陽", @"湘西自治州"];
}
#pragma mark - 資料來源方法
#pragma mark - 1、一共多少組資料
-(NSInteger)numberOfSectionsInTableView:(UITableView *)tableView{
return 2; //廣東、湖南
}
#pragma mark - 2、第section組有多少行資料
-(NSInteger)tableView:(UITableView *)tableView numberOfRowsInSection:(NSInteger)section{
return section==0?self.gd.count:self.hn.count;
}
#pragma mark - 3、返回每一行顯示的具體資料
-(UITableViewCell *)tableView:(UITableView *)tableView cellForRowAtIndexPath:(NSIndexPath *)indexPath{
// 組 indexPath.section
// 列 indexPath.row
UITableViewCell *cell = [[UITableViewCell alloc] initWithStyle:UITableViewCellStyleDefault reuseIdentifier:nil];
NSString *city = nil;
if(indexPath.section == 0){
city = self.gd[indexPath.row];
}else {
city = self.hn[indexPath.row];
}
//設定右邊箭頭樣式
cell.accessoryType = UITableViewCellAccessoryDisclosureIndicator;
//設定cell上面顯示的文字資料
cell.textLabel.text = city;
return cell;
}
#pragma mark - 4、 第section組的header標題
-(NSString *)tableView:(UITableView *)tableView titleForHeaderInSection:(NSInteger)section{
return section == 0? @"廣州" : @"湖南";
}
#pragma mark - 5、 第section組的尾部標題
-(NSString *)tableView:(UITableView *)tableView titleForFooterInSection:(NSInteger)section{
return section == 0? @"廣東很多帥哥": @"湖南很多美女";
}
#pragma mark- 6、 索引,通訊錄效果,是按照分組而不是拼音首字母的索引
- (nullable NSArray<NSString *> *)sectionIndexTitlesForTableView:(UITableView *)tableView __TVOS_PROHIBITED{
return @[@"廣州", @"湖南", @"湖南", @"湖南", @"湖南", @"湖南", @"湖南", @"湖南", @"湖南", @"湖南", @"湖南", @"湖南", @"湖南", @"湖南", @"湖南", @"湖南", @"湖南", @"湖南", @"湖南", @"湖南", @"湖南", @"湖南", @"湖南", @"湖南", @"湖南", @"湖南"];
}
#pragma mark- UITableView代理方法
#pragma mark- 1、 返回某一行的高度
- (CGFloat)tableView:(UITableView *)tableView heightForRowAtIndexPath:(NSIndexPath *)indexPath{
return 70;
}
#pragma mark- 2、 選中某一行的時候呼叫(點選)
-(void)tableView:(UITableView *)tableView didSelectRowAtIndexPath:(NSIndexPath *)indexPath{
NSString *city = indexPath.section == 0? self.gd[indexPath.row] : self.hn[indexPath.row];
//彈出對話方塊修改地名
UIAlertView *alert = [[UIAlertView alloc] initWithTitle:@"地名" message:nil delegate:self cancelButtonTitle:@"取消" otherButtonTitles:@"確定", nil];
//設定alertview樣式
alert.alertViewStyle = UIAlertViewStylePlainTextInput;
//取出文字輸入框
[alert textFieldAtIndex:0].text = city;
alert.tag = 1;
//顯示對話方塊
[alert show];
}
#pragma mark- UIAlertView代理方法
#pragma mark- 對話方塊按鈕點選
- (void)alertView:(UIAlertView *)alertView clickedButtonAtIndex:(NSInteger)buttonIndex NS_DEPRECATED_IOS(2_0, 9_0){
if(buttonIndex == 1){
//點選了確定按鈕
//取得輸入框文字
NSString *city = [alertView textFieldAtIndex:0].text;
NSString *old = self.gd[0];
old = [NSString stringWithFormat:@"%@", city];
//重新整理UITableView資料,相當於android 的 adaptert.notifyDatesetChanged()
//重新整理所有資料
// [self.tableView reloadData];
//區域性重新整理
NSIndexPath *path = [NSIndexPath indexPathForRow:alertView.tag inSection:0];
[self.tableView reloadRowsAtIndexPaths:@[path] withRowAnimation:UITableViewRowAnimationLeft];
}
}
@end10.5 單組資料(ListView效果)
資料來源返回分組數量的方法返回值為1就能實現單組效果
UITableViewCell系統樣式:
條目右邊箭頭樣式:
10.6 效能優化
- 複用Cell
Android的ListView在效能優化的時候複用convertView,這樣getView方法不用每次載入建立條目View;iOS中UITableView的資料來源方法cellForRowAtIndexPath中同樣也可以複用快取中的cell
      #pragma mark 每當有一個cell進入視野範圍內就會呼叫,返回當前這行顯示的cell
- (UITableViewCell *)tableView:(UITableView *)tableView cellForRowAtIndexPath:(NSIndexPath *)indexPath
{
    // 0.用static修飾的區域性變數,只會初始化一次< # # >
    static NSString *ID = @"Cell";

    // 1.拿到一個標識先去快取池中查詢對應的Cell
    UITableViewCell *cell = [tableView dequeueReusableCellWithIdentifier:ID];

    // 2.如果快取池中沒有,才需要傳入一個標識建立新的Cell
    if (cell == nil) {
        cell = [[UITableViewCell alloc] initWithStyle:UITableViewCellStyleDefault reuseIdentifier:ID];
    }

    // 3.覆蓋資料
    cell.textLabel.text = [NSString stringWithFormat:@" fdsfdsf-%d", indexPath.row];

    return cell;
}- 使用者程式碼提醒
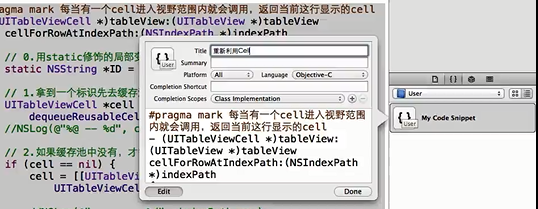
Xcode中有很多系統自帶的程式碼塊,只需要拖動到編輯器中,就能自動生成程式碼,這樣可以避免寫很多重複程式碼,方便程式設計;也可以自定義使用者程式碼塊,比如上面複用Cell的模板方法,選中程式碼後拖動到右下角程式碼塊中即可。
10.7 編輯模式

- 刪除\新增
開啟編輯模式:
 // 開啟編輯模式
    //self.tableView.editing = YES;
    //[self.tableView setEditing:YES];
    // 帶有動畫效果
    [self.tableView setEditing:! edt animated:YES];
下面方法的返回值決定編輯模式是新增還是刪除:
#pragma mark - 代理方法
#pragma mark 當tableview開啟編輯模式就會呼叫
- (UITableViewCellEditingStyle)tableView:(UITableView *)tableView editingStyleForRowAtIndexPath:(NSIndexPath *)indexPath
{
    //return indexPath.row%2 ? UITableViewCellEditingStyleDelete : UITableViewCellEditingStyleInsert;
    return tableView.tag;
}
實現資料來源的方法刪除或新增資料:
#pragma mark 提交編輯操作(點選了"刪除"或者"+"按鈕)時呼叫
// 實現了這個方法,就有左劃刪除功能
- (void)tableView:(UITableView *)tableView commitEditingStyle:(UITableViewCellEditingStyle)editingStyle forRowAtIndexPath:(NSIndexPath *)indexPath
{
//NSLog(@"------commit---%d", indexPath.row);
if (editingStyle == UITableViewCellEditingStyleDelete) {
// 刪除
// 1.更改資料(刪除本行的資料)
[self.mydata removeObjectAtIndex:indexPath.row];
// 2.重新整理UI介面
//[tableView reloadData];
[tableView deleteRowsAtIndexPaths:@[indexPath] withRowAnimation:UITableViewRowAnimationLeft];
} else {
// 新增
// 1.更改資料(新增資料)
相關推薦
iOS常見控制元件的基本使用
UI相關類繼承關係
UIView 常見屬性和方法
1. UIView屬性
Controller的viewDidLoad方法:當所有控制元件載入完畢後呼叫,相當於Android中View的onFinishInflate方法;
UIVi
iOS列印控制元件子檢視
這裡,介紹一個剛剛學到的技巧:我們可以使用UIView的私有方法recursiveDescription來看一下UI控制元件的檢視層次結構,在控制檯打印出它的繼承關係。
如:po [self.searchBar recursiveDescription] 列印結果如下:
從以上可以看出,在
Android設定常見控制元件點選效果
一. Imageview的點選效果——圖片稍微變暗突出點選效果
public class ClickImageView extends AppCompatImageView { public ClickImageView(Context context) { super(context);
iOS基礎控制元件--UIButton
UIButton和UITextField一樣都不是UIView的直接子類,都是UIView子類UIControl的子類。
UIButton介紹
UIButton是按鈕控制元件,用於使用者點選和程式進行互動。按鈕的互動是最簡單也是最直接的,只需要點選就可以進行操作,所以
iOS基礎控制元件--UISwitch
UISwitch是一個開關控制元件,一般用在設定介面上的一些開關。由於這個控制元件的一些特性,在開發中並不能很好的滿足設計需求,所以一般不常使用。
UISwitch建立
UISwitch是繼承自UIControl的,是UIView的非直接子類,所以建立也是使
IOS基礎控制元件UILabel
//新建一個label控制元件並設定它的位置和大小
UILabel *label = [[UILabel alloc]initWithFrame:CGRectMake(100, 100, 260, 150)];
//設定控制元件的背景顏色
label.b
IOS基礎控制元件UIImageView
#import "RootViewController.h"
@interface RootViewController ()
@end
@implementation RootViewController
- (void)viewDidLoad {
iOS UI控制元件學習---swift(一)
**第一學習使用ui swift寫ui控制元件的控制程式碼,記錄學習
UIButton和UISlider的一個小案例
ViewController.swift
//
// ViewContr
selenium常見控制元件操作
下拉選擇框
from selenium.webdriver.support.select import Select# 例項化一個Select類的物件
selector = Select(driver.find_element_by_id("selectdemo"))
# 下面三種方法用於選擇"籃
android仿ios時間控制元件
如果您認為本部落格不錯,讀後覺得有收穫,不妨打賞讚助我一下,讓我有動力繼續寫出高質量的部落格。
贈人玫瑰,手有餘香。分享技術,傳遞快樂。
有心課堂,傳遞的不僅僅是技術!
QQ交流群:250468947
有心課堂會員,請加入VIP QQ交流
IOS-TextField控制元件詳解
//初始化textfield並設定位置及大小
UITextField *text = [[UITextField alloc]initWithFrame:CGRectMake(20, 20, 130, 30)];
//設定邊框樣式,只有設定了才會顯示邊框樣式
text.borderSty
iOS給控制元件的指定位置設定圓角
在我們日常開發中,給一些控制元件設定圓角一般都是給四個角都設定圓角如下所示:
searchBtn.layer.cornerRadius = 5.0f; //設定圓角的弧度
searchBtn.layer.masksToBounds = YES;
當
IOS各個控制元件的尺寸、隱藏方法及對檢視佈局的影響
一、常識
我們都知道裝置及裝置上面控制元件的尺寸對於介面的佈局美觀有很大的影響。所以關於裝置尺寸方面的常識是必備的。可以記不住但是用到的時候至少要能夠找到它 。所以今天給大家彙總一下相關的要點,以備日後不時之需。
(一)裝置尺寸
裝置 解析度
Android常見控制元件使用經驗之——ListView
屬性
首先是stackFromBottom屬性,這隻該屬性之後你做好的列表就會顯示你列表的最下面,值為true和false
android:stackFromBottom="true"
第二是transciptMode屬性,需要用ListView或者其它顯示大量Ite
Swift-iOS常用控制元件(UIActivityIndicatorView 活動指示器)
//UIActivityIndicatorView 活動指示器
func createActivityIndicatorView() {
//建立活動指示器
let aiv =
UIActi
Android進階之自定義View實戰(一)仿iOS UISwitch控制元件實現
一.引言
個人覺得,自定義View一直是Android開發最變換莫測、最難掌握、最具吸引力的地方。因為它涉及到的知識點比較多,想在實際應用中駕輕就熟,由淺入深,你需要掌握以下知識點:
1. View的繪製機制以及Canvas、Paint、Rect等的常用方
iOS常用控制元件
UISwitch & UIActivityIndicatorView
[setOn,isOn]
initWithActivityIndicatorStyle:
startAnimating;
stopAnimating;
isAnimating;
hidesWhen
ios UI控制元件的簡單整理
/**
匿名類目:可以宣告方法和變數,屬性為private(不允許在外部呼叫,且不能被繼承
*/
/**
傳送資料的委託方,接收資料的時代理髮(即代理的反向傳值)
委託方第一步:宣告協議
委託方第二步:宣告代理指標
委託方第三步:操作完成,告訴代理(即呼叫代理的方法)
代理第一步:遵守協議
代
10.2Python圖形使用者介面庫tkinter(2):認識常見控制元件
# 本類展示了Checkbutton、Radiobutton、Entry、Message、Label、Text的使用方式
# 並使用表格佈局將它們佈局在介面中
class WidgetDemo():
def __init__(self):
iOS---分段控制元件的點選事件
NSArray *arr = [[NSArray
alloc]initWithObjects:@"0",@"1",@"2",
nil];
//先建立一個數組用於設定標題
UISegmentedControl *segment = [[UISegmentedControlalloc]initW