
Adapter的getView方法詳解
BaseAdapter就Android應用程式中經常用到的基礎資料介面卡,它的主要用途是將一組資料傳到像ListView、Spinner、Gallery及GridView等UI顯示元件,它是繼承自介面類Adapter,我們經常使用的ListView 的adapter,即SimpleAdapter,是繼承自BaseAdapter的,BaseAdapter是一個基類,沒有實現繫結資料的功能,SimpleAdapter實現了基本控制元件的繫結,如TextView,Button,ImageView).已經為我們實現好了資料優化工作,這些介面卡使用相同元件動態繫結資料的方式進行優化。為什麼需要優化呢?因為
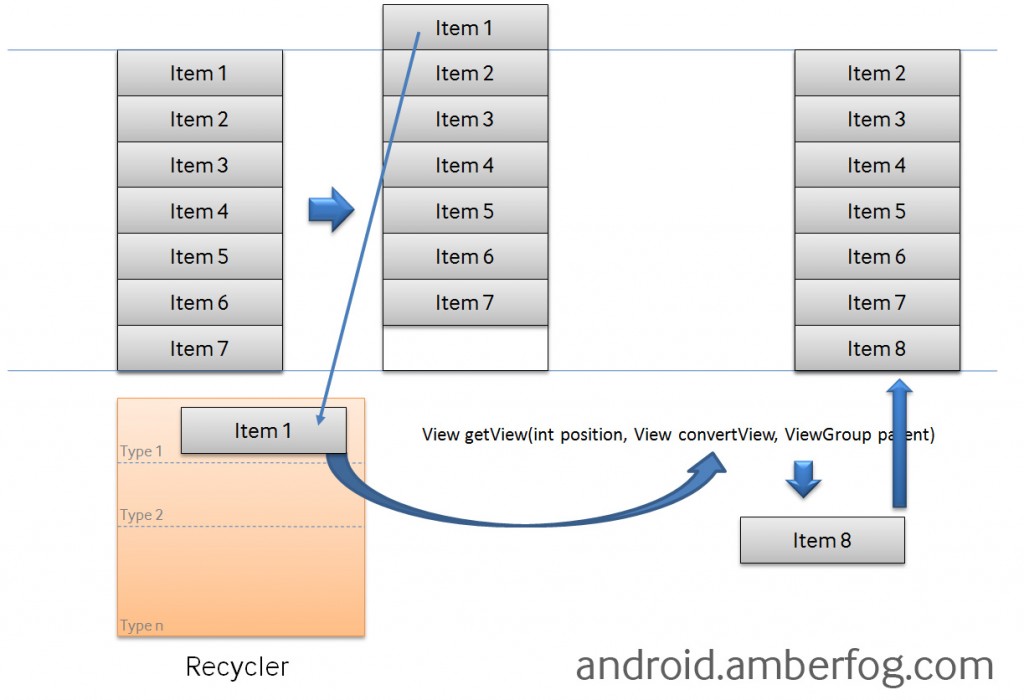
如果你有10億個專案(item),其中只有可見的專案存在記憶體中,其他的在Recycler中。其實我的理解Recyler就是一個佇列,用來儲存不在螢幕範圍內的item,如果item滾出螢幕範圍,那麼就入隊,這裡的滾出是完全滾出,即邊界等也要完全滾出。如果新的item要滾進來,那麼android系統的framework就會檢視Recyler是否含有可以重複使用的iew,如果有那麼就重新設定該iew
的資料來源,然後顯示,即出隊。那麼這麼多的item其實只需要佔用一定空間的記憶體,這個記憶體大小是多少呢?我的感覺是手機螢幕所包含的item的個數,再加上1,然後乘以每個item佔用的記憶體。但是最後我發現是加上2.可能是為了使得快取更大吧。。。。但是為什麼加上2,大家應該理解,如果你不理解,那你就把滾動list的過程好好想一想。那個佇列無非就是一個快取罷了,因為我們的目的是通過那個快取來重複使用那些已經建立的iew。
使用BaseAdapter的話需要過載四個方法,這些方法分別是getCount,getItem,getItemId,最後一個最重要的是getView,getView函式為什麼重要呢?因為它是用來重新整理它所在的ListView的。它在什麼時候呼叫的呢?就是在每一次item從螢幕外滑進螢幕內的時候,或者程式剛開始的時候建立第一屏item的時候。看getView的api:
public abstract View getView (int position, View convertView, ViewGroup parent)
Get a View that displays the data at the specified position in the data set. You can either create a View manually or inflate it from an XML layout file. When the View is inflated, the parent View (GridView, ListView...) will apply default layout parameters unless you use to specify a root view and to prevent attachment to the root.
Parameters
| position | The position of the item within the adapter's data set of the item whose view we want. |
|---|---|
| convertView | The old view to reuse, if possible. Note: You should check that this view is non-null and of an appropriate type before using. If it is not possible to convert this view to display the correct data, this method can create a new view. Heterogeneous lists can specify their number of view types, so that this View is always of the right type (see and ). |
| parent | The parent that this view will eventually be attached to |
Returns
- A View corresponding to the data at the specified position.
為了讓大家更好的理解這個函式,寫了一個程式,請看:
public class MainActivity extends Activity {
@Override
public void onCreate(Bundle savedInstanceState) {
super.onCreate(savedInstanceState);
setContentView(R.layout.activity_main);
ListView lv = (ListView)findViewById(R.id.listview);
ArrayList<String> listdata = new ArrayList<String>();
for(int i=0;i<400;i++){
listdata.add("Item" + i);
}
lv.setAdapter(new MyAdapter(this, listdata));
}
@Override
public boolean onCreateOptionsMenu(Menu menu) {
getMenuInflater().inflate(R.menu.activity_main, menu);
return true;
}
public class MyAdapter extends BaseAdapter{
private ArrayList<String> listdata;
private Context context;
public MyAdapter(Context context,ArrayList<String> listdata){
this.context = context;
this.listdata = listdata;
}
@Override
public int getCount() {
// TODO Auto-generated method stub
return listdata.size();
}
@Override
public Object getItem(int arg0) {
// TODO Auto-generated method stub
return listdata.get(arg0);
}
@Override
public long getItemId(int arg0) {
// TODO Auto-generated method stub
return arg0;
}
@Override
public View getView(int arg0, View arg1, ViewGroup arg2) {
// TODO Auto-generated method stub
Log.i("position",arg0+"");
TextView tmView;
String temstr;
if(arg1 == null){
TextView tm = new TextView(context);
tmView = tm;
tmView.setTag("old" + arg0);
tmView.setText(listdata.get(arg0));
}else {
tmView = (TextView)arg1;
tmView.setText(listdata.get(arg0) + "\t" + arg1.getTag());
}
return tmView;
}
}
}
從log中大家好好觀察相關的輸出結果,便可以將其理解