
centos7 部署Elasticsearch單機/叢集並安裝head外掛實現ES叢集的視覺化管理
centos7 部署Elasticsearch並安裝head外掛實現ES叢集的視覺化管理
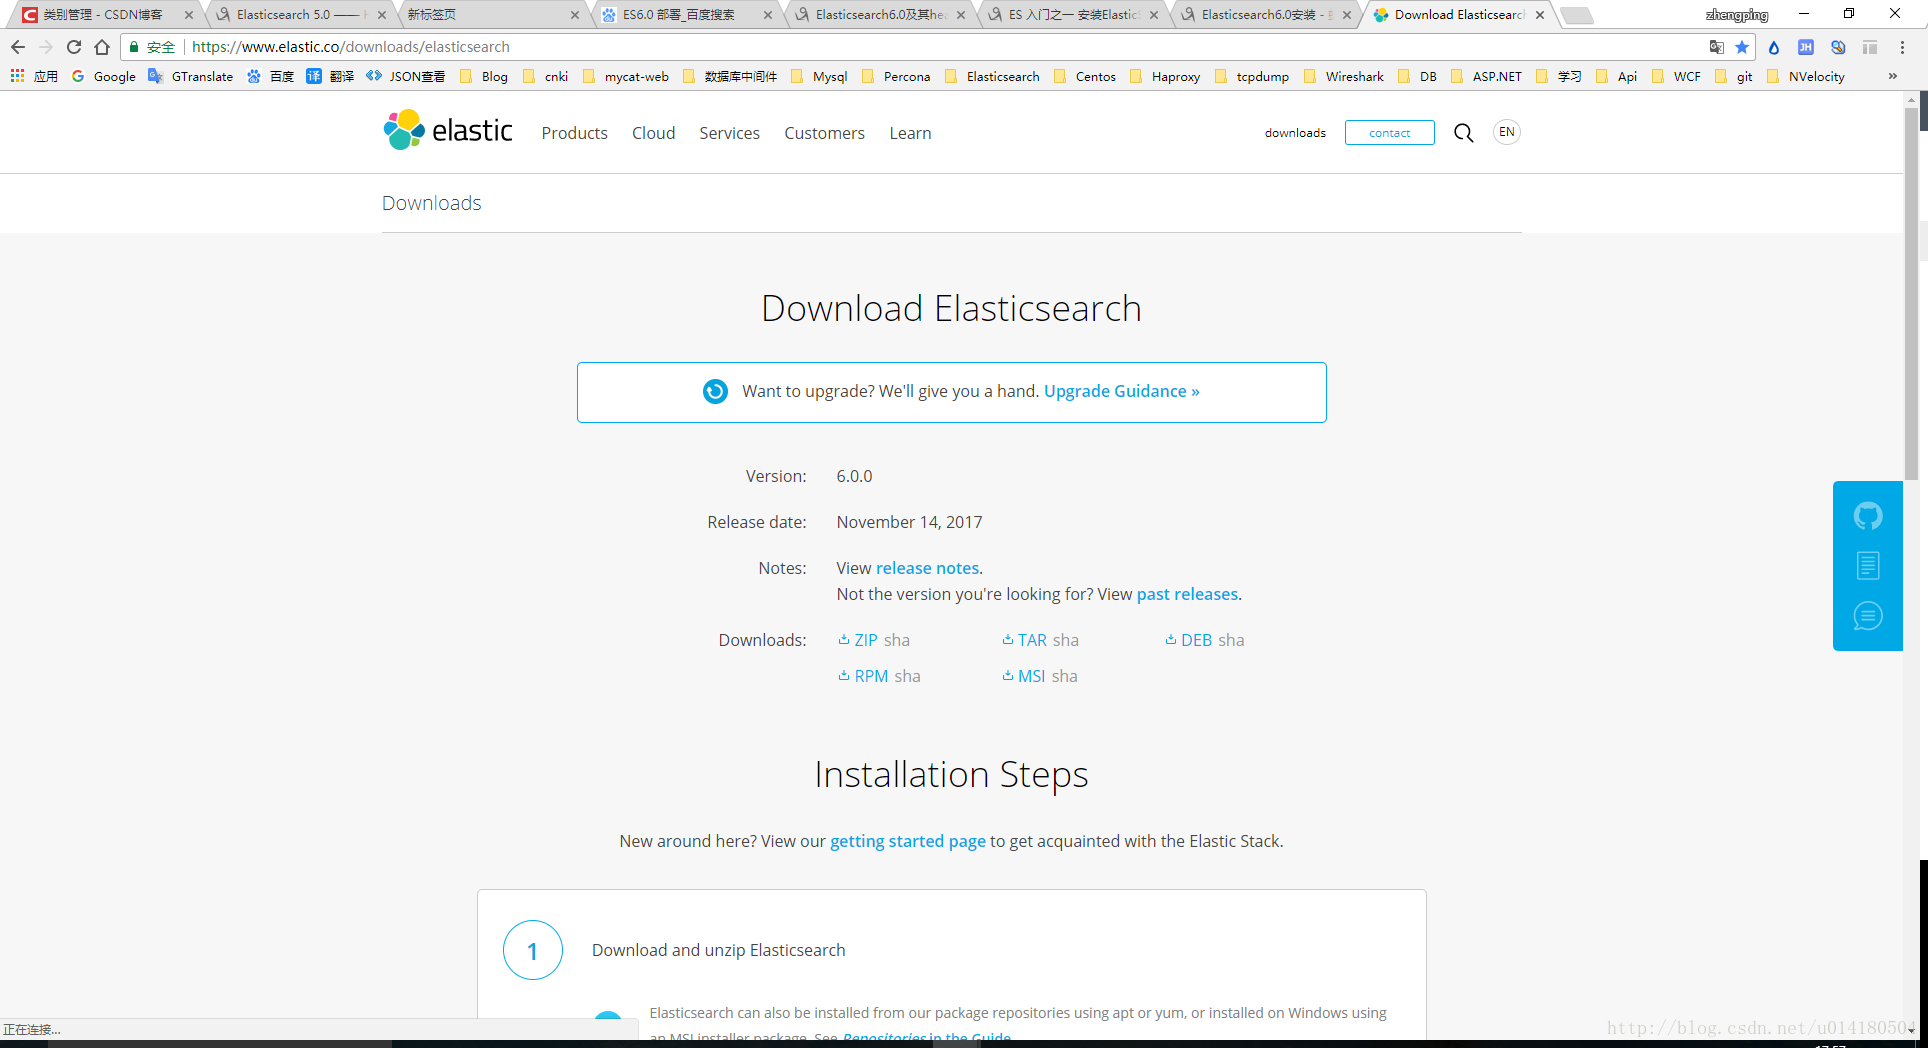
最近看了es的一些介紹想自己動手安裝學習下,畢竟不實際執行是不會遇到坑的,嗯,你沒看錯,全是坑,閒言少敘,直接整體,到ES官網下載
首先機器要安裝jdk 1.8+ 具體參考:安裝教程
[niezp@localhost elasticsearch-6.0.0]$ tar -vxf elasticsearch-6.0.0.tar.gz內部結構
[[email protected] elasticsearch-6.0.0]$ ll
總用量 244
drwxr-xr-x 接下來我們配置 config/elasticsearch.yml檔案
# ======================== Elasticsearch Configuration =========================
#
# NOTE: Elasticsearch comes with reasonable defaults for most settings.
#       Before you set out to tweak and tune the configuration, make sure you
#       understand what are you trying to accomplish and the consequences.
#
# The primary way of configuring a node is via this file. This template lists
# the most important settings you may want to configure for a production cluster.
#
# Please consult the documentation for further information on configuration options:
# https://www.elastic.co/guide/en/elasticsearch/reference/index.html
#
# ---------------------------------- Cluster -----------------------------------
#
# Use a descriptive name for your cluster:
#
#cluster.name: my-application
#
# ------------------------------------ Node ------------------------------------
#
# Use a descriptive name for the node:
#
#node.name: node-1
#
# Add custom attributes to the node:
#
#node.attr.rack: r1
#
# ----------------------------------- Paths ------------------------------------
#
# Path to directory where to store the data (separate multiple locations by comma):
#
#path.data: /path/to/data
#
# Path to log files:
#
#path.logs: /path/to/logs
#
# ----------------------------------- Memory -----------------------------------
#
# Lock the memory on startup:
#
#bootstrap.memory_lock: true
#
# Make sure that the heap size is set to about half the memory available
# on the system and that the owner of the process is allowed to use this
# limit.
#
# Elasticsearch performs poorly when the system is swapping the memory.
#
# ---------------------------------- Network -----------------------------------
#
# Set the bind address to a specific IP (IPv4 or IPv6):
#
#network.host: 0.0.0.0
#
# Set a custom port for HTTP:
#
#http.port: 9200
#
# For more information, consult the network module documentation.
#
# --------------------------------- Discovery ----------------------------------
#
# Pass an initial list of hosts to perform discovery when new node is started:
# The default list of hosts is ["127.0.0.1", "[::1]"]
#
#discovery.zen.ping.unicast.hosts: ["host1", "host2"]
#
# Prevent the "split brain" by configuring the majority of nodes (total number of master-eligible nodes / 2 + 1):
#
#discovery.zen.minimum_master_nodes: 3
#
# For more information, consult the zen discovery module documentation.
#
# ---------------------------------- Gateway -----------------------------------
#
# Block initial recovery after a full cluster restart until N nodes are started:
#
#gateway.recover_after_nodes: 3
#
# For more information, consult the gateway module documentation.
#
# ---------------------------------- Various -----------------------------------
#
# Require explicit names when deleting indices:
#
#action.destructive_requires_name: true

# 叢集的名字
cluster.name: niezp

# 節點名字
node.name: niezp-master
#是否是master
node.master: true

#ES的監聽地址,這樣別的機器也可以訪問
network.host: 192.168.174.148

# 預設的就好
http.port: 9200

#本機最大允許執行節點個數
node.max_local_storage_nodes: 3

# 增加新的引數,這樣head外掛可以訪問es,解決跨域訪問問題
http.cors.enabled: true
http.cors.allow-origin: "*"
這裡ES配置就結束了,對沒有錯,就這麼簡單
啟動ES:
[niezp@localhost elasticsearch-6.0.0]$ ./bin/elasticsearch注意執行目錄
看到輸出如下資訊 started
[2017-12-06T15:20:46,189][INFO ][o.e.e.NodeEnvironment    ] [niezp-master] using [1] data paths, mounts [[/ (rootfs)]], net usable_space [11.2gb], net total_space [36.9gb], types [rootfs]
[2017-12-06T15:20:46,189][INFO ][o.e.e.NodeEnvironment    ] [niezp-master] heap size [495.3mb], compressed ordinary object pointers [true]
[2017-12-06T15:20:46,190][INFO ][o.e.n.Node               ] [niezp-master] node name [niezp-master], node ID [Jena8SthQXiBtzcs5-y0QQ]
[2017-12-06T15:20:46,191][INFO ][o.e.n.Node               ] [niezp-master] version[6.0.0], pid[5031], build[8f0685b/2017-11-10T18:41:22.859Z], OS[Linux/3.10.0-514.el7.x86_64/amd64], JVM[Oracle Corporation/Java HotSpot(TM) 64-Bit Server VM/1.8.0_131/25.131-b11]
[2017-12-06T15:20:46,191][INFO ][o.e.n.Node               ] [niezp-master] JVM arguments [-Xms512M, -Xmx512M, -XX:+UseConcMarkSweepGC, -XX:CMSInitiatingOccupancyFraction=75, -XX:+UseCMSInitiatingOccupancyOnly, -XX:+AlwaysPreTouch, -Xss1m, -Djava.awt.headless=true, -Dfile.encoding=UTF-8, -Djna.nosys=true, -XX:-OmitStackTraceInFastThrow, -Dio.netty.noUnsafe=true, -Dio.netty.noKeySetOptimization=true, -Dio.netty.recycler.maxCapacityPerThread=0, -Dlog4j.shutdownHookEnabled=false, -Dlog4j2.disable.jmx=true, -XX:+HeapDumpOnOutOfMemoryError, -Des.path.home=/home/niezp/ES/elasticsearch-6.0.0, -Des.path.conf=/home/niezp/ES/elasticsearch-6.0.0/config]
[2017-12-06T15:20:47,036][INFO ][o.e.p.PluginsService     ] [niezp-master] loaded module [aggs-matrix-stats]
[2017-12-06T15:20:47,037][INFO ][o.e.p.PluginsService     ] [niezp-master] loaded module [analysis-common]
[2017-12-06T15:20:47,037][INFO ][o.e.p.PluginsService     ] [niezp-master] loaded module [ingest-common]
[2017-12-06T15:20:47,037][INFO ][o.e.p.PluginsService     ] [niezp-master] loaded module [lang-expression]
[2017-12-06T15:20:47,037][INFO ][o.e.p.PluginsService     ] [niezp-master] loaded module [lang-mustache]
[2017-12-06T15:20:47,037][INFO ][o.e.p.PluginsService     ] [niezp-master] loaded module [lang-painless]
[2017-12-06T15:20:47,038][INFO ][o.e.p.PluginsService     ] [niezp-master] loaded module [parent-join]
[2017-12-06T15:20:47,038][INFO ][o.e.p.PluginsService     ] [niezp-master] loaded module [percolator]
[2017-12-06T15:20:47,038][INFO ][o.e.p.PluginsService     ] [niezp-master] loaded module [reindex]
[2017-12-06T15:20:47,038][INFO ][o.e.p.PluginsService     ] [niezp-master] loaded module [repository-url]
[2017-12-06T15:20:47,038][INFO ][o.e.p.PluginsService     ] [niezp-master] loaded module [transport-netty4]
[2017-12-06T15:20:47,038][INFO ][o.e.p.PluginsService     ] [niezp-master] loaded module [tribe]
[2017-12-06T15:20:47,039][INFO ][o.e.p.PluginsService     ] [niezp-master] no plugins loaded
[2017-12-06T15:20:48,519][INFO ][o.e.d.DiscoveryModule    ] [niezp-master] using discovery type [zen]
[2017-12-06T15:20:49,097][INFO ][o.e.n.Node               ] [niezp-master] initialized
[2017-12-06T15:20:49,098][INFO ][o.e.n.Node               ] [niezp-master] starting ...
[2017-12-06T15:20:49,253][INFO ][o.e.t.TransportService   ] [niezp-master] publish_address {127.0.0.1:9300}, bound_addresses {127.0.0.1:9300}
[2017-12-06T15:20:52,347][INFO ][o.e.c.s.MasterService    ] [niezp-master] zen-disco-elected-as-master ([0] nodes joined), reason: new_master {niezp-master}{Jena8SthQXiBtzcs5-y0QQ}{ctySsfBQRp2BgGHXAhj_FQ}{127.0.0.1}{127.0.0.1:9300}
[2017-12-06T15:20:52,356][INFO ][o.e.c.s.ClusterApplierService] [niezp-master] new_master {niezp-master}{Jena8SthQXiBtzcs5-y0QQ}{ctySsfBQRp2BgGHXAhj_FQ}{127.0.0.1}{127.0.0.1:9300}, reason: apply cluster state (from master [master {niezp-master}{Jena8SthQXiBtzcs5-y0QQ}{ctySsfBQRp2BgGHXAhj_FQ}{127.0.0.1}{127.0.0.1:9300} committed version [1] source [zen-disco-elected-as-master ([0] nodes joined)]])
[2017-12-06T15:20:52,375][INFO ][o.e.h.n.Netty4HttpServerTransport] [niezp-master] publish_address {127.0.0.1:9200}, bound_addresses {127.0.0.1:9200}
[2017-12-06T15:20:52,375][INFO ][o.e.n.Node               ] [niezp-master] started
[2017-12-06T15:20:52,419][INFO ][o.e.g.GatewayService     ] [niezp-master] recovered [0] indices into cluster_state
[2017-12-06T15:20:52,375][INFO ][o.e.n.Node] [niezp-master] started 就說明啟動成功
開啟瀏覽器訪問
#ES的監聽地址,這樣別的機器也可以訪問
network.host: 192.168.174.148
配置過的ip地址加9200埠
{
  "name" : "niezp-master",
  "cluster_name" : "niezp",
  "cluster_uuid" : "q7r5GHy4QsOyN_rKyW1K9A",
  "version" : {
    "number" : "6.0.0",
    "build_hash" : "8f0685b",
    "build_date" : "2017-11-10T18:41:22.859Z",
    "build_snapshot" : false,
    "lucene_version" : "7.0.1",
    "minimum_wire_compatibility_version" : "5.6.0",
    "minimum_index_compatibility_version" : "5.0.0"
  },
  "tagline" : "You Know, for Search"
}
返回如下資訊,是不是看著眼熟,name,cluster_name就是我們自定義配置的資訊,至此單機節店就安裝完了,如果啟動報錯
[[email protected] bin]$ sh elasticsearch
[2017-11-23T23:25:41,142][INFO ][o.e.n.Node               ] [] initializing ...
[2017-11-23T23:25:41,203][INFO ][o.e.e.NodeEnvironment    ] [l2KjKQB] using [1] data paths, mounts [[/ (rootfs)]], net usable_space [28.4gb], net total_space [35.5gb], types [rootfs]
[2017-11-23T23:25:41,204][INFO ][o.e.e.NodeEnvironment    ] [l2KjKQB] heap size [989.8mb], compressed ordinary object pointers [true]
[2017-11-23T23:25:41,205][INFO ][o.e.n.Node               ] node name [l2KjKQB] derived from node ID [l2KjKQBBSRacQ3kzNB2Qgg]; set [node.name] to override
[2017-11-23T23:25:41,205][INFO ][o.e.n.Node               ] version[6.0.0], pid[9359], build[8f0685b/2017-11-10T18:41:22.859Z], OS[Linux/3.10.0-514.26.2.el7.x86_64/amd64], JVM[Oracle Corporation/Java HotSpot(TM) 64-Bit Server VM/1.8.0_121/25.121-b13]
[2017-11-23T23:25:41,205][INFO ][o.e.n.Node               ] JVM arguments [-Xms1g, -Xmx1g, -XX:+UseConcMarkSweepGC, -XX:CMSInitiatingOccupancyFraction=75, -XX:+UseCMSInitiatingOccupancyOnly, -XX:+AlwaysPreTouch, -Xss1m, -Djava.awt.headless=true, -Dfile.encoding=UTF-8, -Djna.nosys=true, -XX:-OmitStackTraceInFastThrow, -Dio.netty.noUnsafe=true, -Dio.netty.noKeySetOptimization=true, -Dio.netty.recycler.maxCapacityPerThread=0, -Dlog4j.shutdownHookEnabled=false, -Dlog4j2.disable.jmx=true, -XX:+HeapDumpOnOutOfMemoryError, -Des.path.home=/usr/local/elasticsearch/elasticsearch-6.0.0, -Des.path.conf=/usr/local/elasticsearch/elasticsearch-6.0.0/config]
[2017-11-23T23:25:41,852][INFO ][o.e.p.PluginsService     ] [l2KjKQB] loaded module [aggs-matrix-stats]
[2017-11-23T23:25:41,853][INFO ][o.e.p.PluginsService     ] [l2KjKQB] loaded module [analysis-common]
[2017-11-23T23:25:41,853][INFO ][o.e.p.PluginsService     ] [l2KjKQB] loaded module [ingest-common]
[2017-11-23T23:25:41,853][INFO ][o.e.p.PluginsService     ] [l2KjKQB] loaded module [lang-expression]
[2017-11-23T23:25:41,853][INFO ][o.e.p.PluginsService     ] [l2KjKQB] loaded module [lang-mustache]
[2017-11-23T23:25:41,853][INFO ][o.e.p.PluginsService     ] [l2KjKQB] loaded module [lang-painless]
[2017-11-23T23:25:41,853][INFO ][o.e.p.PluginsService     ] [l2KjKQB] loaded module [parent-join]
[2017-11-23T23:25:41,853][INFO ][o.e.p.PluginsService     ] [l2KjKQB] loaded module [percolator]
[2017-11-23T23:25:41,853][INFO ][o.e.p.PluginsService     ] [l2KjKQB] loaded module [reindex]
[2017-11-23T23:25:41,854][INFO ][o.e.p.PluginsService     ] [l2KjKQB] loaded module [repository-url]
[2017-11-23T23:25:41,854][INFO ][o.e.p.PluginsService     ] [l2KjKQB] loaded module [transport-netty4]
[2017-11-23T23:25:41,854][INFO ][o.e.p.PluginsService     ] [l2KjKQB] loaded module [tribe]
[2017-11-23T23:25:41,854][INFO ][o.e.p.PluginsService     ] [l2KjKQB] no plugins loaded
[2017-11-23T23:25:42,794][INFO ][o.e.d.DiscoveryModule    ] [l2KjKQB] using discovery type [zen]
[2017-11-23T23:25:43,151][INFO ][o.e.n.Node               ] initialized
[2017-11-23T23:25:43,151][INFO ][o.e.n.Node               ] [l2KjKQB] starting ...
[2017-11-23T23:25:43,245][INFO ][o.e.t.TransportService   ] [l2KjKQB] publish_address {192.168.1.108:9300}, bound_addresses {[::]:9300}
[2017-11-23T23:25:43,253][INFO ][o.e.b.BootstrapChecks    ] [l2KjKQB] bound or publishing to a non-loopback or non-link-local address, enforcing bootstrap checks
ERROR: [2] bootstrap checks failed
[1]: max file descriptors [4096] for elasticsearch process is too low, increase to at least [65536]
[2]: max virtual memory areas vm.max_map_count [65530] is too low, increase to at least [262144]
[2017-11-23T23:25:43,258][INFO ][o.e.n.Node               ] [l2KjKQB] stopping ...
[2017-11-23T23:25:43,308][INFO ][o.e.n.Node               ] [l2KjKQB] stopped
[2017-11-23T23:25:43,308][INFO ][o.e.n.Node               ] [l2KjKQB] closing ...
[2017-11-23T23:25:43,314][INFO ][o.e.n.Node               ] [l2KjKQB] closed
重點資訊
ERROR: [2] bootstrap checks failed
[1]: max file descriptors [4096] for elasticsearch process is too low, increase to at least [65536]
[2]: max virtual memory areas vm.max_map_count [65530] is too low, increase to at least [262144]
這裡需要我們修改
1.max file descriptors [4096] for elasticsearch process is too low, increase to at least [65536]

修改/etc/security/limits.conf檔案,新增或修改如下行:
*        hard    nofile           65536
*        soft    nofile           65536
2.max virtual memory areas vm.max......

修改 /etc/sysctl.conf 檔案,新增如下行:

vm.max_map_count=262144
修改好了以後,呼叫sysctl -a檢視,發現引數並沒有變動,要重啟才可以。

重啟以後,再啟動es即可,就可以通過主機ip訪問。
如果是記憶體不足就需要調整記憶體大小了或者調整config/jvm.options的引數
-Xms1g
-Xmx1g
改為
-Xms512M
-Xmx512M如果還不行就需要擴充記憶體了。還有很多坑可以參考各種坑
下面說下怎麼安裝head外掛並構成多個節點的叢集,這裡我們先說安裝head外掛,可以說我在安裝是遇到了很多坑,看了很多部落格被誤導,廢了半天時間,下面來說下:
下載外掛:
wget https://github.com/mobz/elasticsearch-head/archive/master.zip由於執行head需要執行node所以也要下載node,具體版本可以參考node
wget https://npm.taobao.org/mirrors/node/latest-v4.x/node-v4.4.7-linux-x64.tar.gz
tar -zxvf node-v4.4.7-linux-x64.tar.gz
增加以下配置:
JAVA_HOME=/home/soft/jdk1.8.0_131
JRE_HOME=/home/soft/jdk1.8.0_131/jre
NODE_HOME=/home/niezp/ES/node-v0.10.28-linux-x64
CLASS_PATH=.:$JAVA_HOME/lib/dt.jar:$JAVA_HOME/lib/tools.jar:$JRE_HOME/lib
PATH=$PATH:$JAVA_HOME/bin:$JRE_HOME/bin:$NODE_HOME/bin
NODE_PATH=$NODE_HOME/lib/node_modules

export JAVA_HOME JRE_HOME NODE_PATH CLASS_PATH PATH NODE_PATH
修改完儲存並
source /etc/profile這裡遇到了大坑啊,由於ES啟動時不建議用root賬戶的所以我直接用其他的賬戶登入之後修改,但是不讓改沒許可權,然後我就切換到root修改也source 了,但是在切換回其他賬戶的時候
echo $NODE_HOME死活是空的,我就納悶了,在看也修改了,這裡就埋下了坑,就直接說解決方案吧,哭死了,必須在用當前賬戶在 source /etc/profile一次才行,在
echo $NODE_HOME就會輸出配置的資訊,眼淚啊,不熟悉centos的人
安裝grunt
接下來解壓下載的master.zip,進入下載的elasticsearch-head-master,
執行
[root@localnode1 elasticsearch-head-master]#npm install -g grunt-cli 接下來檢查grunt 安裝是否成功
[root@localnode1 elasticsearch-head]# grunt -version
grunt-cli v1.2.0
grunt v0.4.5
輸出版本說明成功
修改head外掛原始碼:
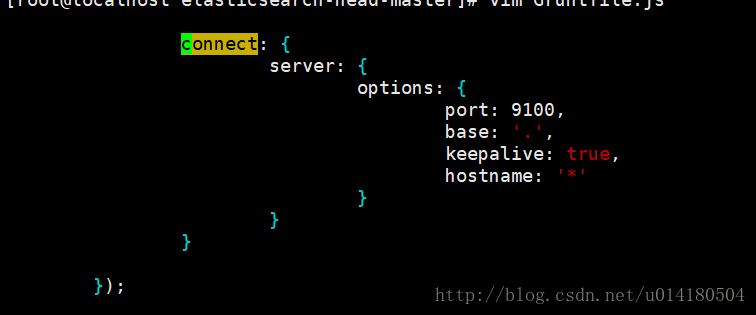
修改伺服器監聽地址:Gruntfile.js
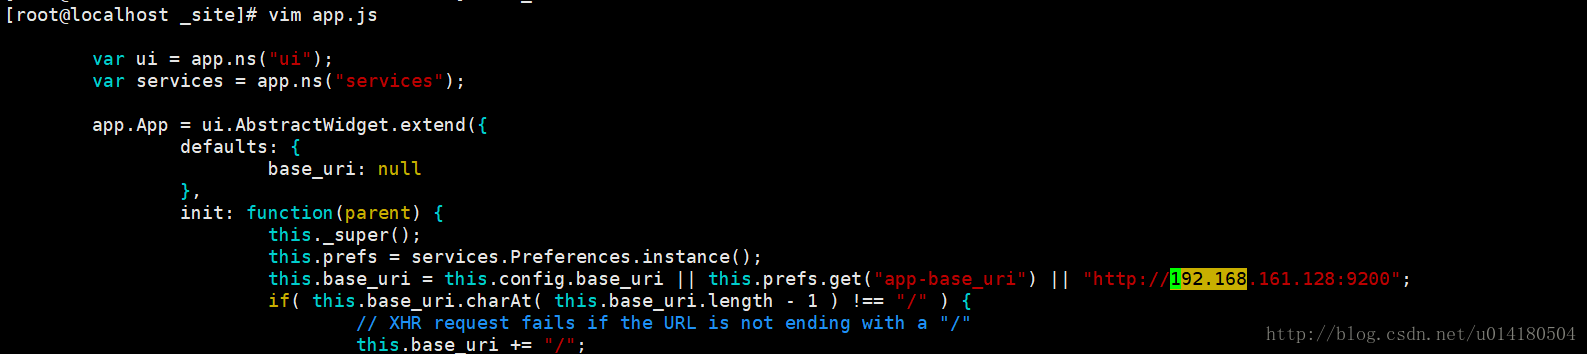
修改修改連線地址:_site/app.js
在elasticsearch-head-master目錄下
[root@localnode1 elasticsearch-head]# npm install
[root@localnode1 elasticsearch-head]# grunt server
啟動成功就可以訪問127.0.0.1:9100就可以看到如下介面

當然是只有一個節點資訊的,具體介面操作就自行學習吧
最後說下叢集部署
分別拷貝下載的es檔案在三個不同的資料夾下,分別配置config/elasticsearch.yml
例項: ES1資料夾下的配置:
# ======================== Elasticsearch Configuration =========================
#
# NOTE: Elasticsearch comes with reasonable defaults for most settings.
#       Before you set out to tweak and tune the configuration, make sure you
#       understand what are you trying to accomplish and the consequences.
#
# The primary way of configuring a node is via this file. This template lists
# the most important settings you may want to configure for a production cluster.
#
# Please consult the documentation for further information on configuration options:
# https://www.elastic.co/guide/en/elasticsearch/reference/index.html
#
# ---------------------------------- Cluster -----------------------------------
#
# Use a descriptive name for your cluster:
#
#cluster.name: my-application
#
# ------------------------------------ Node ------------------------------------
#
# Use a descriptive name for the node:
#
#node.name: node-1
#
# Add custom attributes to the node:
#
#node.attr.rack: r1
#
# ----------------------------------- Paths ------------------------------------
#
# Path to directory where to store the data (separate multiple locations by comma):
#
#path.data: /path/to/data
#
# Path to log files:
#
#path.logs: /path/to/logs
#
# ----------------------------------- Memory -----------------------------------
#
# Lock the memory on startup:
#
#bootstrap.memory_lock: true
#
# Make sure that the heap size is set to about half the memory available
# on the system and that the owner of the process is allowed to use this
# limit.
#
# Elasticsearch performs poorly when the system is swapping the memory.
#
# ---------------------------------- Network -----------------------------------
#
# Set the bind address to a specific IP (IPv4 or IPv6):
#
#network.host: 0.0.0.0
#
# Set a custom port for HTTP:
#
#http.port: 9200
#
# For more information, consult the network module documentation.
#
# --------------------------------- Discovery ----------------------------------
#
# Pass an initial list of hosts to perform discovery when new node is started:
# The default list of hosts is ["127.0.0.1", "[::1]"]
#
#discovery.zen.ping.unicast.hosts: ["host1", "host2"]
#
# Prevent the "split brain" by configuring the majority of nodes (total number of master-eligible nodes / 2 + 1):
#
#discovery.zen.minimum_master_nodes: 3
#
# For more information, consult the zen discovery module documentation.
#
# ---------------------------------- Gateway -----------------------------------
#
# Block initial recovery after a full cluster restart until N nodes are started:
#
#gateway.recover_after_nodes: 3
#
# For more information, consult the gateway module documentation.
#
# ---------------------------------- Various -----------------------------------
#
# Require explicit names when deleting indices:
#
#action.destructive_requires_name: true

# 叢集的名字  必須與其他機器相同
cluster.name: niezp

# 節點名字,必須與其他節點不同
node.name: niezp-slave1

# 修改一下ES的監聽地址,這樣別的機器也可以訪問
network.host: 192.168.174.148

#  不能和其他的節點相同
http.port: 9202
#這裡要說下,這裡的IP地址就是你的mater es的機器ip地址,比如部署在本機可以下127.0.0.1 別的機器就寫別的機器的ip
discovery.zen.ping.unicast.hosts: ["192.168.174.148"]
node.max_local_storage_nodes: 3
# 增加新的引數,這樣head外掛可以訪問es
#http.cors.enabled: true
#http.cors.allow-origin: "*"
例項: ES2資料夾下的配置:
# ======================== Elasticsearch Configuration =========================
#
# NOTE: Elasticsearch comes with reasonable defaults for most settings.
#       Before you set out to tweak and tune the configuration, make sure you
#       understand what are you trying to accomplish and the consequences.
#
# The primary way of configuring a node is via this file. This template lists
# the most important settings you may want to configure for a production cluster.
#
# Please consult the documentation for further information on configuration options:
# https://www.elastic.co/guide/en/elasticsearch/reference/index.html
#
# ---------------------------------- Cluster -----------------------------------
#
# Use a descriptive name for your cluster:
#
#cluster.name: my-application
#
# ------------------------------------ Node ------------------------------------
#
# Use a descriptive name for the node:
#
#node.name: node-1
#
# Add custom attributes to the node:
#
#node.attr.rack: r1
#
# ----------------------------------- Paths ------------------------------------
#
# Path to directory where to store the data (separate multiple locations by comma):
#
#path.data: /path/to/data
#
# Path to log files:
#
#path.logs: /path/to/logs
#
# ----------------------------------- Memory -----------------------------------
#
# Lock the memory on startup:
#
#bootstrap.memory_lock: true
#
# Make sure that the heap size is set to about half the memory available
# on the system and that the owner of the process is allowed to use this
# limit.
#
# Elasticsearch performs poorly when the system is swapping the memory.
#
# ---------------------------------- Network -----------------------------------
#
# Set the bind address to a specific IP (IPv4 or IPv6):
#
#network.host: 0.0.0.0
#
# Set a custom port for HTTP:
#
#http.port: 9200
#
# For more information, consult the network module documentation.
#
# --------------------------------- Discovery ----------------------------------
#
# Pass an initial list of hosts to perform discovery when new node is started:
# The default list of hosts is ["127.0.0.1", "[::1]"]
#
#discovery.zen.ping.unicast.hosts: ["host1", "host2"]
#
# Prevent the "split brain" by configuring the majority of nodes (total number of master-eligible nodes / 2 + 1):
#
#discovery.zen.minimum_master_nodes: 3
#
# For more information, consult the zen discovery module documentation.
#
# ---------------------------------- Gateway -----------------------------------
#
# Block initial recovery after a full cluster restart until N nodes are started:
#
#gateway.recover_after_nodes: 3
#
# For more information, consult the gateway module documentation.
#
# ---------------------------------- Various -----------------------------------
#
# Require explicit names when deleting indices:
#
#action.destructive_requires_name: true

# 叢集的名字  必須與其他機器相同
cluster.name: niezp

# 節點名字,必須與其他節點不同
node.name: niezp-slave2

# 修改一下ES的監聽地址,這樣別的機器也可以訪問
network.host: 192.168.174.148

# 不能和其他的節點相同
http.port: 9201
#同例項1說明
discovery.zen.ping.unicast.hosts: ["192.168.174.148"]
node.max_local_storage_nodes: 3
# 增加新的引數,這樣head外掛可以訪問es
#http.cors.enabled: true
#http.cors.allow-origin: "*"
這樣啟動三個節點之後就能在head中看到如下介面
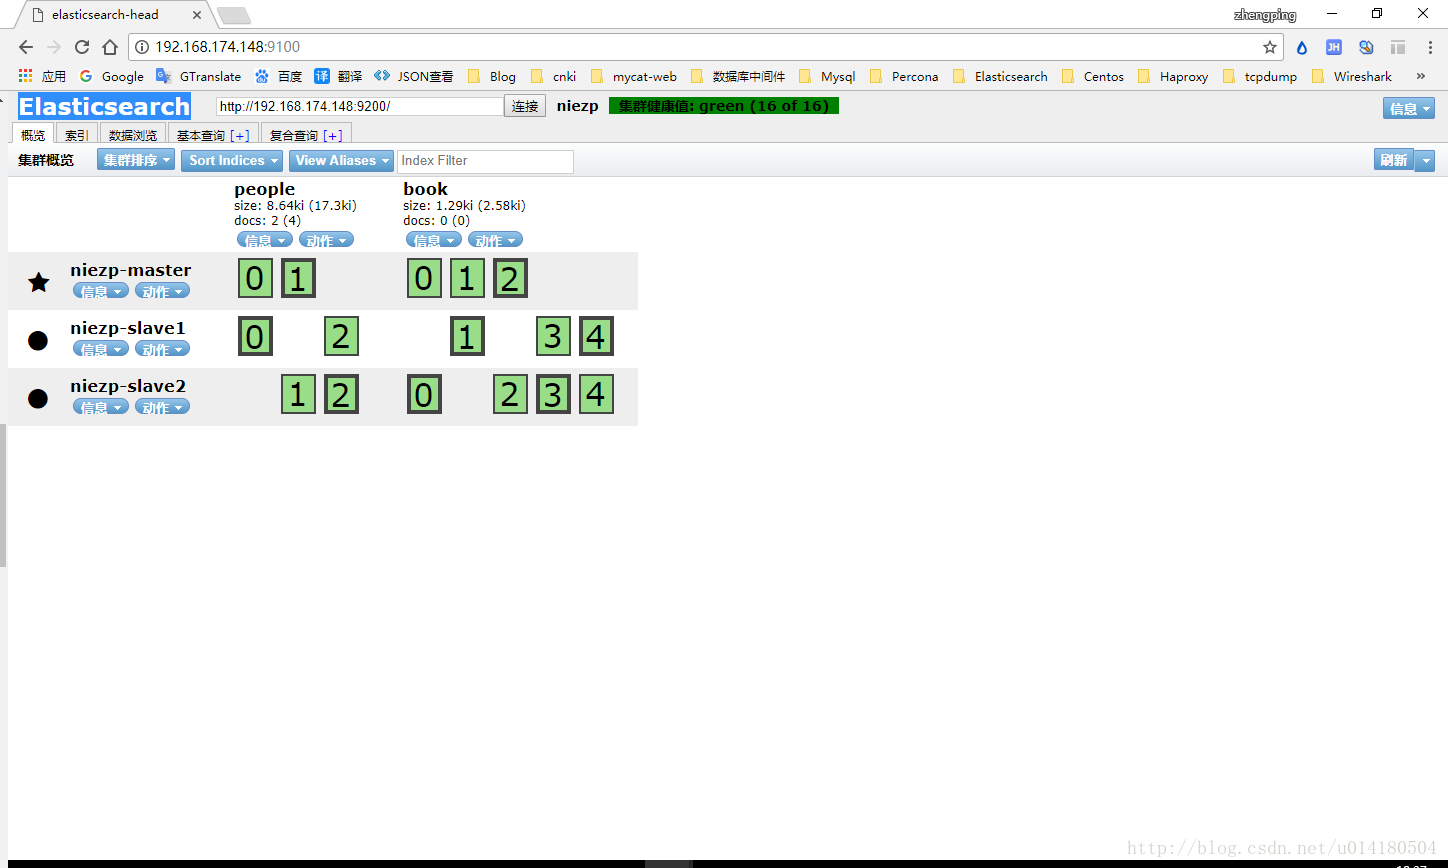
就已經搭建完成了叢集
相關推薦
centos7 部署Elasticsearch單機/叢集並安裝head外掛實現ES叢集的視覺化管理
centos7 部署Elasticsearch並安裝head外掛實現ES叢集的視覺化管理 最近看了es的一些介紹想自己動手安裝學習下,畢竟不實際執行是不會遇到坑的,嗯,你沒看錯,全是坑,閒言少敘,直接整體,到ES官網下載 這裡我直接下載zip檔案, 首先機
elasticsearch 5 0 版本安裝head外掛
分享一下我老師大神的人工智慧教程!零基礎,通俗易懂!http://blog.csdn.net/jiangjunshow 也歡迎大家轉載本篇文章。分享知識,造福人民,實現我們中華民族偉大復興!
WebSSH2安裝過程可實現WEB可視化管理SSH工具
pytho 過程 cheungssh sci mas sgi tle server github 目錄 Chrome web Secure Shell Extension gotty GateOne noVNC+vncser
CentOS7部署ElasticSearch 5.2.2 版本叢集搭建
CentOS7(CentOS Linux release 7.3.1611 (Core))部署ElasticSearch-5.2.2集群系統規劃 節點名稱 內部IP地址 對外IP地址 軟體版本 no
window7部署squid代理,並安裝成服務
squid代理1.下載軟件http://squid.acmeconsulting.it/也可以使用附件中的文件,該配置使用squid-2.7.STABLE8版本2.解壓縮解壓到C盤,命名為squid3.在D盤創建var\cache,和var\logs目錄4.進入c:\squid\etc4.1拷貝squid.c
elasticsearch-5.5.1安裝head客戶端
elk head eleaticsearch 1、安裝nodejs、npm、gruntcurl -sL -o /etc/yum.repos.d/khara-nodejs.repo https://copr.fedoraproject.org/coprs/khara/nodejs/repo/epel
小白學ES 02-Linux中部署Elasticsearch單機服務(5.6.10版本)
目錄 1 前提: 安裝JDK 2 準備安裝包 3 建立ES專用使用者 4 啟動ES服務 5 驗證ES服務是否可用 6 關閉ES服務 7 重啟ES服務 8 常見問題的解決 此部署過程以Elasticsearch-5.6.10版本為例, 後續的學習和演示也用此版本.
ElasticSearch-5.0安裝head外掛
環境 Windows10企業版X64 JDK-1.8 ElasticSearch-5.0.0 node-v4.5.0-x64.msi git客戶端 步驟 安裝node到D盤。如D:\nodejs。 把NODE_HOME設定到環境變數裡(安裝包也可以自動
Centos7.1搭建pyenv環境並安裝python 2.7.10
[[email protected] ~]# cat /etc/redhat-release CentOS Linux release 7.1.1503 (Core) -----------------------------------------------
es6.4叢集安裝 head外掛
基本概念 Elasticsearch 是一個Near Realtime近實時的搜尋平臺。這意味著從您索引一個文件開始直到它可以被查詢時會有輕微的延遲時間(通常為一秒)。 Cluster(叢集) Elasticsearch 啟動時會根據配置檔案中設定的叢集名字(cluster.na
elasticsearch安裝head外掛
1024,今天是程式設計師節哦,祝各位大佬節日快樂..... 今天呢,介紹下在ES中如何安裝head外掛? elasticsearch head外掛是一個入門級的elasticsearch前端外掛;我們來安裝下; 第一步:安裝node.js
小白學ES 02-Linux中部署Elasticsearch單機服務
目錄 此部署過程以Elasticsearch-5.6.10版本為例, 後續的學習和演示也用此版本. 1 前提: 安裝JDK 學習使用ES的前提是成功安裝JDK —— 很基礎的一項步驟, 這裡省略. 此處學習演示所用的JDK版本為: [[email protected] ~]# java -ve
Elasticsearch 5.x安裝head外掛
ES 5.0以上版本中不支援直接安裝head外掛,需要啟動一個服務。 head外掛是一個nodejs的工程,因此需要先安裝nodejs,使用npm來安裝依賴的包。 這裡使用了淘寶的cnpm來加速~ which yum &> /dev/null && yum
Elasticsearch 5.5.0及 head外掛安裝指南
ES5.0及以上的版本相比於上一個版本2.3.4(2015年10月釋出)有了很大的提升和優化,期間間隔一年時間。 效能上相比之前版本磁碟佔用大小減少50%,索引時間降低50%,文件合併時間降低50%,JAVA的對記憶體佔用降低近50%,同時查詢的效能也提升了四分之一左右。
ElasticSearch-5.x 安裝head外掛
環境 Windows10企業版X64JDK-1.8ElasticSearch-5.0.0node-v4.5.0-x64.msigit客戶端步驟 安裝node到D盤。如D:\nodejs。 把NODE_HOME設定到環境變數裡(安裝包也可以自動加入PATH環境變數)。測試一下
騰訊雲centos7部署javaweb專案,並通過域名訪問
具體部署步驟 這裡我用的工具是Xmanager Enterprise 4(xshell和xftp) xshell的設定步驟 1、點選新建會彈出對話,點選連線設定名稱,主機,然後確定 名稱隨便取,我取的是騰訊雲+ip,主機就填伺服器ip 2、點選使用者身份驗證設定使用者
elasticsearch 5.1.1版本升級筆記之安裝Head外掛
分享的安裝檔案下載:點選開啟連結 1.上傳安裝包。 在/data/elasticsearch目錄下上傳檔案: elasticsearch-5.1.1.tar.gz node-v7.2.1-linux-x64.tar.gz elasticsearch-head.tar.gz jdk-8u111-linux-
windows 下elasticsearch5.x 安裝head 外掛
windows 下elasticsearch5.x 安裝head 外掛 elasticsearch5.0 和2有了很大的變化,以前的很多外掛都有了變化比如 bigdesk head,以下是安裝head的方法 參考了http://blog.csdn.net/qq942477618/a
ElasticSearch6.0安裝head外掛出現問題解決辦法
1、安裝head外掛 需要注意的是下載的head專案不要在ElasticSearch安裝目錄下,重新起一個目錄。 這裡可以參考其他人的部落格: http://blog.csdn.net/llwwlql/article/details/77162277 2、安裝完成後可能出現的問題: h
elasticsearch6.x安裝head外掛
1.安裝依賴nodejs wget --no-check-certificate https://nodejs.org/dist/v9.9.0/node-v9.9.0-linux-x64.tar.xz tar -xf node-v9.9.0-linux-x64.tar.xz mv