ionic3 實現掃碼功能
阿新 • • 發佈:2019-01-22
ionic3 通過外掛phonegap-plugin-barcodescanner,呼叫機器硬體攝像頭實現掃碼功能。
首先當然先了解下 phonegap-plugin-barcodescanner,這個外掛。
支援的平臺
- Android的
- iOS版
- Windows(Windows / Windows Phone 8.1和Windows 10)
- Windows Phone 8
- 黑莓10
- 瀏覽器
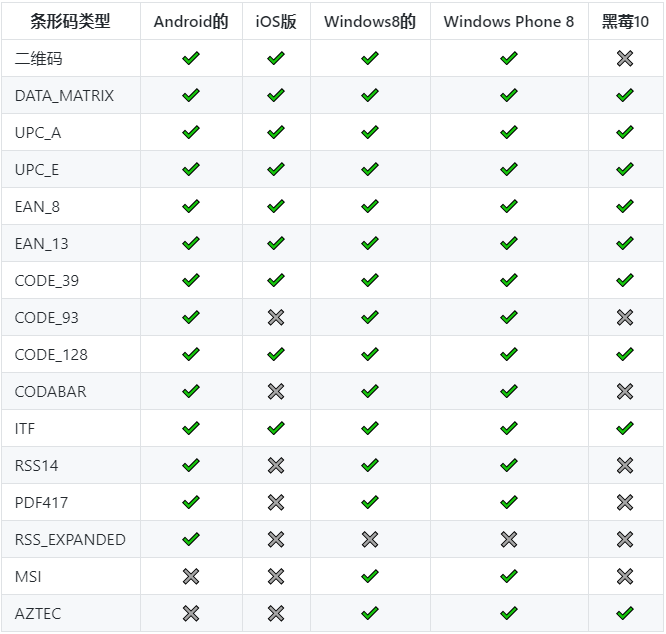
支援的條碼型別

安裝
首先,我們在專案中安裝這個外掛和ionic-native外掛:
$ ionic cordova plugin add phonegap-plugin-barcodescanner
$ npm install --save @ionic-native/barcode-scanner
使用:
import { BarcodeScanner } from '@ionic-native/barcode-scanner';

.....

constructor(private barcodeScanner: BarcodeScanner) { }
.....

scan{
 alert("We got a barcode\n" +
        "Result: " + barcodeData.text + "\n" +
        "Format: " + barcodeData.format + "\n" +
        "Cancelled: " + barcodeData.cancelled);
}
當然不能忘記將此外掛新增到應用程式的NgModule中
...

import { BarcodeScanner } from '@ionic-native/barcode-scanner';

...

@NgModule({
  ...

  providers: [
    ...
    BarcodeScanner
    ...
  ]
  ...
})
export class AppModule { }
新增安卓平臺
cordova platform add android
執行在真機上
cordova run android
後來在使用過程被大佬說這個外掛不行啊,效率不行啊。在ios上掃碼的速度還ok,可是到了android手機上掃碼真慢,看他是先拍照截圖下來再進行識別的,太慢了。
後來我看上了這款掃碼外掛→cordova-plugin-cszbar
install plugin:
ionic cordova plugin add cordova-plugin-cszbar

npm install --save @ionic-native/zbar
ps:要移除我前面安裝的那個外掛,不然再安裝這個外掛就會出現錯誤的。
支援平臺:
- Android
- iOS
用法:
import { ZBar, ZBarOptions } from '@ionic-native/zbar';

constructor(private zbar: ZBar) { }

...

scan() {
    let options: ZBarOptions = {
      flash: 'off',
      text_title: '掃碼',
      drawSight: false
    };

    this.zbar.scan(options)
      .then(result => {
        alert("結果:" + result); // Scanned code
      })
      .catch(error => {
        alert(error); // Error message
      });
  }
記得將外掛新增到應用程式的NgModule中
...

import { ZBar } from '@ionic-native/zbar';

...

@NgModule({
  ...

  providers: [
    ...
    ZBar
    ...
  ]
  ...
})
export class AppModule { }
這份Zbar外掛實現的掃碼功能,在ios上可以說效率是飛快了,在android上 也很ok,比之前那個phonegap-plugin-barcodescanner快了很多了。
如果僅僅是ios跟android這兩個平臺上實現掃碼功能,那麼Zbar也是夠用了。
此隨筆乃本人學習工作記錄,如有疑問歡迎在下面評論,轉載請標明出處。
如果對您有幫助請動動滑鼠右下方給我來個贊,您的支援是我最大的動力。
ps:github連結→https://github.com/tjwoon/csZBar
