React 應用的效能優化思路

要點梗概
React 應用主要的效能問題在於多餘的處理和元件的 DOM 比對。為了避免這些效能陷阱,你應該儘可能的在 shouldComponentUpdate 中返回 false 。
簡而言之,歸結於如下兩點:
-
加速shouldComponentUpdate 的檢查
-
簡化shouldComponentUpdate 的檢查
免責宣告!
文章中的示例是用 React + Redux 寫的。如果你用的是其它的資料流庫,原理是相通的但是實現會不同。
在文章中我沒有使用 immutability (不可變)庫,只是一些普通的 es6 和一點 es7。有些東西用不可變資料庫要簡單一點,但是我不準備在這裡討論這一部分內容。
React 應用的主要效能問題是什麼?
-
元件中那些不更新 DOM 的冗餘操作
-
DOM 比對那些無須更新的葉子節點
- 雖則 DOM 比對很出色並加速了 React ,但計算成本是不容忽視的
React 預設的渲染行為是怎樣的?
我們來看一下 React 是如何渲染元件的。
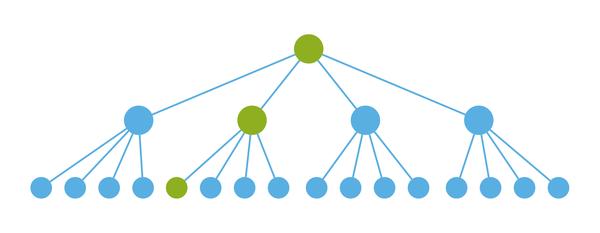
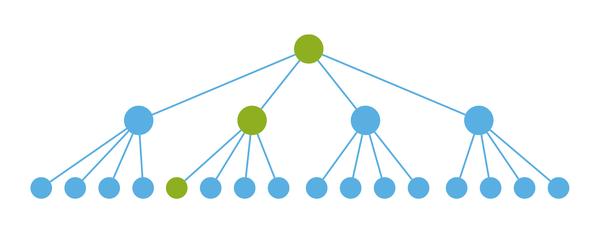
初始化渲染
在初始化渲染時,我們需要渲染整個應用
(綠色 = 已渲染節點)

每一個節點都被渲染 —— 這很贊!現在我們的應用呈現了我們的初始狀態。
提出改變
我們想更新一部分資料。這些改變只和一個葉子節點相關

理想更新
我們只想渲染通向葉子節點的關鍵路徑上的這幾個節點

預設行為
如果你不告訴 React 別這樣做,它便會如此
(橘黃色 = 浪費的渲染)

哦,不!我們所有的節點都被重新渲染了。
React 的每一個元件都有一個 shouldComponentUpdate(nextProps, nextState) 函式。它的職責是當元件需要更新時返回 true , 而元件不必更新時則返回 false 。返回 false 會導致元件的 render 函式不被呼叫。React 總是預設在 shouldComponentUpdate 中返回 true,即便你沒有顯示地定義一個 shouldComponentUpdate 函式。
// 預設行為

shouldComponentUpdate(nextProps, nextState) {

    return true;

}
這就意味著在預設情況下,你每次更新你的頂層級的 props,整個應用的每一個元件都會渲染。這是一個主要的效能問題。
我們如何獲得理想的更新?
儘可能的在 shouldComponentUpdate 中返回 false 。
簡而言之:
-
加速shouldComponentUpdate 的檢查
-
簡化shouldComponentUpdate 的檢查
加速 shouldComponentUpdate 檢查
理想情況下我們不希望在 shouldComponentUpdate 中做深等檢查,因為這非常昂貴,尤其是在大規模和擁有大的資料結構的時候。
class Item extends React.component {

    shouldComponentUpdate(nextProps) {

      // 這很昂貴

      return isDeepEqual(this.props, nextProps);

    }

    // ...

}
一個替代方法是只要物件的值發生了變化,就改變物件的引用。
const newValue = {

    ...oldValue

    // 在這裡做你想要的修改

};


// 快速檢查 —— 只要檢查引用

newValue === oldValue; // false


// 如果你願意也可以用 Object.assign 語法

const newValue2 = Object.assign({}, oldValue);


newValue2 === oldValue; // false
在 Redux reducer 中使用這個技巧:
// 在這個 Redux reducer 中,我們將改變一個 item 的 description

export default (state, action) {


    if(action.type === 'ITEM_DESCRIPTION_UPDATE') {


        const { itemId, description } = action;


        const items = state.items.map(item => {

            // action 和這個 item 無關 —— 我們可以不作修改直接返回這個 item

            if(item.id !== itemId) {

              return item;

            }


            // 我們想改變這個 item

            // 這會保留原本 item 的值,但

            // 會返回一個更新過 description 的新物件

            return {

              ...item,

              description

            };

        });


        return {

          ...state,

          items

        };

    }


    return state;

}
如果你採用這個方法,那你只需在 shouldComponentUpdate 函式中作引用檢查
// 超級快 —— 你所做的只是檢查引用!

shouldComponentUpdate(nextProps) {

    return isObjectEqual(this.props, nextProps);

}
isObjectEqual 的一個實現示例
const isObjectEqual = (obj1, obj2) => {

    if(!isObject(obj1) || !isObject(obj2)) {

        return false;

    }


    // 引用是否相同

    if(obj1 === obj2) {

        return true;

    }


    // 它們包含的鍵名是否一致?

    const item1Keys = Object.keys(obj1).sort();

    const item2Keys = Object.keys(obj2).sort();


    if(!isArrayEqual(item1Keys, item2Keys)) {

        return false;

    }


    // 屬性所對應的每一個物件是否具有相同的引用?

    return item2Keys.every(key => {

        const value = obj1[key];

        const nextValue = obj2[key];


        if(value === nextValue) {

            return true;

        }


        // 陣列例外,再檢查一個層級的深度

        return Array.isArray(value) &&

            Array.isArray(nextValue) &&

            isArrayEqual(value, nextValue);

    });

};


const isArrayEqual = (array1 = [], array2 = []) => {

    if(array1 === array2) {

        return true;

    }


    // 檢查一個層級深度

    return array1.length === array2.length &&

        array1.every((item, index) => item === array2[index]);

};
簡化 shouldComponentUpdate 檢查
先看一個複雜的 shouldComponentUpdate 示例
// 關注分離的資料結構(標準化資料)

const state = {

    items: [

        {

            id: 5,

            description: 'some really cool item'

        }

    ]


    // 表示使用者與系統互動的物件

    interaction: {

        selectedId: 5

    }

};
如果這樣組織你的資料,會使得在 shouldComponentUpdate 中進行檢查變得困難
import React, { Component, PropTypes } from 'react'


class List extends Component {


    propTypes = {

        items: PropTypes.array.isRequired,

        iteraction: PropTypes.object.isRequired

    }


    shouldComponentUpdate (nextProps) {

        // items 中的元素是否發生了改變?

        if(!isArrayEqual(this.props.items, nextProps.items)) {

            return true;

        }


        // 從這裡開始事情會變的很恐怖


        // 如果 interaction 沒有變化,那可以返回 false (真棒!)

        if(isObjectEqual(this.props.interaction, nextProps.interaction)) {

            return false;

        }


        // 如果程式碼執行到這裡,我們知道:

        //    1. items 沒有變化

        //    2. interaction 變了

        // 我們需要 interaction 的變化是否與我們相干


        const wasItemSelected = this.props.items.any(item => {

            return item.id === this.props.interaction.selectedId

        })

        const isItemSelected = nextProps.items.any(item => {

            return item.id === nextProps.interaction.selectedId

        })


        // 如果發生了改變就返回 true

        // 如果沒有發生變化就返回 false

        return wasItemSelected !== isItemSelected;

    }


    render() {

        <div>

            {this.props.items.map(item => {

                const isSelected = this.props.interaction.selectedId === item.id;

                return (<Item item={item} isSelected={isSelected} />);

            })}

        </div>

    }

}
問題1:shouldComponentUpdate 體積龐大
你可以看出一個非常簡單的資料對應的 shouldComponentUpdate 即龐大又複雜。這是因為它需要知道資料的結構以及它們之間的關聯。shouldComponentUpdate 函式的複雜度和體積只隨著你的資料結構增長。這很容易導致兩點錯誤:
-
在不應該返回 false 的時候返回 false(應用顯示錯誤的狀態)
-
在不應該返回 true 的時候返回 true(引發效能問題)
為什麼要讓事情變得這麼複雜?你只想讓這些檢查變得簡單一點,以至於你根本就不必考慮它們。
問題2:父子級之間強耦合
通常而言,應用都要推廣鬆耦合(元件對其它的元件知道的越少越好)。父元件應該儘量避免知曉其子元件的工作原理。這就允許你改變子元件的行為而無須讓父級知曉這些變化(假設 PropsTypes 保持不變)。它還允許子元件獨立運轉,而不必讓父級緊密的控制其行為。
解決辦法:壓平你的資料
通過壓平(合併)你的資料結構,你可以重新使用非常簡單的引用檢查來看是否有什麼發生了變化。
const state = {

    items: [

        {

            id: 5,

            description: 'some really cool item',


            // interaction 現在存在於 item 的內部

            interaction: {

                isSelected: true

            }

        }

    }

};
這樣組織你的資料使得在 shouldComponentUpdate 中做檢查變得簡單
import React, {Component, PropTypes} from 'react'


class List extends Component {


    propTypes = {

        items: PropTypes.array.isRequired

    }


    shouldComponentUpdate(nextProps) {

        // so easy,麻麻再也不用擔心我的更新檢查了

        return isObjectEqual(this.props, nextProps);

    }


    render() {

        <div>

            {this.props.items.map(item => {


                return (

                <Item item={item}

                    isSelected={item.interaction.isSelected} />)

            })}

        </div>

    }

}
如果你想要更新 interaction 你就改變整個物件的引用
// redux reducer

export default (state, action) => {


    if(action.type === 'ITEM_SELECT') {


        const { itemId } = action;


        const items = state.items.map(item => {

            if(item.id !== itemId) {

                return item;

            }


            // 改變整個物件的引用

            return {

                ...item,

                interaction: {

                    isSelected: true

                }

            }

        })


        return {

            ...state,

            items

        };

    }


    return state;

};
誤區:引用檢查與動態 props
一個建立動態 props 的例子
class Foo extends React.Component {

    render() {

        const {items} = this.props;


        // 這個物件每次都有一個新的引用

        const newData = { hello: 'world' };


        return <Item name={name} data={newData} />

    }

}


class Item extends React.Component {


    // 即便前後兩個物件的值相同,檢查也總會返回true,因為 `data` 每次都會得到一個新的引用

    shouldComponentUpdate(nextProps) {

        return isObjectEqual(this.props, nextProps);

    }

}
通常我們不會在元件中建立一個新的 props 把它傳下來 。但是,這在迴圈中更為常見
class List exntends React.Component {

    render() {

        const {items} = this.props;


        <div>

            {items.map((item, index) => {

                // 這個物件每次都會獲得一個新引用

                const newData = {

                    hello: 'world',

                    isFirst: index === 0

                };


                return <Item name={name} data={newData} />

            })}

        </div>

    }

}
這在建立函式時很常見
import myActionCreator from './my-action-creator';


class List extends React.Component {

    render() {

        const {items, dispatch} = this.props;


        <div>

            {items.map(item => {

                // 這個函式的引用每次都會變

                const callback = () => {

                    dispatch(myActionCreator(item));

                }


                return <Item name={name} onUpdate={callback} />

            })}

        </div>

    }

}
解決問題的策略
- 避免在元件中建立動態的 props
改善你的資料模型,這樣你就可以直接把 props 傳下來
- 把動態 props 轉化成滿足全等(===)的型別傳下來
eg:
-
boolean
-
number
-
string
const bool1 = true;

const bool2 = true;


bool1 === bool2; // true


const string1 = 'hello';

const string2 = 'hello';


string1 === string2; // true
如果你實在需要傳遞動態物件,那就把它當作字串傳下來,再在子級進行解構
render() {

    const {items} = this.props;


    <div>

        {items.map(item => {

            // 每次獲得新引用

            const bad = {

                id: item.id,

                type: item.type

            };


            // 相同的值可以滿足嚴格的全等 '==='

            const good = `${item.id}::${item.type}`;


            return <Item identifier={good} />

        })}

    </div>

}
特殊情況:函式
-
如果可以的話,儘量避免傳遞函式。相反,讓子元件自由的 dispatch 動作。這還有個附加的好處就是把業務邏輯移出元件。
-
在 shouldComponetUpdate 中忽略函式檢查。這樣不是很理想,因我們不知道函式的值是否變化了。
-
建立一個 data -> function 的不可變繫結。你可以在 componentWillReceiveProps 函式中把它們存到 state 中去。這樣就不會在每一次 render 時拿到新的引用。這個方法極度笨重,因為你須要維護和更新一個函式列表。
-
建立一個擁有正確 this 繫結的中間元件。這也不夠理想,因為你在層級中引入了一個冗餘層。
-
任何其它你能夠想到的、能夠避免每次 render 呼叫時建立一個新函式的方法。
方案4 的示例
// 引入另外一層 'ListItem'

<List>

    <ListItem> // 你可以在這裡建立正確的 this 繫結

        <Item />

    </ListItem>

</List>


class ListItem extends React.Component {


    // 這樣總能得到正確的 this 繫結,因為它繫結在了例項上

    // 感謝 es7!

    const callback = () => {

        dispatch(doSomething());

    }


    render() {

        return <Item callback={this.callback} item={this.props.item} />

    }

}
工具
以上列出來的所有規則和技巧都是通過使用效能測量工具發現的。使用工具可以幫助你發現你的應用的具體效能問題所在。
console.time
這一個相當簡單:
-
開始一個計時器
-
做點什麼
-
停止計時器
一個比較好的做法是使用 Redux 中介軟體:
export default store => next => action => {

    console.time(action.type)


    // `next` 是一個函式,它接收 'action' 並把它傳送到 ‘reducers' 進行處理

    // 這會導致你應有的一次重渲

    const result = next(action);


    // 渲染用了多久?

    console.timeEnd(action.type);


    return result;

};
用這個方法可以記錄你應用的每一個 action 和它引起的渲染所花費的時間。你可以快速知道哪些 action 渲染時間最長,這樣當你解決效能問題時就可以從那裡著手。拿到時間值還能幫助你判斷你所做的效能優化是否奏效了。
React.perf
這個工具的思路和 console.time 是一致的,只不過用的是 React 的效能工具:
-
Perf.start()
-
do stuff
-
Perf.stop()
Redux 中介軟體示例:
import Perf from 'react-addons-perf';


export default store => next => action => {

    const key = `performance:${action.type}`;

    Perf.start();


    // 拿到新的 state 重渲應用

    const result = next(action);

    Perf.stop();


    console.group(key);

    console.info('wasted');

    Perf.printWasted();

    // 你可以在這裡列印任何你感興趣的 Perf 測量值


    console.groupEnd(key);

    return result;

};
與 console.time 方法類似,它能讓你看到你每一個 action 的效能指標。更多關於 React 效能 addon 的資訊請點選這裡
瀏覽器工具
CPU 分析器火焰圖表在尋找你的應用程式的效能問題時也能發揮作用。
在做效能分析時,火焰圖表會展示出每一毫秒你的程式碼的 Javascript 堆疊的狀態。在記錄的時候,你就可以確切地知道任意時間點執行的是哪一個函式,它執行了多久,又是誰呼叫了它。—— Mozilla
Firefox: 點選檢視
Chrome: 點選檢視
感謝閱讀,祝你順利構建出高效能的 React 應用!
