Android專案中的歡迎介面和引導頁:動畫和ViewPager
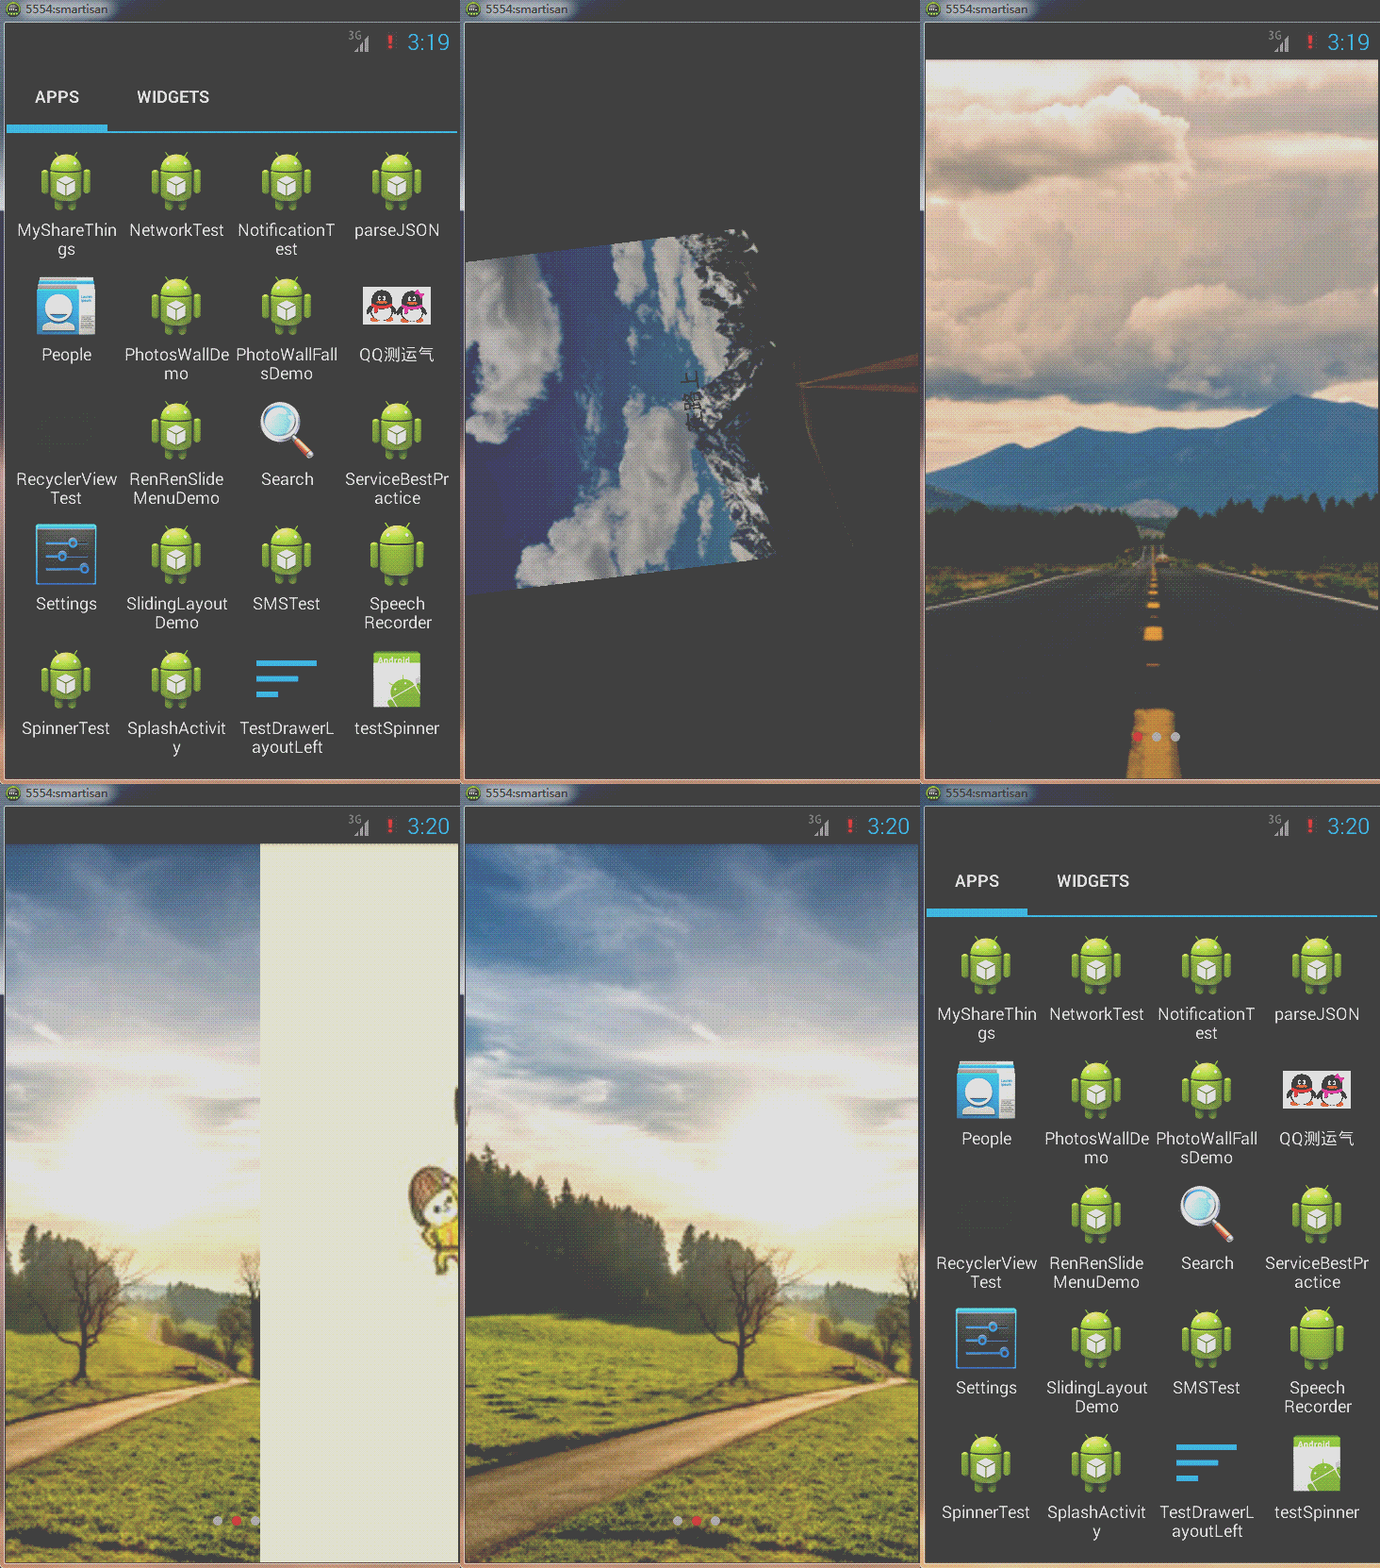
每個安卓的應用都會有歡迎介面和引導頁,引導頁一般只是在第一次進入或者更新應用進入的時候才會出現。我這裡使用另外一種更加靈活和擴充套件性的方式來寫這個小Demo,首先看一下效果圖:
這個Demo可擴充套件的地方在於:引導頁和底部的小圓點可以在不更改佈局檔案的情況下隨時增加和減少,這還是比較省心的,以下分歡迎頁面和引導頁面來展開。
第一部分是歡迎頁面,佈局檔案很簡單,我這裡就是一個帶一張圖片背景的相對佈局和一個TextView:
<RelativeLayout xmlns:android="http://schemas.android.com/apk/res/android"
xmlns:tools 在SplashActivity類中找到佈局id,然後給它設定了縮放、透明、旋轉三種動畫,程式碼如下:
//由於是使用了三種動畫效果合在一起,所以要使用AnimationSet動畫集
AnimationSet set = new AnimationSet(false); 首先是旋轉動畫,傳入的6個引數的含義是讓整個佈局相對於自己的中心點360度旋轉;接著是縮放動畫,引數的含義是讓佈局相對於自己的中心點由無到佈局設定的螢幕大小顯示出來;最後一個是透明動畫,就是由完全不可見到完全顯現(0到1)。
因為歡迎介面動畫完成以後就要跳到引導頁,所以這裡給動畫新增一個監聽事件:
set.setAnimationListener(new AnimationListener() {
            //動畫開始之前會執行方法體裡面的事件
            @Override
            public void onAnimationStart(Animation arg0) {

            }
            //動畫重複的過程中執行方法體裡面的事件
            @Override
            public void onAnimationRepeat(Animation arg0) {

            }
            //動畫執行完成會執行方法裡面的事件
            @Override
            public void onAnimationEnd(Animation arg0) {
                startActivity(new Intent(SplashActivity.this,
                        GuideActivity.class));
                finish();
            }
        });
裡面的三個方法依次是動畫執行前、執行過程中和執行完成後會呼叫的,因為這裡要在動畫完後進入到引導頁,所以在onAnimationEnd中寫入跳轉邏輯,然後finish掉歡迎頁面。
這樣的話歡迎頁面就寫完了,接下來就是引導頁的羅傑了。
同樣的,貼出佈局檔案程式碼:
<?xml version="1.0" encoding="utf-8"?>
<RelativeLayout xmlns:android="http://schemas.android.com/apk/res/android"
    android:id="@+id/rl_guide"
    android:layout_width="match_parent"
    android:layout_height="match_parent"
    android:orientation="vertical" >

    <android.support.v4.view.ViewPager
        android:id="@+id/vp_guide"
        android:layout_width="match_parent"
        android:layout_height="match_parent" >
    </android.support.v4.view.ViewPager>

     <LinearLayout
        android:id="@+id/ll_guide"
        android:layout_width="wrap_content"
        android:layout_height="wrap_content"
        android:layout_alignParentBottom="true"
        android:layout_centerHorizontal="true"
        android:layout_marginBottom="26dp"
        android:orientation="horizontal" >
    </LinearLayout>

</RelativeLayout>
一個相對佈局下面包含著support-v4包中的ViewPager控制元件和一個LinearLayout佈局,目前看到ViewPager和LinearLayout都不包含有子控制元件,這是因為我們會在程式碼中new出來這些物件,這樣的話相對來說比較靈活。
接下來就是GuideActivity中邏輯程式碼了,首先我們找到ViewPager和LinearLayout對應的id,然後準備了三張圖片用來設定給ImageView做背景的。
imageViewList = new ArrayList<ImageView>();
        for (int i = 0; i < imagesId.length; i++) {
            ImageView imageView = new ImageView(this);
            imageView.setBackgroundResource(imagesId[i]);
            imageViewList.add(imageView);
        }
這裡我們定義了一個全域性的儲存ImageView的集合,然後根據圖片的數量,我們new出相應個數的ImageView物件,最後把這些ImageView(也就是3個)新增到集合中去。
然後我們給滑動頁面新增介面卡PagerAdapter,有點類似於ListView中的介面卡。
private class myGuideAdapter extends PagerAdapter {

        //ViewPager的頁數
        @Override
        public int getCount() {
            return imagesId.length;
        }
        //判斷是否由instantiateItem中獲得的物件生成頁面
        @Override
        public boolean isViewFromObject(View arg0, Object arg1) {
            return arg0 == arg1;
        }
        //初始化ViewPager中的每個頁面
        @Override
        public Object instantiateItem(View container, int position) {
            ((ViewGroup) container).addView(imageViewList.get(position));
            return imageViewList.get(position);
        }
        //當頁面滑出視野時銷燬ViewPager中的頁面
        @Override
        public void destroyItem(View container, int position, Object object) {
            ((ViewGroup) container).removeView((View) object);
        }
    }
上面方法中也有相應的註釋,主要是最後兩個方法,一個是初始化ViewPager項,新增到ViewPager的容器中去,這裡也就是把三個ImageView新增到ViewPager中去,另外一個是銷燬item項,當頁面滑出視野時可以從ViewPager容器中銷燬掉這個ImageView。
最後把介面卡設定給ViewPager即可,這樣的話就能實現三張圖片頁面間的滑動了。
接下來去實現底部小圓點,類似的,我們的小圓點view也是在程式碼中new出的物件,如下:
for (int i = 0; i < imagesId.length; i++) {
            View view = new View(this);
            view.setBackgroundResource(R.drawable.guide_point_shape);
            //當不是第一個圓點的時候設定左邊距為10個畫素
            if (i > 0) {
                layoutParams.leftMargin = 10;
            }
            view.setLayoutParams(layoutParams);

            llGuide.addView(view);
        }
這裡我們看到給view設定的背景資源是一個shape檔案,我們看看這個檔案的內容:
<?xml version="1.0" encoding="utf-8"?>
<shape xmlns:android="http://schemas.android.com/apk/res/android"
    android:shape="oval" >

    <solid android:color="@android:color/darker_gray" />

</shape>
原來就是一個簡單的固體小圓點,顏色設定為深灰色。
還有我們看到有一個layoutParams物件,接下來我們看看這裡面的程式碼邏輯:
class MyLayoutParams extends android.widget.LinearLayout.LayoutParams {

        public MyLayoutParams(int arg0, int arg1) {
            super(arg0, arg1);
        }
    }
這是定義的一個內部類,用來設定view(底部圓點)的寬和高的:
MyLayoutParams layoutParams = new MyLayoutParams(10, 10);這裡設定圓點的寬和高都為10個畫素。
這些屬性設定完成以後,把圓點view新增到我們佈局檔案中的LinearLayout佈局中去。
到此,就剩下滑動的時候小圓點變色的邏輯沒有實現了。我們給頁面滑動設定一個監聽事件,並且設定它當前的選中的圓點是第一個圓點,然後根據頁面滑動到下一頁來更變圓點的顏色,這樣就能夠讓小圓點跟隨著頁面的滑動而變顏色了。以下是程式碼邏輯:
//這裡定義的是一個成員變數
currIndex = 0;
        //這裡預設讓第一個圓點的顏色處於選中狀態,是用一個shape來實現的
        vpGuide.setCurrentItem(currIndex);
        llGuide.getChildAt(0)
                .setBackgroundResource(R.drawable.move_point_shape);
        vpGuide.setOnPageChangeListener(new OnPageChangeListener() {
            //當滑動到下一個頁面的時候,根據頁面的索引來更改對應的圓點shape
            @Override
            public void onPageSelected(int arg0) {
                switch (arg0) {
                case 0:
                    //第一個頁面時候,第一個圓點是紅色,其他是灰色
                    llGuide.getChildAt(0).setBackgroundResource(
                            R.drawable.move_point_shape);
                    llGuide.getChildAt(1).setBackgroundResource(
                            R.drawable.guide_point_shape);
                    llGuide.getChildAt(2).setBackgroundResource(
                            R.drawable.guide_point_shape);
                    break;
                case 1:
                    //第二個頁面時候,第二個圓點是紅色,其他是灰色
                    llGuide.getChildAt(0).setBackgroundResource(
                            R.drawable.guide_point_shape);
                    llGuide.getChildAt(1).setBackgroundResource(
                            R.drawable.move_point_shape);
                    llGuide.getChildAt(2).setBackgroundResource(
                            R.drawable.guide_point_shape);
                    break;
                case 2:
                    //第三個頁面時候,第三個圓點是紅色,其他是灰色
                    llGuide.getChildAt(0).setBackgroundResource(
                            R.drawable.guide_point_shape);
                    llGuide.getChildAt(1).setBackgroundResource(
                            R.drawable.guide_point_shape);
                    llGuide.getChildAt(2).setBackgroundResource(
                            R.drawable.move_point_shape);

                    break;

                default:
                    break;
                }
                //把頁面的索引值賦給定義的成員指向變數
                currIndex = arg0;
            }

            @Override
            public void onPageScrolled(int arg0, float arg1, int arg2) {
            }

            @Override
            public void onPageScrollStateChanged(int arg0) {

            }
        });
看一下小圓點選中狀態的shape檔案內容:
<?xml version="1.0" encoding="utf-8"?>
<shape xmlns:android="http://schemas.android.com/apk/res/android"
    android:shape="oval" >

    <solid android:color="@android:color/holo_red_dark" />

</shape>
和上面的一樣,只有顏色變成了紅色,這就可以看到滑動的圓點改變了狀態了。
這樣的話就完成了小圓點跟隨著頁面滑動變化顏色的邏輯了,我們看到這是通過父佈局LinearLayout來獲取它的三個子佈局(小圓點),給它設定背景來實現選中狀態的改變。
效果圖如首頁所見,點選這裡下載原始碼。如有錯誤,歡迎指正出來!

