利用spring+springMvc對單點登入(SSO)的簡單實現(含原始碼)
一、簡介
繼上一次的第三方登入後,趁熱打鐵,繼續學習了一下單點登入。和oauth2.0的原理有些相似。都是客戶端登入的時候需要去服務端認證一下。認證通過才能進行登入。不同的是,單點登入需要自己去維持一個認證伺服器與使用者瀏覽器的全域性會話、客戶端端與使用者瀏覽器的區域性會話,通過判斷確認使用者是否登入。
詳細原理不介紹了,如果不知道原理不建議直接實現過程,需要先去補一補原理。推薦一篇我學習的時候看到大神寫的文章,通俗易懂 : 單點登入原理與簡單實現
當然自己寫過一遍,也遇到一些問題和疑惑的地方,下面來一一列舉。
為了方便,需要從上面文章扣一個圖和簡易說明過來,單點登入的流程圖。
二、步驟說明
簡要說明(標紅地方為我當初困惑的地方以及實現起來遇到問題的地方)
- 使用者訪問系統1的受保護資源,系統1發現使用者未登入,跳轉至sso認證中心,並將自己的地址作為引數
- sso認證中心發現使用者未登入,將使用者引導至登入頁面
- 使用者輸入使用者名稱密碼提交登入申請
- sso認證中心校驗使用者資訊,建立使用者與sso認證中心之間的會話,稱為全域性會話,同時建立授權令牌
- sso認證中心帶著令牌跳轉會最初的請求地址(系統1)
- 系統1拿到令牌,去sso認證中心校驗令牌是否有效
- sso認證中心校驗令牌,返回有效,註冊系統1
- 系統1使用該令牌建立與使用者的會話,稱為區域性會話,返回受保護資源
- 使用者訪問系統2的受保護資源
- 系統2發現使用者未登入,跳轉至sso認證中心,並將自己的地址作為引數
- sso認證中心發現使用者已登入,跳轉回系統2的地址,並附上令牌
- 系統2拿到令牌,去sso認證中心校驗令牌是否有效
- sso認證中心校驗令牌,返回有效,註冊系統2
- 系統2使用該令牌建立與使用者的區域性會話,返回受保護資源
解釋:
問題1:sso認證中心校驗使用者資訊,建立使用者與sso認證中心之間的會話,稱為全域性會話,同時建立授權令牌中,為什麼要建立全域性會話?作用是什麼?怎麼建立?
答:認證中心需要根據是否建立全域性會話來判斷使用者是不是在某個客戶端系統中登入過。用上圖解釋就是,在系統1登入過後,認證中心建立起全域性會話,當系統2再來認證中心進行登入請求的時候,我們發現存在全域性會話,就可以看做使用者已經在系統1中登入過,無需在繼續跳轉登入頁面,而是直接攜帶資訊返回給系統2
問題2:sso認證中心校驗令牌,返回有效,註冊系統1 中為什麼要在認證伺服器中註冊系統1?
答:註冊系統1到認證中心是為了方便實現使用者退出時候的單點退出。單點退出和登入一個道理,一個客戶端系統退出,所有系統全部退出。當系統叢集中,在某一個系統中使用者退出後,認證中心收到退出請求,將會逐個發訊息到註冊在認證中心的子系統中去,確保所有子系統全部退出。
問題3:系統1使用該令牌建立與使用者的會話,稱為區域性會話,返回受保護資源 中區域性會話的作用是什麼?怎麼建立?
答:區域性會話是子系統和使用者之間(瀏覽器)建立的會話,用來驗證使用者是否已經登入,就如同傳統的web應用登入後建立的會話一樣。如果檢測到區域性會話存在則表示該系統已經登入過,無需去認證中心進行驗證,反過來也是一樣,區域性會話不存在就需要去認證中心驗證。同樣為了簡便,我也是利用tomcat的session建立的,和建立全域性會話相同。
問題4:sso認證中心發現使用者已登入,跳轉回系統2的地址,並附上令牌 中,怎麼驗證使用者已經登入?
答:這個問題是我當初最疑惑的地方,後來發現是自己沒有執行看文章,多仔細看幾遍就發現是通過檢查是否存在全域性會話來判斷使用者是否登入的,這同樣是為什麼要建立全域性會話的原因。
三、程式碼
正常來說,客戶端和認證中心都需要配置攔截器或者過濾器,我這為了偷懶,直接在controller中進行判斷。但是並不是所有的子系統或者認證中心都利用了springMvc,甚至有系統直接連開發語言都不一樣。所以要根據實際情況來選擇。怎麼方便、怎麼舒服就怎麼選。還有我選這個的原因就是。。。。。。我對攔截器這些不太熟,工作中沒有用到過,當初學習的時候用過但是都忘了,都忘了,忘了。程式碼狗就是無盡的學習以及複習。
廢話不多說,直接上程式碼。
客戶端部分
contoller部分,為方便。很多的跳轉路徑都是寫死的。
package com.yzz.ssoclient1.controller;

import java.io.IOException;
import java.util.Enumeration;
import java.util.HashMap;
import java.util.Map;
import java.util.Set;

import javax.servlet.http.HttpServletRequest;
import javax.servlet.http.HttpSession;

import org.apache.commons.httpclient.HttpClient;
import org.apache.commons.httpclient.HttpException;
import org.apache.commons.httpclient.methods.PostMethod;
import org.springframework.stereotype.Controller;
import org.springframework.ui.ModelMap;
import org.springframework.web.bind.annotation.RequestMapping;
import org.springframework.web.servlet.ModelAndView;

import com.alibaba.fastjson.JSONObject;
import com.yzz.ssoclient1.util.SessionUtil;

/**
 *
 * @author yzz
 *客戶端部分,本想只用一個session儲存區域性會話,收到服務端的退出請求後直接呼叫request.getSession().removeAttribute("token")清空區域性會話;
 *結果發現,服務端利用httpClient通知客戶端的時候是新建立的一個會話,此時的session和我們區域性建立的session並不是同一個。
 *解決辦法:
 *自己維護一個session管理類,利用map將區域性會話的session物件和id儲存起來。收到請求後再銷燬該session
 */

@Controller
public class SSOClientController {


	//攔截所有獲取資源請求
	@RequestMapping("")
	public String ssoClient(HttpServletRequest request,ModelMap map){

		//判斷請求的連結中是否有token引數
		String token=request.getParameter("token");
		String url=request.getParameter("url");


		if(token!=null){
			//如果有表示是認證伺服器返回的
			String allSessionId=request.getParameter("allSessionId");
			return "redirect:http://localhost:8088/SSOClient1/checkToken?token="+token+"&allSessionId="+allSessionId;
		}else if(url!=null){

			return "redirect:http://localhost:8088/SSOClient1/login?url="+url;
		}else{
			//其他請求,繼續判斷是否建立了和使用者之間的區域性會話
			JSONObject j=(JSONObject) request.getSession().getAttribute("token");
			if(j!=null){
				System.out.println("客戶端1已經登入,存在區域性會話:"+j);
				System.out.println("本次區域性會話的localSessionId:"+request.getSession().getId());
				map.addAttribute("userName", j.getString("userName"));
				map.addAttribute("allSessionId", j.getString("allSessionId"));
				return "index";
			}else{
				//未登入

				return "redirect:http://localhost:8088/SSOServer?clientUrl=http://localhost:8088/SSOClient1";
			}
		}
	}

	//客戶端接收token並且進行驗證
	@RequestMapping(value="/checkToken")
	public String checkToken(HttpServletRequest request,ModelMap map){

		String token=request.getParameter("token");
		String allSessionId=request.getParameter("allSessionId");

		//利用httpClient進行驗證
		String basePath = request.getScheme() + "://" + request.getServerName() + ":"
				+ request.getServerPort() + request.getContextPath();
		HttpClient httpClient = new HttpClient();
		PostMethod postMethod = new PostMethod("http://localhost:8088/SSOServer/tokenCheck");
		postMethod.addParameter("token", token);
		postMethod.addParameter("allSessionId", allSessionId);
		postMethod.addParameter("clientUrl",basePath);

		try {
			httpClient.executeMethod(postMethod);
			String resultJson = postMethod.getResponseBodyAsString();

			postMethod.releaseConnection();
			//用httpClient得到的json資料預設被轉義了兩次變成了"{\\"header\\":\\"認證成功!\\",\\"userName\\":\\"admin\\",\\"erroeCode\\":0}"
			//需要資料還原 \\" 變成  " 同時去掉前後的雙引號

			resultJson=resultJson.replaceAll("\\\\\"", "\"");
			resultJson=resultJson.substring(1, resultJson.length()-1);
			JSONObject j=JSONObject.parseObject(resultJson);
			j.put("allSessionId", allSessionId);
			int errorCode=j.getIntValue("erroeCode");
			if(errorCode==0){
				//建立客戶端和使用者的區域性會話
				request.getSession().setAttribute("token", j);
				String localSessionId=request.getSession().getId();
				HttpSession localSession=request.getSession();
				System.out.println("建立區域性會話,localSessionId是:"+request.getSession().getId());
				map.addAttribute("userName", j.getString("userName"));
				map.addAttribute("allSessionId", j.getString("allSessionId"));
				//儲存區域性會話

				SessionUtil.setSession(localSessionId, localSession);
				//儲存對應關係
				SessionUtil.setLink(allSessionId, localSessionId);

			}else{

			}
		} catch (HttpException e) {
			// TODO Auto-generated catch block
			e.printStackTrace();
		} catch (IOException e) {
			// TODO Auto-generated catch block
			e.printStackTrace();
		}
		return "index";
	}

	//客戶端登入
	@RequestMapping(value="/login")
	public ModelAndView login(HttpServletRequest request){
		String url=request.getParameter("url");
		ModelAndView model=new ModelAndView();
		model.setViewName("login");
		model.addObject("url", url);
		return model;
	}

	//退出
	@RequestMapping(value="/logout")
	public void logout(String allSessionId){

		System.out.println("客戶端1收到退出請求");
		String localSessionId=SessionUtil.getLocalSessionId(allSessionId);

		HttpSession localSession=SessionUtil.getSession(localSessionId);

		localSession.removeAttribute("token");

		//localSession.invalidate();

	}


}
客戶端session管理類 SessionUtil.java
package com.yzz.ssoclient1.util;

import java.util.HashMap;
import java.util.Map;

import javax.servlet.http.HttpSession;
public class SessionUtil {

	private static Map <String, HttpSession> SESSIONMAP=new HashMap<String, HttpSession>();
	private static Map <String,String> sessionLink=new HashMap<String, String>();
	public static HttpSession getSession(String localSessionId){
		return SESSIONMAP.get(localSessionId);
	}

	public static void setSession(String localSessionId,HttpSession localSession){
		 SESSIONMAP.put(localSessionId, localSession);
	}

	public static void remove(String localSessionId){
		SESSIONMAP.remove(localSessionId);
	}

	public static String getLocalSessionId(String allSessionId){
		return sessionLink.get(allSessionId);
	}
	public static void setLink(String allSessionId,String localSessionId){
		sessionLink.put(allSessionId, localSessionId);
	}
	public static void removeL(String allSessionId,String localSessionId){
		sessionLink.remove(allSessionId);
	}
}
mavn配置的pom.xml
<project xmlns="http://maven.apache.org/POM/4.0.0" xmlns:xsi="http://www.w3.org/2001/XMLSchema-instance"
  xsi:schemaLocation="http://maven.apache.org/POM/4.0.0 http://maven.apache.org/maven-v4_0_0.xsd">
  <modelVersion>4.0.0</modelVersion>
  <groupId>com.yzz.ssoclient1</groupId>
  <artifactId>SSOClient1</artifactId>
  <packaging>war</packaging>
  <version>0.0.1-SNAPSHOT</version>
  <name>SSOClient1 Maven Webapp</name>
  <url>http://maven.apache.org</url>
  <properties>
  	<!-- spring版本號 -->
  	<spring.version>4.0.2.RELEASE</spring.version>
  </properties>

  <dependencies>
    <dependency>
      <groupId>junit</groupId>
      <artifactId>junit</artifactId>
      <version>3.8.1</version>
      <scope>test</scope>
     </dependency>
     	<dependency>
            <groupId>org.codehaus.jackson</groupId>
            <artifactId>jackson-mapper-asl</artifactId>
            <version>1.9.13</version>
        </dependency>
      <!-- spring核心包 -->
        <dependency>
            <groupId>org.springframework</groupId>
            <artifactId>spring-core</artifactId>
            <version>${spring.version}</version>
        </dependency>

  		<dependency>
            <groupId>org.springframework</groupId>
            <artifactId>spring-web</artifactId>
            <version>${spring.version}</version>
        </dependency>

        <dependency>
            <groupId>org.springframework</groupId>
            <artifactId>spring-oxm</artifactId>
            <version>${spring.version}</version>
        </dependency>
        <dependency>
            <groupId>org.springframework</groupId>
            <artifactId>spring-tx</artifactId>
            <version>${spring.version}</version>
        </dependency>

        <dependency>
            <groupId>org.springframework</groupId>
            <artifactId>spring-jdbc</artifactId>
            <version>${spring.version}</version>
        </dependency>

        <dependency>
            <groupId>org.springframework</groupId>
            <artifactId>spring-webmvc</artifactId>
            <version>${spring.version}</version>
        </dependency>
        <dependency>
            <groupId>org.springframework</groupId>
            <artifactId>spring-aop</artifactId>
            <version>${spring.version}</version>
        </dependency>

        <dependency>
            <groupId>org.springframework</groupId>
            <artifactId>spring-context-support</artifactId>
            <version>${spring.version}</version>
        </dependency>

        <dependency>
            <groupId>org.springframework</groupId>
            <artifactId>spring-test</artifactId>
            <version>${spring.version}</version>
        </dependency>

        <dependency>
			<groupId>commons-httpclient</groupId>
			<artifactId>commons-httpclient</artifactId>
			<version>3.1</version>
		</dependency>
        <dependency>
            <groupId>commons-io</groupId>
            <artifactId>commons-io</artifactId>
            <version>2.4</version>
        </dependency>
        <dependency>
            <groupId>commons-codec</groupId>
            <artifactId>commons-codec</artifactId>
            <version>1.9</version>
        </dependency>
        <dependency>
            <groupId>commons-dbcp</groupId>
            <artifactId>commons-dbcp</artifactId>
            <version>1.4</version>
        </dependency>
   		<dependency>
            <groupId>mysql</groupId>
            <artifactId>mysql-connector-java</artifactId>
            <version>5.1.30</version>
        </dependency>
        <dependency>
            <groupId>javax</groupId>
            <artifactId>javaee-api</artifactId>
            <version>7.0</version>
        </dependency>
       <dependency>
            <groupId>jstl</groupId>
            <artifactId>jstl</artifactId>
            <version>1.2</version>
        </dependency>
        <!-- 阿里的json包 -->
        <dependency>
            <groupId>com.alibaba</groupId>
            <artifactId>fastjson</artifactId>
            <version>1.2.24</version>
        </dependency>
  </dependencies>
  <build>
    <finalName>SSOClient1</finalName>
  </build>
</project>
還有兩個jsp頁面,一個登陸的,一個顯示的。比較簡單不貼出來了。web.xml和spring-mvc.xml都是用的以前第三方登入專案的,稍微改了下,不重複列了。第三方登入專案連結
客戶端的工程結構圖如下
服務端部分
篇幅問題,我就只列出關鍵部分程式碼
驗證部分 SSOServerContoller
package com.yzz.ssoserver.controller;

import java.util.UUID;

import javax.json.JsonObject;
import javax.servlet.http.HttpServletRequest;

import org.springframework.http.HttpEntity;
import org.springframework.stereotype.Controller;
import org.springframework.web.bind.annotation.RequestMapping;
import org.springframework.web.bind.annotation.RequestMethod;
import org.springframework.web.bind.annotation.ResponseBody;

import com.alibaba.fastjson.JSON;
import com.alibaba.fastjson.JSONArray;
import com.alibaba.fastjson.JSONObject;
import com.yzz.ssoserver.util.TokenUtil;
import com.yzz.ssoserver.util.UrlUtil;

@Controller
public class SSOServerController {

	//判斷使用者是否登入,偷懶,利用controller代替攔截器
	@RequestMapping("")
	public String loginCheck(String clientUrl,HttpServletRequest request){
		String userName=(String)request.getSession().getAttribute("isLogin");
		//未登入跳轉到客戶端登入頁面(也可以是伺服器自身擁有登入介面)
		if(userName==null){

			System.out.println("路徑:"+clientUrl+" 未登入,跳轉登入頁面");
			return "redirect:"+clientUrl+"?url=http://localhost:8088/SSOServer/user/login";
		}else{
			//以登入攜帶令牌原路返回
			String token = UUID.randomUUID().toString();
			System.out.println("已經登入,登入賬號:"+userName+"服務端產生的token:"+token);
			//儲存
			TokenUtil.put(token, userName);
			return "redirect:"+clientUrl+"?token="+token+"&allSessionId="+request.getSession().getId();
		}
	}

	//令牌驗證
	@ResponseBody
	@RequestMapping(value="/tokenCheck",method=RequestMethod.POST)
	public String tokenCheck(String token,String clientUrl,String allSessionId){

		JSONObject j=new JSONObject();
		String userName=TokenUtil.get(token);

		//token一次性的,用完即毀
		TokenUtil.remove(token);
		if(userName!=null){
			//設定返回訊息
			j.put("erroeCode", 0);
			j.put("header", "認證成功!");
			j.put("userName", userName);

			//儲存地址資訊,用於退出時銷燬

			String url=UrlUtil.get(allSessionId);
			if(url==null){
				url=clientUrl;
			}else{
				url+=","+clientUrl;
			}

			UrlUtil.put(allSessionId, url);

		}
		return j.toJSONString();
	}
}
使用者管理部分 UserController
package com.yzz.ssoserver.controller;

import java.io.BufferedReader;
import java.io.IOException;
import java.io.InputStream;
import java.io.InputStreamReader;
import java.io.OutputStream;
import java.io.OutputStreamWriter;
import java.net.HttpURLConnection;
import java.net.MalformedURLException;
import java.net.URL;
import java.util.UUID;

import javax.servlet.http.Cookie;
import javax.servlet.http.HttpServletRequest;
import javax.servlet.http.HttpServletResponse;

import org.apache.commons.httpclient.HttpClient;
import org.apache.commons.httpclient.HttpException;
import org.apache.commons.httpclient.methods.PostMethod;
import org.springframework.beans.factory.annotation.Autowired;
import org.springframework.stereotype.Controller;
import org.springframework.web.bind.annotation.RequestMapping;
import org.springframework.web.bind.annotation.RequestMethod;
import org.springframework.web.servlet.ModelAndView;

import com.yzz.ssoserver.bean.User;
import com.yzz.ssoserver.dao.UserDao;
import com.yzz.ssoserver.util.TokenUtil;
import com.yzz.ssoserver.util.UrlUtil;

/**
 *
 * @author Administrator
 *
 */
@RequestMapping("/user")
@Controller
public class UserController {
	@Autowired
	private UserDao baseDao;
	@RequestMapping("/getName")
	public ModelAndView getName(){
		ModelAndView model=new ModelAndView("index");

		String userName=baseDao.getName();
		model.addObject("userName",userName);
		return model;
	}

	//登入驗證
	@RequestMapping(value="/login",method=RequestMethod.POST)
	public String login(HttpServletRequest request,HttpServletResponse response){
		ModelAndView model=new ModelAndView();
		String userName=request.getParameter("userName");
		String userPassword=request.getParameter("userPassword");
		String redirectUrl=request.getParameter("redirectUrl");
		User user=baseDao.login(userName,userPassword);
		if(user!=null){
			//設定狀態(通過session判斷該瀏覽器與認證中心的全域性會話是否已經建立),生成令牌
			request.getSession().setAttribute("isLogin", userName);
			String token = UUID.randomUUID().toString();

			//儲存
			TokenUtil.put(token, userName);
			/*設定cookie到瀏覽器
			Cookie cookie=new Cookie("sso", userName);
			cookie.setMaxAge(60);
			response.addCookie(cookie);
			*/
			//將token傳送給客戶端,附帶本次全域性會話的sessionId
			String allSessionId=request.getSession().getId();
			System.out.println("全域性會話allSessionId:"+allSessionId);
			return "redirect:"+redirectUrl+"?token="+token+"&allSessionId="+allSessionId;
		}
		return "redirect:http://localhost:8088/SSOServer/redirectUrl?msg=loginError";
	}

	@RequestMapping(value="/redirectUrl",method=RequestMethod.POST)
	public ModelAndView redirectUrl(HttpServletRequest request){
		ModelAndView model=new ModelAndView();
		String msg=request.getParameter("msg");
		if(msg.equals("loginError")){
			msg="賬號密碼錯誤";
			model.setViewName("error");
			model.addObject("msg",msg);
		}
		return model;
	}

	//登出
	@RequestMapping(value="/logout")
	public String logOut(String allSessionId,String redirectUrl,HttpServletRequest request){
		String url=UrlUtil.get(allSessionId);
		UrlUtil.remove(allSessionId);
		//刪除全域性會話
		request.getSession().removeAttribute("isLogin");

		//通知各個客戶端刪除區域性會話
		String [] urls=url.split(",");
		//使用httpClient通知客戶端的時候發現是新建立了一個伺服器與客戶端的會話,導致sessionId和客戶建立的區域性會話id不相同,無法做到刪除區域性會話
		HttpClient httpClient=new HttpClient();
		PostMethod postMethod=new PostMethod();

		for (String u : urls) {

			postMethod.setPath(u+"/logout");
			postMethod.addParameter("allSessionId", allSessionId);

			try {
				httpClient.executeMethod(postMethod);
				postMethod.releaseConnection();

			} catch (HttpException e) {
				// TODO Auto-generated catch block
				e.printStackTrace();
			} catch (IOException e) {
				// TODO Auto-generated catch block
				e.printStackTrace();
			}
		}

		return "redirect:"+redirectUrl;
	}

}
資料庫部分以及dao部分,圖省事,直接使用的是sping 的jdbcTemplate。實現簡單的驗證的話也可以不用資料庫,直接定死使用者名稱和密碼。
dao
package com.yzz.ssoserver.dao;

import java.sql.ResultSet;
import java.util.ArrayList;
import java.util.List;

import javax.swing.text.html.HTMLDocument.HTMLReader.ParagraphAction;
import javax.swing.tree.RowMapper;
import javax.swing.tree.TreePath;

import org.springframework.beans.factory.annotation.Autowired;
import org.springframework.jdbc.core.JdbcTemplate;
import org.springframework.stereotype.Repository;

import com.yzz.ssoserver.bean.User;
import com.yzz.ssoserver.mapping.UserMapping;
@Repository
public class UserDao {

	@Autowired
	private  JdbcTemplate jdbcTemplate;


	public String getName(){
		return jdbcTemplate.queryForObject("select user_name from user_info where user_id=1", String.class);
	}

	public User login(String userName,String userPassword){
		User u=new User();
		String sql=" select * from user_info where user_name=? and user_password=? ";

		Object[] param= new Object[]{userName,userPassword};

		u=jdbcTemplate.queryForObject(sql, new UserMapping(), param);

 		return u;
	}

}
spring.xml,在客戶端的xml基礎中中加入如下配置
<!-- 資料庫設定 -->
    <bean id="propertyConfigurer"
        class="org.springframework.beans.factory.config.PropertyPlaceholderConfigurer">
        <property name="location" value="classpath:db.properties" />
    </bean>

    <bean id="dataSource" class="org.apache.commons.dbcp.BasicDataSource"
        destroy-method="close">
        <property name="driverClassName" value="${driver}" />
        <property name="url" value="${url}" />
        <property name="username" value="${username}" />
        <property name="password" value="${password}" />
        <!-- 初始化連線大小 -->
        <property name="initialSize" value="${initialSize}"></property>
        <!-- 連線池最大數量 -->
        <property name="maxActive" value="${maxActive}"></property>
        <!-- 連線池最大空閒 -->
        <property name="maxIdle" value="${maxIdle}"></property>
        <!-- 連線池最小空閒 -->
        <property name="minIdle" value="${minIdle}"></property>
        <!-- 獲取連線最大等待時間 -->
        <property name="maxWait" value="${maxWait}"></property>
    </bean>

    <bean id="jdbcTemplate" class="org.springframework.jdbc.core.JdbcTemplate">
        <property name="dataSource" ref="dataSource"></property>
    </bean>
還有一些工具類,都是簡單的map操作和客戶端的sessionUtil差不多。bean以及RowMapper的實現就不列了。db.properties和sql我直接用的是以前第三方登入的專案,可以再以前文章找,上面再客戶端程式碼介紹部分有連結。
pom.xml和web.xml和客戶端的差不多,也不列了。
其中需要用多個客戶端進行測試,客戶端的程式碼全相同,自己重新建專案複製程式碼就好。
四、展示
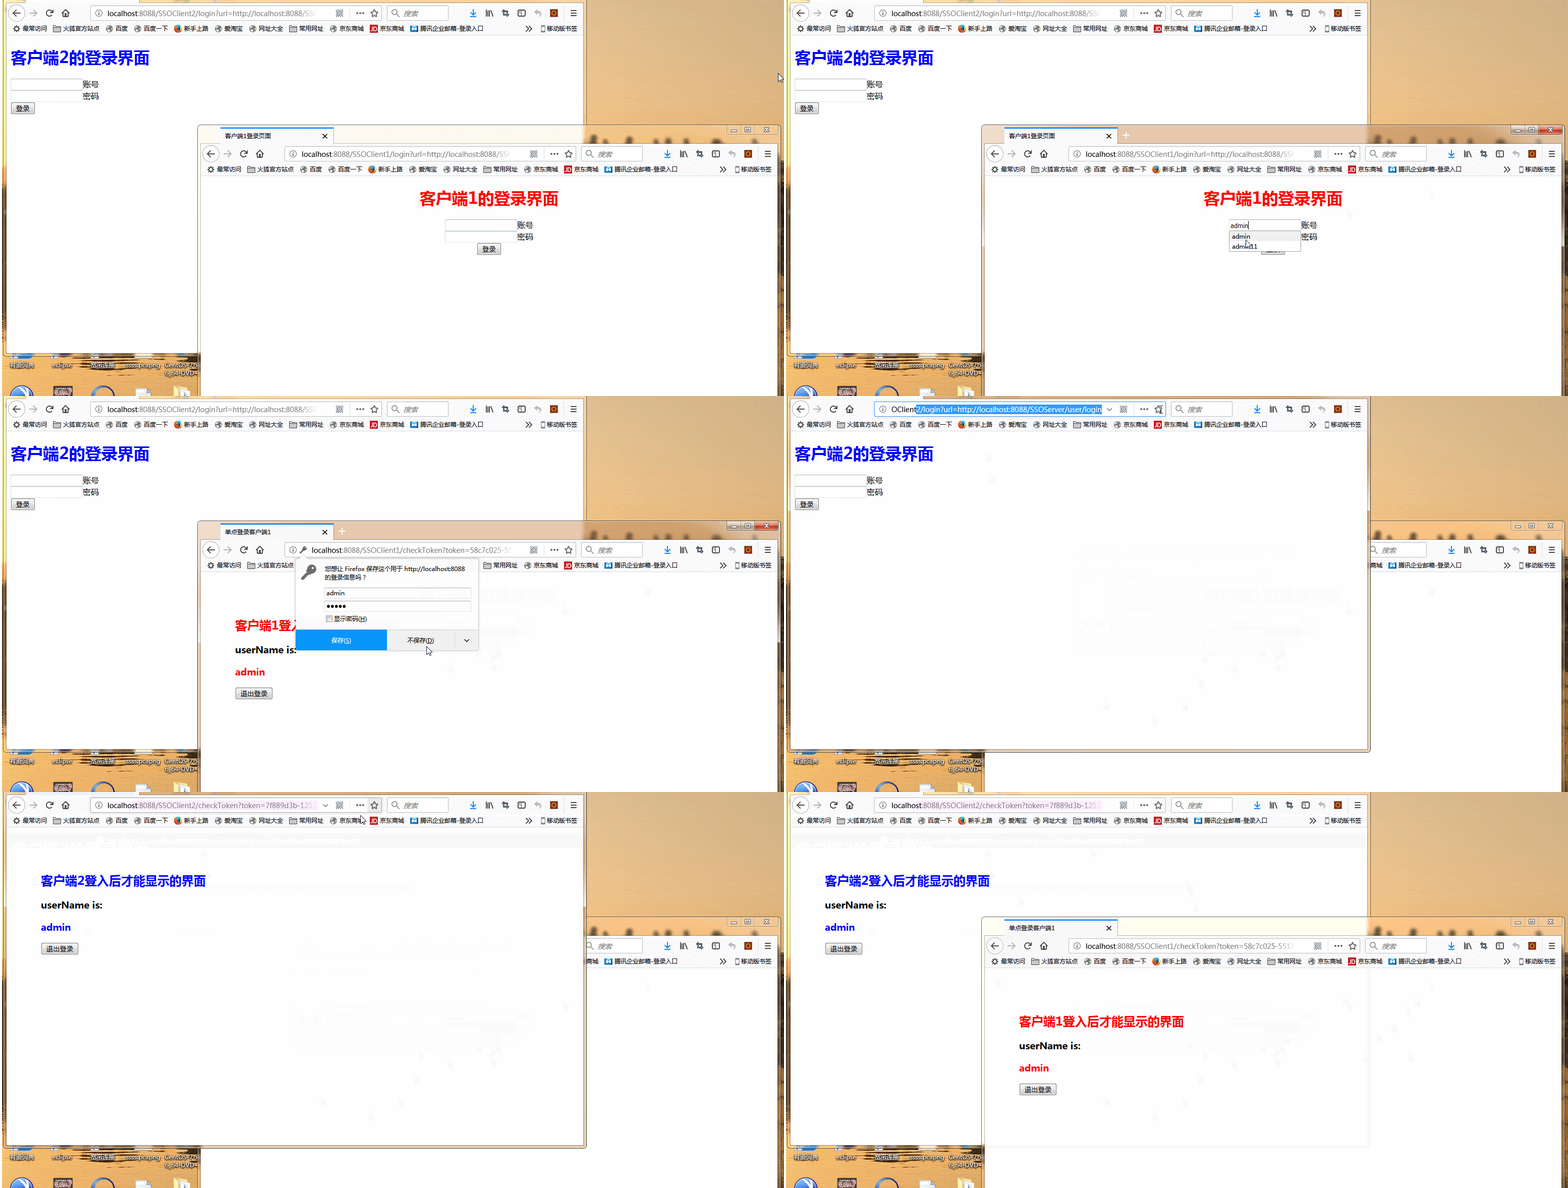
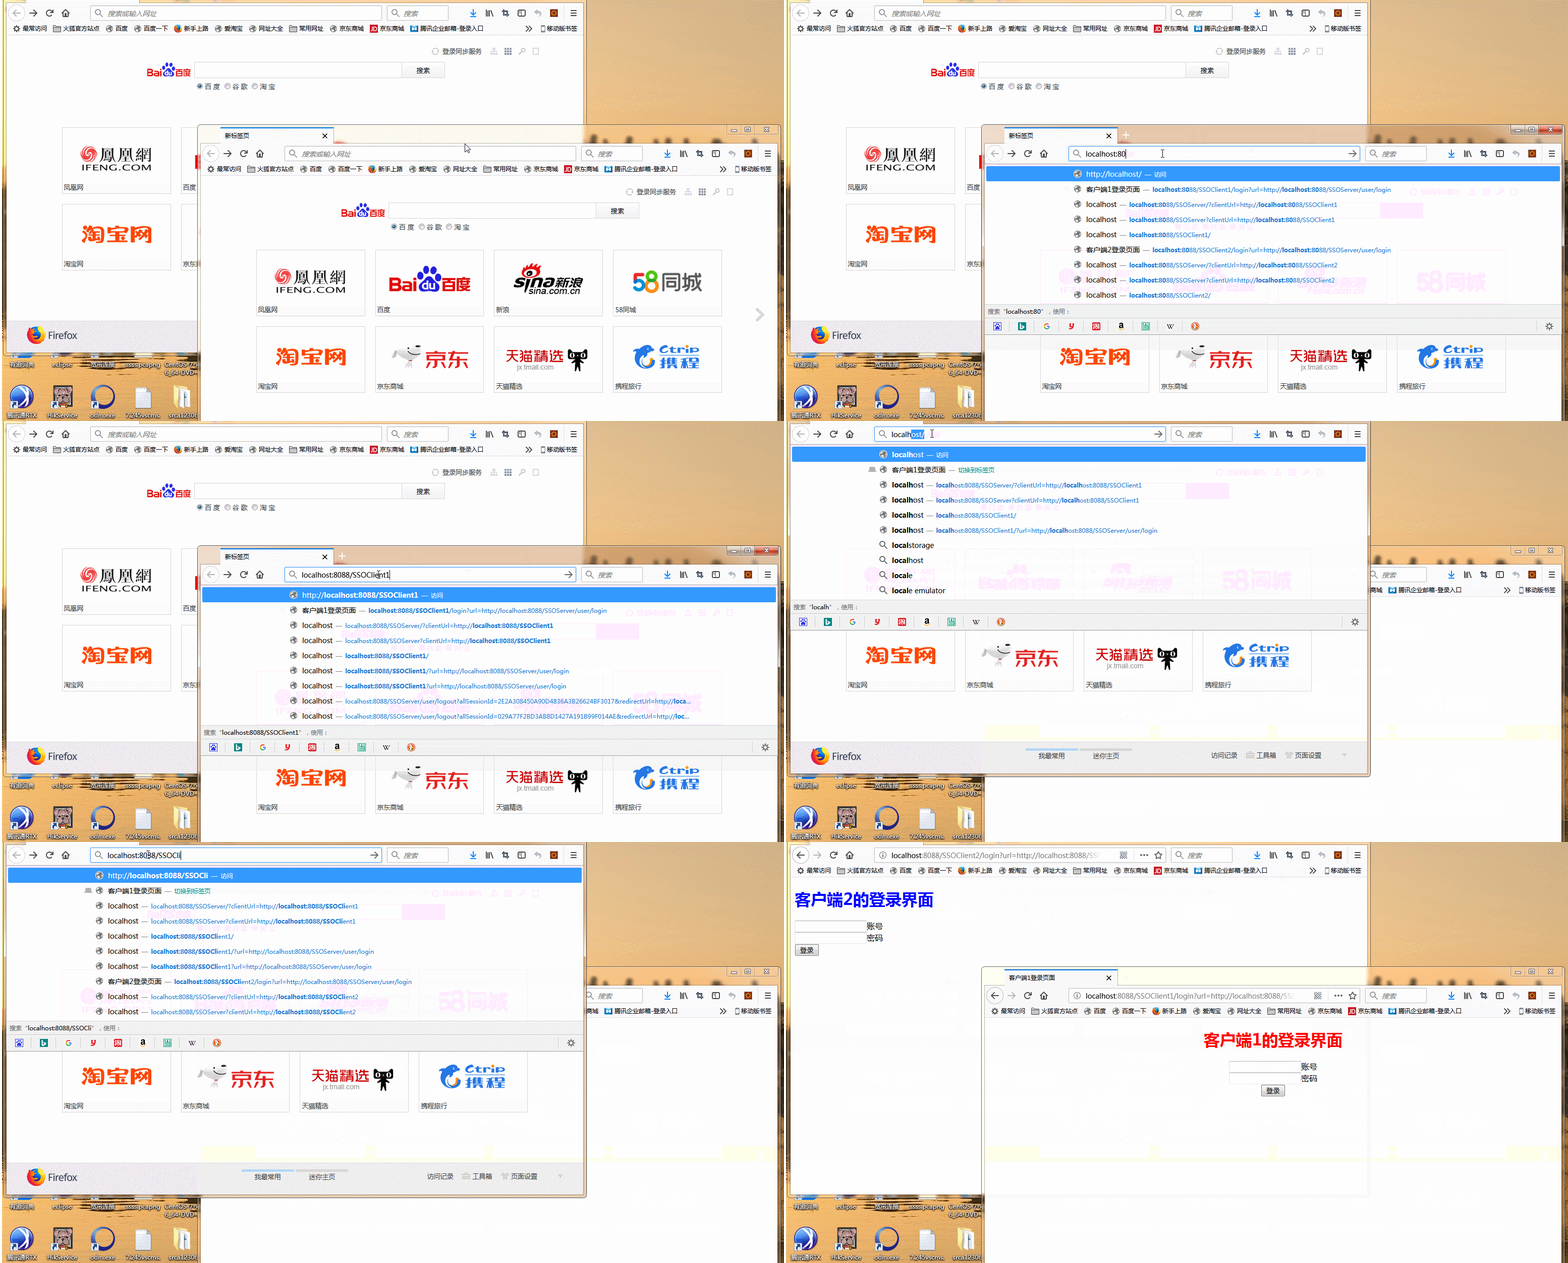
開啟瀏覽器分別訪問兩個子系統 localhost:8088/SSOClient1 和localhost:8088/SSOClient2,如下將全部提示需要登入。
隨便在一箇中登入,在重新訪問另外一個,將出現如下效果,這是在客戶端1中登入,在去訪問客戶端2,此時顯示已登入。

總結
現在已經出現很多的sso單點登入的整合框架,用的最多的是CAS框架:CAS(Central Authentication Service)。也有很多公司提供了直接的SSO模組。但是原理還是需要自己掌握。這個demo還有許多地方要完善,例如,沒有攔截器。沒有完善的授權控制,這兒預設一次性,用完即刪。沒有控制完善的會話檢測功能,每次登入還需要直接從新輸入地址,沒有考慮跨域之類的(如果需要實現跨域的話可以考慮在ajax中利用jsonp來請求資料,或者是在過濾器中進行處理)。
別想著把原始碼下載了就能直接執行。我可以肯定的告訴那些想著下了原始碼就用的人,100%是報錯的。這個的主要作用是參考,每人的機器環境都不一樣的。我把這個專案從公司電腦換的自己的電腦照樣報錯。mavn配置不同、tomcat配置不同、jdk不同都會報錯。重要的程式碼和架構全在這兒貼出來了。
如果實在是想把原始碼拿來就用的話,那就去看看我的另外一篇解決移植錯誤的部落格吧:MAVEN專案移植錯誤的解決方法。最後自己改一下對應的tomcat埠已經路徑。
重新複習了下過濾器和攔截器部分的知識,對這個簡單的demo進行了部分修改,修改如下。(無法更改以刪除資源,改的部分貼著直接貼出來算了)
1、客戶端1部分使用攔截器interceptor實現登入驗證以及部分請求驗證。
2、客戶端2部分使用過濾器OncePerRequestFilter 實現登入驗證以及部分請求驗證。
3、伺服器部分少部分返回路徑進行修改。
修改後的效果:只要其中一個客戶端登入狀態發生變化,另外一個客戶端只需要重新整理頁面或者進行任何操作就能對應的更改狀態。無需瀏覽器手動重新輸入地址,更加人性化。
例如:客戶端1登入後,客戶端2在現有的任意介面裡重新整理一下直接跳轉到顯示介面。無需重新手動輸入專案路徑。退出也是相同的道理。
客戶端1使用攔截器
package com.yzz.ssoclient1.interceptor;

import java.io.PrintWriter;

import javax.servlet.http.HttpServletRequest;
import javax.servlet.http.HttpServletResponse;

import org.springframework.web.servlet.HandlerInterceptor;
import org.springframework.web.servlet.ModelAndView;

import com.alibaba.fastjson.JSONObject;
import com.yzz.ssoclient1.controller.SSOClientController;
import com.yzz.ssoclient1.util.SessionUtil;

/**
 * 攔截器模組,用於對資源請求的過濾
 * @author yzz
 *
 */
public class SSOInterceptor implements HandlerInterceptor{
	private static boolean type=false;
	//請求完全處理完之後呼叫,一般用於清理資源
	public void afterCompletion(HttpServletRequest arg0, HttpServletResponse arg1, Object arg2, Exception arg3)
			throws Exception {
		// TODO Auto-generated method stub

	}

	//業務請求完成後,檢視生成之前呼叫
	public void postHandle(HttpServletRequest arg0, HttpServletResponse arg1, Object arg2, ModelAndView arg3)
			throws Exception {
		// TODO Auto-generated method stub

	}
	//業務請求之前呼叫
	public boolean preHandle(HttpServletRequest request, HttpServletResponse response, Object handler) throws Exception {
		// TODO Auto-generated method stub
		//任何請求路徑,先判斷是否登入,可在xml中進行配置,設定攔截哪一些,不攔截哪一些

		JSONObject j=(JSONObject) request.getSession().getAttribute("token");
		String token=request.getParameter("token");
		String url=request.getParameter("url");
		String allSessionId=request.getParameter("allSessionId");
		SSOClientController c=new SSOClientController();
		response.setContentType("text/html;charset=UTF-8");
		if(j==null){//未登入,繼續判斷。未登入包括幾種情況

			if(token!=null){ //帶有引數token,表示是服務端返回到客戶端的token驗證部分
				return true;
			}else if(url!=null){ //帶有url引數,表示伺服器判斷未登入後跳轉到客戶端對應的登介面

				//對特殊情況進行驗證,即客戶端1還未登入,卡在輸入賬號密碼的頁面,但是客戶端2登入了,此時只要重新整理客戶端1的頁面應改為登入狀態
				if(SessionUtil.getNum()==0){
					PrintWriter out = response.getWriter();
	                StringBuilder builder = new StringBuilder();
	                builder.append("<script type=\"text/javascript\" charset=\"UTF-8\">");
	                builder.append("window.top.location.href=\"");
	                builder.append("http://localhost:8088/SSOServer");  //這裡是http://ip:port/專案名
	                builder.append("?clientUrl=http://localhost:8088/SSOClient1\";</script>");  //這裡是重新登入的頁面url
	                out.print(builder.toString());
	                out.close();
	                SessionUtil.addNum();
	                return false;
				}else{
					SessionUtil.removeNum();
					return true;
				}

			}else if(allSessionId!=null && token==null){//只有allSessionId的時候,表示退出登入
				return true;
			}else{
				//跳轉到服務端登入引導頁面
				PrintWriter out = response.getWriter();
                StringBuilder builder = new StringBuilder();
                builder.append("<script type=\"text/javascript\" charset=\"UTF-8\">");

                builder.append("window.top.location.href=\"");
                builder.append("http://localhost:8088/SSOServer");  //這裡是http://ip:port/專案名
                builder.append("?clientUrl=http://localhost:8088/SSOClient1\";</script>");  //這裡是重新登入的頁面url
                out.print(builder.toString());
                out.close();
				return false;
			}

		}else{
			//已經登入,執行請求
			return true;
		}
	}


}
客戶端1攔截器xml配置
<!-- 配置攔截器-->
     <mvc:interceptors>
     <!-- 使用 bean 定義一個 Interceptor,直接定義在 mvc:interceptors 下面的 Interceptor 將攔截所有的請求 -->
    	<bean class="com.yzz.ssoclient1.interceptor.SSOInterceptor"/>

    	<!-- 另外一種 ,在次一級的mvc:interceptors中進行配置可設定指定攔截路徑和指定不攔截路徑。
    	<mvc:interceptor>
            	 用<mvc:mapping>標籤指定要攔截的路徑
            <mvc:mapping path="/*"/>

               	用<mvc:exclude-mapping>標籤指定不要要攔截的路徑,切記不知能只設置指定不攔截的路徑,否則不生效。必須要設定指定攔截路徑之後才設定不攔截的
            <mvc:exclude-mapping path="/user/check"/>
            	 指定使用哪個攔截器進行攔截
            <bean class="com.yzz.ssoclient1.interceptor.SSOInterceptor"></bean>
        </mvc:interceptor>
    	-->
     </mvc:interceptors>
客戶端2,使用過濾器
package com.yzz.ssoclient2.filter;

import java.io.IOException;

import javax.servlet.Filter;
import javax.servlet.FilterChain;
import javax.servlet.FilterConfig;
import javax.servlet.ServletException;
import javax.servlet.ServletRequest;
import javax.servlet.ServletResponse;
import javax.servlet.annotation.WebFilter;
import javax.servlet.http.HttpServletRequest;
import javax.servlet.http.HttpServletResponse;
import javax.servlet.http.HttpSession;

import org.springframework.web.filter.OncePerRequestFilter;

import com.alibaba.fastjson.JSONObject;
import com.yzz.ssoclient2.util.SessionUtil;

public class SSOClientFilter extends OncePerRequestFilter{


	@Override
	protected void doFilterInternal(HttpServletRequest request, HttpServletResponse response, FilterChain filterChain)
			throws ServletException, IOException {
		// TODO Auto-generated method stub

		request.setCharacterEncoding("UTF-8");
        response.setCharacterEncoding("UTF-8");
		//判斷請求的連結中是否有token引數
		HttpServletRequest servletRequest = (HttpServletRequest) request;
		HttpServletResponse servletResponse = (HttpServletResponse) response;
		HttpSession session = servletRequest.getSession();
		JSONObject j=(JSONObject) session.getAttribute("token");
		String token=request.getParameter("token");
		String url=request.getParameter("url");
		String allSessionId=request.getParameter("allSessionId");

		if(j==null){//未登入,繼續判斷。未登入包括幾種情況

			if(token!=null){ //帶有引數token,表示是服務端返回到客戶端的token驗證部分
				filterChain.doFilter(request, response);
			}else if(url!=null){ //帶有url引數,表示伺服器判斷未登入後跳轉到客戶端對應的登介面
				//對特殊情況進行驗證,即客戶端2還未登入,卡在輸入賬號密碼的頁面,但是客戶端1登入了,此時只要重新整理客戶端2的頁面應改為登入狀態
				if(SessionUtil.getNum()==0){
//					PrintWriter out = response.getWriter();
//	                StringBuilder builder = new StringBuilder();
//	                builder.append("<script type=\"text/javascript\" charset=\"UTF-8\">");
//	                builder.append("window.top.location.href=\"");
//	                builder.append("http://localhost:8088/SSOServer");  //這裡是http://ip:port/專案名
//	                builder.append("?clientUrl=http://localhost:8088/SSOClient1\";</script>");  //這裡是重新登入的頁面url
//	                out.print(builder.toString());
//	                out.close();
	                SessionUtil.addNum();

	                servletResponse.sendRedirect("http://localhost:8088/SSOServer?clientUrl=http://localhost:8088/SSOClient2");
	               // return false;
				}else{
					SessionUtil.removeNum();
					filterChain.doFilter(request, response);
				}

			}else if(allSessionId!=null && token==null){//只有allSessionId的時候,表示退出登入
				filterChain.doFilter(request, response);
			}else{
				//跳轉到服務端登入引導頁面
//				PrintWriter out = response.getWriter();
//                StringBuilder builder = new StringBuilder();
//                builder.append("<script type=\"text/javascript\" charset=\"UTF-8\">");
//
//                builder.append("window.top.location.href=\"");
//                builder.append("http://localhost:8088/SSOServer");  //這裡是http://ip:port/專案名
//                builder.append("?clientUrl=http://localhost:8088/SSOClient1\";</script>");  //這裡是重新登入的頁面url
//                out.print(builder.toString());
//                out.close();
				servletResponse.sendRedirect("http://localhost:8088/SSOServer?clientUrl=http://localhost:8088/SSOClient2");

				//return false;
			}

		}else{
			//已經登入,執行請求
			filterChain.doFilter(request, response);
		}
	}


}
客戶端2過濾器xml配置
<filter>
			<filter-name>ssoClientFilter</filter-name>
        	<filter-class>com.yzz.ssoclient2.filter.SSOClientFilter</filter-class>
    	</filter>
    	<filter-mapping>
        	<filter-name>ssoClientFilter</filter-name>
        	<url-pattern>/*</url-pattern>
    	</filter-mapping>
兩個客戶端的controlller部分去掉原來攔截所有的部分,也就是註解@RequestMapping("")的部分,增加以下程式碼
//顯示頁面
	@RequestMapping(value="/show")
	public String show(String allSessionId){

		return "index";
	}
同時兩個客戶端工具類增加一個計數器,比較簡單就不列了。服務端部分只改了幾個返回路徑,自己過一邊就能發現。


