
在Ubuntu16.04.1上安裝、配置、使用Nginx
實驗環境
ubuntu16.04.1
怎麼安裝
網上有很多安裝的教程,自己摸索吧
我是通過sudo apt-get install nginx命令安裝的nginx
上述命令執行完,都幹了什麼?如何找到它的檔案在哪呢?
使用locate nginx檢視檔案位置
[email protected]-90-170-ubuntu:~$ locate nginx
/etc/nginx
/etc/default/nginx
/etc/init/nginx.conf
/etc/init.d/nginx
/etc/logrotate.d/nginx
/etc/nginx/conf.d
/etc/nginx/fastcgi. 可以看出
/etc/nginx/nginx.conf檔案是配置檔案,檢視其內容
[email protected]90-170-ubuntu:/etc/nginx$ pwd
/etc/nginx
[email protected]90-170-ubuntu:/etc/nginx$ cat nginx.conf
user www-data;
worker_processes auto;
pid /run/nginx.pid;

events {
    worker_connections 768;
    # multi_accept on;
}

http {

    ##
    # Basic Settings
    ##

    sendfile on;
    tcp_nopush on;
    tcp_nodelay on;
    keepalive_timeout 65;
    types_hash_max_size 2048;
    # server_tokens off;

    # server_names_hash_bucket_size 64;
    # server_name_in_redirect off;

    include /etc/nginx/mime.types;
    default_type application/octet-stream;

    ##
    # SSL Settings
    ##

    ssl_protocols TLSv1 TLSv1.1 TLSv1.2; # Dropping SSLv3, ref: POODLE
    ssl_prefer_server_ciphers on;

    ##
    # Logging Settings
    ##

    access_log /var/log/nginx/access.log;
    error_log /var/log/nginx/error.log;

    ##
    # Gzip Settings
    ##

    gzip on;
    gzip_disable "msie6";

    # gzip_vary on;
    # gzip_proxied any;
    # gzip_comp_level 6;
    # gzip_buffers 16 8k;
    # gzip_http_version 1.1;
    # gzip_types text/plain text/css application/json application/javascript text/xml application/xml application/xml+rss text/javascript;

    ##
    # Virtual Host Configs
    ##

    include /etc/nginx/conf.d/*.conf;
    include /etc/nginx/sites-enabled/*;
}


#mail {
#   # See sample authentication script at:
#   # http://wiki.nginx.org/ImapAuthenticateWithApachePhpScript
#
#   # auth_http localhost/auth.php;
#   # pop3_capabilities "TOP" "USER";
#   # imap_capabilities "IMAP4rev1" "UIDPLUS";
#
#   server {
#       listen     localhost:110;
#       protocol   pop3;
#       proxy      on;
#   }
#
#   server {
#       listen     localhost:143;
#       protocol   imap;
#       proxy      on;
#   }
#}
[email protected]90-170-ubuntu:/etc/nginx$
看到http下有incluede
include /etc/nginx/conf.d/*.conf;
include /etc/nginx/sites-enabled/*;
遂去探探究竟
發現
/etc/nginx/conf.d/資料夾下無內容/etc/nginx/sites-enabled/有一個default檔案,內容如下
[email protected]90-170-ubuntu:/etc/nginx/sites-enabled$ cat default
##
# You should look at the following URL's in order to grasp a solid understanding
# of Nginx configuration files in order to fully unleash the power of Nginx.
# http://wiki.nginx.org/Pitfalls
# http://wiki.nginx.org/QuickStart
# http://wiki.nginx.org/Configuration
#
# Generally, you will want to move this file somewhere, and start with a clean
# file but keep this around for reference. Or just disable in sites-enabled.
#
# Please see /usr/share/doc/nginx-doc/examples/ for more detailed examples.
##

# Default server configuration
#
server {
    listen 80 default_server;
    listen [::]:80 default_server;

    # SSL configuration
    #
    # listen 443 ssl default_server;
    # listen [::]:443 ssl default_server;
    #
    # Note: You should disable gzip for SSL traffic.
    # See: https://bugs.debian.org/773332
    #
    # Read up on ssl_ciphers to ensure a secure configuration.
    # See: https://bugs.debian.org/765782
    #
    # Self signed certs generated by the ssl-cert package
    # Don't use them in a production server!
    #
    # include snippets/snakeoil.conf;

    root /var/www/html;

    # Add index.php to the list if you are using PHP
    index index.html index.htm index.nginx-debian.html;

    server_name _;

    location / {
        # First attempt to serve request as file, then
        # as directory, then fall back to displaying a 404.
        try_files $uri $uri/ =404;
    }

    # pass the PHP scripts to FastCGI server listening on 127.0.0.1:9000
    #
    #location ~ \.php$ {
    #   include snippets/fastcgi-php.conf;
    #
    #   # With php7.0-cgi alone:
    #   fastcgi_pass 127.0.0.1:9000;
    #   # With php7.0-fpm:
    #   fastcgi_pass unix:/run/php/php7.0-fpm.sock;
    #}

    # deny access to .htaccess files, if Apache's document root
    # concurs with nginx's one
    #
    #location ~ /\.ht {
    #   deny all;
    #}
}


# Virtual Host configuration for example.com
#
# You can move that to a different file under sites-available/ and symlink that
# to sites-enabled/ to enable it.
#
#server {
#   listen 80;
#   listen [::]:80;
#
#   server_name example.com;
#
#   root /var/www/example.com;
#   index index.html;
#
#   location / {
#       try_files $uri $uri/ =404;
#   }
#}在default檔案裡新增虛擬主機,使能夠反向代理
server {
    listen       80;
    server_name  tomcat.abc.com;

    location / {
        proxy_pass http://127.0.0.1:8080;
    }
}
新增好了虛擬主機,重啟nginx
以下操作要使終端在/etc/init.d/nginx下執行
- 平滑的重啟nginx
nginx -s reload- 快速的停止nginx
nginx -s stop- 優雅的停止nginx
nginx -s quit首頁的檔案在/var/www/html資料夾下,自己可以更改
[email protected]:/var/www/html$ pwd
/var/www/html
[email protected]:/var/www/html$ cat index.nginx-debian.html
<!DOCTYPE html>
<html>
<head>
<title>Welcome to nginx!</title>
<style>
body {
width: 35em;
margin: 0 auto;
font-family: Tahoma, Verdana, Arial, sans-serif;
}
</style>
</head>
<body>
<h1>Welcome to nginx!</h1>
<p>If you see this page, the nginx web server is successfully installed and
working. Further configuration is required.</p>
<p>For online documentation and support please refer to
<a href="http://nginx.org/">nginx.org</a>.<br/>
Commercial support is available at
<a href="http://nginx.com/">nginx.com</a>.</p>
<p><em>Thank you for using nginx.</em></p>
</body>
</html>
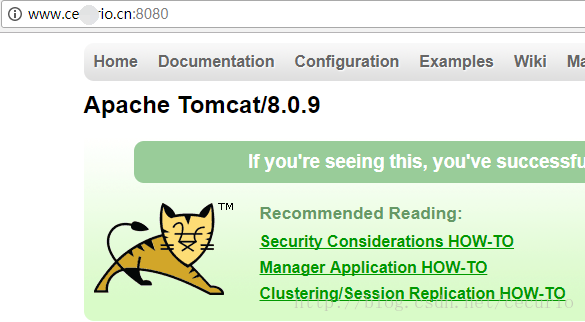
[email protected]:/var/www/html$ 反向代理前
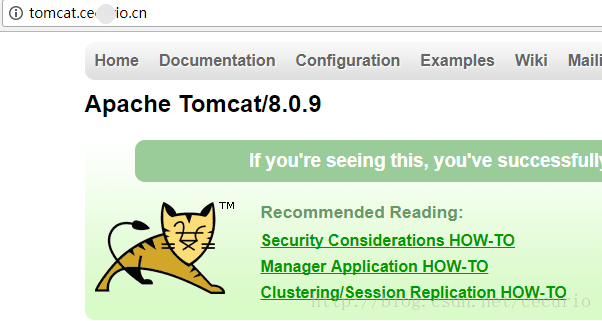
反向代理後
參考連結
相關推薦
在Ubuntu16.04.1上安裝、配置、使用Nginx
實驗環境 ubuntu16.04.1 怎麼安裝 網上有很多安裝的教程,自己摸索吧 我是通過sudo apt-get install nginx命令安裝的nginx 上述命令執行完,都幹了什麼?如何找到它的檔案在哪呢? 使用locate ngi
Ubuntu16.04與ARM的NFS配置、掛載和解除安裝
ip分配: 閘道器 192.168.137.1 電腦 192.168.137.4 Ubuntu 192.168.137.2 開發板 192.168.137.3 一:
在Ubuntu16.04.4上安裝jdk
pro 不同 tro class 配置 1.8 port clas mage 在Ubuntu16.04.4上安裝jdk 一、安裝步驟 1.下載jdk安裝包 首先我們在oracle官網上下載jdk-8u161-linux-x64.tar.gz,當然也可以下載其
ubuntu16.04下hive安裝與配置
cep ted dir mave value usr ubunt java HA 下載 wget http://mirrors.hust.edu.cn/apache/hive/hive-2.3.2/apache-hive-2.3.2-bin.tar.gz 解壓到指定
Ubuntu16.04.1上搭建分散式的Redis叢集,並使用C#操作
為什麼要叢集: 通常為了,提高網站的響應速度,總是把一些經常用到的資料放到記憶體中,而不是放到資料庫中,Redis是一個很好的Cache工具,當然了還有Memcached,這裡只講Redis。在我們的電商系統中,熱點資料量往往巨大,比如單點登入、使用者瀏覽商品的資訊、使用者資訊、使用者收藏的商品資訊、短息提
Ubuntu16.04+pycharm+pyqt5安裝與配置
pycharm的安裝過程直接略過,本文主要講下pyqt5的安裝以及與pycharm的配置。 安裝指令有如下2條: sudo apt-get install qt5-default sudo apt-get install qttools5-dev-tools ok,p
【Ubuntu】Ubuntu16.04+VMware+Win10安裝及配置教程
Ubuntu16.04+VMware+Win10安裝及配置教程 前言: 我之所以使用Ubuntu16.4,既為學Linux操作,也為學習Python。Ubuntu16.4一直以來在虛擬機器上都跑著好好的,今晚突然就黑屏了,不知緣故。無奈,只能選擇
如何在ubuntu16.04版本上安裝指定的docker版本,阿里映象
一說明:網上安裝docker的方式都基本是通過apt-get install docker的方式安裝,但該方法安裝無法指定docker版本,受限較多。本貼選擇採用安裝deb包的方式進行二安裝策略一簡述直接下載docker的deb安裝包(CentOS為rpm包)後,安裝即可。命
ubuntu16.04.1下安裝KDE環境
首先,開啟終端,輸入sudo apt-get install kubuntu-desktop終端提示要下載280MB左右的檔案,遇到提示時全部選“Y”,接下來是長時間的等待(取決於你的頻寬情況,畢竟要下載280MB左右的檔案)。接下來自動配置。。。安裝好後,登出一下,在登陸窗的“會話”中選擇KDE,登陸後就
VMware + ubuntu16.04 Linux 下安裝、配置Gogs
自己 不知道 advance bsp 空間 home apt-get gogs systemctl 本文在Win7+VMware的ubuntu 16.04中測試。運行如下命令: sudo apt-get install git sudo adduser git # 為Go
ubuntu16.04安裝、配置、使用tftp
安裝 #apt install xinetd #apt install tftp tftpd 其中,tftpd-hpa是伺服器端,tftp-hpa是客戶端(如果不需要客戶端可以不安裝)。 配置/etc/xinetd.d/tftp檔案 vi /et
centos7 上配置Javaweb---MySQL的安裝與配置、亂碼解決
dog ces set div success 編碼問題 都是 下載 use 上一篇謝了關於jdk和tomcat的安裝。今天先更新一下有用的。 1. 不用關閉防火墻,把80端口添加進防火墻的開放端口。 firewall-cmd --zone=public --add-po
CentOS7上安裝並配置Nginx、PHP、MySql
是否 cnblogs cif 藍色 進程id 其中 ram 否則 usr 一、Nginx 1、安裝nginx yum install nginx 2、啟動nginx systemctl start nginx 除了systemctl start nginx之外,
ubuntu16.04伺服器上無root許可權,配置個人tensorflow環境--cuda9.0+cuDNN7+tensorflow-gpu-1.18
本人在伺服器上已經用Anconda建立好python3.5的環境,這個網上有一大堆教程。接下來是重點。 1. cuda的安裝 https://developer.nvidia.com/cuda-downloads,選runfile(local)這個檔案下載然後執行如下程式碼 sh cuda_9
Ubuntu Server 16.04.1 LTS 64位配置nginx、mysql、php7.2
配置源,更新一下 sudo apt-get install software-properties-common python-software-properties sudo add-apt-repository ppa:ondrej/php && sudo apt-
Linux也可以這樣美——Ubuntu18.04安裝、配置、美化-踩坑記
開篇 前幾天Ubuntu18.04 LTS穩定版釋出了,這也是將官方作為一個長期維護的版本,從ubuntu17.10開始,官方又開始使用gnome作為預設的桌面環境,這也給我們增加了更多可以div的地方,以前的unity桌面確實不太美觀,並且小bug就更加的多
Ubuntu16.04環境下安裝CUDA、cudnn、Caffe、Tensorflow、pytorch
【主題】Ubuntu16.04環境下安裝CUDA、cudnn、Caffe、Tensorflow、pytorch 【環境】 筆記本: 筆記本:惠普 Pavilion NoteBook 系統環境:Ubuntu16.04+Win10 64位雙系統 顯示卡:NVIDIA GT
Ubuntu16.04下Hadoop3.1的安裝與配置
1. 下載壓縮包 Hadoop環境需要安裝java,若未安裝見:java下載與安裝 然後到官網下載對應的安裝包,然後解壓到本地目錄下. 2. 配置環境變數 sudo gedit
Git安裝、配置、上傳公鑰、測試登入及clone庫(使用者教程)
1安裝Git 以windows為例,Linux和Mac OS X的同學請百度。 由於雙擊Git-1.9.4-preview20140815.exe,安裝過程很簡單,這裡不再贅述。 但是有幾點注意的地方: (1) 選擇目標安裝位置時,最好不使用預設的路徑如”C:\Progra
Ubuntu18.04 LTS安裝、配置、美化、常用軟體安裝、問題總結和使用體驗
一、前言 2018 年 4 月 24 日,Ubuntu18.04 LTS釋出,它是Ubuntu第七個長期支援版本。以前大學時候玩過ubuntu10.04和ubuntu12.04,還用它們來寫過c語言和java語言程式碼。一轉眼大學畢業多年,很久沒碰Ubuntu