MapKit之大頭針全面解析(使用系統大頭針、自定義大頭針callout檢視、使用圖片顯示大頭針)
阿新 • • 發佈:2019-01-24
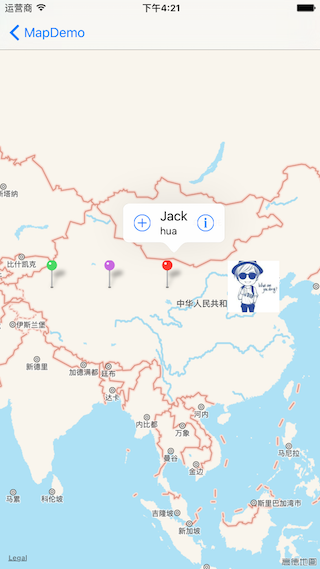
1:使用系統樣式大頭針檢視和系統大頭針模型、
2:使用圖片顯示大頭針檢視,並使用自定義大頭針模型、
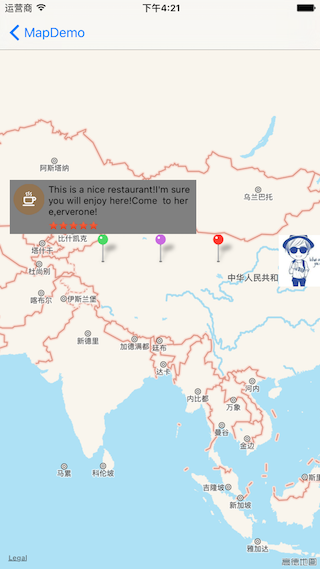
3:自定義彈出檢視、
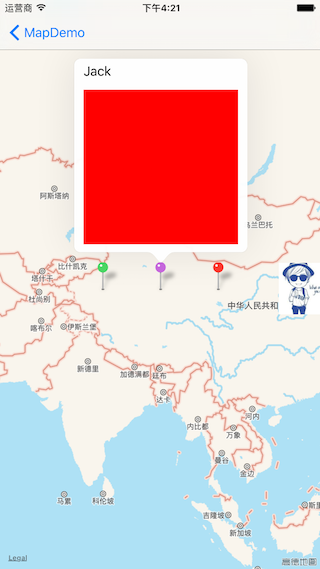
4:適用於頂部title,底部自定義檢視 ios9之後
程式碼部分:
class SecondViewController: UIViewController {

    lazy var mapView: MKMapView = {
        let mapView = MKMapView(frame:  UIScreen.mainScreen().bounds)
        mapView.mapType = .Standard
        mapView.scrollEnabled = true
        mapView.zoomEnabled = true
        mapView.showsUserLocation = true
        mapView.delegate = self
        return mapView
    }()

    override func viewDidLoad() {
        super.viewDidLoad()
        view.addSubview(self.mapView)
        addAnnotations()
    }

    //MARK:  新增大頭針
    func addAnnotations(){
        //建立MKPointAnnotation物件
        let pointAnnotation = MKPointAnnotation()
        pointAnnotation.coordinate = CLLocationCoordinate2DMake(39, 100)
        pointAnnotation.title = "Jack"
        pointAnnotation.subtitle = "hua"
        self.mapView.addAnnotation(pointAnnotation)

        //建立自定義大頭針並新增到地圖上
        let annotationOne = FirstAnnotation(coordinate:  CLLocationCoordinate2DMake(39, 115),title:"xxx大飯店",subtitle:"全場一律15折,會員20折")
        annotationOne.iconImage = UIImage(named: "boy")
        self.mapView.addAnnotation(annotationOne)

        //自定義彈出檢視
        let calloutAnnotation = <span style="font-family: Menlo; font-variant-ligatures: no-common-ligatures;">SecondAnnotation</span><span style="font-family: 'PingFang SC';">(coordinate: CLLocationCoordinate2DMake(39, 80))</span>
        calloutAnnotation.icon = UIImage(named: "icon_classify_cafe")
        calloutAnnotation.rate = UIImage(named: "icon_Movie_Star_rating")
        calloutAnnotation.descriptionDetail = "This is a nice restaurant!I'm sure you will enjoy here!Come  to here,everone!"
        self.mapView.addAnnotation(calloutAnnotation)

        //使用系統自帶附屬檢視
        let detailAnnotation = DetailCalloutAccessoryAnnotation(coordinate: CLLocationCoordinate2DMake(39, 90),title:"Jack")
        self.mapView.addAnnotation(detailAnnotation)
    }
}
程式碼分析:
上面程式碼主要是將地圖新增到當前檢視控制器檢視上,並新增4個大頭針到地圖上,自定義大頭針模型物件程式碼如下:
//自定義大頭針模型
class FirstAnnotation: NSObject,MKAnnotation {

    //位置
    var coordinate: CLLocationCoordinate2D
    //主標題
    var title: String?
    //副標題
    var subtitle: String?
    //圖片icon
    var iconImage: UIImage?
    init(coordinate: CLLocationCoordinate2D,title: String,subtitle:String) {
        self.coordinate = coordinate
        self.title = title
        self.subtitle = subtitle
        super.init()
    }
}

//用於彈出框型別判斷模型
class SecondAnnotation: NSObject,MKAnnotation {

    //位置
    var coordinate: CLLocationCoordinate2D
    //左側icon
    var icon: UIImage?
    //icon描述
    var descriptionDetail: String?
    //底部評分檢視
    var rate: UIImage?
    init(coordinate: CLLocationCoordinate2D) {
        self.coordinate = coordinate
        super.init()
    }
}

//彈出檢視模型
class SHCalloutAnnotation: NSObject,MKAnnotation{

    var coordinate: CLLocationCoordinate2D
    init(coordinate: CLLocationCoordinate2D) {
       self.coordinate = coordinate
       super.init()
    }
    //左側icon
    var icon: UIImage?
    //icon描述
    var descriptionDetail: String?
    //底部評分檢視
    var rate: UIImage?
}


//附屬檢視模型
class DetailCalloutAccessoryAnnotation: NSObject,MKAnnotation {

    //位置
    var coordinate: CLLocationCoordinate2D
    //主標題
    var title: String?
    //副標題
    var subtitle: String?
    init(coordinate: CLLocationCoordinate2D,title: String) {
        self.coordinate = coordinate
        self.title = title
        super.init()
    }

    //官方示例程式碼使用:在模型中建立大頭針檢視
    class func createViewAnnotationForMapView(mapView:MKMapView, annotation:MKAnnotation) ->MKAnnotationView{
        let identifier = "DetailCalloutAccessoryAnnotation"
        var annotationView = mapView.dequeueReusableAnnotationViewWithIdentifier(identifier)  as? MKPinAnnotationView
        if  (annotationView == nil){
            annotationView =  MKPinAnnotationView(annotation: annotation, reuseIdentifier: identifier)
            annotationView!.canShowCallout = true
            //設定大頭針顏色
            annotationView!.pinColor = MKPinAnnotationColor.Purple

            let backgroundView = UIView(frame:  CGRectZero)
            backgroundView.backgroundColor = UIColor.redColor()
            //新增約束才可以使用自定義檢視
            let widthConstraint = NSLayoutConstraint(item: backgroundView, attribute: .Width, relatedBy: .Equal, toItem: nil, attribute: .NotAnAttribute, multiplier: 1, constant: 200)
            backgroundView.addConstraint(widthConstraint)
            let heightConstraint = NSLayoutConstraint(item: backgroundView, attribute: .Height, relatedBy: .Equal, toItem: nil, attribute: .NotAnAttribute, multiplier: 1, constant: 200)
            backgroundView.addConstraint(heightConstraint)

            if #available(iOS 9.0, *) {
                //賦值UIImageView直接可以使用
                //returnAnnotaionView!.detailCalloutAccessoryView = UIImageView(image: UIImage(named: "icon_classify_cafe"))
                //直接賦值UIView,UILabel等檢視不行?http://stackoverflow.com/questions/32581049/mapkit-ios-9-detailcalloutaccessoryview-usage 因為我們需要對寬和高做約束
                annotationView!.detailCalloutAccessoryView =  backgroundView
            } else {
                print("iOS9以下系統暫時不能夠使用!")
            }
        }
        return annotationView!
    }
}
接下來,繼續看一下檢視控制器中的程式碼,我通過extension實現協議內容:
extension SecondViewController:MKMapViewDelegate{

    //顯示大頭針時呼叫,注意方法中的annotation引數是即將顯示的大頭針物件.1)該方法首先顯示大頭針的時候會呼叫2)向地圖上新增大頭針的時候也會呼叫
    func mapView(mapView: MKMapView, viewForAnnotation annotation: MKAnnotation) -> MKAnnotationView? {

        var returnAnnotaionView:MKAnnotationView?
        if !(annotation.isKindOfClass(MKUserLocation)){//根據模型進行分類
            if annotation.isKindOfClass(MKPointAnnotation.self){
                //MARK:使用系統樣式大頭針檢視和系統大頭針模型
                let identifier = "MKPinAnnotationView"
                var returnAnnotaionView = mapView.dequeueReusableAnnotationViewWithIdentifier(identifier)
                if  (returnAnnotaionView == nil){
                    returnAnnotaionView =  MKPinAnnotationView(annotation: annotation, reuseIdentifier: identifier)
                    returnAnnotaionView!.canShowCallout = true
                    returnAnnotaionView!.calloutOffset = CGPoint(x: 0, y: -10)
                    returnAnnotaionView!.leftCalloutAccessoryView = UIButton(type: .ContactAdd)
                    returnAnnotaionView!.rightCalloutAccessoryView = UIButton(type: .DetailDisclosure)
                }else{
                    returnAnnotaionView!.annotation = annotation
                }
                return returnAnnotaionView
            }else if annotation.isKindOfClass(FirstAnnotation.self){
                //MARK:使用圖片顯示大頭針檢視,並使用自定義大頭針模型
                returnAnnotaionView = SHAnnotationView.annotationViewWith(mapView, reuseIdentifier:"SHAnnotationView")
                returnAnnotaionView!.annotation = annotation
                return returnAnnotaionView
            }else if annotation.isKindOfClass(SecondAnnotation.self){
                let identifier = "Annotation"
                var returnAnnotaionView = mapView.dequeueReusableAnnotationViewWithIdentifier(identifier) as? MKPinAnnotationView
                if  (returnAnnotaionView == nil){
                    returnAnnotaionView =  MKPinAnnotationView(annotation: annotation, reuseIdentifier: identifier)
                    returnAnnotaionView!.pinColor = MKPinAnnotationColor.Green
                }
                 returnAnnotaionView!.annotation = annotation
                return returnAnnotaionView
            }else if annotation.isKindOfClass(SHCalloutAnnotation.self){
                //MARK:自定義彈出檢視
                returnAnnotaionView = SHCalloutAnnotationView.calloutAnnotationViewWith(mapView)
                returnAnnotaionView!.annotation = annotation
                return returnAnnotaionView
            }else if annotation.isKindOfClass(DetailCalloutAccessoryAnnotation.self){
                //MARK:適用於頂部title,底部自定義檢視 ios9之後
                returnAnnotaionView = DetailCalloutAccessoryAnnotation.createViewAnnotationForMapView(mapView, annotation: annotation)
                returnAnnotaionView!.annotation = annotation
                return  returnAnnotaionView
            }
        }
        return returnAnnotaionView
    }

    //選中大頭針時觸發
    func mapView(mapView: MKMapView, didSelectAnnotationView view: MKAnnotationView) {
        //點選大頭針模型為SecondAnnotation時,新增自定義彈出檢視的大頭針到地圖上。
        if let annotation = view.annotation{
            if(annotation.isKindOfClass(SecondAnnotation.self)){
            let annotation = annotation as! SecondAnnotation
            let calloutAnnotaion = SHCalloutAnnotation(coordinate: annotation.coordinate)
            calloutAnnotaion.icon = annotation.icon
            calloutAnnotaion.rate = annotation.rate
            calloutAnnotaion.descriptionDetail = annotation.descriptionDetail
            mapView.addAnnotation(calloutAnnotaion)
            }
        }
    }

    //反選時觸發
    func mapView(mapView: MKMapView, didDeselectAnnotationView view: MKAnnotationView) {
        for annotation in self.mapView.annotations {
            if annotation.isKindOfClass(SHCalloutAnnotation.self){
                dispatch_async(dispatch_get_main_queue(), {
                    mapView.removeAnnotation(annotation)
                })
            }
        }
    }
}
以及自定義檢視部分:
//邊距
public let CalloutBorderSpace:CGFloat = 5
//MARK:自定義大頭針檢視
class SHAnnotationView: MKAnnotationView {

    class func annotationViewWith(mapView: MKMapView,reuseIdentifier:String) ->SHAnnotationView{
        //從快取池中取出可以迴圈利用的大頭針view
        var annotationView = mapView.dequeueReusableAnnotationViewWithIdentifier(reuseIdentifier) as? SHAnnotationView
        if annotationView == nil{
           annotationView = SHAnnotationView(annotation: nil, reuseIdentifier:reuseIdentifier)
           annotationView?.canShowCallout = true
           annotationView?.leftCalloutAccessoryView = UIButton(type: .InfoDark)
           annotationView?.rightCalloutAccessoryView = UIButton(type: .DetailDisclosure)
        }
        return annotationView!
    }

    override var annotation: MKAnnotation?{
        didSet(annotation){
               //顯示大頭針為圖片
            if let annotationOne = annotation as? FirstAnnotation{
               self.image = annotationOne.iconImage
            }
        }
    }
}

//MARK:彈出檢視 繼承於MKAnnotationView進行顯示檢視
class SHCalloutAnnotationView: MKAnnotationView{

    //#MARK:使用懶載入宣告需要的控制元件屬性
    lazy var leftIcon:UIImageView = {
         let leftIcon = UIImageView()
         self.addSubview(leftIcon)
         return leftIcon
    }()

    lazy var detailLabel:UILabel = {
         let detailLabel = UILabel(frame:  CGRectZero)
         detailLabel.lineBreakMode = .ByCharWrapping
         detailLabel.font = UIFont.systemFontOfSize(12)
         detailLabel.numberOfLines = 0
         self.addSubview(detailLabel)
         return detailLabel
    }()

    lazy var rateIcon:UIImageView = {
         let rateIcon = UIImageView()
         self.addSubview(rateIcon)
         return rateIcon
    }()

    var button:UIButton!

    //#MARK: 建立彈出檢視
    class func calloutAnnotationViewWith(mapView: MKMapView)-> SHCalloutAnnotationView{
       let indentifier = "SHCallOutAnnotationView"
       var calloutView = mapView.dequeueReusableAnnotationViewWithIdentifier(indentifier) as? SHCalloutAnnotationView
       if calloutView == nil{
          calloutView = SHCalloutAnnotationView()
          calloutView!.backgroundColor = UIColor.grayColor()
       }
        return calloutView!
    }

    //#MARK:賦值資料模型顯示相應的資料
    override var annotation: MKAnnotation?{

        didSet(callOutAnnotation){
            if let callOutAnnotation = callOutAnnotation as? SHCalloutAnnotation{
                self.leftIcon.image = callOutAnnotation.icon
                self.leftIcon.frame = CGRect(x: CalloutBorderSpace, y: CalloutBorderSpace, width: callOutAnnotation.icon!.size.width, height: callOutAnnotation.icon!.size.height)

                self.detailLabel.text = callOutAnnotation.descriptionDetail
                let string:NSString = self.detailLabel.text!
                let detailLabelSize = string.boundingRectWithSize(CGSize(width: 200,height: 200), options:.UsesLineFragmentOrigin, attributes: [NSFontAttributeName: self.detailLabel.font], context: nil)
                self.detailLabel.frame = CGRect(x: CGRectGetMaxX(self.leftIcon.frame) + CalloutBorderSpace, y:CGRectGetMinY(self.leftIcon.frame), width: detailLabelSize.width, height: detailLabelSize.height)

                self.rateIcon.image = callOutAnnotation.rate
                self.rateIcon.frame = CGRect(x: CGRectGetMinX(self.detailLabel.frame), y: CGRectGetMaxY(self.detailLabel.frame) + CalloutBorderSpace, width: callOutAnnotation.rate!.size.width, height: callOutAnnotation.rate!.size.height)

                self.bounds = CGRect(x: 0, y: 0, width: CGRectGetMaxX(self.detailLabel.frame) + CalloutBorderSpace, height: CGRectGetMaxY(self.rateIcon.frame) + CalloutBorderSpace)

                //注意:確定最終的顯示位置
                self.centerOffset = CGPointMake(0, -self.bounds.size.height)
            }
        }
    }

    //#MARK:當彈出檢視顯示的時候新增縮放動畫
    override func didMoveToSuperview() {
            let animation = CAKeyframeAnimation(keyPath: "transform.scale")
            animation.values = [0,1.5,1,1.5,1]
            animation.duration = 0.5
            self.layer.addAnimation(animation, forKey: nil)
        }
}
程式碼分析:
我們之前已經添加了4個大頭針到地圖,當顯示大頭針的時候,會觸發mapView(mapView:MKMapView, viewForAnnotation annotation:MKAnnotation)方法獲取大頭針檢視,我們根據所新增的大頭針模型進行分類返回對應的大頭針檢視。
對於顯示使用系統樣式大頭針檢視和系統大頭針模型、使用圖片顯示大頭針檢視,並使用自定義大頭針模型、ios9之後出現的附屬檢視的屬性等都很簡單,直接看程式碼就好。主要分析一下是如何實現callout檢視的:
首先是新增一個大頭針到檢視上,當該大頭針被點選的時候,新增我們自定義的大頭針SecondAnnotation物件,所有資料都是源於原大頭針模型,然後會觸發mapView(mapView: MKMapView, viewForAnnotation annotation: MKAnnotation)方法,進行新增我們自定義的callout檢視。並賦值annotation資料,顯示整個檢視。
實現效果圖如下: