Openstack元件部署 — Nova_Install and configure a compute node
目錄
前文列表
Prerequisites 先決條件
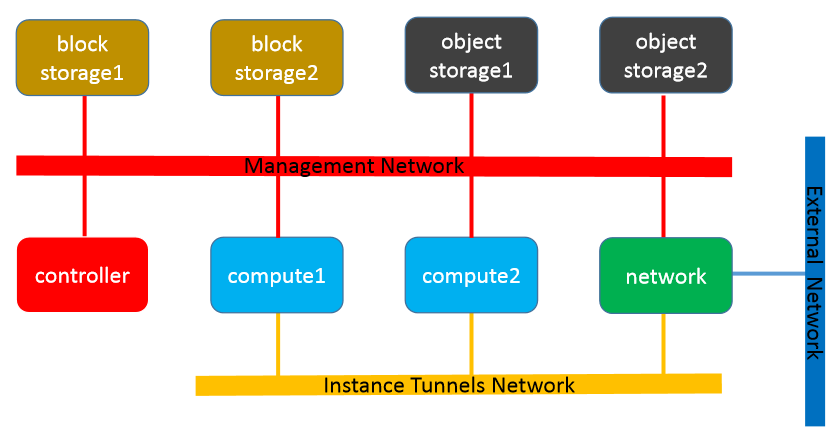
從這一篇博文開始,Openstack組建部署進入了多節點的階段,我們再重新回顧一下當初我們擬定的Network拓撲:
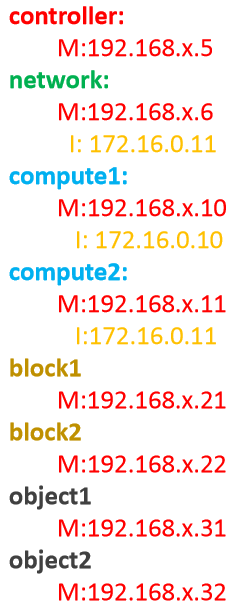
IP Address Config:
多節點部署首先要確保節點之間能夠通訊和成功解析主機名,並且按照建議重新瀏覽Openstack元件部署 — Overview和前期環境準備 來對節點進行部署環境初始化操作。
Step1.關閉防火牆
systemctl mask iptables.service
systemctl mask ip6tables.service
systemctl mask ebtables.service Step2.設定主機名
hostnamectl set-hostname compute1.jmilk.comStep3.關閉Selinux
Step4.按照IP Address Config來設定Static_IP
nmcli connection modify eth0 ipv4.addresses "192.168.1.10/24 192.168.1.1" ipv4.dns "192.168.1.5" ipv4.method manual注意:當我們需要連線到外網下載RDO的時,我們需要將DNS IP指向外網DNS Server。Example:
vim /etc/resolv.conf
search jmilk.com
nameserver 202.106.195.68
nameserver 202.106.46.151
**Step5.**Install OpenStack預備包
#1. 安裝yum-plugin-priorities包,防止高優先順序軟體被低優先順序軟體覆蓋
yum install yum-plugin-priorities
#2. 安裝EPEL擴充套件yum源,是一個RHEL系列的高質量軟體源,可能版本號會被修改
yum install http://dl.fedoraproject.org/pub/epel/7/x86_64/e/epel-release-7-7.noarch.rpm Step6.配置DNS service或修改hosts檔案,新增所有的Network拓撲節點的IP域名解析。
Step7. 配置NTP Client時間同步客戶端
vim /etc/chrony.conf
#註釋其他以server開頭的配置項,並新增下列配置,使用Controller Node上的NTP Server
server comtroller.jmilk.com iburst
重啟NTP service
systemctl enable chronyd.service
systemctl start chronyd.service
Install and configure a compute node
官檔:This section describes how to install and configure the Compute service on a compute node. The service supports several hypervisors to deploy instances or VMs. For simplicity, this configuration uses the QEMU hypervisor with the KVM extension on compute nodes that support hardware acceleration for virtual machines. On legacy hardware, this configuration uses the generic QEMU hypervisor. You can follow these instructions with minor modifications to horizontally scale your environment with additional compute nodes.
粗譯:這個章節講述了怎樣在Compute Node上安裝和配置Compute service。Compute service能夠支援使用多種型別的hypervisors(虛擬化管理系統)技術來部署虛擬機器。為了方便起見,Compute Node會配置使用QEMU hypervisor和KVM extension去實現虛擬機器的hardware acceleration(硬體加速)。一般在舊的硬體裝置中,會更多的使用QEMU hypervisor。你可以按照下述的指令來水平擴充套件你的環境和部署更多的Compute Nodes。
Note:This section assumes that you are following the instructions in this guide step-by-step to configure the first compute node. If you want to configure additional compute nodes, prepare them in a similar fashion to the first compute node in the example architectures section. Each additional compute node requires a unique IP address.
注意:該章節假設你是在第一個Compute Node上配置Compute service。如果你希望配置更多的Compute Node,可以使用類似的方式去部署更多的Compute Node。每一個額外的Compute Node都需要有一個唯一的IP Address。
Install the packages
安裝軟體包
yum install openstack-nova-computeEdit the /etc/nova/nova.conf file
In the [DEFAULT] and [oslo_messaging_rabbit] sections, configure RabbitMQ message queue access:
配置RabbitMQ訊息佇列訪問
vim /etc/nova/nova.conf
[DEFAULT]
rpc_backend = rabbit

[oslo_messaging_rabbit]
rabbit_host = controller.jmilk.com
rabbit_userid = openstack
rabbit_password = fanguiju
In the [DEFAULT] and [keystone_authtoken] sections, configure Identity service access:
配置Keystone認證服務訪問
[DEFAULT]
auth_strategy = keystone

[keystone_authtoken]
auth_uri = http://controller.jmilk.com:5000
auth_url = http://controller.jmilk.com:35357
memcached_servers = controller.jmilk.com:11211
auth_type = password
project_domain_name = default
user_domain_name = default
project_name = service
username = nova
password = fanguijuNote: Comment out or remove any other options in the [keystone_authtoken] section.
注意:註釋或刪除[keystone_authtoken]配置節點中所有的其他選項。
In the [DEFAULT] section, configure the my_ip option:
[DEFAULT]
my_ip = MANAGEMENT_INTERFACE_IP_ADDRESSNote:Replace MANAGEMENT_INTERFACE_IP_ADDRESS with the IP address of the management network interface on your compute node.
注意:將引數MANAGEMENT_INTERFACE_IP_ADDRESS替換成Compute Node的management network interface的IP地址,即Compute Node的IP地址。
Example:
[DEFAULT]
my_ip = 192.168.1.10
In the [DEFAULT] section, enable support for the Networking service:
[DEFAULT]
use_neutron = True
firewall_driver = nova.virt.firewall.NoopFirewallDriverNote:By default, Compute uses an internal firewall service. Since Networking includes a firewall service, you must disable the Compute firewall service by using the nova.virt.firewall.NoopFirewallDriver firewall driver.
注意:預設的,計算機使用一個內部的防火牆服務,由於Neteorking包含了一個防火牆服務,你必須通過nova.virt.firewall.NoopFirewallDriver防火牆驅動來關閉Compute Node作業系統中自帶防火牆服務
In the [vnc] section, enable and configure remote console access:
開啟並配置遠端控制檯代理訪問
[vnc]
enabled = True
vncserver_listen = 0.0.0.0
vncserver_proxyclient_address = $my_ip
novncproxy_base_url = http://controller.jmilk.com:6080/vnc_auto.html
The server component listens on all IP addresses and the proxy component only listens on the management interface IP address of the compute node. The base URL indicates the location where you can use a web browser to access remote consoles of instances on this compute node.
Compute Node的監聽元件會監聽所有的IP Address,但是Compute Node的代理監聽元件只會監聽Compute Node中的管理介面IP Address(Compute Node IPAddress)。這個novncproxy_base_url表明你可以使用一個Web瀏覽器去遠端訪問這臺Compute Node上例項的介面控制檯位置。
Note:If the web browser to access remote consoles resides on a host that cannot resolve the controller hostname, you must replace controller with the management interface IP address of the controller node.
注意:如果Web瀏覽器訪問遠端的控制檯存在於一個不能夠被成功解析的controller node hostname,你必須將controller引數值替換成Controller Node IP Address。
In the [glance] section, configure the location of the Image service API:
配置Glance映象伺服器訪問路徑
[glance]
api_servers = http://controller.jmilk.com:9292
In the [oslo_concurrency] section, configure the lock path:
[oslo_concurrency]
lock_path = /var/lib/nova/tmp
Finalize installation
Determine whether your compute node supports hardware acceleration for virtual machines:
egrep -c '(vmx|svm)' /proc/cpuinfoIf this command returns a value of one or greater, your compute node supports hardware acceleration which typically requires no additional configuration.
如果這條指令返回一個或大於一個的值,你的Compute Node就支援hardware acceleration(硬體加速),這樣的話通常不需要進行額外的配置。
If this command returns a value of zero, your compute node does not support hardware acceleration and you must configure libvirt to use QEMU instead of KVM.
如果這條指令執行後不返回值,你的Compute Node就不支援hardware acceleration(硬體加速),所以你必須配置libvirt去使用QEMU來代替KVM虛擬化。
Example:
[root@compute1 ~]# egrep -c '(vmx|svm)' /proc/cpuinfo
0- Edit the
[libvirt]section in the /etc/nova/nova.conf file as follows:
啟用qemu來支援虛擬化
vim /etc/nova/nova.conf
[libvirt]
virt_type = qemu
Start the Compute service including its dependencies and configure them to start automatically when the system boots:
systemctl enable libvirtd.service openstack-nova-compute.service
systemctl start libvirtd.service openstack-nova-compute.serviceERROR:執行start openstack-nova-compute.service失敗
Troubleshooting:
- 檢視日誌 vim /var/log/nova/nova-compute.log
2016-06-30 10:56:01.802 2846 ERROR oslo.messaging._drivers.impl_rabbit [req-b850e200-ae71-47e0-97e0-e48810633ccd - - - - -] AMQP server on controller.jmilk.com:5672 is unreachable: [Errno 111] ECONN REFUSED. Trying again in 32 seconds.從日誌中可以看出是AMQP不能通過Port:5672連線,我們使用的Queue方案是rabbitmq。
在Controller Node上檢視埠資訊,如果沒有開啟Port:5672。則檢查
rabbitmq-server.serivce是否正常執行。在Controller Node上檢視
rabbitmq的執行狀態
[[email protected] ~]# rabbitmqctl status
Status of node [email protected] ...
Error: unable to connect to node [email protected]: nodedown

DIAGNOSTICS:
===========

attempted to contact: [[email protected]]

[email protected]:
  * connected to epmd (port 4369) on controller
  * epmd reports: node 'rabbit' not running at all
                  no other nodes on controller
  * suggestion: start the node

current node details:
- node name: 'rabbitmq-cli-25@controller'
- home dir: /var/lib/rabbitmq
- cookie hash: +lRccUmBW2uDMa6+zRfabA==上面的Output指明瞭rabbitmq-server.service發生了nodedown錯誤。
- 修改/etc/hosts檔案(Controller & Compute1兩個節點都要修改)
Openstack叢集中的每個節點需要互相訪問,所以每個節點中的hosts檔案應包含叢集內所有節點的解析記錄。而且rabbitmq-server.service使用Hostname:controller來訪問Controller Node,所以還需要額外新增解析記錄controller。
vim /etc/hosts
#新增解析記錄:(Controller Node IP Address)192.168.1.5 ==> controller
192.168.1.5 controller.jmilk.com controller
- 在Controller Node上重啟
rabbitmq-server.service,並檢視埠開啟情況。
[[email protected] ~]# netstat -uptan | grep beam
tcp        0      0 0.0.0.0:25672           0.0.0.0:*               LISTEN      4382/beam.smp
tcp        0      0 127.0.0.1:40823         127.0.0.1:4369          ESTABLISHED 4382/beam.smp
tcp6       0      0 :::5672                 :::*                    LISTEN      4382/beam.smp
tcp6       0      0 127.0.0.1:5672          127.0.0.1:59724         ESTABLISHED 4382/beam.smp
tcp6       0      0 127.0.0.1:5672          127.0.0.1:59723         ESTABLISHED 4382/beam.smp
tcp6       0      0 127.0.0.1:5672          127.0.0.1:59722         ESTABLISHED 4382/beam.smp
tcp6       0      0 192.168.1.5:5672        192.168.1.10:44852      ESTABLISHED 4382/beam.smp
tcp6       0      0 127.0.0.1:5672          127.0.0.1:59725         ESTABLISHED 4382/beam.smp
tcp6       0      0 127.0.0.1:5672          127.0.0.1:59726         ESTABLISHED 4382/beam.smp
tcp6       0      0 192.168.1.5:5672        192.168.1.10:44858      ESTABLISHED 4382/beam.smp
tcp6       0      0 192.168.1.5:5672        192.168.1.10:44854      ESTABLISHED 4382/beam.smp
tcp6       0      0 127.0.0.1:5672          127.0.0.1:59721         ESTABLISHED 4382/beam.smp
tcp6       0      0 192.168.1.5:5672        192.168.1.10:44860      ESTABLISHED 4382/beam.smp
Port:5672已經開啟。
- 在Compute Node上重啟
openstack-nova-compute.service
如果openstack-nova-compute.service還是不能啟動並報出同樣的錯誤的話,則在Controller Node上執行下面的操作,通過防火牆開放Port:5672 。
systemctl restart iptables.service
iptables -I INPUT -p tcp --dport 5672 -j ACCEPT
service iptables save
systemctl restart iptables.service
相關推薦
Openstack元件部署 — Nova_Install and configure a compute node
目錄 前文列表 Prerequisites 先決條件 從這一篇博文開始,Openstack組建部署進入了多節點的階段,我們再重新回顧一下當初我們擬定的Network拓撲: IP Address Config: 多節點部署首先要
Openstack元件部署 — keystone(domain, projects, users, and roles)
目錄 前文列表 Create a domain, projects, users, and roles The Identity service provides authentication services for each Open
Openstack元件部署 — 將一個自定義 Service 新增到 Keystone
目錄 Keystone 認證流程 User 使用憑證(username/password) 到 keystone 驗證並獲得一個臨時的 Token 和 Generic catalog(全域性目錄),臨時的 Token 會儲存在 keystone-
OpenStack Queens指南 :Install and configure the dashboard for Red Hat Enterprise Linux and CentOS
[[email protected] ~]# yum install openstack-dashboard -yLoaded plugins: fastestmirror, langpacksRHEL-Repository
OPENSTACK-210-13-部署第二計算節點(Deploy a second compute node)
1.下載匯入的json檔案到director機器,因為後面要用director機器來進行控制。 2.通過source重新變成stack的身份。通過server 和baremetal進行檢視,目前compute1是還沒有加入雲上平臺的。通過import匯入json檔案
[React] Configure a React & Redux Application For Production Deployment and Deploy to Now
hang scrip app class pack pub relative pts als In this lesson, we’ll make a few small changes to our scripts and add some environme
轉:springboot專案啟動報錯Failed to configure a DataSource: 'url' attribute is not specified and no embedde
*************************** APPLICATION FAILED TO START *************************** Description: Failed to configure a DataSource: 'url' attribute
springboot報錯 Failed to configure a DataSource: 'url' attribute is not specified and no embedded data
報錯 Description: Failed to configure a DataSource: 'url' attribute is not specified and no embedded datasource could be configured.
轉:springboot專案啟動報錯Failed to configure a DataSource: 'url' attribute is not specified and no embedde
*************************** APPLICATION FAILED TO START *************************** Description: Failed to configure a DataSource: 'url'
springboot專案啟動報錯Failed to configure a DataSource: 'url' attribute is not specified and no embedded..
*************************** APPLICATION FAILED TO START *************************** Description:
Failed to configure a DataSource: 'url' attribute is not specified and no embedded 解決
在建立springboot時,啟動失敗,出現這樣的錯誤: Failed to configure a DataSource: 'url' attribute is not specified and no embedded datasource could be confi
springboot啟動報錯 Failed to configure a DataSource: 'url' attribute is not specified and no embedded datasource could be configured.
unicode class art ica jdbc rmi red toc onf 新建了一個springboot項目報一下錯誤: Failed to configure a DataSource: ‘url‘ attribute is not specified
SpringBoot啟動報錯:Failed to auto-configure a DataSource: 'spring.datasource.url' is not specified and
今天倒騰了一下自己的SpringBoot demo的程式碼,發現啟動報瞭如下的錯誤: *************************** APPLICATION FAILED TO START *************************** Des
Livemedia-creator- How to create and use a Live CD
download further burning method create Livemedia-creator- How to create and use a Live CDNote for older method (namely for Fedora 23) using livec
openstack項目【day24】:OpenStack mitaka部署
系統版本 fig 插件 val interface 認證服務 更新 per 正在 前言: openstack的部署非常簡單,簡單的前提建立在紮實的理論功底,本人一直覺得,玩技術一定是理論指導實踐,網上遍布個種搭建方法都可以實現一個基本的私有雲環境,但是諸位可曾發現,很多
openstack安裝配置—— compute node配置
安裝配置nova客戶端 安裝配置neutron客戶端 openstack compute節點配置 計算節點需要配置的主要是nova和neutron的客戶端,控制節點在進行資源調度及配置時需要計算節點配合方能實現的,計算節點配置內容相對較少,實際生產環境中,需要配置的計算節點數量相當龐大,那
openstack-基本部署(一)
openstack-基本部署(一)這個案例網絡規劃如下:這個案例網絡規劃如下:管理網絡使用10.0.0.0/24 網關:10.0.0.1提供商網絡在203.0.113.0/24 網關為203.0.113.1此外,所有的節點名稱要能解析,IP地址解析為管理網段的地址。例如:controller對應10.0.0
如何部署 sources and javadoc jars
plugins apach epo javadoc path org pac file source mvn org.apache.maven.plugins:maven-deploy-plugin:2.8.2:deploy-file -Durl=file:///home/
Openstack 安裝部署指南翻譯系列 之 網絡
openstack 翻譯 網絡網絡包括兩種類型,網絡選項1:提供商網絡(Provider networks)和網絡選項2:自助網絡(Self-service networks),其中網絡選項2:自助網絡(Self-service networks)能夠實現更加高級的網絡功能,能夠實現網絡選項1的所有功能,因此
Openstack安裝部署指南翻譯系列 之 硬件需求
openstack 翻譯1.1.1.1. 控制節點控制器節點運行身份服務,鏡像服務,計算的管理部分,網絡的管理部分,各種網絡代理和儀表板。它還包括支持服務,如SQL數據庫,消息隊列和NTP。可選地,控制節點運行塊存儲,對象存儲,編排和計量服務的部分。控制器節點至少需要兩個網絡接口。1.1.1.2. 計算節點計


